
Onn Soundbar User Manual
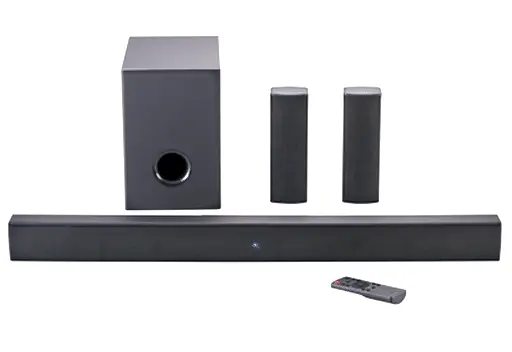
Onn Soundbar User Manual
What’s in the Box?
Check to make sure you have everything below:

- Main unit
- Subwoofer
- Satellite Speaker x 2
- RCA to RCA Cable x 2
- Remote Control
- Power Cord x 2
- AUX Cable x 1
- HDMI Cable x 1
- Optical Cable x 1
- QSG x 1
- User manual x 1
OTHER TOP ONN’S MANUAL:
Get to Know Your 36” 5.1 SOUNDBAR

- LED Indicator• Red when the unit is in STANDBY mode.• Lights up yellow in AUX mode.• Lights up green in OPTICAL mode.• Lights up blue in BLUETOOTH mode.• Lights white in HDMI(ARC)mode.• Lights up orange in HDMI IN mode
- Remote Control Sensor
- HDMI IN Port
- HDMI ARC Port
- OPTICAL Port
- AUX IN Port
- AC IN Port
- Button Switches the unit between ON and STANDBY modes
- SOURCE Button Selects the input source
- VOL- Button Decreases the volume
- VOL+ Button increases the volume
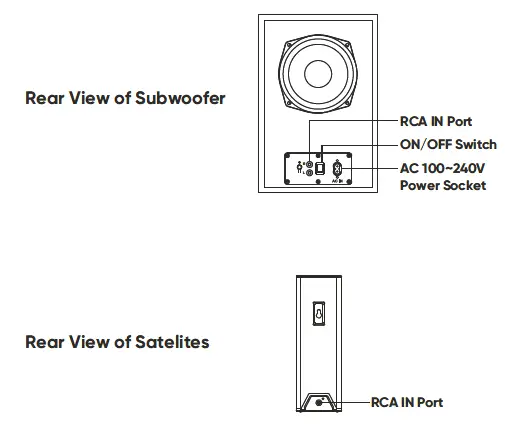
Remote Control Overview

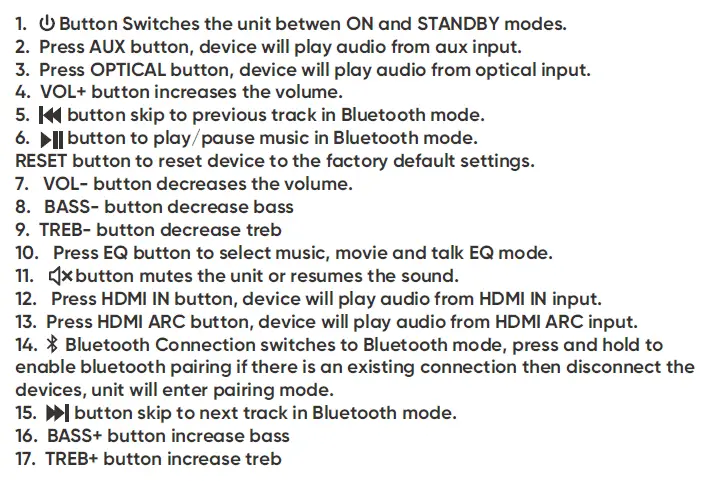
Using the HDMI IN or HDMI ARC connection
- Use a HDMI cable (included) to connect the TV’s HDMI OUT Port to the soundbar’s HDMI IN Port.

- HDMI cable (included) length is 1.7m
Please note the soundbar has HDMI CEC function:
- Use a HDMI to HDMI cable (included) to connect the TV’s HDMI (ARC) port to the soundbar’s HDMI(ARC) port.

- HDMI cable (included) length is 1.7m
Using the AUX or Optical Connection
- Use a 3.5mm to RCA stereo audio cable (not included) to connect the TV’s audio output Port to the soundbar’s AUX IN port.
- Use a 3.5mm to 3.5mm stereo audio cable (included) to connect the TV’s headphone Port to the soundbar’s AUX IN port.

- Use an optical cable (included) to connect the TV’s OPTICAL OUT Port to the soundbar’s OPTICAL Port.

Bluetooth Connection and 5.1 System Connection
Establish Bluetooth connectionWhen unit powers on, press source button on soundbar or press the Bluetooth key on the remote change to Bluetooth(Bluetooth ID: Onn 36″ 5.1 Soundbar ) mode to enter Bluetooth pairing mode, the blue LED indicator will fast flash, the LED indicator remain solid bright when Bluetooth connected.
Pairing the subwooferPair manually: Long press mute on the remote for 7s, then long press pairing button on subwoofer for 3s, soundbar’s current LED indicator and subwoofer’s mixed-color(mixed by red and blue) LED will quick blink until be paired each other.After connected, led indicator will remain solid bright.PS: Subwoofer is paired with soundbar before ex-factory, when power on, they will be connected each other automatically.
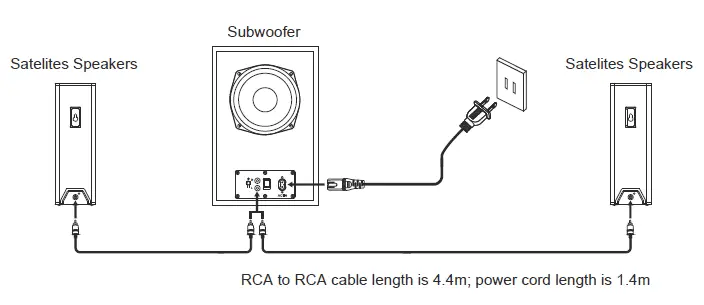
Using The Bluetooth Connection
- Turn on the power, press ( ) on the unit or remote control to switch the unit to ON mode with a prompt tone.
- Keep the distance of the soundbar and your mobile phone, PC, tablet or other Bluetooth enabled device within 1 mete, The closer, the better.
- Ensure Bluetooth is enabled on your device and that your device is discoverable.
- Select the Bluetooth mode on the soundbar. -Using the remote control, press the Bluetooth button. The indicator light on the soundbar will be flashing blue. -Alternatively, press the source button on the soundbar until the indicator light is flashing blue.
- Select the Bluetooth search function on your device. Your device should discover the soundbar which is called “Onn 36″ 5.1 soundbar”.
- Select pairing mode: -Using the remote control, press and hold the Bluetooth button for 3 seconds until blue indicator light is flashing slowly. -Alternatively, press and hold the source button on the soundbar for 3 seconds until the blue indicator light is flashing slowly.
- Select the Bluetooth search function on your device. Your device should discover the soundbar which is called “Onn 36” 5.1 soundbar “.
- Select “Onn 36″ 5.1 soundbar”. your device is paired with the soundbar when the blue indicator light stops flashing and becomes solid.

Connection to the Power Outlet
- Connect the AC IN port to the power outlet by power cable.

- Ensure all audio connections of the unit are connected before connecting to the mains power owlet.
Product Wall Mounting the first step
- Drill 2 parallel holes ( 98mm each according to well type) in the wall. The distance between the holes should be58ornm.

- Installation must be carried out by qualified personnel only. Incorrect assembly can result severe personal injury and property damage (If you intend to Install this product yourself, you must check for installations such as electrical wiring and plumbing that may be bunde inside the wall). It is the installer’s responsibility to verify that the wall will safely support the total load of the Soundbar.
- Additional tools (not included) are required for the installation.
- Do not overtighten screws.
- Keep this instruction manual for future reference.
- Use an electronic stud finder to check the wall type before drilling and mounting.
Product Wall Mounting the secons step

Product Wall Mounting the Third Step
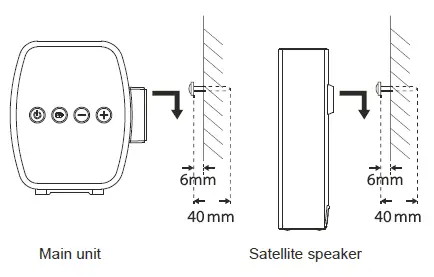
- Insert 1 screw TA 9.40mm (not included) into each anchor. Be sure to leaves 6mm gal, between the wall and the screw’s head. Lift the unit over the heads of the screws and slot into place
Battery Replacement for the Remote Control the First Step:
Lift up the back cover to open the battery compartment of the remote control.
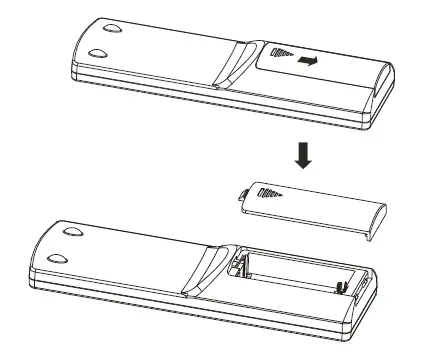
Battery Replacement for the Remote Control the Second Step:
Insert two AAA two batteries. Make sure the (.) and (-) ends alba batteries match the (a) and (-) ends Indicated in the battery compartment.

Battery Replacement for the Remote Control the Third Step:
Close the battery compartment cover:

Remote Control Operation Range:
The remote control sensor on the front unit is sensitive to the remote control’s commands up to a maximum of 15′ away and within a maximum of a 60 arc.


Specification

FAQS
I would not know because this item was not even able to be hooked up to my modern hd tv. it did not have the right plug to hook up.
That’s correct. You’d either need to run an optical cable out of your tv to the optical input on the sound bar, or you could use a headphone auxiliary output (if your tv has it) to the aux input on the speaker.
In my opinion I would say get a A surround sound system more than just a sound bar because I don’t think a sound bar but especially this sound bar is going to give you the volume you are looking for and having multiple speakers that a sound system has would be a much better option for you. A sound bar is more of just enhancing the sound but not making the sound crazy loud or anything like that. I hope this helps you on your journey
There are different modes to choose from, but no specific bass controls.
First off, HDMI ARC (audio return channel) allows for an audio signal from a box (like one provides by DirecTV) to pass to the television, and then back out again to the sound bar or stereo receiver. Standard HDMI connection cannot do this, as it does not support two way audio transmission. Nearly all televisions produced within the last 5 years, and even out to 10 years or longer, if they have HDMI inputs, will have a dedicated HDMI ARC input. It would be labeled as such right next to the television’s input.Optical cables are made of higher quality materials (glass based fiber optic strands), and as such are shielded from electromagnetic interference, as they transmit sound via light waves. HDMI ARC cables are constructed using copper as their principal material. Copper is susceptible to this kind of interference.For most people, an optical cable connection will provide an acceptable level of audio quality. Optical provides up to 5.1 support, as does HDMI ARC. However, for cinephiles wanting the best possible A/V experience, HDMI ARC is the way to go, unquestionably. Optical cables don’t support Dolby Digital Plus, True HD, or DTS HD. The HDMI ARC does this beautifully.HDMI ARC has the added benefit of supporting television volume control from the tv remote, via what is called CEC technology. Once everything is properly set up, and you’re watching the big game, a live broadcast, or a movie, your tv remote can control how loud the sound bar outputs its signal. Optical cable can’t do that.In most cases, HDMI ARC is the best answer. You’ll still get pretty good sound from optical, and if your A/V equipment is spaced out, requiring longer cables, optical won’t see as much signal degradation; but the HDMI ARC is superior in it supports far more audio formats. And as HDMI eARC becomes the norm with upcoming A/V releases, 7.1 will be supported.
A slide off cover on the back of the remote reveals the battery compartment for 3 AAA batteries.
Yes, it comes with a small wall mount. (Depending on how you mount, you’ll have to worry about cords being visible, etc.)
VIDEO
Questions about your Manual? Post in the comments!

[xyz-ips snippet=”download-snippet”]


