
Electric Bicycle (Electric Vehicle)
Comply with safety standards
Operation Instruction
Maintenance Manual
Warranty Instruction
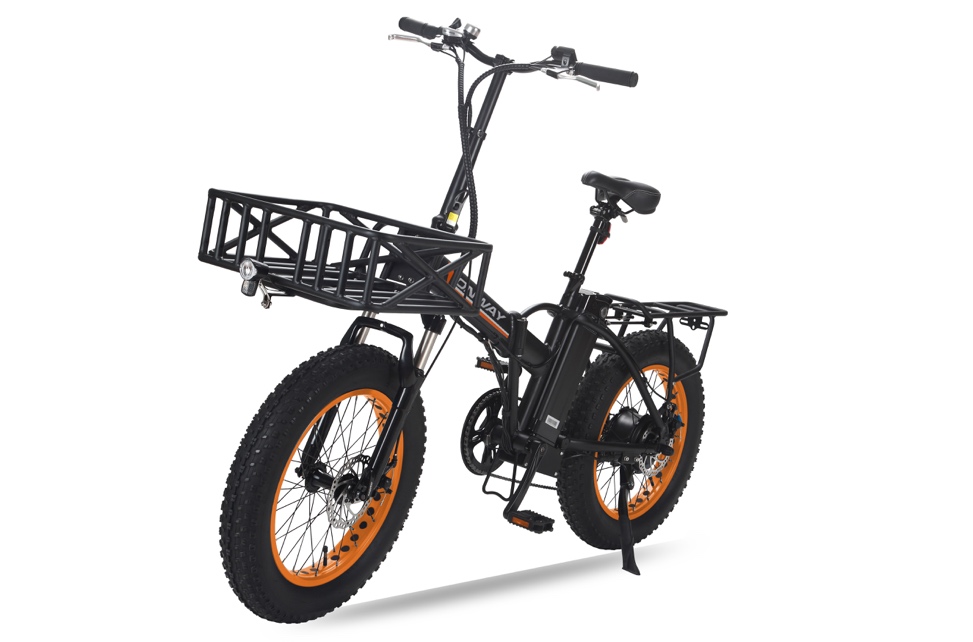
Model:ONWAY MINI PLUS
Electric Bicycle (Electric Vehicle)
Comply with safety standards
Operation Instruction
Maintenance Manual
Warranty Instruction
Model:ONWAY MINI PLUS
感谢选择此款电动自行车。
Thank you for purchasing ONWAY electric bicycle.
If you have any questions, please contact us for help before you decide to return the e-bike.
After-sales : [email protected]
You can also visit ONWAY website www.onway-ebikes.com and leave messages to us, we will contact you asap.
Please Pay Attention:
Our electric bicycle is specially designed for city roads.
Intensive use of the electric bicycle or riding it not on flat roads can cause damage to the bicycle so that the bicycle will be out of order ahead of time and result in injuries.
Like other machine combination, electric vehicles will also be aging due to high pressure and wear. Different materials or components have different aging situations. Once surpassing the expected service life, electric bicycle is likely to be blew out suddenly and cause injuries during the using process. Under high pressure, cracks, scratches or discoloration can be occurred to electric vehicles, which indicate that the components have exceeded their using services and should be replaced.
Therefore, you are advised to regularly check the frame, front fork and rim of your electric bicycle, especially in the case of intensive use.
You are also advised to read the instruction in detail before using the electric bicycle, which contains the information of the first adjustment, maintenance and use. Wish you have safety and happiness when using the electric bicycle and get satisfaction.
Important Suggestion:
- Wearing a suitable helmet when riding.
- Not suggest riding this e-bike under 18 years old.
- Not suggest used for picking up children.
- Can ride in rainy or snowy, but avoid wading into water.
- Store the battery in a dry and ventilated condition, keep it away
from fire. Unplug the power after charging, please charge the battery once a month when not in use.
Battery: extraction, charge, insertion, use and maintenance
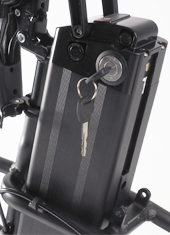
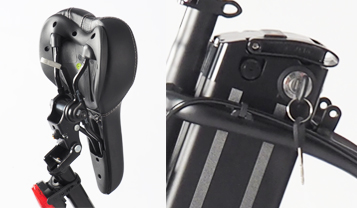
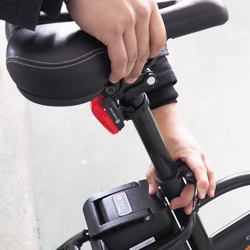
Battery is located behind the central beam and it should be fully charged before using. If you need to take out the battery, please follow the steps below:1.1 Extract battery: turn the seat around before inserting the key, then turn they key clockwise till the bolt jumps open. The unlocked battery then can be extracted (making sure that the key is turned to the bottom).

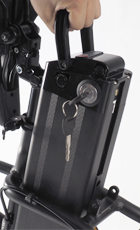
1.2 Grab the handle of the battery, lift it up vertically.

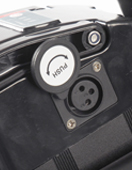
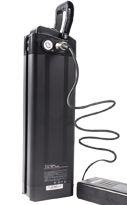
1.3 Charge: connect the charging plug of the charger to the battery, and then, plug the charger power plug into AC socket, finally remove battery separator and turn the switch on.

The charging time is about 6 hours (initial electric quantity is zero), and if the battery has parts of electric quantity, charging time should be shortened. But for fully charging maintenance, charging time will be extended: generally the expected additional charging time of battery is 1-2 hours.

1.4 Reinsert battery: insert battery in the groove behind the seat and push it down to the end until the battery is completely locked.
Push battery down
1.5 Be sure to lock the battery box tightly against theft.
1.6 Battery debugging period: during the using periods for first 5 to 10 times (fully charging and discharging in about 2 to 5 times), there will be chemical reaction inside the battery. If the reaction is inadequate, the battery can’t achieve the best running status, so charge using in the first time will not exceed 80% of the capacity of electricity.
1.7 Battery has no memory effect. You can charge when the electricity has or has not been used completely. It is advised that charge timely after each use in case that the electric vehicle stops operation on the way.
1.8 When fully charged, the indicator light on the top of the charger will turn from red to green. Considering the service life of the charger, you’d better unplug after finishing charge each time.
1.9 Maintenance obligations: just as muscle movement can keep normal only by adding sugar regularly, battery needs being recharged regularly. Interval time of charging must not exceed one month, or the battery will be accelerated aging that can lead to failure. If it’s the above mentioned reason that causes failure, you can’t enjoy warranty service.
1.10 Compared with summer, driving range in winter will reduce 10%-20%.
1.11 The cycle life of an ordinary battery is about 500 times, while that of a high quality battery is 700 times which is equal to 2 to 4 years of use. Good habits of using and maintenance will prolong the using service of the battery.
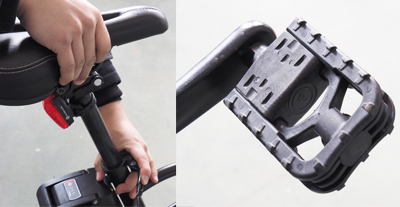
2.1 Adjust the height of the Stem
Adjust the stem to the desired height in order to have a straight and comfortable position.
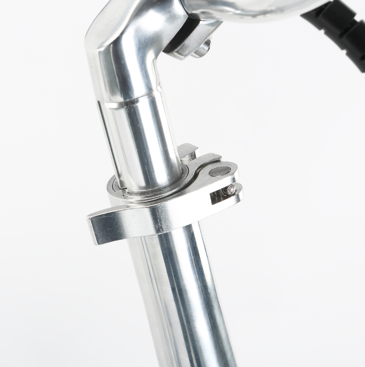
Tighten the attachment
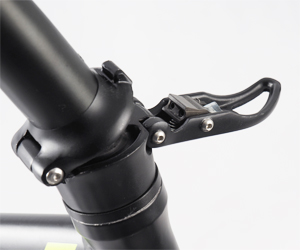
2.2 Adjust the height of the seat
Adjust the seat to the desired height and quick tighten

Warning: do not lift the rod beyond the minimum insertion mark.
Observe the tire walls and control the tire pressure intensity. Unit: P.S.I. or BAR(kgf/cm2)
Make sure that the tire pressure is always between the minimum and maximum threshold recommended, an under inflated tire will deflated more easily and excessive inflation will cause a burst
Tip: in order to avoid tire burst, please operate according to the requirements.
The maximum load of the electric bicycle is 220-280 lb (including the rider and his goods)
The rear rack and fender are not included, if you need please contact ONWAY seller support for help.
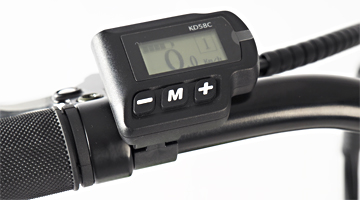
How to Start the Motor:
- Long Press the “M” button of the handlebar display 3 seconds, then the system will start.
- Select your preferred level of electric motor assist with the MODE button:
Level 1 Low Speed
Level 2 Mid Speed
Level 3 High Speed
When driving, you can also turn off the motor (press M 3 seconds) and resume at any time motor assistance by reverse manipulation.

- The pedal motor assistance will not start until the user cycle the bicycle ( after a quarter of a turnaround bracket ) .
How To Open / Close the Front Light:
Long press the “+” button 3 seconds. The lights of diode (LED) run at 6 volt
Press the “-” button 3 seconds and the system will continue at 3.8 mph.
Please be cautious when riding so as to avoid any damage to the panel display.
Note: if the switch is on (even if you have close the motor and headlamp), only the indicator light is still on, the battery will continue to discharge that will result in: Even if electric bicycle stop operation, battery continue to keep operation state.
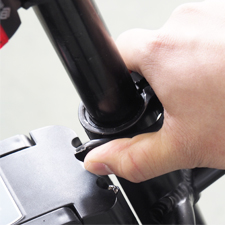
6.1 Fold the stem: rotate the ring in the black hard plastic to release the bracket, then tilt the stem along the front wheel

6.2 Lower the seat and fold the two pedals
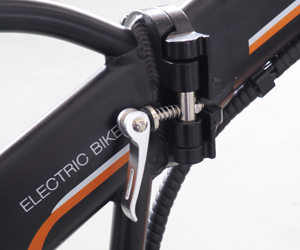
6.3 Open the frame to fold in on itself:
Raise the silver handle, open the clamping of aluminum and fold the frame (you can help yourself with the knee)

7.1 Lubricating Methods
Steel rope and other rotating parts need to use Vaseline lubricating oil, while chain should use special oil. After cleaning, add oil to such fulcrums as front axle, middle axle, rear axle, flywheel, front fork, chain, etc. for lubrication.
7.2 Adjustment of chain tightness
If the chain is too tight, the driving speed will be influenced; if too loose, the chain will be easy to escape.
You need to adjust chain tightness regularly according to the following method:
Loosen the nuts on the both sides of the rear axle, and move the rear wheel backward slightly until the chain gets moderate tightness. At the same time, you should pay attention that the rear wheel should be parallel with the bicycle frame flat, then fasten the nuts on the both sides to make tightening torque being 35Nm (front wheel and rear wheel).
7.3 Adjustment of the Speed Control System
Please adjust the speed control system as follows:
*When pedaling gently, you can change shift by pressing the control lever of the derailleur, ensuring the chain fits onto the fly wheel. When poor contact or noise is detected, you can try to adjust the screws or the lever cable. Not to pedal hard.
*Please do not press the control level when the bicycle is not in operation (not moving) and do not press it with too much strength either.
*Do not pedal backward while changing shift, you might risk causing the chain to slip off or inflicting damage to the derailleur.
Place the bicycle onto an adjustment station or an adjustment rack before adjusting the speed control system. Gently pull the steel cable to ensure full contact between the steel cable and the tube. When the chain cannot be shifted to or slips off from the smallest sprocket, you can adjust the rear derailleur “L” adjusting screw; when the chain cannot be shifted to or slips off from the largest sprocket, you can adjust the rear derailleur “H” adjusting screw (A). If the chain “jumps over teeth” (chain jamming)after adjusting the rear derailleur, you can adjust the rear derailleur fine-tuning adjusting screw (B).

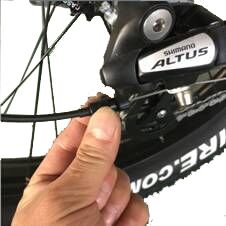
A B
7.4 Adjustment of the Brake System
When adjusting the brake system, you need to ensure that the brake block not only parallels but also aligns with the rim so that the brake block will not touch the tire when you apply the brake system when riding (A).
The acting surface of the brake blocks wears and must be changed after being used for a certain amount of time. Some rims have a safety braking groove. A rim must be changed if its safety braking groove has been completely worn off.
When adjusting the brake system, a lack of spring force on the springs of the right/left clamp arm can cause the left/right braking arm to act incongruently. When this happens, you can fine-tune the screw (B).


A B
Note: use the brake handle correctly for safe braking. In order to avoid brake failure or injuries, don’t hold the left brake handle suddenly in case of rider’s forward lean and injuries.
7.5 Replacement of Brake Steel Wire
Loosen the wire clip of the brake caliper, take out the old steel wire from pipe shroud, embed new steel wire, thread the hole of brake caliber, and then, insert wire clip, at last, adjust the tightness.
7.6 Check rim and braking system
Before using the electric vehicle, check the following proceedings:
- The function of left brake lever and right brake lever. If damages (wear) appear on brake blocks or steel wires, replace them immediately.
- Keep rim clean and there should be no oil contamination on the surface of braking device to avoid the danger brought by brake failure.
- Use appropriate degreaser cleaning the surface of braking device regularly.
- Check if the condition of rim is satisfactory by visual.
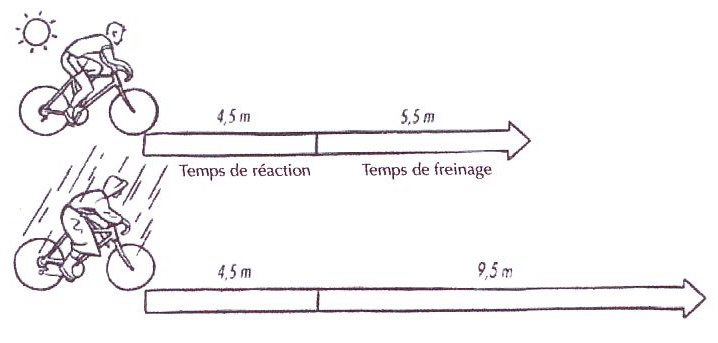
Note: the braking distance on wet roads is 40% longer than that on dry pavement.
The braking distance on dry pavement is 10m.
The braking distance on wet roads is 14m.
7.7 Cleaning and Maintenance of Bicycle
Scrubbing the bicycle with wet cloth and use it until the bicycle is naturally dry. Never wash it with water to avoid the damage of electronic components. The bicycle should be parked in dry places to avoid damages caused by bad weather.
For safe riding, it is advised the tightening torque of all parts of the bicycle should meet the following criteria:
- ·Handlebars/Stem 15Nm
- Saddle 15Nm
- Saddle Post 10Nm
- Front wheel 35Nm
- Rear wheel 35Nm
- Pedal 40Nm
- Quick Release Post 30Nm
Items of Regular Maintenance
| Items to Check | 60Days | 180Days | 360Days | 540Days | 720Days |
| 1. Whether components of the handles and steering gear are tightened or damaged ? | T | IL | IL | IL | IL |
| 2. Whether hubs and the bead holder are tightened or damaged ? | T | IL | IL | IL | IL |
| 3. Whether components of the bottom bracket are tightened or damaged ? | T | IL | IL | IL | IL |
| 4. Whether tires are inflated properly or damaged ? | I | I | R | I | R |
| 5. Whether the brake block damaged ? | I | I | R | I | R |
| 6. Whether the brake handles are in good working condition ? | I | I | I | I | I |
| 7. Whether the speed control system is in good working condition ? | I | IA | I | IA | I |
| 8. Whether the front fork is deformed or damaged ? | I | I | I | I | I |
| 9. Whether the fluted disc and the crank are deformed ? | I | I | I | I | I |
| 10. Whether the pedals are tightened or damaged ? | I | IL | I | IL | I |
| 11. Whether the rear racket is tightened or deformed ? | I | I | I | I | I |
| 12. Whether the splash guard is deformed or damaged ? | I | I | I | I | I |
| 13. Whether the cables are tightened and connected ? | I | I | I | I | I |
|
I | I | I | I | I |
|
I | I | I | I | I |
|
I | I | I | I | I |
|
I | A | I | A | I |
|
I | A | I | A | I |
|
A | A | A | A | A |
|
A | A | A | A | A |
An explanation of the chart language:
I: Check and adjust or change as necessary;
A: Adjust;
R: Change;
L: Lubricate;
T: Tighten
We suggest that you ask professional person to assemble components. If some part are damaged, please replace them immediately.
- For safe riding, you’d better obey the following provisions:
- Check carefully if the bicycle is in good condition before departure.
- If you want to wear a helmet, please purchase qualified products.
- Drive on the correct side of the road according to traffic regulations
- Don’t be pulled by other motor vehicles.
- Don’t ride side by side with other driver.
- If you are riding at night, please be sure to open the headlight to guarantee visibility.
- Check if the reflecting mirror/ reflector is in good condition.
Open the front and rear light.
- Wear reflective coat.
Before using the electric vehicle, please check the following contents: if both the left and right brake levers are functioning well; if the wheel nuts have been tightened; if lighting signal devices (front and back) are in good condition; if the saddle tube, saddle, and handlebar stem have been tightened; if the sound device works well; if the vehicle fastening parts are tight; for more details, please refer to the corresponding section.
Q: Why can’t I turn the bicycle on?
A:Please check if all wires are well connected between the panel and the controller; or if the switch of the battery is on.
Q: Why can’t the battery be charged?
A: Please check if all wires are well connected, Normally when the charger is powered on, it shows 1 red light and 1 green light. Then after the charger is connected to the battery, it will become 2 red lights. After the battery is fully charged, it will change to 1 red light and 1 green light again.
Every ONWAY E-bike is covered under our manufacturer’s 15-month warranty under normal use, and the warranty period starts from the date of purchase. (Normal use refers to single person riding without people, without overloading and maliciously destroying the bicycle)
This warranty covers the parts:
ONWAY’s bicycle components including frame, forks, handlebar, bowl set, seatpost, saddle, brake, light, crank, pedal, rim, hub, flywheel, transmission, variable handlebar, motor, throttle, controller, display, bracket, etc. These parts are warranted to be free from manufacturer defects in materials and/or workmanship for 15-month period from the date of original purchase.
Wear and tear is not covered under warranty.
The battery warranty does not include damage from power surges, use of non-original chargers, improper maintenance, or water immersion.
Terms of Warranty:
- This warranty only applies to the original owner of ONWAY bicycle.
- This warranty does not cover damage caused by non-compliance with the instructions, irresistible factors, accidents, vandalism, improper riding, riding in extreme weather, improper storage, incorrect assembly, and arbitrary modification; normal wear and tear, improper follow-up maintenance, any damage or defects caused by the installation of accessories are not covered by the warranty.
- This warranty does not include consumables or normal wear parts (tires, brake pads, brake cables, shift cables, plastic housings, grips, chains, spokes, etc.).
- ONWAY will not be responsible for any damage, malfunction or loss caused by unauthorized repair or use of unauthorized parts.
- ONWAY shall not be responsible or liable, directly or indirectly, for any damage or loss caused by our products, including but not limited to compensation for personal injury, property damage or economic loss.
- ONWAY shall not be responsible for the loss caused by natural corrosion during outdoor parking.
- ONWAY will not be responsible for the loss caused by intensive use (special use or lease).
What Will We Do to Correct Problems with Your Bikes:
- Please provide proof of purchase of the product and photos or videos of the damaged parts.
- If a component is deemed to be defective or damaged without user error we will issue a replacement part, and we will assist you in replacing any defective part.
- If the product is damaged during transportation, please contact us as soon as possible and we will replace any parts deemed to have been damaged during shipping.
- If the customer is unable to repair the bicycle after many communication operations with ONWAY, the user can ask a third party to help to repair the bicycle, and we will bear the repair costs at our discretion according to the invoice or receipt provided by the user.
- The whole vehicle will be replaced only in special circumstances. In this case, the original bicycle must be transported to a factory designated by ONWAY for inspection before a new bicycle can be issued. If it can be repaired, vehicle replacement service is generally not provided.
What Will We Not Do:
- ONWAY will not replace any parts without first seeing photos or videos of the damaged part.
- We will not replace any parts damaged by the user.
- We will not pay for any third party services or part replacement unless agreed upon prior to the fix. We will not pay for return shipping on any damaged or defective product or component.
Shipping Damage Claims:
IMMEDIATELY inspect whether the packaging is intact when receiving the goods. If you see obvious damage to the product, you can choose to reject and contact us in time. We will not accept claims for shipping damage later than 7 days from the receipt of the product.
Customer Information
Order Number:
Customer Name:
Address:
City:
State:
Phone:
Frame Serial NO. :
Battery Serial NO. :
Motor Serial NO. :
ONWAY Seller Support Contact Information:
After-sales:
Website: www.onway-ebikes.com,
You can visit it and leave messages to us, we will contact you asap.
Your electric bicycle is equipped with two keys.The key can lock the battery on your electric bicycle.If the keys are lost, we are not responsible for the key.
Note
To avoid dangers:
Please don’t put anything into the internal battery.
About the key

Thank you for purchasing ONWAY electric bicycle.
If you have any questions, please contact us for help before you decide to return the e-bike.
After-sales : [email protected]
You can also visit ONWAY website www.onway-ebikes.com and leave messages to us, we will contact you asap.
Please Pay Attention:
Our electric bicycle is specially designed for city roads.
Intensive use of the electric bicycle or riding it not on flat roads can cause damage to the bicycle so that the bicycle will be out of order ahead of time and result in injuries.
Like other machine combination, electric vehicles will also be aging due to high pressure and wear. Different materials or components have different aging situations. Once surpassing the expected service life, electric bicycle is likely to be blew out suddenly and cause injuries during the using process. Under high pressure, cracks, scratches or discoloration can be occurred to electric vehicles, which indicate that the components have exceeded their using services and should be replaced.
Therefore, you are advised to regularly check the frame, front fork and rim of your electric bicycle, especially in the case of intensive use.
You are also advised to read the instruction in detail before using the electric bicycle, which contains the information of the first adjustment, maintenance and use. Wish you have safety and happiness when using the electric bicycle and get satisfaction.
Important Suggestion:
- Wearing a suitable helmet when riding.
- Not suggest riding this e-bike under 18 years old.
- Not suggest used for picking up children.
- Can ride in rainy or snowy, but avoid wading into water.
- Store the battery in a dry and ventilated condition, keep it away
from fire. Unplug the power after charging, please charge the battery once a month when not in use.
Battery is located behind the central beam and it should be fully charged before using. If you need to take out the battery, please follow the steps below:1.1 Extract battery: turn the seat around before inserting the key, then turn they key clockwise till the bolt jumps open. The unlocked battery then can be extracted (making sure that the key is turned to the bottom).
1.2 Grab the handle of the battery, lift it up vertically.
1.3 Charge: connect the charging plug of the charger to the battery, and then, plug the charger power plug into AC socket, finally remove battery separator and turn the switch on.
The charging time is about 6 hours (initial electric quantity is zero), and if the battery has parts of electric quantity, charging time should be shortened. But for fully charging maintenance, charging time will be extended: generally the expected additional charging time of battery is 1-2 hours.
1.4 Reinsert battery: insert battery in the groove behind the seat and push it down to the end until the battery is completely locked.

Push battery down
1.5 Be sure to lock the battery box tightly against theft.
1.6 Battery debugging period: during the using periods for first 5 to 10 times (fully charging and discharging in about 2 to 5 times), there will be chemical reaction inside the battery. If the reaction is inadequate, the battery can’t achieve the best running status, so charge using in the first time will not exceed 80% of the capacity of electricity.
1.7 Battery has no memory effect. You can charge when the electricity has or has not been used completely. It is advised that charge timely after each use in case that the electric vehicle stops operation on the way.
1.8 When fully charged, the indicator light on the top of the charger will turn from red to green. Considering the service life of the charger, you’d better unplug after finishing charge each time.
1.9 Maintenance obligations: just as muscle movement can keep normal only by adding sugar regularly, battery needs being recharged regularly. Interval time of charging must not exceed one month, or the battery will be accelerated aging that can lead to failure. If it’s the above mentioned reason that causes failure, you can’t enjoy warranty service.
1.10 Compared with summer, driving range in winter will reduce 10%-20%.
1.11 The cycle life of an ordinary battery is about 500 times, while that of a high quality battery is 700 times which is equal to 2 to 4 years of use. Good habits of using and maintenance will prolong the using service of the battery.
2.1 Adjust the height of the Stem
Adjust the stem to the desired height in order to have a straight and comfortable position.

Tighten the attachment
2.2 Adjust the height of the seat
Adjust the seat to the desired height and quick tighten

Warning: do not lift the rod beyond the minimum insertion mark.
Observe the tire walls and control the tire pressure intensity. Unit: P.S.I. or BAR(kgf/cm2)
Make sure that the tire pressure is always between the minimum and maximum threshold recommended, an under inflated tire will deflated more easily and excessive inflation will cause a burst
Tip: in order to avoid tire burst, please operate according to the requirements.
The maximum load of the electric bicycle is 220-280 lb (including the rider and his goods)
The rear rack and fender are not included, if you need please contact ONWAY seller support for help.
How to Start the Motor:
- Long Press the “M” button of the handlebar display 3 seconds, then the system will start.
- Select your preferred level of electric motor assist with the MODE button:
Level 1 Low Speed
Level 2 Mid Speed
Level 3 High Speed
When driving, you can also turn off the motor (press M 3 seconds) and resume at any time motor assistance by reverse manipulation.
- The pedal motor assistance will not start until the user cycle the bicycle ( after a quarter of a turnaround bracket ) .
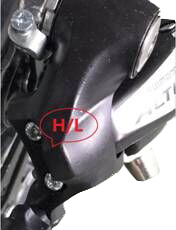
How To Open / Close the Front Light:
Long press the “+” button 3 seconds. The lights of diode (LED) run at 6 volt
Press the “-” button 3 seconds and the system will continue at 3.8 mph.
Please be cautious when riding so as to avoid any damage to the panel display.
Note: if the switch is on (even if you have close the motor and headlamp), only the indicator light is still on, the battery will continue to discharge that will result in: Even if electric bicycle stop operation, battery continue to keep operation state.
6.1 Fold the stem: rotate the ring in the black hard plastic to release the bracket, then tilt the stem along the front wheel
6.2 Lower the seat and fold the two pedals

6.3 Open the frame to fold in on itself:
Raise the silver handle, open the clamping of aluminum and fold the frame (you can help yourself with the knee)

7.1 Lubricating Methods
Steel rope and other rotating parts need to use Vaseline lubricating oil, while chain should use special oil. After cleaning, add oil to such fulcrums as front axle, middle axle, rear axle, flywheel, front fork, chain, etc. for lubrication.
7.2 Adjustment of chain tightness
If the chain is too tight, the driving speed will be influenced; if too loose, the chain will be easy to escape.
You need to adjust chain tightness regularly according to the following method:
Loosen the nuts on the both sides of the rear axle, and move the rear wheel backward slightly until the chain gets moderate tightness. At the same time, you should pay attention that the rear wheel should be parallel with the bicycle frame flat, then fasten the nuts on the both sides to make tightening torque being 35Nm (front wheel and rear wheel).
7.3 Adjustment of the Speed Control System
Please adjust the speed control system as follows:
*When pedaling gently, you can change shift by pressing the control lever of the derailleur, ensuring the chain fits onto the fly wheel. When poor contact or noise is detected, you can try to adjust the screws or the lever cable. Not to pedal hard.
*Please do not press the control level when the bicycle is not in operation (not moving) and do not press it with too much strength either.
*Do not pedal backward while changing shift, you might risk causing the chain to slip off or inflicting damage to the derailleur.
Place the bicycle onto an adjustment station or an adjustment rack before adjusting the speed control system. Gently pull the steel cable to ensure full contact between the steel cable and the tube. When the chain cannot be shifted to or slips off from the smallest sprocket, you can adjust the rear derailleur “L” adjusting screw; when the chain cannot be shifted to or slips off from the largest sprocket, you can adjust the rear derailleur “H” adjusting screw (A). If the chain “jumps over teeth” (chain jamming)after adjusting the rear derailleur, you can adjust the rear derailleur fine-tuning adjusting screw (B).

A B
7.4 Adjustment of the Brake System
When adjusting the brake system, you need to ensure that the brake block not only parallels but also aligns with the rim so that the brake block will not touch the tire when you apply the brake system when riding (A).
The acting surface of the brake blocks wears and must be changed after being used for a certain amount of time. Some rims have a safety braking groove. A rim must be changed if its safety braking groove has been completely worn off.
When adjusting the brake system, a lack of spring force on the springs of the right/left clamp arm can cause the left/right braking arm to act incongruently. When this happens, you can fine-tune the screw (B).
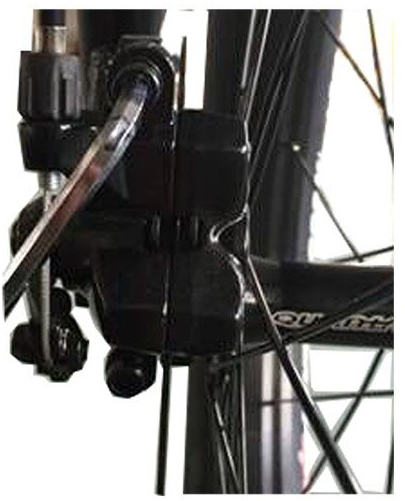
A B
Note: use the brake handle correctly for safe braking. In order to avoid brake failure or injuries, don’t hold the left brake handle suddenly in case of rider’s forward lean and injuries.
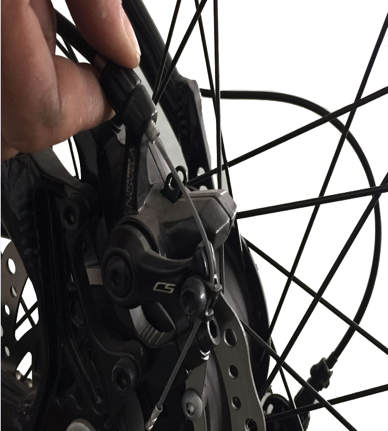
7.5 Replacement of Brake Steel Wire
Loosen the wire clip of the brake caliper, take out the old steel wire from pipe shroud, embed new steel wire, thread the hole of brake caliber, and then, insert wire clip, at last, adjust the tightness.
7.6 Check rim and braking system
Before using the electric vehicle, check the following proceedings:
- The function of left brake lever and right brake lever. If damages (wear) appear on brake blocks or steel wires, replace them immediately.
- Keep rim clean and there should be no oil contamination on the surface of braking device to avoid the danger brought by brake failure.
- Use appropriate degreaser cleaning the surface of braking device regularly.
- Check if the condition of rim is satisfactory by visual.
Note: the braking distance on wet roads is 40% longer than that on dry pavement.
The braking distance on dry pavement is 10m.
The braking distance on wet roads is 14m.

7.7 Cleaning and Maintenance of Bicycle
Scrubbing the bicycle with wet cloth and use it until the bicycle is naturally dry. Never wash it with water to avoid the damage of electronic components. The bicycle should be parked in dry places to avoid damages caused by bad weather.
For safe riding, it is advised the tightening torque of all parts of the bicycle should meet the following criteria:
- ·Handlebars/Stem 15Nm
- Saddle 15Nm
- Saddle Post 10Nm
- Front wheel 35Nm
- Rear wheel 35Nm
- Pedal 40Nm
- Quick Release Post 30Nm
Items of Regular Maintenance
| Items to Check | 60Days | 180Days | 360Days | 540Days | 720Days |
| 1. Whether components of the handles and steering gear are tightened or damaged ? | T | IL | IL | IL | IL |
| 2. Whether hubs and the bead holder are tightened or damaged ? | T | IL | IL | IL | IL |
| 3. Whether components of the bottom bracket are tightened or damaged ? | T | IL | IL | IL | IL |
| 4. Whether tires are inflated properly or damaged ? | I | I | R | I | R |
| 5. Whether the brake block damaged ? | I | I | R | I | R |
| 6. Whether the brake handles are in good working condition ? | I | I | I | I | I |
| 7. Whether the speed control system is in good working condition ? | I | IA | I | IA | I |
| 8. Whether the front fork is deformed or damaged ? | I | I | I | I | I |
| 9. Whether the fluted disc and the crank are deformed ? | I | I | I | I | I |
| 10. Whether the pedals are tightened or damaged ? | I | IL | I | IL | I |
| 11. Whether the rear racket is tightened or deformed ? | I | I | I | I | I |
| 12. Whether the splash guard is deformed or damaged ? | I | I | I | I | I |
| 13. Whether the cables are tightened and connected ? | I | I | I | I | I |
|
I | I | I | I | I |
|
I | I | I | I | I |
|
I | I | I | I | I |
|
I | A | I | A | I |
|
I | A | I | A | I |
|
A | A | A | A | A |
|
A | A | A | A | A |
An explanation of the chart language:
I: Check and adjust or change as necessary;
A: Adjust;
R: Change;
L: Lubricate;
T: Tighten
We suggest that you ask professional person to assemble components. If some part are damaged, please replace them immediately.
- For safe riding, you’d better obey the following provisions:
- Check carefully if the bicycle is in good condition before departure.
- If you want to wear a helmet, please purchase qualified products.
- Drive on the correct side of the road according to traffic regulations
- Don’t be pulled by other motor vehicles.
- Don’t ride side by side with other driver.
- If you are riding at night, please be sure to open the headlight to guarantee visibility.
- Check if the reflecting mirror/ reflector is in good condition.
Open the front and rear light.
- Wear reflective coat.
Before using the electric vehicle, please check the following contents: if both the left and right brake levers are functioning well; if the wheel nuts have been tightened; if lighting signal devices (front and back) are in good condition; if the saddle tube, saddle, and handlebar stem have been tightened; if the sound device works well; if the vehicle fastening parts are tight; for more details, please refer to the corresponding section.
Q: Why can’t I turn the bicycle on?
A:Please check if all wires are well connected between the panel and the controller; or if the switch of the battery is on.
Q: Why can’t the battery be charged?
A: Please check if all wires are well connected, Normally when the charger is powered on, it shows 1 red light and 1 green light. Then after the charger is connected to the battery, it will become 2 red lights. After the battery is fully charged, it will change to 1 red light and 1 green light again.
Every ONWAY E-bike is covered under our manufacturer’s 15-month warranty under normal use, and the warranty period starts from the date of purchase. (Normal use refers to single person riding without people, without overloading and maliciously destroying the bicycle)
This warranty covers the parts:
ONWAY’s bicycle components including frame, forks, handlebar, bowl set, seatpost, saddle, brake, light, crank, pedal, rim, hub, flywheel, transmission, variable handlebar, motor, throttle, controller, display, bracket, etc. These parts are warranted to be free from manufacturer defects in materials and/or workmanship for 15-month period from the date of original purchase.
Wear and tear is not covered under warranty.
The battery warranty does not include damage from power surges, use of non-original chargers, improper maintenance, or water immersion.
Terms of Warranty:
- This warranty only applies to the original owner of ONWAY bicycle.
- This warranty does not cover damage caused by non-compliance with the instructions, irresistible factors, accidents, vandalism, improper riding, riding in extreme weather, improper storage, incorrect assembly, and arbitrary modification; normal wear and tear, improper follow-up maintenance, any damage or defects caused by the installation of accessories are not covered by the warranty.
- This warranty does not include consumables or normal wear parts (tires, brake pads, brake cables, shift cables, plastic housings, grips, chains, spokes, etc.).
- ONWAY will not be responsible for any damage, malfunction or loss caused by unauthorized repair or use of unauthorized parts.
- ONWAY shall not be responsible or liable, directly or indirectly, for any damage or loss caused by our products, including but not limited to compensation for personal injury, property damage or economic loss.
- ONWAY shall not be responsible for the loss caused by natural corrosion during outdoor parking.
- ONWAY will not be responsible for the loss caused by intensive use (special use or lease).
What Will We Do to Correct Problems with Your Bikes:
- Please provide proof of purchase of the product and photos or videos of the damaged parts.
- If a component is deemed to be defective or damaged without user error we will issue a replacement part, and we will assist you in replacing any defective part.
- If the product is damaged during transportation, please contact us as soon as possible and we will replace any parts deemed to have been damaged during shipping.
- If the customer is unable to repair the bicycle after many communication operations with ONWAY, the user can ask a third party to help to repair the bicycle, and we will bear the repair costs at our discretion according to the invoice or receipt provided by the user.
- The whole vehicle will be replaced only in special circumstances. In this case, the original bicycle must be transported to a factory designated by ONWAY for inspection before a new bicycle can be issued. If it can be repaired, vehicle replacement service is generally not provided.
What Will We Not Do:
- ONWAY will not replace any parts without first seeing photos or videos of the damaged part.
- We will not replace any parts damaged by the user.
- We will not pay for any third party services or part replacement unless agreed upon prior to the fix. We will not pay for return shipping on any damaged or defective product or component.
Shipping Damage Claims:
IMMEDIATELY inspect whether the packaging is intact when receiving the goods. If you see obvious damage to the product, you can choose to reject and contact us in time. We will not accept claims for shipping damage later than 7 days from the receipt of the product.
Customer Information
Order Number:
Customer Name:
Address:
City:
State:
Phone:
Frame Serial NO. :
Battery Serial NO. :
Motor Serial NO. :
ONWAY Seller Support Contact Information:
After-sales:
Website: www.onway-ebikes.com,
You can visit it and leave messages to us, we will contact you asap.
Your electric bicycle is equipped with two keys.The key can lock the battery on your electric bicycle.If the keys are lost, we are not responsible for the key.
Note
To avoid dangers:
Please don’t put anything into the internal battery.
About the key
ONWAY Electric Bicycle – ONWAY MINI PLUS User Manual – ONWAY Electric Bicycle – ONWAY MINI PLUS User Manual –
[xyz-ips snippet=”download-snippet”]