

Quick Start Guide

Thank you for using Ooma Managed Wi-Fi® service! Blending the power of enterprise-grade, high performance hardware with the convenience of a custom-configured service, Ooma Managed Wi-Fi® provides a hassle-free solution for businesses like yours. The Ooma AP250 is a compact, desk – or ceiling – mountable device that is both stylish and unobtrusive.It’s easy to get up and running. Once you have installed the Ooma AP250, your wireless networks will be automatically created and accessible to all your wireless devices.
What’s in the Box
■ Ooma AP250 ■ Ethernet Cable
STEP 1 Note the Network Name and Password
Before you get started, take a moment to check the label on the back of the device to note the preconfigured network names and passwords. You will need this information later.

If you would like to update the network name and password, please contact Customer Support.
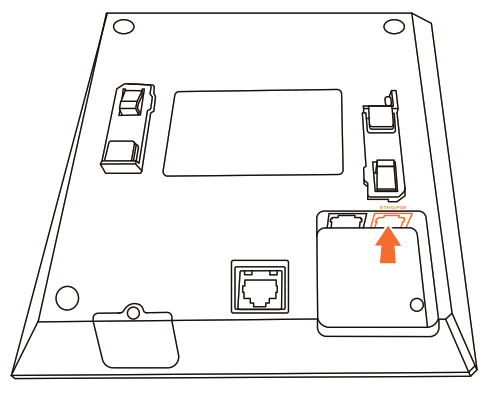
STEP 2 Power on the AP250 and Connect it to the Ethernet
Use an Ethernet cable to connect the ETH0/POE port on the back of the AP250 to a port on a PoE switch.
The device’s status light will blink orange as the AP250 initializes and connects to the Internet. Once the device is fully operational and the Wi-Fi® networks are available, the status light will turn solid white. This could take up to five minutes.
IMPORTANT: If you are using Ooma Connect Internet service or if you are connecting the AP250 to another device that does not provide a POE connection, you will need to use a POE switch (sold separately) or a POE injector as an intermediary to get the Ooma AP250 online.
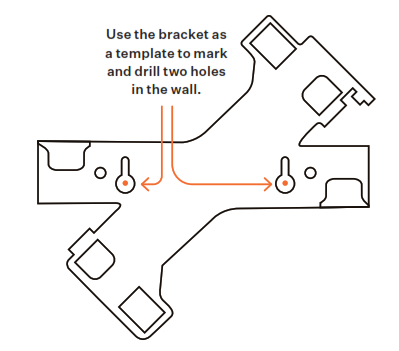
STEP 3 Install the Wall or Ceiling Mounting Bracket (Optional)
The Ooma AP250 can be installed to sit on a desk or other flat surface, or it can be mounted on the ceiling.
If you would like to mount the device on the ceiling, use the bracket from the mounting kit as a template to mark the two mounting hole locations. Drill two corresponding holes into the drywall. Install the two screws (and the drywall anchors if necessary), leaving the screw heads far enough away from the ceiling that you can slip the bracket over them.
BEST PRACTICE: The area where you install the AP250 will have the best Internet speed, so we recommend installing the AP250 in a centralized location at desk level or above.
STEP 4 Complete Installation of AP250
If you are installing the device on a desk, set the device on a flat surface closest to where you would like to have the strongest Wi-Fi® signal.
If you are installing the AP250 on the ceiling, mount the device to the bracket by lining up the mounting tabs on the bottom of the AP250 with the corresponding tab depressions on the bracket. Slip the tabs under the edges of the tab depressions and then rotate the device until it clicks into place on the bracket.
Secure the device on the ceiling by slipping the bracket keyholes over the screw heads and sliding the bracket so that the screws move into the narrow part of the keyhole. Tighten the screws to complete installation.

STEP 5 Connect Devices to a Wi-Fi® Network
Using the information you noted in STEP 1, you may now connect wireless devices to one or more of the of the AP250’s wireless networks.

Status Light Reference
-
- Off – Device is powered off.
- Flashing Amber – Device is performing a firmware upgrade.Do not power the device off during this process.
- Solid Amber – Internet connection has not been established successfully or the device is either booting up or shutting down.
- Solid White – Device is powered on, connected to the network, and operating normally. Wi-Fi® connection is active.
Troubleshooting
-
-
- AP250 status light is off
- Your device might be powered off. Check that the Ethernet cable is securely plugged into the ETH0/POE in port.
- Make sure that you are connecting the AP250 to a port that provides POE power. You may need to purchase a POE switch (sold separately) if you are using Ooma Connect Internet service.
- Try using a different Ethernet cable.
- AP250 status light is solid amber
- Check that your network cable is plugged in securely. Verify that the ETH0/POE in port is connected to your modem, router, or switch.
- Unable to connect to wireless network
- Check your notes above or the label on the device to verify that you are using the correct password. Note that the label will not reflect the correct password if you changed the password after the device was shipped to you.
- Contact customer support.
- Connected to the wireless network but unable to access the Internet
- Move your device closer to the access point and see if the connection problem resolves.
- Contact customer support.
- AP250 status light is off
-
Customer SupportNeed help? Ooma has a wealth of available resources to help if you need assistance.Support Articles and User Manuals. Access our comprehensive knowledge base at https://support.ooma.com/wifi.Live Customer Care. Speak with a support specialist at 1-866-939-6662 (US) or 1-877-948-6662 (Canada).
![]()
For warranty, safety, and other legal information, visit ooma.com/legalThis device complies with part 15 of the FCC rules. Operation is subject to the following two conditions: (1) This device manynot cause harmful interference, and (2) This device must accept any interference received, including interference that maycause undesired operation. P/N: 710-0202-101
Ooma AP250 User Manual – Ooma AP250 User Manual –