
![]()

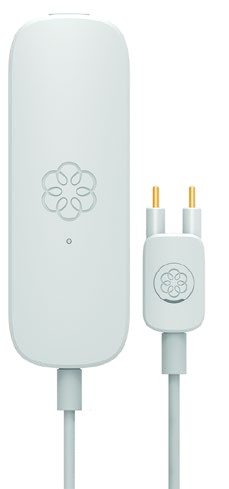
Ooma Telo Base Station Package Contents


Welcome to Ooma Home Security
Installation is easy!Congratulations on purchasing the Ooma Telo Base Station, your hub for Ooma Home Security. Installation is easy and will take only about 15 minutes. Follow the steps in this guide to set up your Base Station, then log into your account to visit our web store and choose the Home Security sensors that are right for your home.
02 Ooma Home Security Starter Kit Contents03 Welcome to Ooma Home Security04 Step 1: Download the Ooma Home Security App05 Step 2: Activate Your Ooma Telo Base Station06 Step 3: Connect Base Station to Router and Power On08 Step 4: Pair Sensors with your Base Station andConfigure your Home Security Settings10 Other Sensors for Ooma Home Security11 Upgrade to Ooma Home Telephone Service12 Quick Reference13 Troubleshooting
Have a Question or Need Assistance?Here is where you can look for help:Knowledge base: www.ooma.com/supportUser manuals: www.ooma.com/userguideCommunity forum: www.ooma.com/forumsLive Customer Care: 1-877-629-1284
Step 1 Download the Ooma Home Security App
The Ooma Home Security app will be the main tool you use to control your home security system. You will use it now to complete the setup process for your Base Station. Later, you can use the app to pair your Ooma sensors to your Base Station, to configure your setup, to receive notifications about your sensors, to manage the system’s active mode, and more. To download the app, search for Ooma Home Security in the Apple App Store or the Google Play Store. Once the app is installed on your device, open it up to move on to the next step in the installation process.


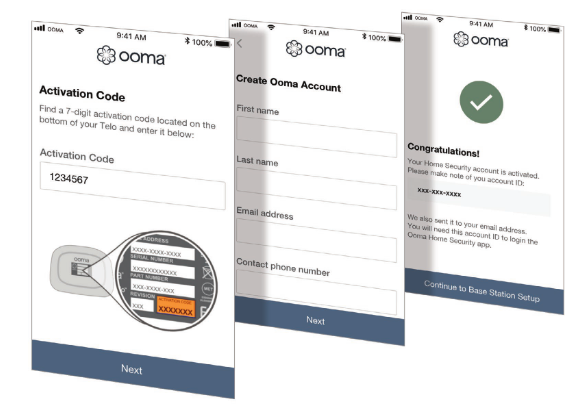
Step 2 Activate your Ooma Base Station
The Ooma Home Security app will guide you through the process of activating your Ooma Telo Base Station. You will need to provide your 911 address and billing information. At the end of the activation process, you will be assigned an Account ID that you will use to log into the Home Security app.
Step 3 Connect Base Station to Your Router and Power It On
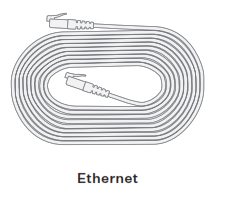
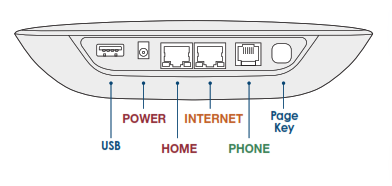
Use the provided Ethernet cable to connect the INTERNET port of the Base Station to an open Ethernet port on your router.

Plug the provided AC adapter into the POWER port on the back of the Base Station. It is normal for the lights on the Base Station to blink for a couple of minutes while it boots up. The Ooma logo will light up blue once the device is ready to be used.

 If your Base Station needs a software upgrade, the Ooma logo will blink purple while it is downloading the newest version. This may take 5-10 minutes.Do not unplug the Base Station while it is upgrading. It will automatically reboot after the upgrade is done.
Step 3 Pair Sensors with your Base Station and ConfigureHome Security Settings
If you have already purchased one or more Ooma Home Security sensors, you can now pair them with your Base Station.
Use the Account ID and password you created during the activation process to log into the app. Tap Add Sensor on the main dashboard and select the type of sensor you wish to pair. Follow the on-screen instructions to complete the pairing process. You may repeat this process for each sensor you have purchased.

NOTE Each sensor you purchase should include a Quick Start Guide that contains information that will help with the installation process.
ModesModes control when sensors send notifications and the types of notifications that are sent.
For example, you may want your motion sensor to alert you to movement when you are away, but not when you are home. Modes can switch automatically based on the time of day or through user location (geofencing). They can also be changed manually by swiping left and right at the top of the dashboard screen.

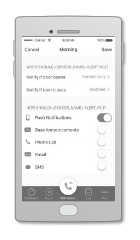
NotificationsThere are several types of Home Security notifications, including a phone call, a text message, a voice announcement on your Base Station, and more.
You can add one or more Contacts to your account, each of whom will receive sensor notifications based on your preferences, by going to the More menu and tapping Contacts. You can update your notification settings by going to the app dashboard, tapping the sensor you want to update, and tapping Notifications.
Other Sensors for Ooma Home Security
Here is a brief overview of the sensors that are currently available.
You can visit www.ooma.com/home-security to learn more.Ooma Home Security sensors connect to the Base Station wirelessly from up to 200 feet away (depending on the thickness of your home’s walls and floors). The sensors can be easily mounted using the included fasteners. All sensors include a tamper sensor that triggers when the sensor is removed from its mounting plate.
Motion Sensor
- Alerts you when motion is sensed in your home
- Uses passive infrared (PIR) sensor and lens
- 85° field of view and 30 to 35-foot detection range
- Includes optional standing mount

Door/Window Sensor
- Alerts you if your door or window opens or is left ajar
- Works using magnetic activation tab and main sensor
- Includes spacers to raise the magnet tab for different configurations

Water Sensor
- Provides alerts before the water damage
- Triggered when water is detected between the two sensor probes
- Gold-plated probe tips to prevent corrosion
Garage Door Sensor
- Alerts you when your garage door is opened
- Detects the garage door’s tilt to determine whether it’s open (vertical) or closed (horizontal)
- Includes mounting equipment for any garage door setup
Ooma Siren
- Emits an audible alarm when unexpected activity triggers the system
- Compatible with all Ooma Home Security sensors
- Plugs into any available electrical outlet for simple installation

Butterfleye Camera
- Provides a real-time, 24/7 instant video feed of your home
- Uses facial recognition to reduce false alarms
- Works during Internet and power outages
- Listen through the camera and respond from anywhere

Upgrade to Ooma Home Telephone Service
You can choose to upgrade your Ooma account to include Internet-based home phone service at any time.
Ooma offers crystal clear calling to domestic landlines and cell phones for only the cost of applicable taxes and fees. For a small additional monthly fee, basic telephone service can be upgraded further to Ooma Premier, which includes unlimited access to over 25 premium calling features like telemarketer blocking, a second phone number, enhanced voicemail, and more.
To learn more or to initiate the upgrade process, please contact our Customer Care team at 1-877-629- 1284 (US and Canada)
Quick Reference


Troubleshooting
-
-
√logo is blinking redA blinking red logo indicates that your Ooma Telo Base Station is not operational. It is normal for the Ooma logo to blink red for a couple of minutes during boot up. Otherwise, check the following to make sure everything is set up correctly:• Verify that you have activated your device as described on Page 4. If you plugged in your device before going through the activation process, try rebooting it now.• Check that your network cables are plugged in securely. Verify that the INTERNET port is connected to your router (or modem). The LED at the bottom right of the connector will be lit green if the cable is connected properly.• Check that your Internet connection is working.• Try rebooting your Base Station, modem, and router by pulling out the power and plugging them back in.√logo does not light upCheck that the AC adapter is plugged in and power is being supplied to the device.- App shows “Home Security is Offline on your Base Station” messageTry the following troubleshooting steps to make sure your your Ooma Telo Base Station is connected to the Internet:• Make sure the Base Station is powered on and connected to the Internet so the Ooma logo is solid blue.• If the Ooma logo on the Base Station is blue, try rebooting the Base Station by unplugging the power, waiting 10 seconds, then reconnecting the power.
- Sensor shows “Disconnected” in the appTry the following troubleshooting steps to determine why the sensor is not connecting to the Home Security app:• Generate activity on the sensor. If the disconnected sensor is a Door/Window sensor you may try opening and closing the door a few times. If the sensor is a motion sensor, generate motion in front of the sensors.• Ensure the sensor is not mounted on or near a large metal surface, which can interfere with the radio signal necessary for the sensor to connect to the Base Station.• Replace the batteries in the sensor.• Try unpairing and re-pairing the sensor. To unpair, the sensor, open the mobile app, visit the dashboard, and tap on the sensor that is disconnected. Choose “Unpair Sensor.” After the sensor has disappeared from the dashboard, tap “Add Sensor” on the dashboard and follow the instructions to pair it again.
-
Have a Question or Need Assistance?Ooma has a wealth of available resources if you need assistance:Support articles. Access our comprehensive knowledge base at support.ooma.comUser manuals. Access this guide and all other product manuals at ooma.com/userguideForums. Talk with your fellow Ooma customers and our support staff at forums.ooma.comLive support. Still having trouble? Chat with a service representative at any time at support.ooma.comSpeak with a support specialist. M–F, 5am–5pm PST, or Sat/Sun 8am–5pm PST at 1-877-629-1284 (US and Canada)
![]()
525 Almanor Ave | Suite 200 | Sunnyvale, CA 94085Learn more at www.ooma.com or call 1-877-629-1284
© 2018 Ooma, Inc. All rights reserved. Patent Pending. Butterfleye, Ooma, Ooma Base Station, Ooma Home Security, and the Ooma logo are trademarks or service marks of Ooma, Inc. Other companies and product names mentioned herein are trademarks of their respective companies. Mention of third-party products is for informational purposes only and constitutes neither an endorsement nor a recommendation. Ooma assumes no responsibility with regard to the performance or use of these products.
Ooma Home Security Telo Base Station User Manual – Ooma Home Security Telo Base Station User Manual –