
![]()

Quick Start Guide
Introduction
Congratulations on purchasing the Ooma Office phone system! Blending the power of cloud computing with the convenience of plug-and-play hardware, Ooma Office creates a complete, multi-user communications platform for businesses like yours. Ooma Office includes all of the features you need to better connect to and serve your customers, with plenty of room for the system to grow as your business expands.
Package Contents

System Overview
Before you get started, there are a few things you should know about the Ooma Office phone system:
 Each Ooma Office account can support up to 20 users. Each user will be assigned a unique 3-digit extension number, voicemail box and account in the Ooma Office Manager web portal.
 Each user can be configured with one or more of the following types of devices on the system: analog telephones, iOS or Anrdoid smartphones running the Ooma Office mobile app, and select models of IP phones. Each user can also choose to forward calls to a regular cell phone or landline.
 If a user has multiple devices assigned to his extension, all of the devices will ring when the user receives a call. The user can answer the call on any of the devices.
How Ooma Fits in Your Office
This illustration depicts how Ooma Office is used in an office environment. Familiarize yourself with the Ooma Office devices as well as the phone and Internet equipment in your business.
A Modem or Router – The broadband Internet connection from your service provider will connect to a modem or router installed inside your business
B Ooma Base Station – The Base Station connects to your modem or router and routes calls to the analog phones in your office. It includes one phone jack for connecting to an analog phone or fax machine.
C Fax machine – Fax machines should connect to the Base Station. This may require some changes to your phone wiring, or moving your fax machine closer to the Base Station.
D Ooma Linx – The Linx connects an analog phone to your Ooma Office system. The Linx plugs into a power outlet and operates wirelessly by communicating with the Base Station over radio frequencies. Up to four Linx devices can be paired with each Base Station and the device has a range of up to 150 feet indoors.
E Analog phones – Each analog phone (corded or cordless) in the office will connect to a phone jack in the Base Station or a Linx device.

Installation Overview
The installation process is simple and straightforward. You should be up and running and making your first call in no more than 30 minutes!This guide will walk you through the entire process. Just follow along as we take you through four easy steps in sequence:
Step 1 Activate Ooma Office account
Step 2 Install Ooma Office Base StationStep 3 Connect More Analog Phones
Step 4 Add Users and Customize
IMPORTANT: Ooma Office requires a broadband Internet connection and a minimum of 128kbps of upstream and downstream bandwidth for each user inside the office. Users who primarily access the system from outside the office using the mobile app or a remote number do not need to be counted.
Have a Question or Need Assistance?Help is here.
Knowledge base ooma.com/support/officeUser manuals ooma.com/userguide24×7 Customer Care Hotline 1-866-939-6662
Step 1 | Activate Ooma Office Account
Begin by activating your Base Station online. Locate the sevendigit activation code printed on the bottom of the Base Station.Next, go to the Ooma Office Manager web portal located at: http://office.ooma.com
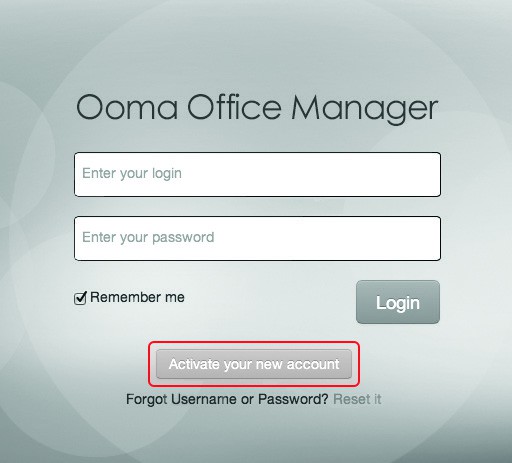 Click on the Activate your new account button.The activation wizard will guide you through:
- Selecting a phone number
- Registering your 911 address
- Entering your billing information
You’ll receive an email confirmation once your account is activated.NOTE: If you plan to transfer an existing phone number to Ooma Office, select a temporary phone number during the activation process. Follow the directions to port your number in the Next Steps section once you have finished your installation.
Step 2 | Install Ooma Office Base Station
2a Connect Base Station to Router
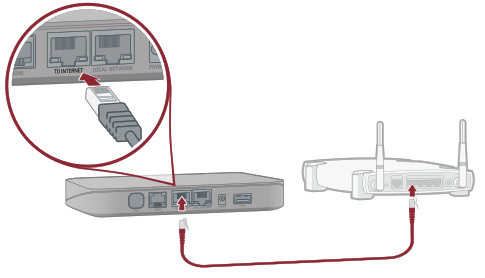 Connect your Base Station to the InternetUse the included Ethernet cable to connect the TO INTERNET port of the Base Station to an open Ethernet port on your router.
NOTE: If you experience poor voice quality you may want to enable Quality of Service (QoS) settings on your router or install the Base Station between your modem and router. Please call our customer care hotline if you need help configuring QoS. See the Alternative Setup Option to the right for instructions on how to connect the Base Station between your modem and router.
2b Connect Your Phone

Plug your phone into the Base StationUsing your existing phone cable, plug your analog phone into the PHONE port of the Base Station. If you are using a cordless phone, connect the cordless phone base unit to the PHONE port.
NOTE: If you plan to connect a fax machine to your Ooma Office system, it should be connected to the PHONE port of the Base Station.
◊ Alternative Setup Option
For optimal voice quality, the Ooma Office Base Station should be installed between your modem and router. This allows the Base Station to prioritize voice packets over other Internet traffic and prevents audio glitches and dropped calls.

Connect the Base Station between modem and router
- Locate the Ethernet cable that connects your modem to your router. Unplug the modem end of the cable and plug it into the LOCAL NETWORK port of the Base Station.
- Use the included Ethernet cable and connect the TO INTERNET port of the Base Station to your modem.
- To ensure the new network setting takes effect, reboot your modem and router.
2c Power On

Plug in your Base StationPlug the provided AC adapter into the POWER port. It is normal for the status light on the front of the Base Station to blink amber for several minutes while the device is booting up.The status light will turn solid blue once the system is fully functional.
Make your first callPick up the phone and listen for a dial tone to confirm that your system setup is complete.Feel free to call a friend and tell them about your new Ooma Office system!
![]() If your device requires a software upgrade, it may take 15-30 minutes to finish booting up the first time you plug it in. Do not unplug the Base Station while it is upgrading. It will automatically reboot after the upgrade is complete.
If your device requires a software upgrade, it may take 15-30 minutes to finish booting up the first time you plug it in. Do not unplug the Base Station while it is upgrading. It will automatically reboot after the upgrade is complete.
Step 3 | Connect More Analog Phones
3a
3b

Plug in your Linx deviceDecide where you would like to install your analog phone and find the closest power outlet.
Plug the Linx into the power outlet. The system status indicator on the Linx should start to blink amber as it searches for a Base Station.
The system status indicator on the Linx device will turn blue once the Linx has paired with the Base Station.
Connect your phoneUse a telephone cord to connect your analog phone to the phone jack at the bottom of the Linx device.
Repeat Step 3 for each Linx you want to install. Note that each Base Station can pair with a total of four Linx devices. If you wish to use more than four Linx devices, see below.
Step 4 | Add Users and Customize
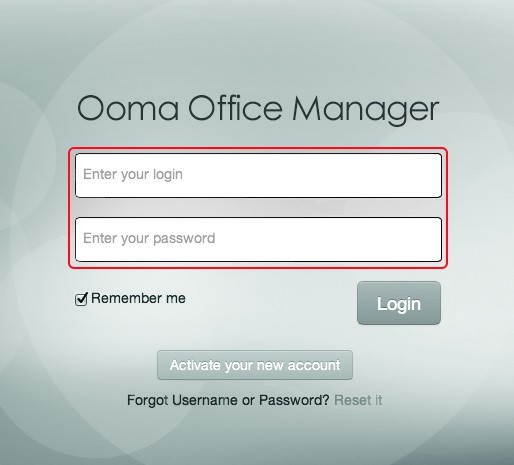
Log into Ooma Office ManagerThe hard part is over! Your Base Station and Linx devices have been installed. Now you can start to customize your configuration.The Ooma Office Manager web portal will be your primary system administration tool. To access the site, go to: http://office.ooma.comLog in as an administrator using your phone number and the password you selected during the activation process.
To begin, use the Manage tab to navigate through the different parts of the system you can customize. You will be able to:
- Manage users and devices
- Add phone numbers and control how they are routed
- Customize your virtual receptionist settings
- Update your system preferences
Note: End users can also access Ooma Office Manager to listen to voicemail, check call logs, and manage settings for their extension. When you create a user on the system, the user will receive an email with information about how to access the web portal.
That’s it. You’re Done!
If you have any questions about setting up or configuring your system, please call our customer care hotline for help: 1-866-939-OOMA (6662)
Next Steps Transfer Your Phone NumberDo you have an existing phone number that you would like to transfer to your Ooma Office system? In most areas, Ooma can help you port your existing phone number from your old provider. You must maintain the phone service associated with your existing phone number until the porting process is completed, which usually takes around 2-3 weeks.To get started, please visit: http://office.ooma.com/port
Explore Ooma Office ManagerAfter your initial setup is complete, explore all the other features that Ooma Office Manager has to offer. You can:
- Set up additional users
- Select additional local and toll-free numbers
- Customize your virtual receptionist
- Upload custom music on hold and transfer music
- And much, much more
Learn more about all the features Ooma Office has to offer in the Features Overview section of the user manual.
◊ Advanced Features of Ooma Office
Ooma Office comes with a full suite of features to accomodate all types of businesses. Learn more below:
 Mobile Application (coming soon)All users on your system can make and receive calls, listen to voicemail, and update preferences by using the Ooma Office mobile app for iOS and Android. Before they can use the app, you must first enable the mobile app on their extension. The user will receive an email with instructions on how to download the app. To get started, visit: http://office.ooma.com/mobile_app
 Supporting More Analog PhonesEach Base Station can support up to five analog phones using the built-in phone port and wireless links to up to four Linx devices. To add support for more analog phones in the office, you can purchase additional Base Stations and Linx devices (each sold separately). With four Base Stations and 16 Linx devices, you can connect up to 20 analog phones in one location. To add more base stations to your account, visit: http://office.ooma.com/base_stations
 Toll-Free NumbersAdding a toll-free number gives your small business a national footprint and makes it easy for customers to reach you. You may select one toll-free number for your Ooma Office account. The number comes with 500 minutes of free inbound calling. Additional usage rates apply; see our website for details. To select a toll-free number, visit: http://office.ooma.com/toll_free
 IP Phones (coming soon)IP Phones are “smart” desktop phones that connect to your office network using a hardwired Ethernet connection. They often have large displays which make it convenient to handle multiple lines and access advanced features. Ooma Office is compatible with select models of IP phones and can support a mixture of analog phones and IP phones at the same location. To set up IP phones, visit: http://office.ooma.com/ip_phone
 Virtual FaxSend and receive faxes online with a Virtual Fax extension. Once it has been set up, all inbound faxes will be forwarded to your email and any of your users will be able to use the Ooma Office web portal to send out PDF files as faxes. The Virtual Fax extension includes a dedicated phone number. To set up a virtual fax, visit: http://office.ooma.com/virtual_fax
 Conference ServerThe conference server can host up to ten meeting rooms. Each meeting room is assigned its own unique conference ID and can accommodate up ten simultaneous internal or external call-in participants. The conference server comes with a dedicated phone number for direct access. To set up conferencing, visit: http://office.ooma.com/conferences
√ Quick Reference Guide
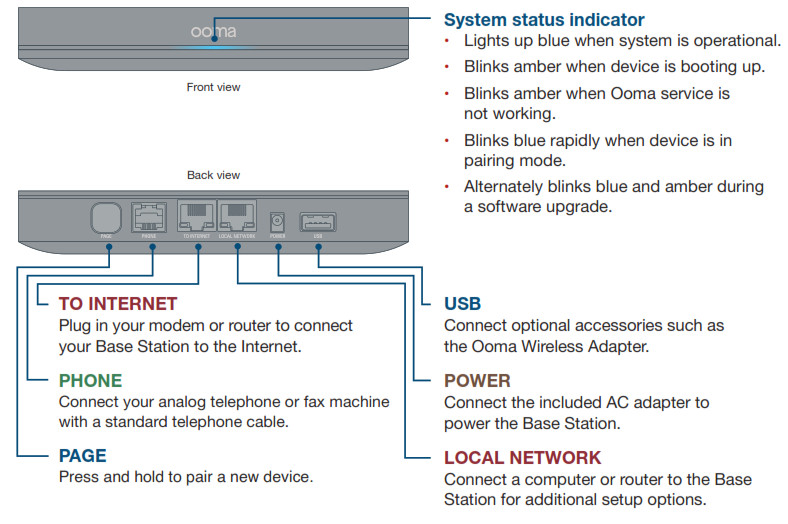
Ooma Office Base Station

√ Troubleshooting
Base Station status indicator is blinking amberWhen the status indicator on your Ooma Office Base Station blinks amber, your Base Station is not operational. Check below to find out what is preventing it from working.
- Your Base Station may not be connected to the Internet. Check that your network cables are plugged in securely. Verify that the TO INTERNET port is connected to your router (or modem) and the green LED at the top of the port is lit up.
- Try rebooting your Base Station, modem, and router by power cycling the devices.
- Your Base Station may be unable to register with the Ooma network. Verify that you have activated your device as described in Step 1. Try power cycling the Base Station.
- Verify that your Internet connection is working. Optionally, connect a computer to the LOCAL NETWORK port of the Base Station and browse to http://office.ooma.com. You should see the login screen for Ooma Office Manager. If not, troubleshoot your Internet connection.
The phone connected to the Base Station has no dial tone If the status indicator on the Base Station is blue but you don’t hear a dial tone, check that your phone is correctly plugged into the PHONE port of the Base Station.I hear an “extension has not been set up” error message when I pick up the phone Log into the Ooma Office Manager and make sure that your Linx or Base Station device has been assigned to a user. Select a user and switch to the Devices tab to add the Linx or Base Station phone port to a user.
The Linx device won’t pair with my Base Station
- Move the Linx closer to your Base Station and try to pair again.
- Perform a factory reset of the Linx by inserting a paper clip into the pinhole next to the phone jack of the Linx device. Hold for 10 seconds until the system status light blinks amber. Try to pair again.
- If the status indicator on the Base Station blinks purple/blue when you put it into pairing mode, you have exceeded the capacity of the Base Station. Each Base Station can only support up to four wireless DECT devices like the Linx. You may purchase additional Base Stations if you need to connect more Linx devices inside your office.
The phone connected to my Ooma Linx device has no dial tone
- If the system status indicator on the Linx is lit amber, try installing the Linx closer to the Base Station. Also try performing a factory reset of the Linx device by following the directions above.
- If the system status indicator on the Linx is blinking amber, follow the setup instructions again to register the device with your Base Station.
- Verify that your Base Station is powered on and has a blue status indicator. Next, plug an analog phone into the PHONE port of the Base Station to check for a dial tone.
Voice sounds stuttery or sometimes breaks upVoice quality depends on the speed and quality of your Internet. For best results, Ooma recommends that your Base Station is connected between the modem and router as shown in Alternative Setup Option in Step 2a. Please call our customer care hotline if you are experiencing voice quality issues.
© 2015 Ooma, Inc. Patent pending. All rights reserved. Reproduction in whole or in part without written permission is prohibited. Ooma, the Ooma logo, Ooma Office, Ooma Linx, and all other Ooma company, product and service names and slogans are trademarks of Ooma, Inc. All other product, service or brand names are the property of their respective owners.
Ooma Office Phone User Manual – Ooma Office Phone User Manual –