![]()
Instruction ManualModel No. OS-Honor
Before operating this unit, please read these instructions completely.
IMPORTANT SAFETY INSTRUCTIONS
When using an electrical appliance, basic precautions should always be followed, including the following:Read all instructions before using (this appliance).
DANGERTo reduce the risk of electric shock:
- Always unplug this appliance from the electrical outlet immediately after using and before cleaning.
- Never use pins or other metallic fasteners with this appliance.
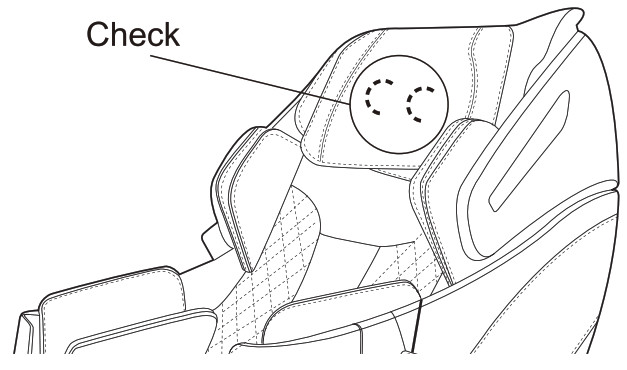
- Carefully examine the covering before each use. Discard the appliance if the covering shows any sign of deterioration, such as checking, blistering, or cracking.
WARNINGTo reduce the risks of burns, fire, electric shock or injury to persons:
- An appliance should never be left unattended when plugged in. Unplug from outlet when not in use, and before putting on or taking off parts.
- Close supervision is necessary when this appliance is used by, on, or near children, invalids, or disabled persons.
- Use this appliance only for its intended use as described in this manual. Do not use attachments not recommended by the manufacturer.
- Never operate this appliance if it has a damaged cord or plug, if it is not working properly, if it has been dropped or damaged, or dropped into water. Return the appliance to a service center for examination and repair.
- Do not carry this appliance by supply cord or use cord as a handle.
- Keep the cord away from heated surfaces.
- Never operate the appliance with the air openings blocked. Keep the air openings free of lint, hair, and the like.
- Never drop or insert any object into any opening.
- Do not use outdoors.
- Do not operate where aerosol (spray) products are being used or where oxygen is being administered.
- To disconnect, turn all controls to the off position, then remove plug from outlet.
- Keep children away from extended foot support.
- Connect this appliance to a properly grounded outlet only. See Grounding Instructions.
- Use heated surfaces carefully. May cause serious burns. Do not use over insensitive skin areas or in the presence of poor circulation. The unattended use of heat by children or incapacitated persons may be dangerous.
- Do not operate under blanket or pillow. Excessive heating can occur and cause fire, electric shock, or injury to persons.
SAVE THESE INSTRUCTIONS
Safety Precautions
When using the massage chair, basic precautions should always be followed to reduce the risk of electric shock, burns, fire or injury to persons. Please read the following precautions before using the massage chair.
- Make sure the power plug is securely inserted into a proper electrical outlet to reduce the risk of short-circuit and fire.
- It is highly recommended that a surge protector is used to prevent from damage.
- DO NOT use the massage chair in areas where the humidity is high such as sauna steam rooms, pools, bathrooms, AC or heating vents, etc.
- DO NOT use the massage chair outdoors and avoid areas with direct sunlight.
- If the chair is not being used, turn the power switch to the OFF position and unplug the massage chair from the electrical outlet to prevent any damages to the chair when there are power outages/surges that may cause serious damage.
- Never plug/unplug the power cord plug socket with wet hands.
- Close and continuous supervision is necessary when the massage chair is used by, on or near children or disabled persons.
- No more than one person should use the massage chair at the same time.
- The massage chair is intended for use as described in the Instruction Manual. Dot not use any attachments other than those recommended by the manufacturer.
- DO NOT attempt to stand or sit on the backrest, armrest or footrest in order to prevent accident, injury or damage to the chair.
- Avoid falling asleep while using the massage chair.
- Always keep the massage chair clean, and never insert any objects into or around the gaps of the massage chair.
- DO NOT move the massage chair by pulling on the power supply cord.
- Make sure there are no children, pets or other obstacles behind or underneath the massage chair.
- If you find any rips or tears in the fabric of the massage chair, contact the service department and stop using the chair immediately.
- This massage chair is designed for household use and should not be used in non-residential settings.
- Please consult your doctor if you are in doubt as to whether or not you should use this massage chair.
- Please consult a doctor before using the massage chair if you are pregnant, undergoing any medical treatment, using a medical electronic device such as a pacemaker, or are experiencing any of the following: malignant tumor, heart disease, back pain, abnormal or curved back bone, osteoporosis or acute illness.
- If you experience pain while using the massage chair, stop using the chair immediately and consult your doctor.
- Never use a massage function on swollen or inflamed parts of the body.
- DO NOT use the massage chair for more than 30 minutes at a time.
- DO NOT use the massage chair where aerosol(spray) products are being used or where oxygen is being administered.
- This massage chair is a non-professional product designed to provide a comfortable massage and should not be substituted for appropriate medical treatment.
- Never operate the appliance with the air hoses that inflate while they are blocked. Keep the air openings free of lint, hair, and any other obstructions.
- Check the skin which is in contact with the heated area of the appliance frequently to reduce the risk of injury. If the heating pad malfunctions and extreme heat is produced it may cause serious burns.
- Bums may result from improper use. If this is the case immediately shut off the chair and unplug from the outlet.
- Remove all sharp objects from the body and pockets such as keys and pens.
- Keep children away from extended foot support (or other similar parts.)
- DO NOT WET-DO NOT USE PINS.
- NEVER REMOVE COVER.
![]() CautionThe user’s weight is usually limited to 220 lbs. For those who are weighing 220 lbs or more, the product operations may make more noise and the fabric cover may wear out faster.
CautionThe user’s weight is usually limited to 220 lbs. For those who are weighing 220 lbs or more, the product operations may make more noise and the fabric cover may wear out faster.
FCC Radiation Exposure Statement
FCC Radiation Exposure Statement: (mobile device)This equipment complies with FCC radiation exposure limits set forth for an uncontrolled environment. In order to avoid the possibility of exceeding the FCC radio frequency exposure limits, Human proximity to the antenna shall not be less than 20cm (8 inches) during normal operation.
FCC STATEMENT
- This device complies with Part 15 of the FCC Rules. Operation is subject to the following two conditions:(1) This device may not cause harmful interference, and(2) This device must accept any interference received, including interference that may cause undesired operation.
- Changes or modifications not expressly approved by the party responsible for compliance could void the user’s authority to operate the equipment.This equipment has been tested and found to comply with the limits for a Class B digital device, pursuant to part 15 of the FCC Rules. These limits are designed to provide reasonable protection against harmful interference in a residential installation. This equipment generates, uses and can radiate radio frequency energy and, if not installed and used in accordance with the instructions, may cause harmful interference to radio communications. However, there is no guarantee that interference will not occur in a particular installation. If this equipment does cause harmful interference to radio or television reception, which can be determined by turning the equipment off and on, the user is encouraged to try to correct the interference by one or more of the following measures:—Reorient or relocate the receiving antenna.—Increase the separation between the equipment and receiver.—Connect the equipment into an outlet on a circuit different from that to which the receiver is connected.— Consult the dealer or an experienced radio/ TV technician for help.
Industry Canada Notice
Industry Canada NoticeThis device complies with Industry Canada licence-exempt RSS standard(s).
- Operation is subject to the following two conditions:(1) this device may not cause interference, and(2) this device must accept any interference, including interferencethat may cause undesired operation of the device.
- Changes or modifications not expressly approved by the party responsible for compliance could void the user’s authority to operate the equipment.
Chair Components
Front

- Pillow Pad
- Shoulder side massage section
- Backrest Pad
- Hand and arm massage section
- Seat Cushion
- LED Light
- Legrest
Air Massage Area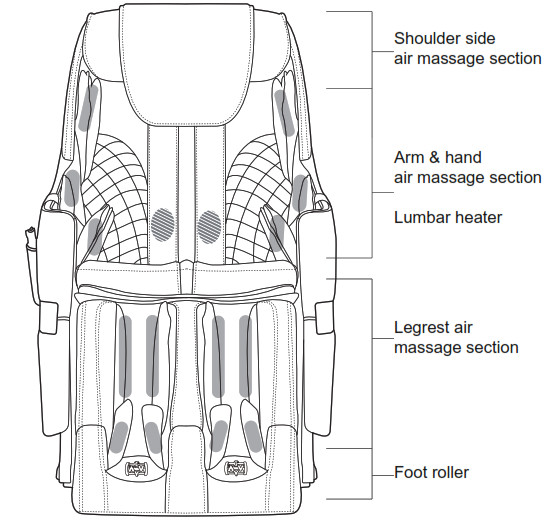

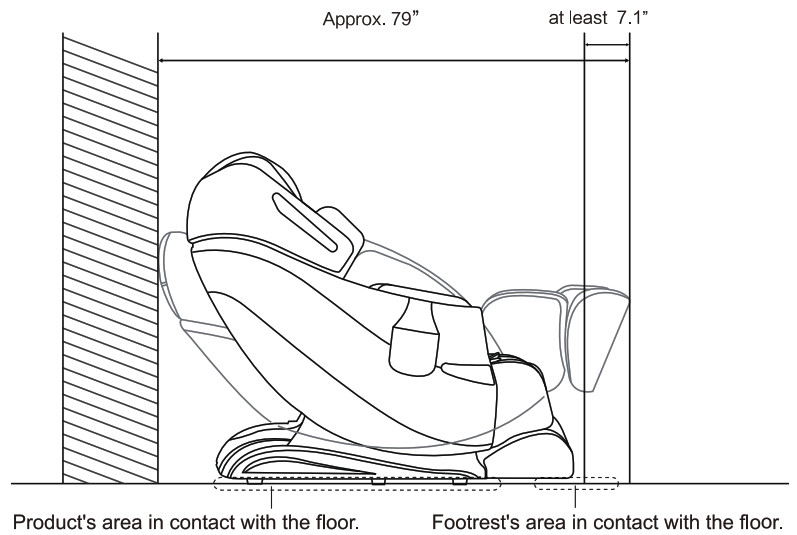
Setting up the massage chair
- Installation Position.• Ensure there is adequate space to recline.
 • Do not expose the massage lounger to direct sunlight or high temperatures, such as in front of heating sources, because this can cause discoloration or hardening of the synthetic leather.• Pleace the unit on a mat to prevent floor damage.• When placing a mat under the unit, the size of the mat should be sufficient to cover the areas where the unit touches and where the legrest could touch the floor, as shown in the dia gram on the above.• Install the unit near a power outlet.
 • Do not expose the massage lounger to direct sunlight or high temperatures, such as in front of heating sources, because this can cause discoloration or hardening of the synthetic leather.• Pleace the unit on a mat to prevent floor damage.• When placing a mat under the unit, the size of the mat should be sufficient to cover the areas where the unit touches and where the legrest could touch the floor, as shown in the dia gram on the above.• Install the unit near a power outlet.
Preparation before Use
- Check the space around the product.Make sure there is no person, pet, or other object close to the product.
- Make sure there is no foreign matter in the seams of the product.• Before sitting on the product, make sure there is no foreign matter between any two parts of it.• Do not put hands, arms or head between the backrest and the back cover.• Do not put pets on the product (such as its back cover, backrest and armrests).
- Power on the product1)Push the power connector into the appliance inlet till the end.2) Insert the power plug into the power outlet till the end.3) Turn the switch to “I” position
- Make sure the massage rollers are retracted.If they are not, press NO button to return them to the retracting position.


How to Use
Controller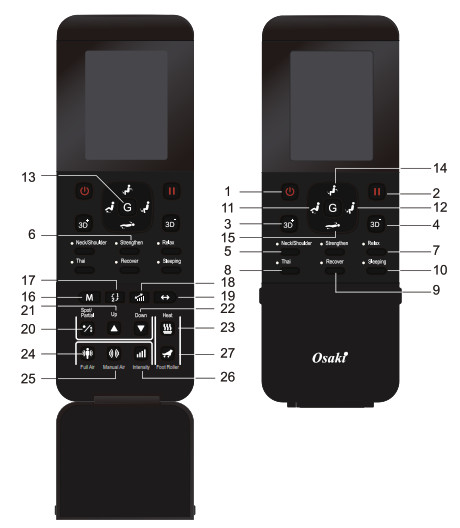 Product Operation GuideConnect to the power supply, then turn the switch to”I”position, thus the chair will be in idle mode,and the backrest angle will reach the highest position as well as the footrest angle will reach the lowest position.During its idle mode, there are only five functions:ON/OFF, Incline, Recline, Incline Leg, Recline Leg that can be operated.Control Buttons for the Massage Chair
- ON/OFFThe Start/Stop Control ButtonPress once on this button, the LCD backlight, and ON/OFF button will be lit. Press any massage function button to start the chair’s massage functions. This will also start the timer function. Press this button again to stop all massage functions, and the massage rollers & backrest & leg-rest will return to their position.
- PauseThe Pause Button When the chair is in massage mode and the user wants to temporarily pause it, press the Pause Button and all massage functions will stop. The “Pause” button will be blinking and the set time countdown will be paused as well. Press the Pause button again to resume the original massage function, the set time countdown will continue.
- The 3D adjustmentPress the 3D+/3D- to adjust the 3D assage roller forward/backward respectively. There are 3 different levels available for adjustments to suit various massage strength requirements.Auto programIf the either 1 of the 6 auto program is activated, chair will automatically performing a shoulder height scan.And the theme will go to shoulder adjustment automatically,user can manually adjust the shoulder height position to the desire comfortable posi-tion before auto program start.The following are the auto program available:
- Neck/Shoulder
- Strengthen
- Relax
- Thai
- Recover
- Sleeping
- Incline Leg/recline LegAngle Adjustment Control Button for FootrestThese two control buttons can adjust the massage angle on the footrest.Press once on the Incline Leg or Recline Leg control button, and the Footrest will start to move; When the Footrest reaches the desired comfortable position, press the button again to stop it.
- Zero-GPress this button to activate Zero-G1 function in default, press the button again to activate Zero-G2 function, and press again to retum to the idle position.Note: If this button is pressed while moving to Zero-G1, the massage chair will stop at the latest angle. If Zero-G button is not pressed while moving to Zero-G1, the mas-sage will stop at the preset Zero-G1 angle. Same conditions apply to Zero-G2 function.
-
Backrest Incline / ReclineAngle Adjustment Control Button for Massage ChairThis two contro! buttons can adjust the Backrest Inclining/Reclining angle respectively.Press once on the Inclining or Reclining control button, and the Backrest will start to move. When the Backrest reaches the desired comfortable position, press the button again to stop it.
-
Manual Massage FunctionKNEADING, TAPPING, SWEDISH, SHIATSU, CLAPPING, ROLLINGPress this button to activate the rhythmic kneading manual massage function for a full back massage at medium strength. Every time this button is pressed, the manual mmassage function will change in the sequence of KNEADING>TAPPING>SWEDISH>SHIATSU> CLAPPING> ROLLING=>Stop.
-
Direction of Manual Massage FunctionWhen the manual massage function is operating, press this button to change the rhythmic mode of manual massage between 1 and 2.
-
SpeedThe Speed Adjustment Button for backrest -5 levels of speed can be adjusted After activating manual massage function, every time the button is pressed, the speed can be adjusted to from weak to strong.
-
Width AdjustmentBack massage width adjustment button- 3 level availableAfter activating the tapping, clapping, shiatsu, or rolling function, user can touch the button to adjust massage width, total 3 level available (narrow, medium, wide).
-
Spot / PartialThe Spot or Partial Back massageThis button allows the user to select spot massage for any part on the back.Press this button once to activate spot massage at the required location.Press this again to switch to partial function.
- Upward / DownwardThe massage position adjustment button for spot and partial massageWhen the manual or automatic shoulder scanning can’t meet individual requirements, you manual fine tune the shoulder height location by pressing up ‘down button within sound 10 seconds. Once appropriate location found release the key, the final position will be lock.Note: In the spot or partial massage, you can also use these two buttons to adjust the massage position.
- HeatEvery time this button is pressed, the heat massage function will change in the sequence of mechanism heating > knee/leg heating > mechanism /knee/leg heating > stop.
- Full Body Air Pressure MassageFull Body Air Pressure massagePress once to activate the air-pressure massage at full body Press again to stop the function.
- Manual AirSetting Air SqueezeEvery time this button is pressed, the manual air-pressure massage function will change in the sequence of EGREST>ARMREST>SHOULDER=STOP.
- IntensityThe Intensity Adjustment Button for Air-pressure- 5 levels of intensity to be adjusted.After activating the air-pressure function(Auto and Manual), press this button to adjust the intensity in the cycle.
-
Foot RollerFoot roll function Start/Stop Control ButtonPress once to activate the roller on foot, press again to stop the foot roll function.End OperationPlease press the “ON/OFF”button after use, and the chair will stop its operation, while the massage rollers will return to their original position; then switch the power supply button under the chair to”O”position and unplug the machine from the electrical outlet.
Cleaning arm maintenance
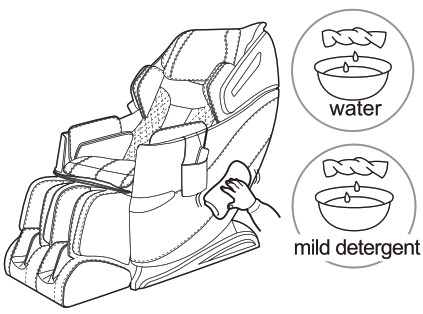
- Cleaning of the synthetic leatherWipe the synthetic leather with a soft dry cloth.• Do not clean the product with chemicals such as thinners, gasoline and alcohol.• When using a leather maintenance product (cleaning cloth) sold on the market, follow its directions for use.• If the synthetic leather is very dirty, wipe it with the method below.(1.) Put a piece of soft cloth into water or 3% to 5% neutral detergent contained hot water and wring it out.(2) Wipe surface of the synthetic leather with the soft cloth.(3) Wipe the detergent with a piece of cloth once soaked in clean water and wrung out.(4) Wipe with a piece of wrung soft cloth.(5) Have the synthetic leather take natural air drying.• If it is difficult to remove the stains on the synthetic leather, soak a piece of melamine foam bought from the market into a neutral detergent and use it wipe the product.• Do not dry the surface by a hair drier.• Surface of the synthetic leather may be dyed by fabric colors; therefore, be careful when wiping the product with denim or colored cloth.• Synthetic leather may discolor, so the position in contact with the hair dye used should be covered by a towel.
- Cleaning of the plastic parts1) Put a piece of soft cloth into water or neutral detergent contained hot water, wring it out and wipe the plastic parts.• Do not clean the product with chemicals such as thinners,gasoline and alcohol.2) Wipe with a piece of cloth once soaked in clean water and wrung out.• Wring the cloth out before using it to wipe the remote controller.3) Have the plastic parts take natural air drying.
 • If the synthetic leather is very dirty, wipe it with the method below.(1.) Put a piece of soft cloth into water or 3% to 5% neutral detergent contained hot water and wring it out.(2) Wipe surface of the synthetic leather with the soft cloth.(3) Wipe the detergent with a piece of cloth once soaked in clean water and wrung out.(4) Wipe with a piece of wrung soft cloth.(5) Have the synthetic leather take natural air drying.
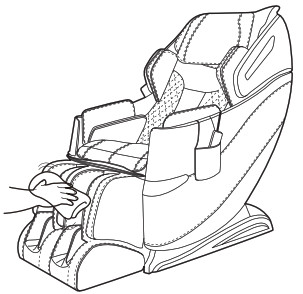 • If it is difficult to remove the stains on the synthetic leather, soak a piece of melamine foam bought from the market into a neutral detergent and use it wipe the product.• Do not dry the surface by a hair drier.• Surface of the synthetic leather may be dyed by fabric colors; therefore, be careful when wiping the product with denim or colored cloth.• Synthetic leather may discolor, so the position in contact with the hair dye used should be covered by a towel.
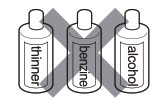
 2) Wipe with a piece of cloth once soaked in clean water and wrung out.• Wring the cloth out before using it to wipe the remote controller.3) Have the plastic parts take natural air drying.
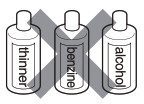
Troubleshooting
This page summarizes the most common problems you could encounter with the product. If you are unable to solve the problem with the information below, contact service center immediately.If the problem encountered is not listed, please try the following suggestions:
- Turn off the product and unplug it.
- Wait for 60 minutes.
- Plug the product back to the recommended outlet and restart.
- If the problem persists, contact the authorized service center.
Problem Possible Cause Suggestion The product does not work The product is not plugged in properly. Ensure the voltage on the product corresponds to thelocal mains voltage and then plugin again. Make sure the outlet is properly working. The product stopped working The product has justfinished its auto timer session and has automatically switched to standby mode. If you want another session, press the Power buttonagain. The product stopped working You may have used the product continuously for 45 minutes where the over heat protection has been activated. Unplug the product and let it cool down for 60 minutes before you use it again. The product does not work An excessive load has been applied on the product. Reduce the excessive load and start again. The product is abnormally warm The product is likely to be overused. Unplug the product and let it cool down before using it again. Noise can be heard from the product Noise is made by the mechanical parts of the product. This is normal and does not mean that the product is faulty.
Grounding Instructions
This product must be grounded. If it should malfunction or break down, grounding provides a path of least resistance for the electric current to reduce the risk of electric shock. This product is equipped with a cord with an equipment-grounding conductor and a grounding plug. The plug must be plugged into an appropriate outlet that is properly installed and grounded in accordance with all local codes and ordinances.
Danger-Improper connection of the equipment-grounding conductor can result in a risk of electric shock. Check with a qualified electrician or service technician if the product will not fit the outlet, have a proper outlet installed by a qualified electrician.
This product is for use on a nominal 120V circuit and has grounding plug that looks like that plug illustrated below. Make sure that the product is connected to an outlet having the same configuration as the plug. No adapter should be used with this product.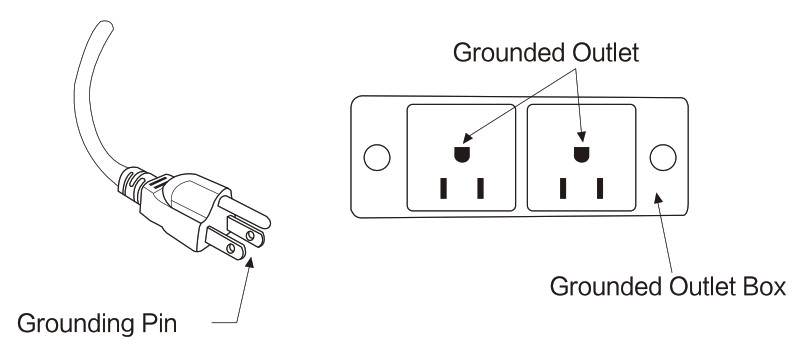
Chair Specifications
| Description | Specifications |
| Model No. | OS-Honor |
| Rated Voltage | 110-120V~ |
| Rated Frequency | 60Hz |
| Rated Power Consumption | 100W |
| Rated Time | 15 minutes |
| Dimensions(L x W x H) | Upright: 59.1″ x 28.0″ x 47.2″ |
| Reclined:70.1″ x 28.0″ x 38.6″ | |
| Weight | Gross Weight: Approx. 264.5 lbs |
| Net Weight: Approx. 220.5 lbs | |
| Length of Wire | Controller wire: 59.0″ |
| Power supply wire: 70.9″ | |
| Usage Condition | Environment temperature: 32°F-95°F |
| Contrasting humidity: 20-80RH | |
| Storage Condition | Storage temperature: 23°F-95°F |
| Storage humidity: 20-80RH | |
| Safety Feature | Equipped with overheated and power |
| Maximum body weight of user | 220 lbs |
Publish: 2019.05V1.0
[xyz-ips snippet=”download-snippet”]