
Oypla Glass Panel Heater Manual
[Model:4018, 4019]
Safety Instructions
Notice: Ensure you read and fully understand instructions before use
While every attempt is made to ensure the highest degree of protection in all equipment, we cannot guarantee freedom from injury. The user assumes all risk of injury due to use. All merchandise is sold on this condition, which no representative of the company can waive or change.
- Never carry out any alterations or modifications to this product.
- This product is not a toy, and is only to be used for its designated purpose.
- This product is intended for indoor use only.
- Never leave the product unattended whilst it is switched on. If you have to leave the product unattended, even for a short while, always switch it off.
- Keep the product out of children’s reach and do not allow children to use it.
- The product is only intended for domestic use and only in the manner described in this instruction manual.
- Do not place the mains lead on or near any hot surface.
- Do not touch the product if your hands are moist or wet.
- Do not attempt to move the product by pulling on the power cord.
- Only mount the product indoors in a clean and dry environment.
- Do not place the heater next to, or above, an electrical socket.
- Do not cover the heater in any way.
- Do not place the heater close to flammable materials or explosive gasses or liquids.
- Only place the heater in a position that will allow for the flow of hot air to not be blocked.
- Always unplug the heater when it is not in use. Even at the lowest setting, the heater is still operating (making it a potential fire hazard).
- Clean only with a damp cloth. Do not use strong industrial cleaning substances or abrasive materials as these will damage the product. Make sure the product is off, unplugged from the socket and been left for five minutes to remove the risk of electrical shock.
- If the product is damaged or has any defects, please contact [email protected]
Assembly Instructions
Freestanding Method
Follow these steps if you wish to attach the feet supplied with the appliance, to use in a freestanding manner.
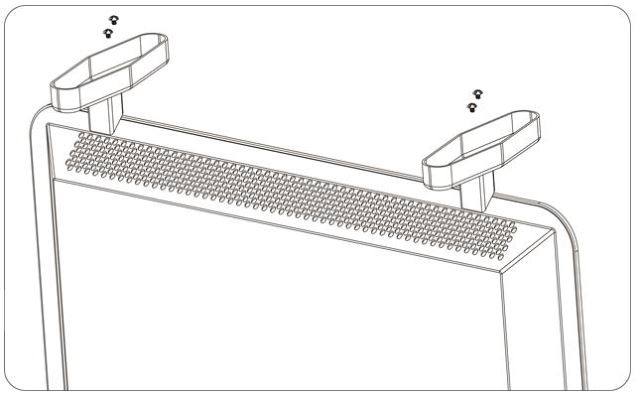
- Turn the panel heater upside down.
- Align the feet with the mounting holes on the bottom of the panel heater.
- Using the screws provided, attach the feet onto the bottom of the panel heater, being careful not to overtighten as this can cause damage to the product.
Wall-Mounted Method
Follow these steps if you wish to attach the product to a wall or surface. Please note that this product must be installed at least 15cm from the floor, and 50cm from the ceiling.
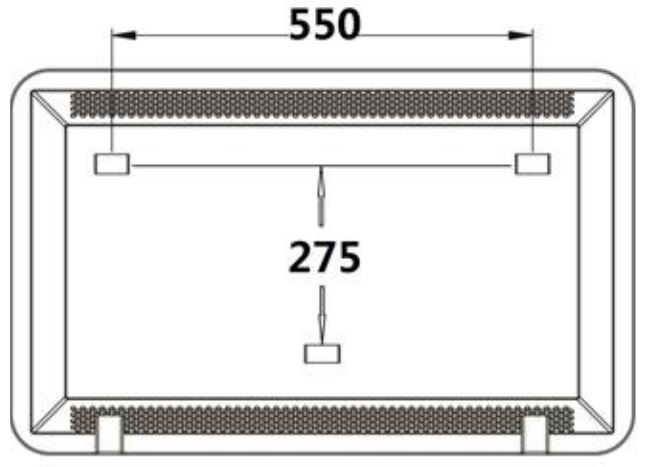
- Plan where you want to mount the heater, using a pencil to mark the two hole locations. Ensure that the holes are level for the best mount. The holes should be 550mm apart.
- Proceed to drill the two holes. Be aware that the holes need to have a diameter of 8mm and be 40mm deep to accommodate the anchors properly.
- Insert the supplied anchors into the holes, using a screwdriver to tighten them. Screws must protrude 6mm from the anchor head.
- Mount the product by hanging the hook holes onto the protruding screws.
Operating Instructions
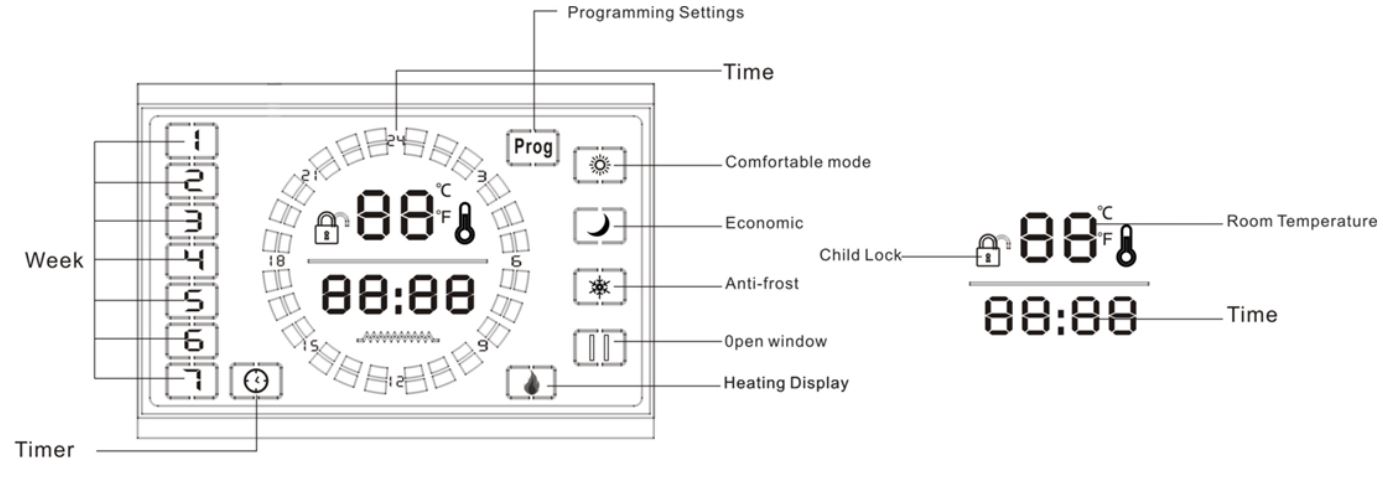
Display Overview
The below diagram shows the function of each icon that may appear on the display screen during usage.
First Use
Please follow the below steps when powering on the heater for the first time.
- Plug the heater in via mains connection, and press the power switch.
- Press the power button on the heater’s control panel (
 ) to turn it on, and then press . The below layout should appear on the heater:

Setting the Time
Please follow the below steps to set the time.
The default time is set to 12:30 on Sunday – and the temperature is set to 20°C
- Press the button to turn on the timing function. Upon activating the timer function for the first time, 00:00 will be displayed.
- Hold the key for 3 seconds to set the current time. When this is done for the first time, the default time will be 12:30. Once the timer button is held for 3 seconds, the hours begin to flash. Use the + and/or – buttons to set the hour.
- Hold the key for another 3 seconds, and the minutes will flash, just like the hours did. Again, use the + and/or – keys to set the minutes.
- After completing the above settings, wait 5 seconds or press the key to finish and exit.
Setting the Temperature
Please follow the below steps to set the desired temperature.
The heater will aim to reach and maintain the temperature you set. If the heater turns off, it is because the target temperature has been reached.
- The default temperature is 20°C. To adjust this, simply use the + and/or – keys to raise or lower the desired temperature accordingly. Each press of the + or – key will raise or lower the temperature by 1°C.
- After setting the desired temperature, wait 5 seconds and the ambient/room temperature should re-appear instead of the desired temperature.
NOTES:
- Whilst anti-frost mode is active, when the ambient/room temperature is detected to be less than 5°C, the heater will automatically turn on the low-gear heating until the ambient temperature is equal or greater than 9°C, before returning to standby mode.
- Pressing for 3 seconds will activate window mode. Whilst this mode is active, if the temperature drops by a minimum of 5 degrees within 10 minutes, the heater assumes that the user has opened a window and the heater will stop heating and enter standby mode.
- Use the key to cycle between low power, high power and anti-frost modes.
Activating Child Lock
Please follow the below steps to activate/deactivate the Child Lock function.
- To activate the child lock, press the + and – keys (at the same time) and hold for 3 seconds.
- The icon will appear on the display, confirming child lock has been activated. Whilst this mode is active, no controls on the display or panel will not work (no settings can be changed).
- The process of deactivating child lock is the same as activating it. Simply press and hold the + and – buttons for 3 seconds together.
Note: ALL OF THE ABOVE FUNCTIONS ARE ONLY FUNCTIONAL WHEN WEEKLY TIMING MODE IS TURNED OFF
Weekly Timing Mode
Please follow the below steps to help set up weekly timing mode.Please be sure to follow the steps in part c. Setting the Time, before following these instructions.
- To enter weekly timing mode, press and hold the key for 3 seconds.
- Press the key once, and the number “6” is displayed on the week. The numbers, 1-7, indicate Monday to Sunday. Press the + and/or – keys to select the desired day of the week.
- After selecting your desired day, press the key again – the selected day will begin to flash. You can set up to 6 different time periods for each day. Use the + and/or – keys to select the time period you wish to set up. (For example, you could set the heater to reach 18°C between 10:00AM and 11:00AM, and 20°C between 11:01AM and 11:59AM)
- Press the key again, and the number of hours will flash. Use +/- to select the desired hour. Press the key again, and the follow the same process to set the minutes, using the +/- keys. Press the key again, and the temperature can be set using the +/- keys. Be aware that when the heater reaches the desired temperature, it will automatically enter standby mode and cease heating.
- Once you have completed the above steps to set up your first day, follow the same process for each desired day. A total of 42 time periods can be set throughout the week, 6 per day.
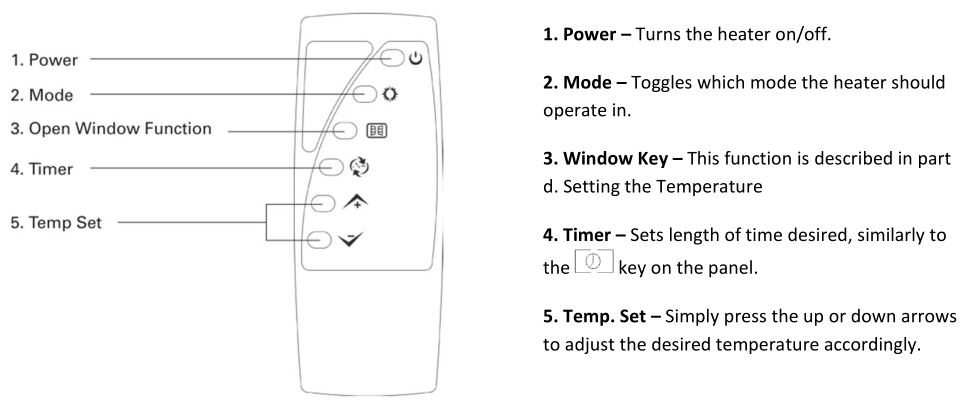
Remote Control Operation
Please refer to the below diagram on how to use your remote control. Be aware that the remote control is only intended for usage with daily/normal mode – to make changes to your weekly timer, please refer to part e. Weekly Timing Mode

![]()
![]()

Environmental ProtectionProducts bearing the symbol shown below means that used electrical and electronic equipment (WEEE) should not be mixed with general household waste. For proper treatment, recovery and recycling, please take this product(s) to designated collection points where it will be accepted free of charge. Disposing of this product correctly will help save valuable resources and prevent any potential negative effects on human health and the environment, which could otherwise arise from inappropriate waste handling. Please contact your local authority for further details of your nearest designated collection point. Penalties may be applicable for incorrect disposal of this waste, in accordance with your national legislation.
![]()
Imported by Oypla.com LLP, Uxbridge, UB8 2FXUSER MANUAL Model No: 4018, 4019
Oypla Glass Panel Heater Manual [Model:4018, 4019] – Oypla Glass Panel Heater Manual [Model:4018, 4019] –
[xyz-ips snippet=”download-snippet”]