
OZ Builder’s Hoist Wireless OBHW600 User Manual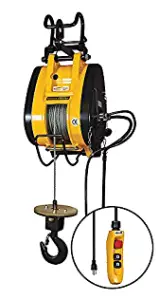
CAUTION
READ AND UNDERSTAND THIS MANUAL BEFORE INSTALLATION AND OPERATION OF YOUR WIRELESS ELECTRIC HOIST
Introduction:
The OZ Builder’s Hoist Wireless is designed for use on commercial buildings sites and in various construction workplaces, warehouses, storage facilities and factories
Specifications:
MODEL OBHW600
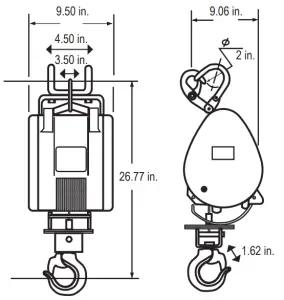
Lifting Capacity (Full Drum): 600 lbsMotor Voltage: 115/1/60Speed: 52 fpmMotor: 2 HPMotor KW: 1500W / 12.5ALifting Height: 90 ftWire Rope: 3/16 inWinch Weight: 43 lbsGross Weight: 49 lbsPower cord length: 15 ft
Product Features
- Lightweight and compact design for convenient mounting
- Automatic shut-off when rope reaches limit arm
- Sensor arm for motor shut-off to prevent reverse winding
- Standard 115V power source-compatible
- Wireless remote control for ease of use
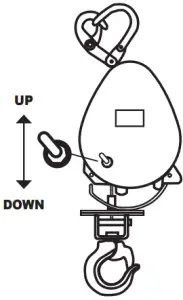
- 360-degree hook with safety latch
- Emergency UP / DOWN control switch
- Built-in safety features and easy control of lifting for a wide range of applications pg.3 9
Safety Precautions:
Environmental Precautions
The following conditions may result in hoist failure or damage:
- Temperatures below -14°F or above 104°F or humidity above 90%

- Acidic or salty conditions
- Rain or snow
- Explosive fumes or sprays
- Heavy dust or flammable particles


NOTE: Never exceed the duty cycle of the hoist. The duty cycle for OZ Builder’s Hoist Wireless is 15 continuous minutes or 75 starts per hour. Please follow these ratings.
The life of the hoist depends on attention to the load and to working frequency. Use the hoist only within its duty cycle.
With any electric motor, it is important to let the motor cool after reaching the duty cycle.
Handling Precautions
Failure to follow these handling precautions may result in personal injury or equipment damage
- Never lift a load heavier than the rated capacity.
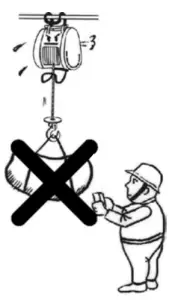
- Don’t work, walk or stand under an operating hoist.
- Always be aware of your surroundings. Think safety
- Only lift a load vertically
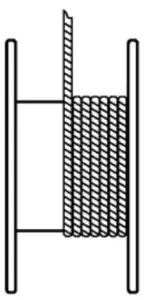
- Ensure there is a minimum of five (5) wraps of rope around the drum
- Check brake performance prior to lifting. If there is any malfunction, stop operation immediately.
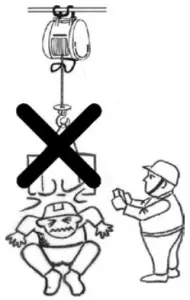
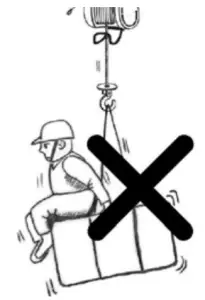
- Never hitch a ride on the hook, sling or load being moving.
- Do not lift or lower people.
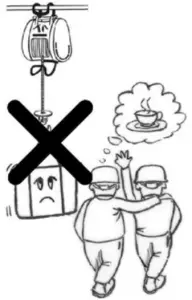
- Always remain in control. Never neglect the hoist while lifting a load
- Confirm that all components of the hoist are in good working order prior to lifting.
Assembly:
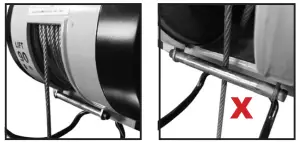
Very important when connecting the wire rope to the bottom hook the cable must run on the outside of the lower limit bar. If ran on the inside of the bar damage will happen to the wire rope and the hoist.
Mounting
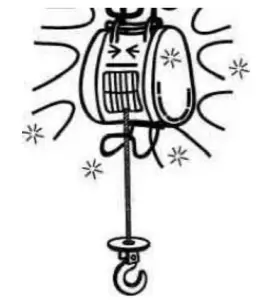
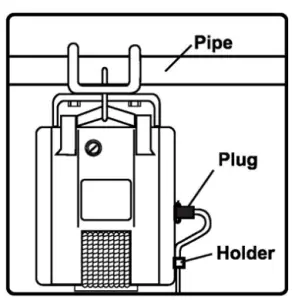
Ensure the hoist is mounted on a straight bar that allows only for front-to-back swinging, not left-to-right or rotational swinging. Failure to do so could result in uneven winding of rope onto the drum, rope jamming and rope damage. When hanging the hoist, ensure it is free from other obstructions. Always keep the hoist as level as possible to preventuneven winding.
NOTE: Always lock the hanger before every lift.
Connecting the Cords
Power cord:
- Align the power cord with the matching socket on the power receptacle of the hoist. Push in tightly.
- Secure the power cord with the strain relief clip. This clip is attached to the power cord and secures to a ring on the hoist to reduce cable strain. Do not allow the power cord to come into contact with the wire rope or drum.
- The power cord is designed for distances of 65 ft or less. For additional length, use a power cable of 12 (AWG) to prevent a drop in voltage.
Power cord length selections
Section 14 (AWG) – Cord Length 65 ft.Section 12 (AWG) – Cord Length 114 ft.
Grounding:
To prevent the risk of electric shock, the power plug must be plugged into a matching outlet in good condition.
Working Methods
Preparation
- Always maintain a line of site with the hoist while operating.
- Confirm a safe working environment prior to operation.
- Ensure a minimum of five (5) wraps of wire rope is wound around the drum.
- Discard wire rope that shows signs of excessive wear or broken wires. Look for corrosion or other defects.
- Connect the main power source. There will be a loss of power if input voltage falls out of rated voltage by +10%.
- Do not lift loads exceeding the rated load.
Remote Control Up-and-Down Switching
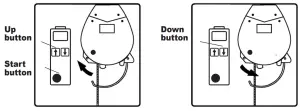
Push the green (Start) button to turn on the remote control. Press the up button and the drum will take in cable, lifting the load. Press the down button and the drum will let out cable, lowering the load. To stop the drum, release the button.
Emergency Switch
If your wireless remote control is malfunctioning or lost in the loading situation. To avoid the danger, please operate the emergency button on the winch body to move the loading things to safe place.
Oil Lubrication
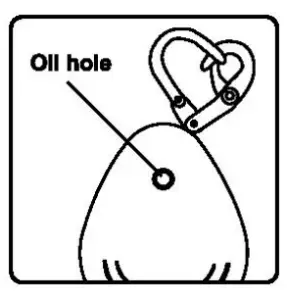
Winches are pre-oiled at the factory and do not require initial lubrication. Relubrication interval depends upon service. Recommended oil replenishment quantity & intervals are as follows.
Carbon Brush Replacement
WARNING Clean the accumulated powder off carbon brushes periodically.
- It is essential to check the carbon brushes periodically.
- If the length is less than .30 in. replace carbon brushes immediately.
- While replacing, smoothly insert carbon brush into carbon holder.
- Before tightening the carbon brush holder, make sure to position the O ring.
ONE YEAR WARRANTY
OZ Lifting Products LLC® guarantees this product to be free of defects in materials and workmanship for one year from the date of shipment. This warranty does not apply to products that show signs of misuse, overloading, alteration, improper maintenance or negligence. The normal wear and tear of moving parts is excluded from the warranty. Moving parts are defined as brake discs, wire rope and other wear components that are subject to use conditions. This warranty does not cover any costs related to removal of this product, lost time, or any other incidental or consequential damages/costs resulting from the claimed defects. If this product fails during the first year of operating due to defective materials or workmanship, it will be repaired or replaced at the discretion of OZ Lifting Products LLC®. Any product subject to a warranty claim must be returned, prepaid, to an authorized OZ Lifting Products LLC® warranty depot along with proof of purchase. Upon repair, the product will be returned to the customer free of charge. If no defect is found, the customer will be responsible for return shipping costs. The product’s warranty will be effective for the remainder of the original warranty period (one year from shipment date).
OZ Lifting Products LLC® will not be held liable for the following arising from the use of this product: injuries to persons or property, death, incidental, consequential, or contingent damages, whether negligent or deliberate. It is the sole responsibility of the owner to install and operate the product properly and safely
This is OZ Lifting Products LLC®‘s only written warranty. This warranty is in lieu of all other warranties implied by law such as merchantability and fitness. The sale of products from OZ Lifting Products LLC® under any other warranty or guarantee, expressed or implied, is not authorized.
NOTE: OZ Lifting Products LLC® has the right to alter the design of or discontinue the production of any product without prior notice.
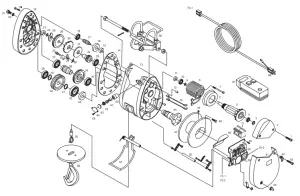
OBHW600 Parts Breakdown
Description:
| 1 | Hex Screw (3) |
| 2 | Motor cover (1) |
| 3 | Washer (1) |
| 4 | Bearing (1) |
| 5 | Armature ass’y (1) |
| 6 | Fan cover (1) |
| 7 | Hex Screw (2) |
| 8 | Field coil ass’y (1) |
| 9 | C ring (1) |
| 10 | Bearing (1) |
| 11 | Oil ring (1) |
| 12 | Knob pin (2) |
| 13 | Gear box (1) |
| 14 | Packing (1) |
| 15 | Bearing (1) |
| 16 | 1st gear (1) |
| 17 | 2nd shaft (1) |
| 18 | Bearing (1) |
| 19 | Gear case cover (1) |
| 20 | Hex Screw (7) |
| 21 | Hex Screw (1) |
| 22 | 0 ring (1) |
| 23 | Bearing (1) |
| 24 | C ring (1) |
| 25 | Gear box fixture (1) |
| 26 | 2nd gear (1) |
| 27 | Set bolt (1) |
| 28 | Spring (1) |
| 29 | Pawl (1) |
| 30 | Ratchet (1) |
| 31 | Brake Disk (1) |
| 32 | 3rd shaft (1) |
| 33 | Bearing (1) |
| 34 | Bearing (1) |
| 35 | 3rd gear (1) |
| 36 | 4th shaft (1) |
| 37 | Bearing (1) |
| 38 | Bearing (1) |
| 38 | C ring (1) |
| 40 | 4th gear (1) |
| 41 | C ring (1) |
| 42 | Bearing (1) |
| 43 | Oil ring (1) |
| 44 | Output shaft (1) |
| 45 | P.T screw (1) |
| 46 | Hex Screw (6) |
| 47 | Drum (1) |
| 48 | Screw (4) |
| 49 | Control ass’y (1) |
| 50 | Screw |
| 51 | Housing Cover (1) |
| 52 | Ring (1) |
| 53 | Hex Screw (4) |
| 54 | Emergency Switch (1) |
| 55 | Limit am ass’y-down (1) |
| 56 | Supspension hook ass’y (1) |
| 57 | Limit arm ass’y-up (1) |
| 58 | Wire rope ass’y (1) |
| 59 | Swivel hook (1) |
| 60 | Carbon holder (2) |
| 61 | Carbon brush (2) |
| 62 | Brush cap (2) |
| 63 | 0 ring (2) |
| 64 | Brush cover (2) |
| 65 | Screw (4) |
| 66 | Power cord ass’y (1) |
| 67 | Wireless Remote (1) |
| 68 | Rope stopper (1) |
| 70-1 | Power Connector (1) |
| 70-2 | Power Connect (on body) (1) |
| 71 | Relay(2) |
| 72-1 | Resistor 50W 4 4 (1) |
 report this ad
P.O. Box 845, Winona, MN 55987Phone: (800) 749-1064(507) 474-6250Tech Support (507) 457-3346Fax (507) 452-5217[email protected]www.ozliftingproducts.com
References
[xyz-ips snippet=”download-snippet”]