AUTO-DARKENING WELDING HELMET
STANDARD EQUIPMENTAuto Darkening Welding Helmet & CR2450 Battery (Fitted)ADWH-011
SHADE 11INSTRUCTION MANUAL
Viewing Window: 92.5 x 42.5mmSwitching Time: ≤3/10,000s (Light to Dark)Power Supply: 3V Lithium Battery (CR2450) & Solar PowerLight State: Shade 4Dark State: Shade 11Operating Temp.: -5 to 55°CNo. of Sensors: 2Weight: 0.94kg
WARRANTY
Auto Darkening WeldingHelmet & CR2450 Battery (Fitted)
IN ORDER TO MAKE A CLAIM UNDER THIS WARRANTY YOU MUST RETURN THE PRODUCT TO YOUR NEAREST BUNNINGS WAREHOUSE WITH YOUR BUNNINGS REGISTER RECEIPT. PRIOR TO RETURNING YOUR PRODUCT FOR WARRANTY PLEASE TELEPHONE OUR CUSTOMER SERVICE HELPLINE:Australia: 1800 069 486New Zealand: 0508 069 486
TO ENSURE A SPEEDY RESPONSE PLEASE HAVE THE MODEL NUMBER AND DATE OF PURCHASE AVAILABLE. A CUSTOMER SERVICE REPRESENTATIVE WILL TAKE YOUR CALL AND ANSWER ANY QUESTIONS YOU MAY HAVE RELATING TO THE WARRANTY POLICY OR PROCEDURE.
The benefits provided under this warranty are in addition to other rights and remedies which are available to you at law. Our goods come with guarantees that cannot be excluded at law. You are entitled to a replacement or refund for a major failure and for compensation for any other reasonably foreseeable loss or damage. You are also entitled to have the goods repaired or replaced if the goods fail to be of acceptable quality and the failure does not amount to a major failure. Generally you will be responsible for all costs associated with a claim under this warranty, however, where you have suffered any additional direct loss as a result of a defective product you may be able to claim such expenses by contacting our customer service helpline above.
1 YEAR REPLACEMENT WARRANTY*Your product is guaranteed for a period of 12 months from the original date of purchase. If a product is defective it will be replaced in accordance with the terms ofthis warranty. Warranty excludes consumable parts, for example: valve adapters and accessories.*This product is intended for DIY use only and replacement warranty covers domestic use.WARNINGThe following actions will result in the warranty being void.If the tool has been operated on a supply voltage other than that specified on the tool.If the tool shows signs of damage or defects caused by or resulting from abuse, accidents or alterations.Failure to perform maintenance as set out within the instruction manual.If the tool is disassembled or tampered with in any way.Professional, industrial or high-frequency use.
WELDING HELMET WARNINGS
 WARNING! The appliance is not to be used by persons (including children) with reduced physical, sensory or mental capabilities, or lack of experience and knowledge, unless they have been given supervision or instruction.Young children should be supervised to ensure that they do not play with the appliance.THIS MANUAL CONTAINS IMPORTANT SAFETY AND OPERATING INSTRUCTIONS FOR YOUR WELDING HELMET. Serious personal injury may occur if these warnings are ignored.
- The auto darkening welding helmet is not suitable for laser welding and oxygen acetylene welding.
- Do not put the helmet near flames or in damp places.
- Before operation, please confirm that the welding or grinding function is correctly selected.
- Before operation, tear off the protective film from the lens.
- Cease using the helmet immediately if the filter does not darken on exposure to UV/IR light. Contact Ozito customer service for further instructions. Arc rays from the welding process produce intense visible and invisible (ultraviolet and infrared) rays that can burn eyes and skin. Sparks fly off from the weld.
- Do not attempt to replace or modify parts of the helmet.
- Do not remove the filter protective plate or the filter.
- Do not use alcohol, petrol, or thinners to clean the filter.
- Do not immerse the helmet in water.
- Optimum operating temperature is between -5 to 55°C (23 to 131°F). The auto darkening function may react slower outside of this range.
- Contact Ozito customer service for further instructions if the protective films are broken or scratched.
- Contact Ozito customer service for further if the filter protective plate is broken or scratched. To prevent damage to the filter, do not use hard objects near it.
- Clean the filter surface, sensors, and solar cells regularly.
- This welding helmet does not provide protection against serious impact, explosives, or corrosive liquid damage.
- The Auto darkening filter must have outside protective lens installed to prevent potential irreparable damage. Do not use auto darkening welding helmet with any of the lenses removed.
- Change scratched or broken lens that reduces visual field and protection level.
- Frequently clean the sweatband.
- Do not remove the auto darkening filter from the helmet. Never try to open the filter.
- Before welding, adjust the auto-darkening lens sensitivity setting to meet the application. Ensure the correct shade is used for the application.
- Wear approved safety glasses with side shields and ear protection under your helmet.
- Use protective screens or barriers to protect others from flash, glare, and sparks; warn others not to watch the arc.
- Wear body protection made from durable, flame resistant material (leather, heavy cotton wool).
- Do not weld in the overhead position while using this helmet.
- Inspect the auto-lens frequently. Immediately replace any scratched, cracked, or pitted cover lenses or auto-lenses.
- Use only genuine replacement parts from the manufacturer.
- Welding produces fumes and gases. Breathing these fumes and gases can be hazardous to your health. Keep your head out of the fumes. Do not breathe the fumes.
- Only work in a well-ventilated environment.
- Read and understand the Safety Data Sheets (SDS) and the manufacturer’s instructions for adhesives, coatings, cleaners, consumables, coolants, degreasers, fluxes, and metals.
- Do not weld in locations near degreasing, cleaning, or spraying operations. The heat and rays of the arc can react with vapours to form highly toxic and irritating gases.
- Do not weld on coated metals, such as galvanized, lead, or cadmium plated steel. The coatings and any metals containing these elements can give off toxic fumes if welded.
- Button batteries pose a serious hazard to children. If swallowed, in addition to presenting a choking hazard, a button battery can get stuck in a child’s throat and cause a chemical reaction that burns through tissue causing catastrophic bleeding. Keep Auto Darkening Welding Helmet and button batteries out of sight and out of reach of small children. Dispose of old or spent button batteries you have removed from a product immediately. Flat batteries can still be dangerous.
- If you think a child has swallowed or inserted a button battery, contact the Poisons Information Centre on 13 11 26 (Australia) or 0800 764 766 (NZ) for 24/7 expert advice.
- Do not store lens cartridge in a location near a heat source or in a high moisture environment.
KNOW YOUR PRODUCT
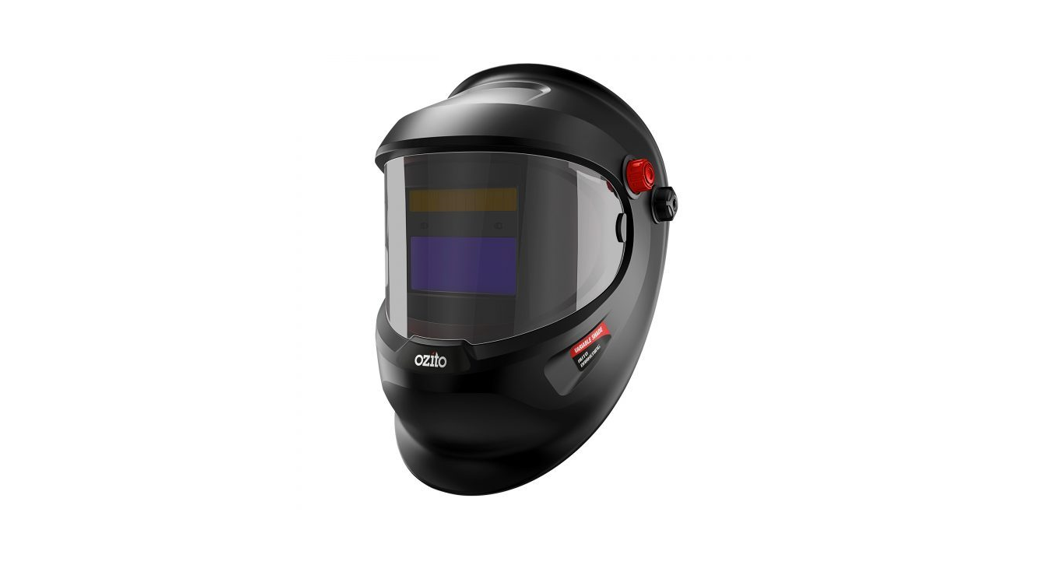
AUTO DARKENING WELDING HELMET
| 1. Solar Panel | 6. Low Battery Indicator |
| 2. Arc Sensor | 7. Sensitivity Selector |
| 3. UV/IR Filter | 8. Mode Selector |
| 4. Locking Knob | 9. Delay Time Selector |
| 5. Auto Darkening Test Button | 10. Lithium Battery Cover |
ONLINE MANUALScan this QR Code with your mobile device to take you to the online manual.
 http://www.ozito.com.au/products/ADWH-011
SETUP & PREPARATION
UV/IR FILTER
Checking The BatteryBefore first use, pull and remove the plastic tab to engage the battery contact. WARNING! ALWAYS CHECK THAT THE AUTO DARKENING FEATURE IS FUNCTIONING AS NORMAL BEFORE ATTEMPTING TO WELD. FAILURE TO DO SO MAY RESULT IN INJURY TO YOUR CORNEAS.1. Set the mode selector to ‘WELD’. Note: The test function will not work if the slider is set to ‘GRIND’.2. Press the ‘TEST’ button. The viewing window should darken briefly before returning to normal.Note: The timing between dark state to light state will correspond with the delay setting. Refer to Delay time in 3. Controls section.Note: Remove the protective film from the lenses before use.
Solar Panel![]() WARNING! ENSURE THAT ALL OPERATING PARTS ARE CLEAN & UNDAMAGED BEFORE USE. SCRATCHED OR BROKEN PARTS SHOULD BE REPLACED IMMEDIATELY.
WARNING! ENSURE THAT ALL OPERATING PARTS ARE CLEAN & UNDAMAGED BEFORE USE. SCRATCHED OR BROKEN PARTS SHOULD BE REPLACED IMMEDIATELY.![]() WARNING! DO NOT USE AUTO DARKENING WELDING HELMET IF THE SOLAR PANEL IS DAMAGED OR COVERED.
WARNING! DO NOT USE AUTO DARKENING WELDING HELMET IF THE SOLAR PANEL IS DAMAGED OR COVERED.
The solar panel works in conjunction with the battery to provide power to the welding helmet. The helmet will not work with the solar panel blocked.
ADJUSTING THE HEADBAND
Changing The Distance & Tilt Angle
- Loosen the locking knobs on both sides of the helmet by turning it anti-clockwise.

- To change the helmet distance from your face, slide the cross pin forward or backwards in relation to the headband slots.
- To change the tilt angle of the helmet, hook the tab onto one of the 5 pin options.Note: Ensure the cross pins and tilt angle on both sides of the helmet match.
- Retighten the locking knobs. Set the screw tightness so that the mask can be flipped up or down easily when nudged, but remains in position otherwise.Note: When properly adjusted, your line of sight and the locking knobs should be connected by a straight line perpendicular to the viewing window.
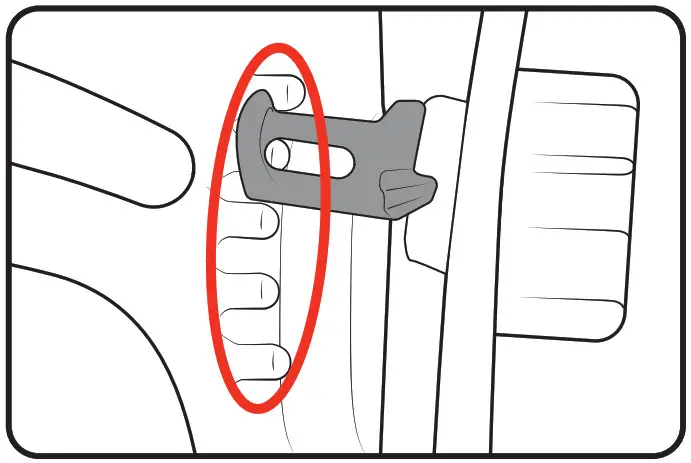 Note: Ensure the cross pins and tilt angle on both sides of the helmet match.
Adjusting The Tightness
- To loosen the headband, turn the band adjuster counterclockwise.
- To tighten the headband, turn the knob clockwise.
- Disengage the tab from the top strap of the headband.
- Loosen or tighten the band as required, then press the tab back into one of the holes to lock the setting in place.
OPERATION
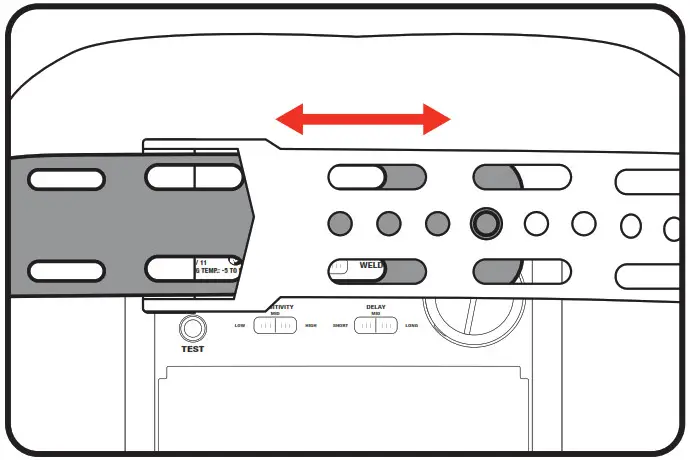
CONTROLS
![]() WARNING! ENSURE THE LOW BATTERY INDICATOR LIGHT IS OFF & YOU HAVE VERIFIED THE WELDING HELMET IS WORKING PROPERLY WITH THE “TEST” FUNCTION BEFORE PROCEEDING TO WELD.
WARNING! ENSURE THE LOW BATTERY INDICATOR LIGHT IS OFF & YOU HAVE VERIFIED THE WELDING HELMET IS WORKING PROPERLY WITH THE “TEST” FUNCTION BEFORE PROCEEDING TO WELD.![]() WARNING! WELDING HELMETS DO NO PROVIDE UNLIMITED EYE, EAR AND FACE PROTECTION. WARNING! NEVER WELD WITH ANY OF THE LENS OR FILTERS REMOVED.
WARNING! WELDING HELMETS DO NO PROVIDE UNLIMITED EYE, EAR AND FACE PROTECTION. WARNING! NEVER WELD WITH ANY OF THE LENS OR FILTERS REMOVED.![]() WARNING! BEFORE WELDING, ADJUST THE AUTODARKENING LENS SENSITIVITY SETTING TO MEET THE APPLICATION. ENSURE THE CORRECT SHADE IS USED FOR THE APPLICATION.
WARNING! BEFORE WELDING, ADJUST THE AUTODARKENING LENS SENSITIVITY SETTING TO MEET THE APPLICATION. ENSURE THE CORRECT SHADE IS USED FOR THE APPLICATION.
SensitivityAdjust this to suit ambient and welding light levels.Low sensitivity is best for high current welding, whilst the high setting is suited for welding with small currents. The medium setting is suitable for the majority of indoor and outdoor welding activities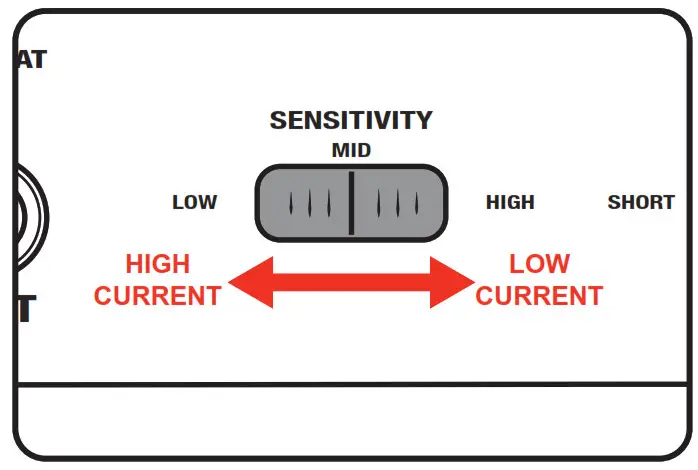
- To adjust, turn the dial to the lowest setting and face the helmet in the direction of use, exposing it to the surrounding light levels.
- Gradually increase the sensitivity until the lens darkens.
- Then lower the sensitivity just slightly below the setting in stepNote: Slight re-adjustment may be necessary for certain applications or if the lens is flashing on and off.
Delay TimeThe delay time controls the time taken for the helmet to switch between full dark and full light.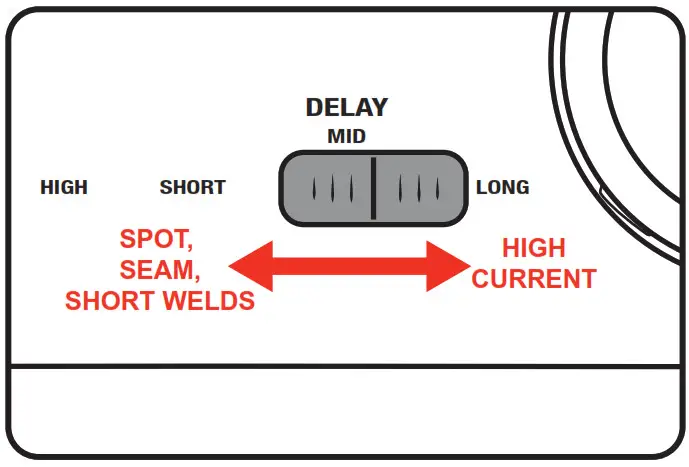
The short delay time (0.1s) is suitable for spot, seam or short welding sessions. The medium setting (0.4s) is suitable for the majority of indoor and outdoor welding. Use the long delay time (0.8s) for high current welding or to prevent eye fatigue during long welding sessions.
Mode SelectionBefore use, peel off the protective film from the front and inner lens.
Set the slider to ‘WELD’ or ‘GRIND’ depending on the application.This welding helmet has a fixed dark mode of Shade11. Refer to the label on the inside of the mask for appropriate welding currents and processes.
![]() WARNING! ALWAYS ENSURE THE CORRECT MODE AND SHADE IS SELECTED BEFORE WELDING.Note: Shade level should be based on the welding process and arc current being used. Refer to the lens shade level guide on the inside of the mask for guidance.
WARNING! ALWAYS ENSURE THE CORRECT MODE AND SHADE IS SELECTED BEFORE WELDING.Note: Shade level should be based on the welding process and arc current being used. Refer to the lens shade level guide on the inside of the mask for guidance. Note: Set the mode to ‘GRIND’ if using the helmet while grinding. The auto-darkening function does not activate in GRIND mode.
![]() WARNING! DO NOT WELD IN GRIND MODE, THE LENS WILL NOT DARKEN.
WARNING! DO NOT WELD IN GRIND MODE, THE LENS WILL NOT DARKEN.![]() WARNING! ARC RAYS FROM THE WELDING PROCESS PRODUCE INTENSE VISIBLE AND INVISIBLE (ULTRAVIOLET & INFRARED) RAYS THAT CAN BURN EYES AND SKIN. SPARKS CAN ALSO FLY OFF FROM THE WELD, CAUSING BURNS.
WARNING! ARC RAYS FROM THE WELDING PROCESS PRODUCE INTENSE VISIBLE AND INVISIBLE (ULTRAVIOLET & INFRARED) RAYS THAT CAN BURN EYES AND SKIN. SPARKS CAN ALSO FLY OFF FROM THE WELD, CAUSING BURNS.
MAINTENANCE
TROUBLESHOOTING
![]() WARNING! THE AUTO DARKENING WELDING HELMET SHOULD NOT BE USED IF THE PROBLEMS MENTIONED BELOW ARE NOT CORRECTED.
WARNING! THE AUTO DARKENING WELDING HELMET SHOULD NOT BE USED IF THE PROBLEMS MENTIONED BELOW ARE NOT CORRECTED.
Filter does not darken or flickers
- Check that the filter protector & filter is not scratched or dirty.
- Check that the arc sensors are clear and unobstructed.
- Welding current may be too low, adjust the sensitivity level to higher setting.
- Check that the low battery indicator light is not lit.
- Check that the battery is in good condition and installed properly. Try installing a new battery.
Filter reacts slowly
- Check that the ambient temperature is within the operating range.
- Check that the sensitivity is not set to minimum.
- Review the sensitivity recommendations and adjust the sensitivity.
- Clean the lens cover and sensors of any obstructions.
- Make sure the sensors are facing the arc; angles of 45° or more may not allow the arc light to reach the sensors.
Filter is not clear
- Check that the filter protector is not stained.
- Check that the protective film has been removed.
- Check that there is enough ambient light in the work space.
- Check front and inner lens is clear.
Helmet is slipping
- Check that the headband is adjusted correctly.
- Check that the locking knobs have been tightened sufficiently.
![]() WARNING! BUTTON BATTERIES POSE A SERIOUS HAZARD TO CHILDREN. IF SWALLOWED, IN ADDITION TO PRESENTING A CHOKING HAZARD, A BUTTON BATTERY CAN GET STUCK IN A CHILD’S THROAT AND CAUSE A CHEMICAL REACTION THAT BURNS THROUGH TISSUE CAUSING CATASTROPHIC BLEEDING. KEEP THE AUTO DARKENING WELDING HELMET AND BUTTON BATTERIES OUT OF SIGHT AND OUT OF REACH OF SMALL CHILDREN. DISPOSE OF OLD OR SPENT BUTTON BATTERIES YOU HAVE REMOVED FROM A PRODUCT IMMEDIATELY. FLAT BATTERIES CAN STILL BE DANGEROUS.
WARNING! BUTTON BATTERIES POSE A SERIOUS HAZARD TO CHILDREN. IF SWALLOWED, IN ADDITION TO PRESENTING A CHOKING HAZARD, A BUTTON BATTERY CAN GET STUCK IN A CHILD’S THROAT AND CAUSE A CHEMICAL REACTION THAT BURNS THROUGH TISSUE CAUSING CATASTROPHIC BLEEDING. KEEP THE AUTO DARKENING WELDING HELMET AND BUTTON BATTERIES OUT OF SIGHT AND OUT OF REACH OF SMALL CHILDREN. DISPOSE OF OLD OR SPENT BUTTON BATTERIES YOU HAVE REMOVED FROM A PRODUCT IMMEDIATELY. FLAT BATTERIES CAN STILL BE DANGEROUS.
If you think a child has swallowed or inserted a button battery, contact the Poisons Information Centre on 13 11 26 (Australia) or 0800 764 766 (NZ) for 24/7 expert advice.
Changing The BatteryThe low battery indicator will light up red when the battery charge gets too low and indicates that the battery should be changed.
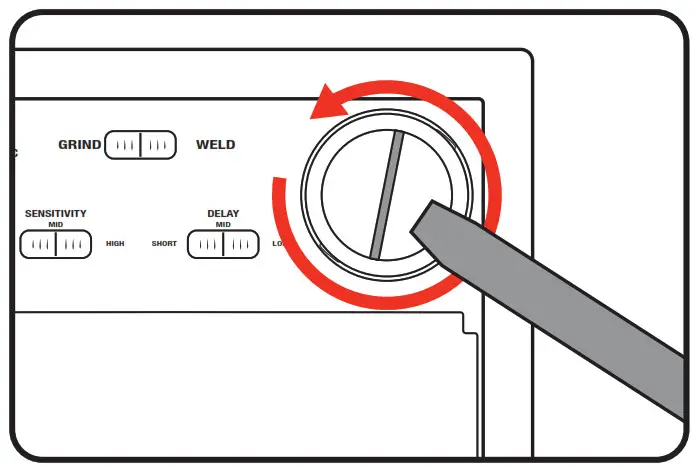
- Place a flat head screwdriver (not supplied) into the battery cap slot and turn it counter-clockwise to unlock it. Remove the cap.
- Replace the battery with a new CR2450 battery.Note: The auto-darkening helmet will not work if the battery is installed in the wrong orientation. The positive side of the battery should be facing out.
- Fit the cap back into place and turn clockwise to secure it.
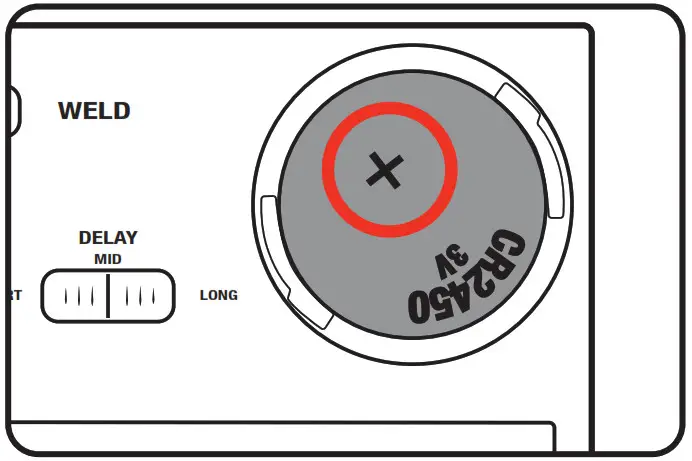 Note: The auto-darkening helmet will not work if the battery is installed in the wrong orientation. The positive side of the battery should be facing out.
![]() WARNING! DO NOT IMMERSE THE LENS ASSEMBLY OR THE HELMET IN WATER.
WARNING! DO NOT IMMERSE THE LENS ASSEMBLY OR THE HELMET IN WATER.![]() WARNING! DO NOT USE SOLVENTS OR ABRASIVE CLEANING DETERGENTS.
WARNING! DO NOT USE SOLVENTS OR ABRASIVE CLEANING DETERGENTS.
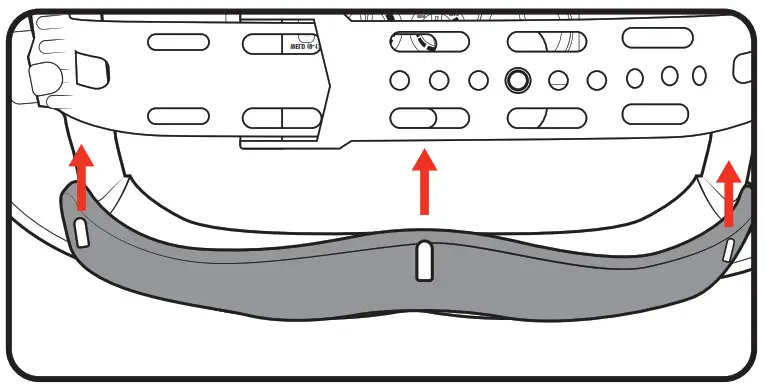
Cleaning The Sweatbands
- Unhook the sweatband from the head strap.
- Use a neutral detergent to clean the helmet shell, outer lens and sweat bands.
- Allow the sweatband to air dry fully before re-attaching it to the head strap.
Cleaning The Lens Assembly
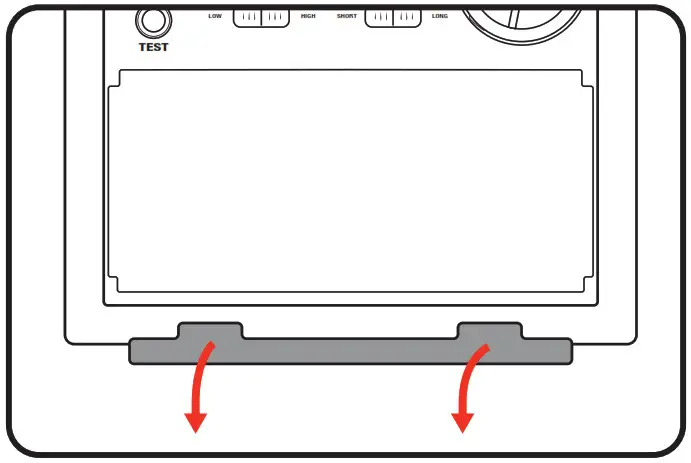
- Push the tab down to un-clip the filter compartment.
- Lift out the filter compartment from the bottom edge.
- Clean the filter lens and sensors regularly by gently wiping with lens paper or a soft cloth.
- The clear lens cover can also be removed for cleaning and/or replacement. Push inwards from the outside of the helmet to remove it.
StorageStore it in a dry location which is not accessible to unauthorised persons.
![]() WARNING! KEEP OUT OF REACH OF CHILDREN. THE BUTTON CELL BATTERY IS HARMFUL IF INGESTED.
WARNING! KEEP OUT OF REACH OF CHILDREN. THE BUTTON CELL BATTERY IS HARMFUL IF INGESTED.
DESCRIPTION OF SYMBOLS
SPARE PARTS
 report this ad
Spare parts can be ordered from the Special Orders Desk at your local Bunnings Warehouse.For further information, or any parts not listed here, visit www.ozito.com.au or contact Ozito Customer Service:Australia 1800 069 486New Zealand 0508 069 486E-mail: [email protected]
CARING FOR THE ENVIRONMENT
Power tools that are no longer usable should not be disposed of with household waste but in an environmentally friendly way. Please recycle where facilities exist. Check with your local council authority for recycling advice.
![]() Recycling packaging reduces the need for landfill and raw materials. Reuse of recycled material decreases pollution in the environment. Please recycle packaging where facilities exist. Check with your local council authority for recycling advice.
Recycling packaging reduces the need for landfill and raw materials. Reuse of recycled material decreases pollution in the environment. Please recycle packaging where facilities exist. Check with your local council authority for recycling advice.
References
[xyz-ips snippet=”download-snippet”]