![]()

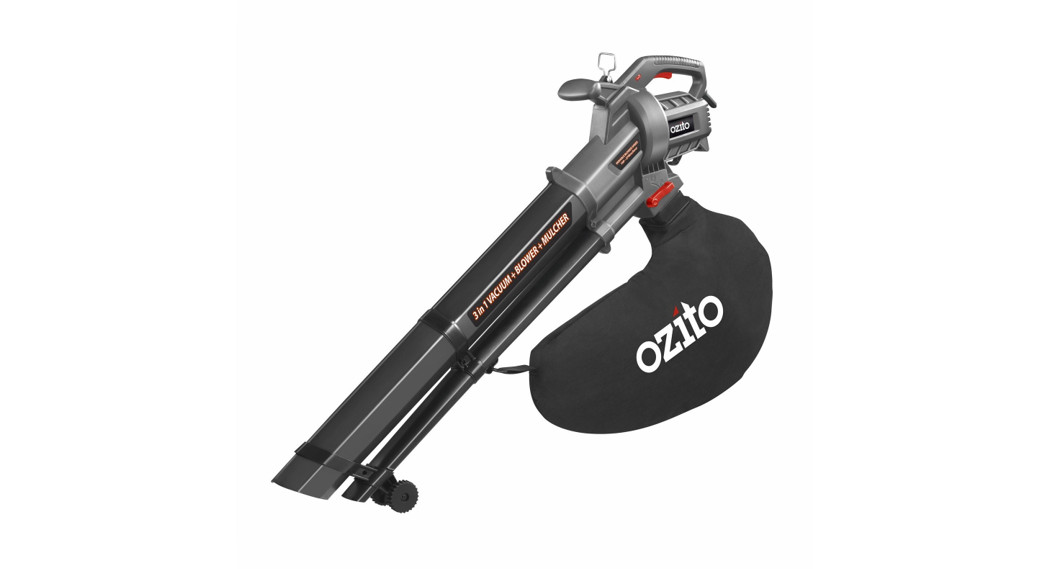
CORDLESS3-IN-1 BLOWERVAC-MULCHERORIGINAL INSTRUCTIONS
SPECIFICATIONS
| Input: | 18V x 2 |
| No Load Speed: | 8,000-14,000/min |
| Air Speed Max.: | 230km/hr |
| Suction Power Max.: | 700m3/hr |
| Air Volume Max.: | 225m3/hr |
| Mulching Ratio: | 10:1 |
| Collection Bag: | 45 litres |
| Noise Rating: | 103dB |
| Tool Weight: | 4.0kg (Blower) 5.3kg (Vacuum-Mulcher) |

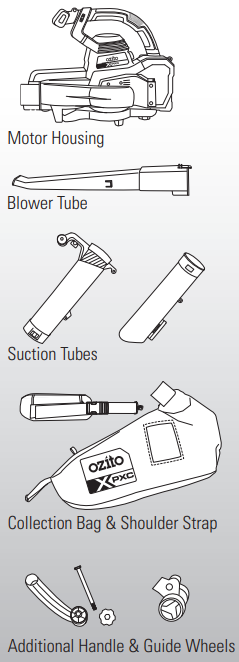
STANDARD EQUIPMENT
PXBVS-0182
WARRANTY
IN ORDER TO MAKE A CLAIM UNDER THIS WARRANTY YOU MUST RETURN THE PRODUCT TO YOUR NEAREST BUNNINGS WAREHOUSE WITH YOUR BUNNINGS REGISTER RECEIPT. PRIOR TO RETURNING YOUR PRODUCT FOR WARRANTY PLEASE TELEPHONE OUR CUSTOMER SERVICE HELPLINE:Australia 1800 069 486New Zealand 0508 069 486TO ENSURE A SPEEDY RESPONSE PLEASE HAVE THE MODEL NUMBER AND DATE OF PURCHASE AVAILABLE. A CUSTOMER SERVICE REPRESENTATIVE WILL TAKE YOUR CALL AND ANSWER ANY QUESTIONS YOU MAY HAVE RELATING TO THE WARRANTY POLICY OR PROCEDURE.WARNINGThe following actions will result in the warranty being void.
- If the tool has been operated on a supply voltage other than that specified on the tool.
- If the tool shows signs of damage or defects caused by or resulting from abuse, accidents, or alterations.
- Failure to perform maintenance as set out within the instruction manual.
- If the tool is disassembled or tampered with in any way
- Professional, industrial or high-frequency use.
The benefits provided under this warranty are in addition to other rights and remedies which are available to you at law.Our goods come with guarantees that cannot be excluded by law. You are entitled to a replacement or refund for a major failure and for compensation for any other reasonably foreseeable loss or damage. You are also entitled to have the goods repaired or replaced if the goods fail to be of acceptable quality and the failure does not amount to a major failure.Generally, you will be responsible for all costs associated with a claim under this warranty, however, where you have suffered any additional direct loss as a result of a defective product you may be able to claim such expenses by contacting our customer service helpline above.5 YEAR REPLACEMENT WARRANTYYour Product is guaranteed for a period of 60 months from the original date of purchase and is intended for DIY (Do It Yourself) use only. If a product is defective it will be replaced in accordance with the terms of this warranty. Lithium-Ion batteries and chargers are covered by a 36-month warranty Warranty exclude consumable parts, for example: blower tubes, collection bag, shoulder strap, and included accessories.
OZITO Australia/New Zealand (Head Office) 25 Fox Drive, Dandenong South, Victoria, Australia 3175.
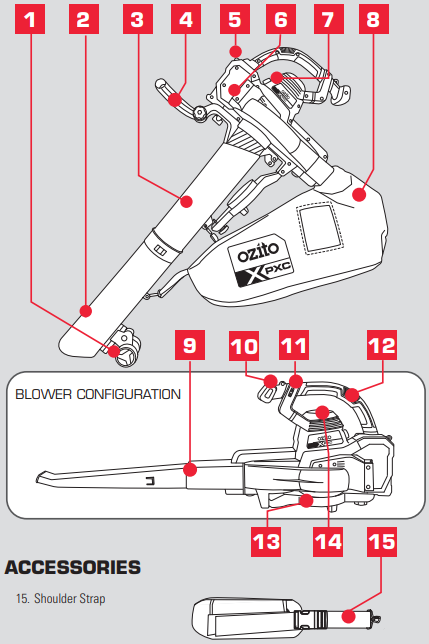
KNOW YOUR PRODUCT
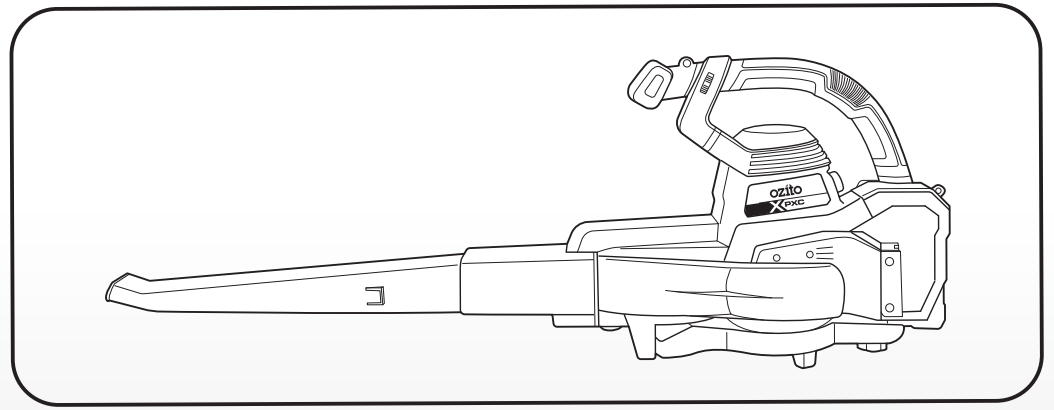
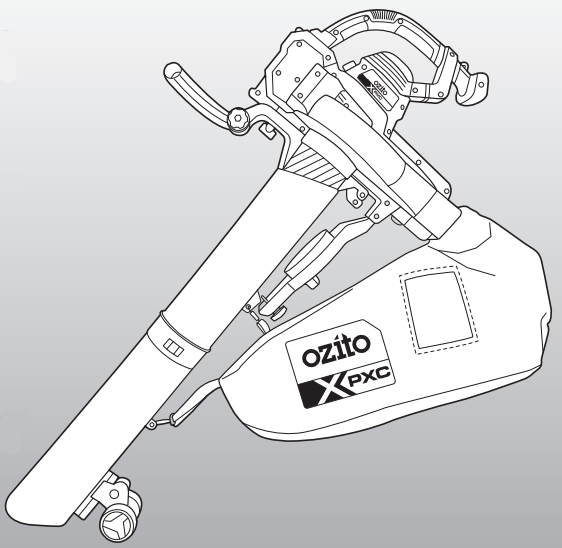
BLOWER VACUUM–MULCHER
- Guide Wheels
- Lower Suction Tube
- Upper Suction Tube
- Secondary Handle
- Shoulder Strap Mount (Vac)
- Battery Seating x 2
- On/Off Switch
- Collection Bag
- Blower Tube
- Shoulder Strap Mount (Blower)
- Variable Speed Dial
- Soft Grip Handle
- Air Intake Cover
- TURBO Boost Button
VACUUM–MULCHER CONFIGURATION
BATTERY & CHARGERThis tool is compatible with all battery and chargers from the Ozito Power X Change Range.ONLINE MANUALScan this QR Code with your mobile device to take you to the online manual.

http://www.ozito.com.au/PXBP-400
ASSEMBLY
TUBE ASSEMBLY
WARNING!: ENSURE THE TOOL IS OFF AND THE BATTERIES REMOVED BEFORE PERFORMING ANY OF THE FOLLOWING OPERATIONS.Assembling the Vacuum Tube
- Fit the guide wheels onto the lower suction tube. Press and hold the release button as you slide the guide wheels onto the mount and let it snap into place.

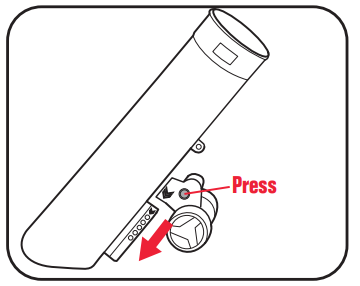
Note: The position can be changed at any time by pressing the release button again and sliding to any of 5 positions.Make sure that it snaps into place correctly.2. Connect lower suction tube with the matching upper suction tube being sure that the bag holding points are on the same side. Push together until they are connected firmly and the guide lugs (one each side) click into the corresponding recess.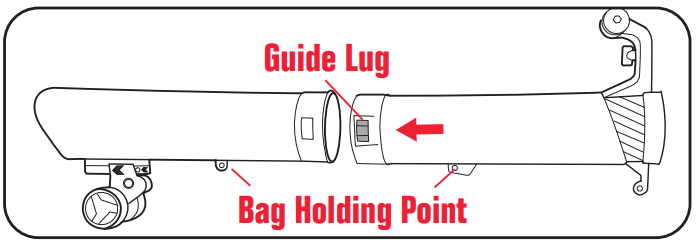
WARNING!: USE THE SUCTION TUBES ONLY IF IT IS FULLY ASSEMBLED.3. Fit the additional handle over the mount on the upper suction tube. Bag Holding Point
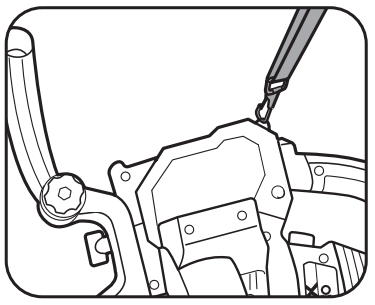
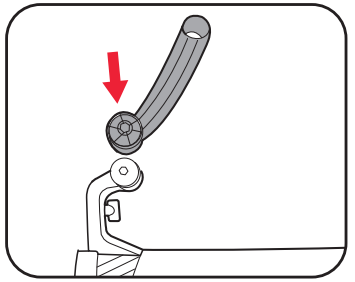 4. Insert the bolt from the side with the hexagon recess.
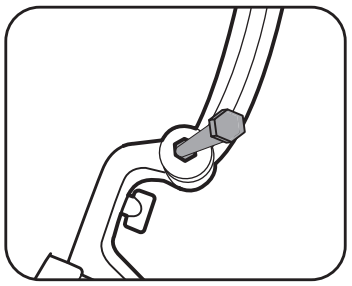
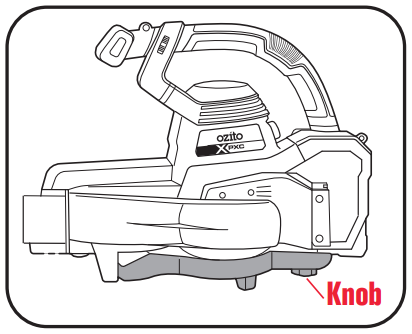
5. Rotate the handle to the desired position, fit and tighten the knob to secure in place.

SETUP & PREPARATION
2. BLOWER MODE SETUPWARNING!: ENSURE THE TOOL IS OFF AND THE BATTERIES REMOVED BEFORE PERFORMING ANY OF THE FOLLOWING OPERATIONS.
- The air intake cover must be in position on the suction opening when using as a blower.Note: Ensure the locking knob is fully tightened otherwise the motor will not start.
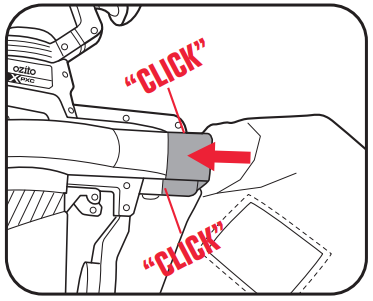
- Pull the sleeve to the top end of the blower tube.
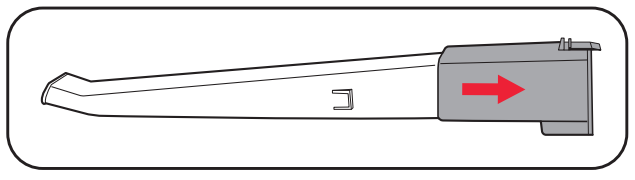
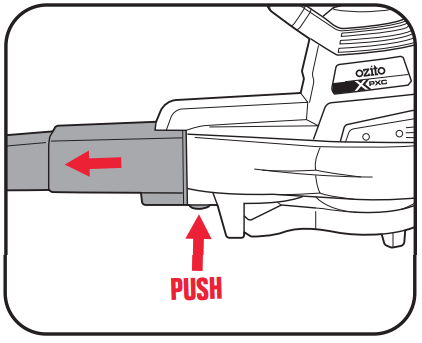
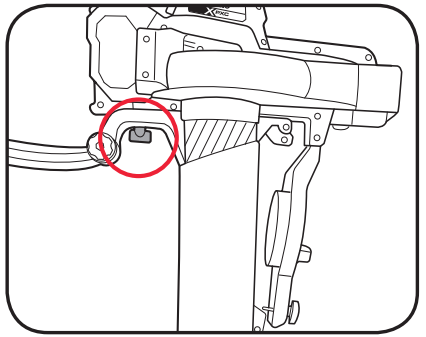
- Push the blower tube onto the motor housing, it will click in place when fully inserted.
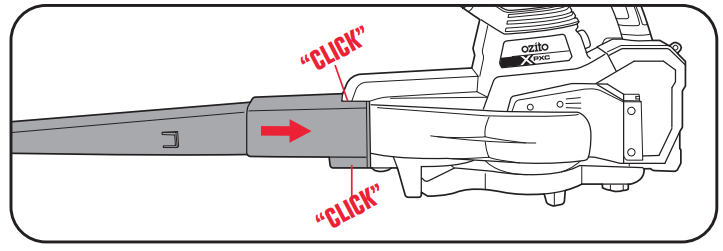 Note: Ensure the blower tube is pushed fully onto the motor housing otherwise the motor will not start.
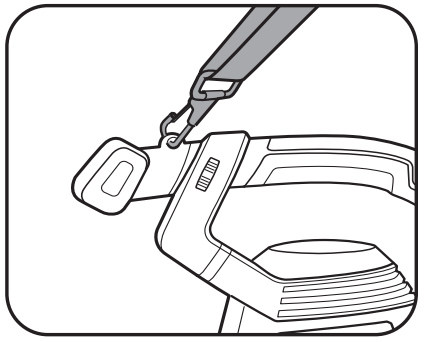
- Attach the shoulder strap to the top of the motor housing.To use the shoulder strap simply slide the strap over your shoulder so that some of the weight of the blower can be taken by your shoulder.
- To remove blower tube, press the release button and pull the blower tube away from the motor housing.
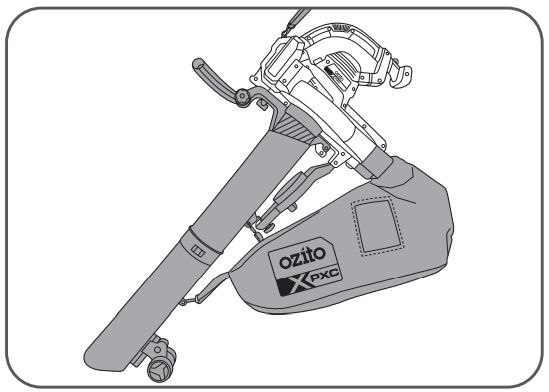
3. VACUUM-MULCHER MODE SETUPWARNING!: ENSURE THE TOOL IS OFF AND THE BATTERIES REMOVED BEFORE PERFORMING ANY OF THE FOLLOWING OPERATIONS.
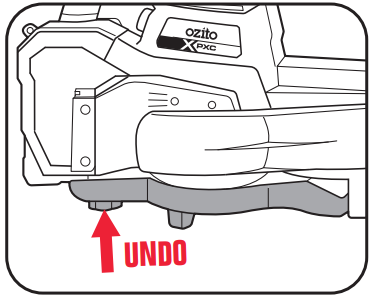
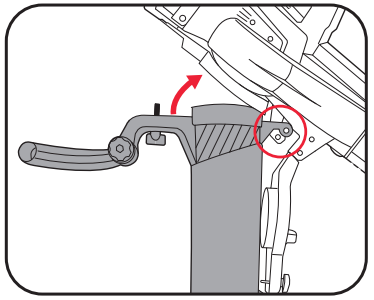
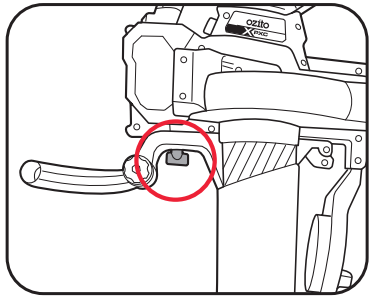
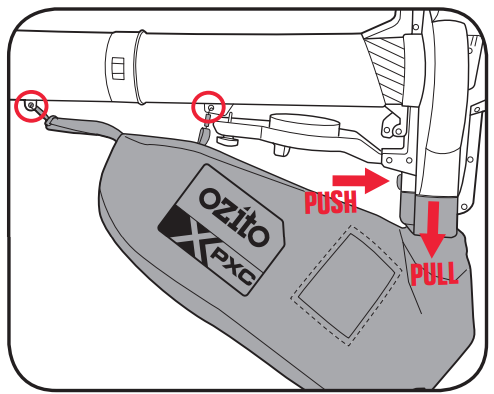
- To install the vacuum tube assembly, undo the air intake cover knob and open the intake cover.
- Attach the vacuum tube assembly and hinge it onto the motor housing as shown.
- Secure the vacuum tube assembly in place by tightening the thumbscrew into the body of the motor housing.Note: Ensure the thumbscrew is fully tightened otherwise the motor will not start.Note: The intake cover is spring-loaded and simply rest under tension against the vacuum tube.
- Attach the collection bag onto the motor housing, it will click in place when fully inserted.Note: Ensure the collection bag is pushed fully onto the motor housing otherwise the motor will not start.
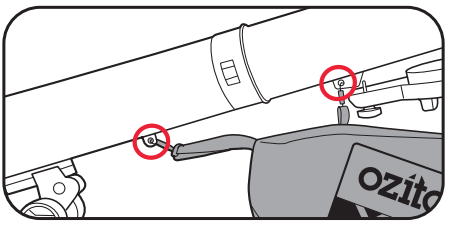
- Hang the two bag fastening hooks onto the vacuum tube bag holding points.
- Attach the shoulder strap to the top of the motor housing.To use the shoulder strap simply slide the strap over your shoulder so that some of the weight of the blower vac can be taken by your shoulder.
To remove the collection bag, first unfasten hooks from the vacuum tube holding points, then press the release button and pull the collection bag away from the motor housing.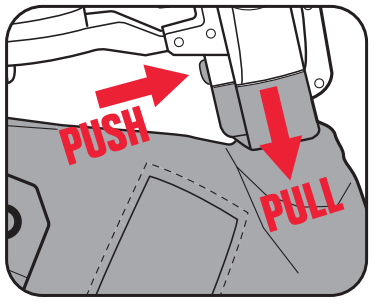
OPERATION
4. PREPARATIONInserting the BatteriesOnly use 2 batteries with the same capacity and charge state with the blower vacuum-mulcher. Slide two batteries of the same capacity and same charge state into the battery mount aligning the ribs so that they click into place.Note: For best performance use only batteries that are charged to the same level. Never combine full and half-full batteries as the equipment‘s operating time depends on the battery with the lower charge level.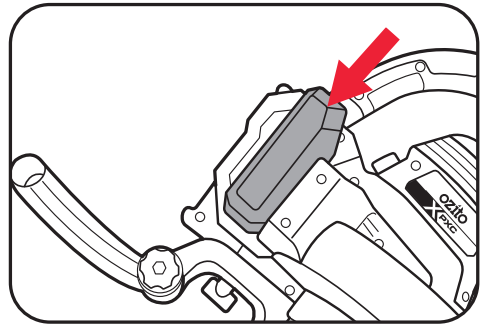
Removing the BatteriesPress and hold the battery release tab to release a battery and slide the battery out.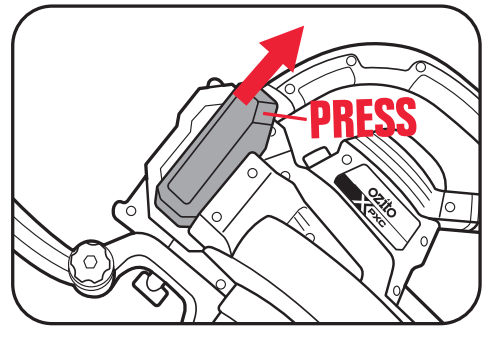 Shoulder StrapSlip the shoulder strap over your shoulder and adjust the length of the strap so that you can handle the equipment comfortably.To quickly unclip, press either side of the buckle.
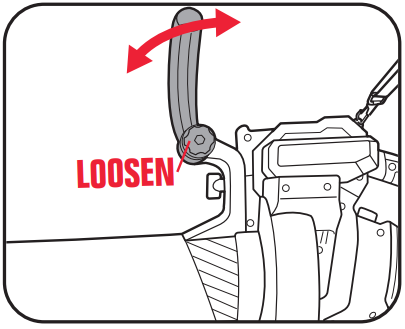
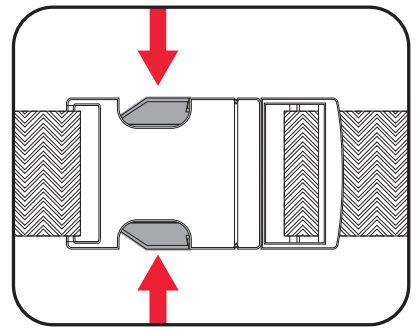 Additional HandleLoosen the knob to rotate handle to the desired position, retighten knob to secure in place.
5. CONTROLS
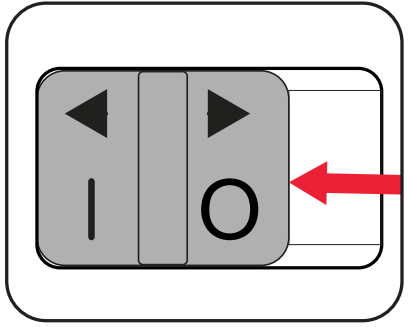
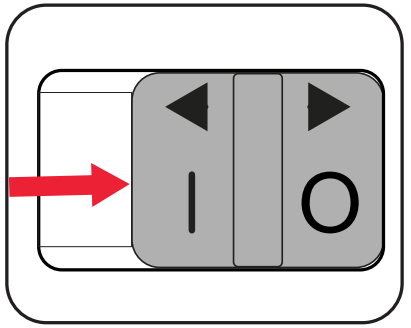
On/Off Switch
- To switch ON, push the on/off switch to the “I” position.
- To switch OFF, push the on/off switch to the “O” position.
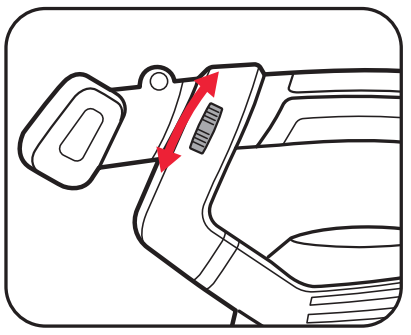
Note: There are a number of safety switches for preventing the unsafe operation of this machine. Ensure the machine is fully assembled in either Blower or Vacuum-Mulcher mode setup, otherwise it will not be possible to switch on the machine.Power Setting AdjustmentThis blower vac is fitted with a variable speed dial and turbo speed button. Varying the speed provides greater control when using the blower vac, the blowing velocity and suction power can be adjusted depending on the application.– Variable Speed DialUse the variable speed dial only with the speed which is actual required and do not let it run at a speed which is faster than necessary. To adjust the air speed rotate the variable speed dial. The dial is numbered “1” to “MAX”. Setting to “1” provides the slowest air speed, setting to “MAX” provides the fastest air speed.
 – Turbo Speed ButtonIf you need higher blowing power or suction power for a short time, you can press the turbo button. Pressing the turbo button increases the speed for a short time and with it the blowing or suction power. To increase air speed for a short period, press the “Turbo” button.Note: Never press the Turbo button to keep the noise level down and extend the battery operating time.

6. USING THE BLOWER VACUUM
BlowingInstall the blower tubes and protective intake cover as explained in the “Blower Mode Setup” section of this manual.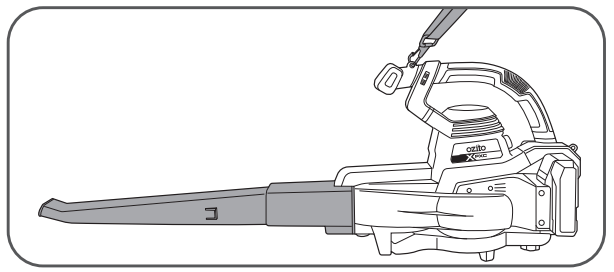 Ideal for blowing leaves, grass clippings and other debris from paths, driveways and deck areas. Also blow material out of places hard to access like under vehicles or play equipment.Hold firmly, move the on/off switch to the “I” position, point the jet of air in front of you and move forward slowly. Move the blower from side to side, with the nozzle several inches above the ground.Be careful where you point the jet of air as it can move heavy material and cause injury or damage to bystanders.
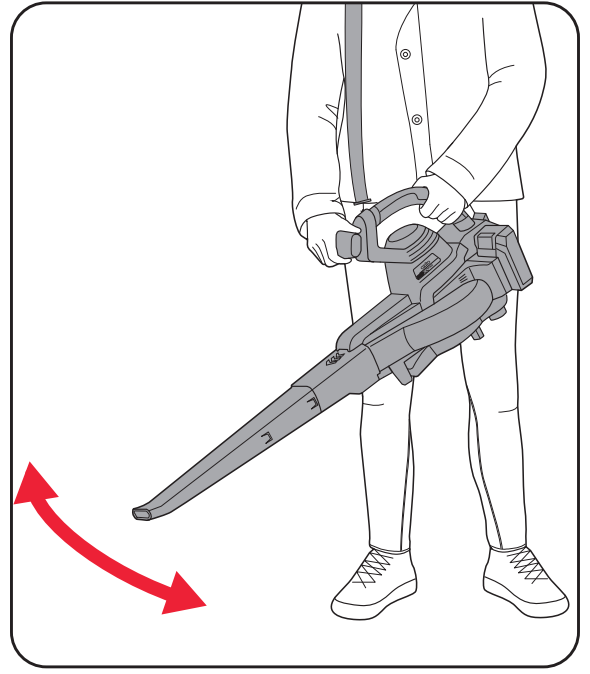 Note: Be aware of other people and animals in the area where you are to be operating the blower.Note: Avoid collisions with hard objects which could damage your machine.WARNING! DO NOT SWITCH THE MACHINE ON IN ENCLOSED OR POORLY VENTILATED SPACES OR IN THE PRESENCE OF FLAMMABLE AND/OR EXPLOSIVE LIQUIDS, GASES AND POWDERS.
Vacuum-MulchingInstall the vacuum tubes and collection bag as explained in the “Vacuum-Mulcher Mode Setup” section of this manual.
 Ideal for collecting dry leaves, grass clippings and other garden debris while shredding and reducing the volume collected for composting if desired.Hold firmly, move the on/off switch to the “I” position, point the vacuum tubes in front of you and move forward slowly resting the guide wheels on the ground. The guide rollers at the bottom end of the suction tube will help you to manoeuvre the suction tube on the ground.WARNING! DO NOT ATTEMPT TO VACUUM STONES, GLASS OR OTHER SOLID OBJECTS, DOING SO COULD CAUSE MAJOR DAMAGE TO THE IMPELLOR AND COLLECTION BAG.
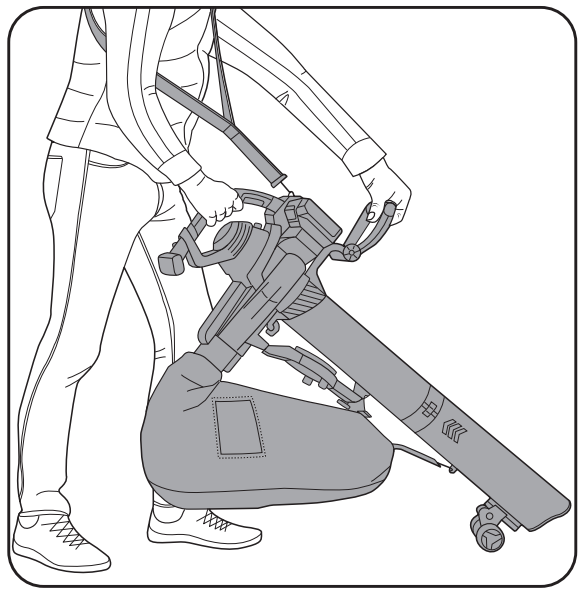
- Only use the blower vac in vacuum mode if the collection bag is undamaged and properly fitted.
- Do not pick up too many leaves in one go as this could clog the tube and the mulcher.
- To clear any blockages, follow the steps described in the section “Clearing Debris”.
- Do not pick up hard or damp materials.
6. USING THE BLOWER VACUUM (cont.)
Emptying The Collection Bag For best results when vacuuming it is recommended to empty the collection bag after it becomes half full. As the bag fills beyond half way, vacuuming performance will decrease. Always empty the collection bag after you have finished your job. Organic waste should be composted.WARNING! MAKE SURE THAT THE TOOL IS SWITCHED OFF AND BOTH BATTERIES ARE REMOVED. WAIT UNTIL THE IMPELLER HAS STOPPED BEFORE ATTEMPTING TO EMPTY OR REMOVE THE COLLECTION BAG.
- Open the zipper on the bag and empty in desired location.
- Be sure to close the zipper prior to operating the tool.

MAINTENANCE
 MAINTENANCE
WARNING!: BEFORE CLEANING YOUR BLOWER VAC OR CARRYING OUT ANY MAINTENANCE PROCEDURE, MAKE SURE THE BATTERIES ARE REMOVED TO PREVENT ACCIDENTAL STARTING.Clearing DebrisTo access the impeller, remove the vacuum tube and collection bag. Wear protective gloves
- Unfasten hooks from the bag holding points and remove the collection bag from the blower vac outlet
- Unscrew thumb screw on the body of the motor housing and remove tube assembly from motor housing.
- Do not reach in, use a suitable tool (like a long stick) to remove any debris from the impeller and within the blower vac outlet.
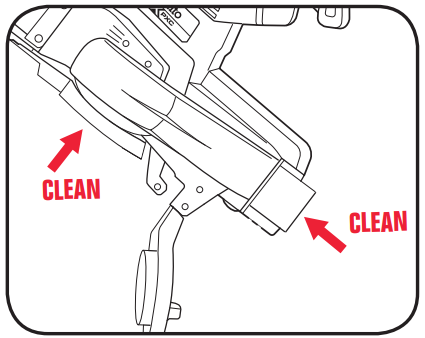
Cleaning and storing• There are no user-serviceable parts in the blower vac; if a fault is suspected, return the blower vac to a power tool repairer.• Keep air intake clean and air vents free from debris to avoid overheating the motor.• Do not use cleaning agents to clean the plastic parts of the blower vac. A mild detergent on a damp cloth is recommended. Water must never come into contact with the blower vac.• After shaking out the catch bag, turn it inside out and thoroughly clean it in order to prevent mold and unpleasant odours from forming.• Rub a bar of dry soap across the zipper teeth if the zipper becomes difficult to pull.• If the blower vac vibrates abnormally, stop motor immediately. Abnormal vibration usually indicates a mechanical problem continued operation could lead to injury or damage.• No lubrication is necessary as the motor is equipped with lifetime-lubrication bearings.• Keep the ventilation vents of the blower vac clean at all times, if possible, prevent foreign matter from entering the vents.• After each use, blow air through the blower vac housing to ensure it is free from all dust particles which may have built up. The build-up of dust particles may cause the blower vac to overheat and fail.• If the enclosure of the blower vac requires cleaning do not use solvents but a moist soft cloth only. Never let any liquid get inside the blower vac; never immerse any part of the blower vac into liquid.• When not in use, the blower vac should be stored in a dry, frost-free location not within the reach of children.Note: Ozito Industries will not be responsible for any damage or injuries caused by the repair of the blower vac by an unauthorized person or by mishandling of the blower vac. This tool is designed for DIY use – use in commercial or industrial environments will void the warranty.
TROUBLESHOOTING
| Problem | Cause | Remedy |
| Poor suction | Collection bag full | Empty the collection bag. |
| Clogged suction tubes | Remove any debris or built-up within the upper and lower tubes. | |
| Clogged collection bag connector | Remove the collection bag, remove the build-up of debris from connector & outlet in the housing. | |
| Low-speed setting | Turn up the variable speed dial. | |
| Clogged impeller | Remove any debris or built up in the impeller | |
| Blower is not starting | Blower air tube not secure in place. | A microswitch prevents theblower from operating if the blower air tube is not secured to the motor housing, it will click in place when fully inserted. |
| Battery low in charge | Charge battery | |
| Batteries not inserted correctly. | Insert both battery packs correctly. | |
| Vacuum doesn’t start | Loosen thumbscrew or collection bag not fully connected. | Tighten the thumbscrew and ensure the collection bag is pushed fully onto the housing. |
| The collection bag is not pushed fully onto the motor housing | Push the collection bag fully onto the motor housing |
Battery protection systemThe tool is equipped with a battery protection system, which helps to ensure a long service life.The output power automatically cuts off during operation when the tool and/or battery are placed under the following situations:
- When the tool is overloaded:If this occurs, turn off and remove causes of overload, then turn on again to restart.
- When the remaining battery capacity becomes l
Recharge the battery pack. ow:Note: The battery protection system does not in any way damage the tool.Note: The indicated capacity may be lower than the actual level during use or immediately after using the tool.
DESCRIPTION OF SYMBOLS

SPARE PARTS
Spare parts can be ordered from the Special Orders Desk at your local Bunnings Warehouse.For further information, or any parts not listed here,visit www.ozito.com.au or contact OzitoCustomer Service:Australia 1800 069 486New Zealand 0508 069 486E-mail: [email protected]
CARING FOR THE ENVIRONMENT
 Power tools that are no longer usable should not be disposed of with household waste but in an environmentally friendly way. Please recycle where facilities exist. Check with your local council authority for recycling advice.
 Recycling packaging reduces the need for landfills and raw materials. The reuse of recycled material decreases pollution in the environment. Please recycle packaging where facilities exist. Check with your local council authority for recycling advice.
ELECTRICAL SAFETY
WARNING! When using mains-powered tools, basic safety precautions, including the following, should always be followed to reduce risk of fire, electric shock, personal injury and material damage.Read the whole manual carefully and make sure you know how to switch the tool off in an emergency, before operating the tool. Save these instructions and other documents supplied with this tool for future reference.Before you connect the charger to the mains supply make sure that the data on the rating plate are identical to the mains data.If the supply cord is damaged, it must be replaced by an electrician or a power tool repairer in order to avoid a hazard.The power supply for this products charger should be protected by a residual current device (rated at 30mA or less). A residual current device reduces the risk of electric shock.
GENERAL POWER TOOL SAFETY WARNINGS
WARNING! Read all safety warnings and all instructions. Failure to follow the warnings and instructions may result in electric shock, fire and/or serious injury.Save all warnings and instructions for future reference. The term “power tool” in the warnings refers to your mains-operated (corded) power tool or battery-operated (cordless) power tool.
- Work area safetya. Keep work area clean and well lit. Cluttered or dark areas invite accidents.b. Do not operate power tools in explosive atmospheres, such as in the presence of flammable liquids, gases or dust. Power tools create sparks which may ignite the dust or fumes.c. Keep children and bystanders away while operating a power tool. Distractions can cause you to lose control.
- Electrical safetya. Power tool plugs must match the outlet. Never modify the plug in any way. Do not use any adapter plugs with earthed (grounded) power tools. Unmodified plugs and matching outlets will reduce risk of electric shock.b. Avoid body contact with earthed or grounded surfaces, such as pipes, radiators, ranges and refrigerators. There is an increased risk of electric shock if your body is earthed or grounded.c. Do not expose power tools to rain or wet conditions. Water entering a power tool will increase the risk of electric shock.d. Do not abuse the cord. Never use the cord for carrying, pulling or unplugging the power tool. Keep cord away from heat, oil, sharp edges or moving parts. Damaged or entangled cords increase the risk of electric shock.e. When operating a power tool outdoors, use an extension cord suitable for outdoor use. Use of a cord suitable for outdoor use reduces the risk of electric shock.f. If operating a power tool in a damp location is unavoidable, use a residual current device (RCD) protected supply. Use of an RCD reduces the risk of electric shock.
- Personal safetya. Stay alert, watch what you are doing and use common sense when operating a power tool. Do not use a power tool while you are tired or under the influence of drugs, alcohol or medication. A moment of inattention while operating power tools may result in serious personal injury.b. Use personal protective equipment. Always wear eye protection. Protective equipment such as dust mask, non-skid safety shoes, hard hat, or hearing protection used for appropriate conditions will reduce personal injuries.c. Prevent unintentional starting. Ensure the switch is in the off-position before connecting to power source and/or battery pack, picking up or carrying the tool.Carrying power tools with your finger on the switch or energising power tools that have the switch on invites accidents.d. Remove any adjusting key or wrench before turning the power tool on. A wrench or a key left attached to a rotating part of the power tool may result in personal injury.e. Do not overreach. Keep proper footing and balance at all times. This enables better control of the power tool in unexpected situations.f. Dress properly. Do not wear loose clothing or jewellery. Keep your hair, clothing andgloves away from moving parts. Loose clothes, jewellery or long hair can be caught in moving parts.g. If devices are provided for the connection of dust extraction and collection facilities, ensure these are connected and properly used. Use of dust collection can reduce dust-related hazards.4. Power tool use and carea. Do not force the power tool. Use the correct power tool for your application. The correct power tool will do the job better and safer at the rate for which it was designed.b. Do not use the power tool if the switch does not turn it on and off. Any power tool that cannot be controlled with the switch is dangerous and must be repaired.c. Disconnect the plug from the power source and/or the battery pack from the power tool before making any adjustments, changing accessories, or storing power tools. Such preventive safety measures reduce the risk of starting the power tool accidentally.d. Store idle power tools out of the reach of children and do not allow persons unfamiliar with the power tool or these instructions to operate the power tool. Power tools are dangerous in the hands of untrained users.e. Maintain power tools. Check for misalignment or binding of moving parts, breakage of parts and any other condition that may affect the power tool’s operation. If damaged, have the power tool repaired before use. Many accidents are caused by poorly maintained power tools.f. Keep cutting tools sharp and clean. Properly maintained cutting tools with sharp cutting edges are less likely to bind and are easier to control.g. Use the power tool, accessories and tool bits etc. in accordance with these instructions, taking into account the working conditions and the work to be performed. Use of the power tool for operations different from those intended could result in a hazardous situation.5 Battery tool use and carea. Recharge only with the charger specified by the manufacturer. A charger that is suitable for one type of battery pack may create a risk of fire when used with another battery pack.b. Use power tools only with specifically designated battery packs. Use of any other battery packs may create a risk of injury and fire.c. When battery pack is not in use, keep it away from other metal objects, like paper clips, coins, keys, nails, screws or other small metal objects, that can make a connection from one terminal to another. Shorting the battery terminals together may cause burns or a fire.d. Under abusive conditions, liquid may be ejected from the battery; avoid contact. If contact accidentally occurs, flush with water. If liquid contacts eyes, additionally seek medical help. Liquid ejected from the battery may cause irritation or burns.e. Do not use a battery pack or tool that is damaged or modified. Damaged or modified batteries may exhibit unpredictable behavior resulting in fire, explosion or risk of injury.f. Do not expose a battery pack or tool to fire or excessive temperature. Exposure to fire or temperature above 130 °C may cause an explosion.g. Follow all charging instructions and do not charge the battery pack or tool outside the temperature range specified in the instructions. Charging improperly or at temperatures outside the specified range may damage the battery and increase the risk of fire.6 Servicea. Have your power tool serviced by a qualified repair person using only identical replacement parts. This will ensure that the safety of the power tool is maintained.b. Never service damaged battery packs. Service of battery packs should only be performed by the manufacturer or authorized service provider.
BLOWER VAC SAFETY WARNINGS
Always wear adequate protective clothing when operating the tool to avoid injuries to face, eyes, hand, feet, head or hearing.Use safety glasses or a face shield, high boots or sturdy shoes, long trousers, work gloves, a hard hat and ear defenders.Do not start the tool when it is upside down or when it is not in the operating position.Switch the motor off and remove the plug when the tool is not being used, left unattended, being cleaned, being moved from one place to another or when the extension cord is entangled or damaged.Do not operate the tool near people, especially children or pets. Turn it off if they get too close. Maintain a safe distance of at least 5m from other people when using the tool.Never direct the blower direction nozzle towards bystanders or pets. Never blow debris in the direction of bystanders or pets.The operator is responsible for accidents or hazards occurring to other people or their property.Do not handle the plug or the tool with wet hands and do not use the tool in the rain.Keep all the air intakes and the blower tube free of dust, lint, hair, and other material that may cause a reduction in airflow.Keep a balanced and stable stance while using the tool. Do not switch on the tool in enclosed or poorly ventilated spaces or in the presence of inflammable and/or explosive substances such as liquids, gasses, and powders.Do not get distracted and always concentrate on what you are doing. Use common sense. Never operate the tool when you are tired, sick or under the influence of alcohol or other drugs.Do not operate this appliance with long loose hair or loose-fitting jewelry. Tie long loose hair back and remove loose-fitting jewelry.Only operate the tool during broad daylight or with adequate artificial light.This appliance is not intended for use by young children or infirm persons unless they have been adequately supervised by a responsible person to ensure that they can use the appliance safely.Young children should be supervised to ensure that they do not play with the appliance.Only use the tool according to the instructions given in this manual.Check regularly that the screws are tight.Do not allow the blower vac to pick up any burning or smoldering materials like ashes, cigarette butts etc.Do not attempt to pick up breakable objects like glass, plastics, china etc.Do not use in vacuum operation without the collection bag fitted.Do not use in the rain or leave outdoors while raining.
1) Training
- Read the instructions carefully. Be familiar with the controls and the proper use of the appliance.
- Never allow children to use the appliance.
- Never allow people unfamiliar with these instructions to use the appliance. Local regulations may restrict the age of the operator.
- Never operate the appliance while people, especially children, or pets are nearby.
- The operator or user is responsible for accidents or hazards occurring to other people or their property.2) Preparation
- While operating the appliance, always wear substantial footwear and long trousers.
- Do not wear loose clothing or jewellery that can be drawn into the air inlet. Keep long hair away from the air inlets.
- Wear protective goggles while operating.
- To prevent dust irritation the wearing of a face mask is recommended.
- Never operate the appliance with defective guards or shields, or without safety devices, for example debris collector in place.3) Operation
- Disconnect the appliance from the battery– whenever you leave the machine;– before clearing a blockage;– before checking, cleaning or working on the appliance;– if the appliance starts to vibrate abnormally.
- Operate the appliance only in daylight or in good artificial light.
- Do not overreach and keep your balance at all times.
- Always be sure of your footing on slopes.
- Walk, never run.
- Keep all cooling air inlets clear of debris.
- Never blow debris in the direction of bystanders.4) Maintenance and storage
- Keep all nuts, bolts and screws tight to be sure the appliance is in safe working condition.
- Check the debris collector frequently for wear or deterioration.
- Replace worn or damaged parts.
- Use only genuine replacement parts and accessories.
- Store the appliance only in a dry place.
![]()
4.0Ah BATTERYINSTRUCTION MANUAL
SPECIFICATIONSInput: 18VBattery Capacity: 4.0Ah Li-ionPower Consumption: 72WhWeight: 0.65kg
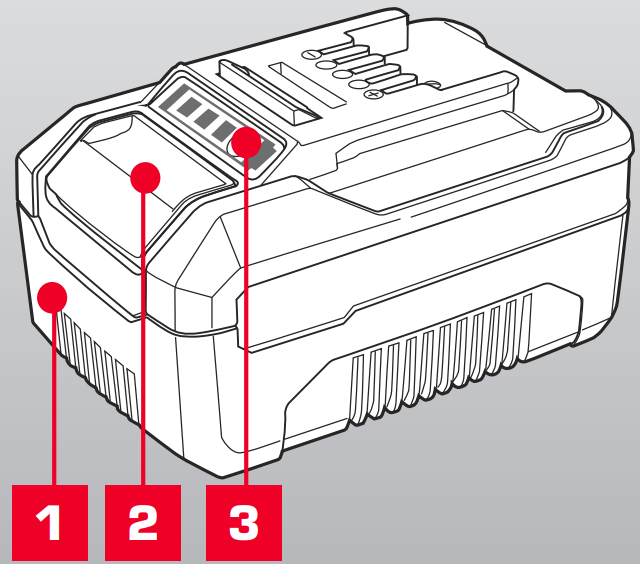
1. Battery2. Battery Release Button3. Charge Indicator Button
![]()
PXBP-400
DESCRIPTION OF SYMBOLS
| Volts | Hertz | ||
| Alternating Current | Watts | ||
| Direct Current | Amp Hour | ||
| Milliamperes |  |
Warning | |
 |
Lithium Ion Battery |  |
Do not store or use battery in temperatures exceeding 50°C |
 |
Recycle Battery |  |
Do not put in the rubbish |
 |
Do not incinerate |  |
Do not get battery wet |
| Regulatory Compliance Mark (RCM) |  |
Do not store battery when the charge is low; store between 40-60%. |
CARING FOR THE ENVIRONMENT
![]() Power tools that are no longer usable should not be disposed of with household waste but in an environmentally friendly way. Please recycle where facilities exist. Check with your local council authority for recycling advice.
Power tools that are no longer usable should not be disposed of with household waste but in an environmentally friendly way. Please recycle where facilities exist. Check with your local council authority for recycling advice.
Recycling packaging reduces the need for landfills and raw materials. Reuse of recycled material decreases pollution in the environment. Please recycle packaging where facilities exist. Check with your local council authority for recycling advice.
BATTERY & CHARGER SAFETY WARNINGS
Before using the charger or battery read all instructions and cautionary markings on the charger, battery pack and the product using the battery pack. Do not lose these safety instructions.
Battery Warnings
- The battery pack is not fully charged out of the carton. First read the safety instructions and then follow the charging notes and procedures.
- For optimum battery performance avoid low discharge cycles. Charge the battery pack frequently.
- Use and store the battery pack in dry conditions with low humidity between 0-50°C, ideally at 15°C. Avoid exposing battery pack and charger to direct sunlight.
- Do not keep battery pack in places where temperatures are liable to reach over 50°C, such as in a car, metal shed or similar that is in direct sunlight.
- Do not ignite the battery pack or expose it to fire. There is a risk of explosion!
- Do not exhaustively discharge batteries. Exhaustive discharge will damage the battery cells. The most common cause of exhaustive discharge is long-term storage and continued use of low-charge batteries. Always store the battery with some charge. Charge the batteries every 2-3 months to restore charge. Stop working as soon as the performance of the battery falls noticeably or the electronic protection system triggers.
- Protect batteries and the tool from overloads. Overloads will quickly result in overheating and cell damage inside the battery housing without this overheating being apparent externally.
- Avoid damage and shocks. Do not use batteries which have been dropped from a height of more than one meter or strong external impact, even if the housing of the battery pack appears to be ndamaged. The battery cells inside the battery may have suffered serious damage.
- If the battery pack suffers overloading and overheating, the integrated protective cut-off will switch off the equipment. Do not press the ON/OFF switch on the tool if the protective cut-off has actuated. This may damage the battery pack. Allow the battery to cool to room temperature before use.
- Use only original battery packs. The use of other batteries may result in injuries, explosion and a fire risk.
- Protect your rechargeable battery against moisture, rain and high humidity. Moisture, rain and high humidity can cause dangerous cell damage. Never charge or use batteries which have been exposed to moisture, rain or high humidity.
- Never attempt to open the battery pack for any reason. If the plastic housing of the battery pack is damaged, do not use the battery.
- When battery pack is not in use, keep it away from other metal objects, like paper clips, coins, keys, nails, screws or other small metal objects, that can make a connection from one terminal to nother. Shorting the battery terminals together may cause burns or a fire.
- Under abusive conditions, liquid may be ejected from the battery; avoid contact. If accidental contact occurs, flush with water and seek medical help immediately. Liquid ejected from the battery may cause irritation or burns.
- Do not use a battery pack or tool that is damaged or modified. Damaged or modified batteries may exhibit unpredict- able behaviour resulting in fire, explosion or risk of injury.
- Do not expose a battery pack or tool to fire or excessive temperature. Exposure to fire or temperature above 130°C may cause explosion.
- Never service damaged battery packs. Service of battery packs should only be performed by the manufacturer.
- 18. Do not disassemble Battery. This may result in a risk of electric shock, electrocution or fire.Charger Warnings
- Please check the data marked on the rating plate of the battery charger. Ensure to only connect the battery charger to a power supply with the voltage marked on the rating plate.
- Protect the battery charger and its cable from damage and sharp edges. Have damaged cables repaired by an authorised service agent before use.
- Keep the battery charger, batteries and the cordless tool out of children’s reach.
- Do not use damaged battery chargers.
- Do not use the supplied battery charger to charge other cordless tools. Only charge Ozito Power X Change rechargeable batteries with an Ozito Power X Change Charger.
- The battery pack may become warm during use. Allow the battery pack to cool to room temperature before commencing with the charging.
- Do not over-charge batteries. Do not exceed the maximum charging times. These charging times only apply to discharged batteries. Frequent insertion of a charged or partly charged battery pack will result in over-charging and cell damage. Do not leave fully charged batteries in the charger.
- Charge the battery pack in dry conditions with low humidity between 10-40°C. Avoid exposing battery pack and charger to direct sunlight.
- Do not use batteries that have suffered deformation during the charging process or shows any other signs of abnormalities including, excessive curvature of the housing, gassing, hissing or racking.
- Never fully discharge the battery pack. A complete discharge of the battery pack will lead to premature ageing of the battery cells.
- Never charge the batteries unsupervised.
- Do not cover or place any object on top of the charger, place the charger away from heat sources.
- To reduce risk of damage to the electric plug and cord, pull by the plug rather than the cord when disconnecting the charger.
- Make sure the cord is located so that it will not be stepped on, tripped over, or otherwise subjected to damage or stress.
- An extension cord should not be used unless necessary. Use of an improper extension cord could result in the risk of fire, electric shock or electrocution.
- Do not disassemble charger. This may result in a risk of electric shock, electrocution or fire.
- To reduce risk of electric shock, unplug the charger from the outlet before attempting any cleaning. Removing the battery pack will not reduce this risk.
- Do not use the cordless tool or the battery charger near vapors and inflammable liquids.
ELECTRICAL SAFETY
![]() WARNING! When using mains-powered tools, basic safety precautions, including the following, should always be followed to reduce risk of fire, electric shock, personal injury and material damage. Read the whole manual carefully and make sure you know how to switch the tool off in an emergency, before operating the tool. Save these instructions and other documents supplied with this tool for future reference.Note: The supply of 230V and 240V on Ozito tools are interchangeable for Australia and New Zealand. If the supply cord is damaged, it must be replaced by the manufacturer, its service agent or similarly qualified persons in order to avoid hazard.Note: Double insulation does not take the place of normal safety precautions when operating this tool. The insulation system is for added protection against injury resulting from a possible electrical insulation failure within the tool.Using an Extension LeadAlways use an approved extension lead suitable for the power input of this tool. Before use, inspect the extension lead for signs of damage, wear and ageing. Replace the extension lead if damaged or defective.When using an extension lead on a reel, always unwind the lead completely. Use of an extension lead not suitable for the power input of the tool or which is damaged or defective may result in a risk of fire and electric shock.To reduce the risk of electric shock, we recommend the use of a residual current device (rated 30mA or less).This appliance is not intended for use by persons (including children) with reduced physical, sensory or mental capabilities, or lack of experience and knowledge unless they have been given supervision or instruction concerning use of the appliance by a person responsible for their safety.Children should be supervised to ensure that they do not play with the appliance.
WARNING! When using mains-powered tools, basic safety precautions, including the following, should always be followed to reduce risk of fire, electric shock, personal injury and material damage. Read the whole manual carefully and make sure you know how to switch the tool off in an emergency, before operating the tool. Save these instructions and other documents supplied with this tool for future reference.Note: The supply of 230V and 240V on Ozito tools are interchangeable for Australia and New Zealand. If the supply cord is damaged, it must be replaced by the manufacturer, its service agent or similarly qualified persons in order to avoid hazard.Note: Double insulation does not take the place of normal safety precautions when operating this tool. The insulation system is for added protection against injury resulting from a possible electrical insulation failure within the tool.Using an Extension LeadAlways use an approved extension lead suitable for the power input of this tool. Before use, inspect the extension lead for signs of damage, wear and ageing. Replace the extension lead if damaged or defective.When using an extension lead on a reel, always unwind the lead completely. Use of an extension lead not suitable for the power input of the tool or which is damaged or defective may result in a risk of fire and electric shock.To reduce the risk of electric shock, we recommend the use of a residual current device (rated 30mA or less).This appliance is not intended for use by persons (including children) with reduced physical, sensory or mental capabilities, or lack of experience and knowledge unless they have been given supervision or instruction concerning use of the appliance by a person responsible for their safety.Children should be supervised to ensure that they do not play with the appliance.
WARRANTY
IN ORDER TO MAKE A CLAIM UNDER THIS WARRANTY YOU MUST RETURN THE PRODUCT TO YOUR NEAREST BUNNINGS WAREHOUSE WITH YOUR BUNNINGS REGISTER RECEIPT. PRIOR TO RETURNING YOUR PRODUCT FOR WARRANTY PLEASE TELEPHONE OUR CUSTOMER SERVICE HELPLINE:Australia 1800 069 486New Zealand 0508 069 486TO ENSURE A SPEEDY RESPONSE PLEASE HAVE THE MODEL NUMBER AND DATE OF PURCHASE AVAILABLE. A CUSTOMER SERVICE REPRESENTATIVE WILL TAKE YOUR CALL AND ANSWER ANY QUESTIONS YOU MAY HAVE RELATING TO THE WARRANTY POLICY OR PROCEDURE.The benefits provided under this warranty are in addition to other rights and remedies which are available to you at law. Our goods come with guarantees that cannot be excluded at law. You are entitled to a replacement or refund for a major failure and for compensation for any other reasonably foreseeable loss or damage. You are also entitled to have the goods repaired or replaced if the goods fail to be of acceptable quality and the failure does not amount to a major failure. Generally you will be responsible for all costs associated with a claim under this warranty, however, where you have suffered any additional direct loss as a result of a defective product you may be able to claim such expenses by contacting our customer service helpline above.
36 MONTH REPLACEMENT WARRANTYYour product is guaranteed for a period of 36 months from the original date of purchase and is intended for DIY (Do It Yourself) use only. If a product is defective it will be replaced in accordance with the terms of this warranty. Warranty excludes consumable parts.WARNINGThe following actions will result in the warranty being void.
- If the tool has been operated on a supply voltage other than that specified on the tool.
- If the tool shows signs of damage or defects caused by or resulting from abuse, accidents or alterations.
- Failure to perform maintenance as set out within the instruction manual.
- If the tool is disassembled or tampered with in any way.
ONLINE MANUALScan this QR Code with your mobile device to take you to the online manual.
http://www.ozito.com.au/PXBP-400OZITO Australia/New Zealand (Head Office)25 Fox Drive, Dandenong South, Victoria, Australia 3175.
COMPACT FAST CHARGER INSTRUCTION MANUAL
SPECIFICATIONSInput:200-250V ~AC 50-60Hz, 72WOutput:20V DC, 3ABattery Charge Time: 30Min – PXBP-150 (18V 1.5Ah)40Min – PXBP-200 (18V 2.0Ah)50Min – PXBP-250 (18V 2.5Ah)60Min – PXBP-300 (18V 3.0Ah)75Min – PXBP-400 (18V 4.0Ah)120Min – PXBP-520 (18V 5.2Ah)100Min – PXUBP-520 (18V 5.2Ah Ultra)
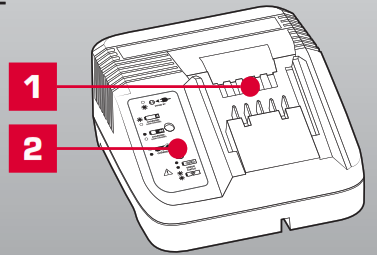
- Charging Unit
- Charging Unit LED

PXCG-030C
DESCRIPTION OF SYMBOLS
|
V |
Volts |
Hz |
Hertz |
|
A |
Amperes |
Ah |
Amp Hour |
 |
Read Instruction Manual |  |
Double Insulated |
| Indoor Use Only | Do not dispose of in rubbish | ||
 |
Do not charge battery in
temperatures exceeding 40°C |
 |
Regulatory Compliance
Mark (RCM) |
 |
3.15A Slow Blow Fuse | Warning |
CARING FOR THE ENVIRONMENT
![]() Power tools that are no longer usable should not be disposed of with household waste but in an environmentally friendly way. Please recycle where facilities exist. Check with your local council authority for recycling advice.
Power tools that are no longer usable should not be disposed of with household waste but in an environmentally friendly way. Please recycle where facilities exist. Check with your local council authority for recycling advice.
Recycling packaging reduces the need for landfills and raw materials. The reuse of recycled material decreases pollution in the environment. Please recycle packaging where facilities exist. Check with your local council authority for recycling advice.
BATTERY & CHARGER SAFETY WARNINGS
Before using the charger or battery read all instructions and cautionary markings on the charger, battery pack and the product using the battery pack. Do not lose these safety instructions.Battery Warnings
- The battery pack is not fully charged out of the carton. First, read the safety instructions and then follow the charging notes and procedures.
- For optimum battery performance avoid low discharge cycles. Charge the battery pack frequently.
- Use and store the battery pack in dry conditions with low humidity between 0-50°C, ideally at 15°C. Avoid exposing battery pack and charger to direct sunlight.
- Do not keep battery pack in places where temperatures are liable to reach over 50°C, such as in a car, metal shed or similar that is in direct sunlight.
- Do not ignite the battery pack or expose it to fire. There is a risk of explosion!
- Do not exhaustively discharge batteries. Exhaustive discharge will damage the battery cells. The most common cause of exhaustive discharge is long-term storage and continued use of low-charge batteries. Always store the battery with some charge. Charge the batteries every 2-3 months to restore charge. Stop working as soon as the performance of the battery falls noticeably or the electronic protection system triggers.
- Protect batteries and the tool from overloads. Overloads will quickly result in overheating and cell damage inside the battery housing without this overheating being apparent externally.
- Avoid damage and shocks. Do not use batteries that have been dropped from a height of more than one meter or strong external impact, even if the housing of the battery pack appears to be undamaged. The battery cells inside the battery may have suffered serious damage.
- If the battery pack suffers overloading and overheating, the integrated protective cut-off will switch off the equipment. Do not press the ON/OFF switch on the tool if the protective cut-off has actuated. This may damage the battery pack. Allow the battery to cool to room temperature before use.
- Use only original battery packs. The use of other batteries may result in injuries, explosions, and a fire risk.
- Protect your rechargeable battery against moisture, rain, and high humidity. Moisture, rain, and high humidity can cause dangerous cell damage. Never charge or use batteries that have been exposed to moisture, rain or high humidity.
- Never attempt to open the battery pack for any reason. If the plastic housing of the battery pack is damaged, do not use the battery.
- When battery pack is not in use, keep it away from other metal objects, like paper clips, coins, keys, nails, screws or other small metal objects, that can make a connection from one terminal to another. Shorting the battery terminals together may cause burns or a fire.
- Under abusive conditions, liquid may be ejected from the battery; avoid contact. If accidental contact occurs, flush with water and seek medical help immediately. Liquid ejected from the battery may cause irritation or burns.
- Do not use a battery pack or tool that is damaged or modified. Damaged or modified batteries may exhibit unpredictable behavior resulting in fire, explosion or risk of injury.
- Do not expose a battery pack or tool to fire or excessive temperature. Exposure to fire or temperature above 130°C may cause an explosion.
- Never service damaged battery packs. Service of battery packs should only be performed by the manufacturer.
- 18. Do not disassemble Battery. This may result in a risk of electric shock, electrocution or fire.Charger Warnings
- Please check the data mared on the rating plate of the battery charger. Ensure to only connect the battery charger to a power supply with the voltage marked on the rating plate.
- Protect the battery charger and its cable from damage and sharp edges. Have damaged cables repaired by an authorised service agent before use.
- Keep the battery charger, batteries and the cordless tool out of children’s reach.
- Do not use damaged battery chargers.
- Do not use the supplied battery charger to charge other cordless tools. Only charge Ozito Power X Change rechargeable batteries with an Ozito Power X Change Charger.
- The battery pack may become warm during use. Allow the battery pack to cool to room temperature before commencing with the charging.
- .Do not overcharge batteries. Do not exceed the maximum charging times. These charging times only apply to discharged batteries. Frequent insertion of a charged or partly charged battery pack will result in over-charging and cell damage. Do not leave fully charged batteries in the charger.26. Charge the battery pack in dry conditions with low humidity between 10-40°C. Avoid exposing the battery pack and charger to direct sunlight.
- Do not use batteries that have suffered deformation during the charging process or show any other signs of abnormalities including, excessive curvature of the housing, gassing, hissing, or cracking.
- Never fully discharge the battery pack. A complete discharge of the battery pack will lead to premature aging of the battery cells.
- Never charge the batteries unsupervised.
- Do not cover or place any object on top of the charger, place the charger away from heat sources.
- To reduce the risk of damage to the electric plug and cord, pull by the plug rather than the cord when disconnecting the charger.
- Make sure the cord is located so that it will not be stepped on, tripped over, or otherwise subjected to damage or stress.
- An extension cord should not be used unless necessary. Use of an improper extension cord could result in the risk of fire, electric shock or electrocution.
- Do not disassemble the charger. This may result in a risk of electric shock, electrocution or fire.
- To reduce the risk of electric shock, unplug the charger from the outlet before attempting any cleaning. Removing the battery pack will not reduce this risk.
- Do not use the cordless tool or the battery charger near vapors and inflammable liquids.
ELECTRICAL SAFETY
 WARNING! When using mains-powered tools, basic safety precautions, including the following, should always be followed to reduce risk of fire, electric shock, personal injury, and material damage. Read the whole manual carefully and make sure you know how to switch the tool off in an emergency, before operating the tool. Save these instructions and other documents supplied with this tool for future reference.Note: The supply of 230V and 240V on Ozito tools are interchangeable for Australia and New Zealand. This tools charger is double insulated therefore no earth wire is required.If the supply cord is damaged, it must be replaced by the manufacturer, its service agent or similarly qualified persons in order to avoid hazard.Note: Double insulation does not take the place of normal safety precautions when operating this tool. The insulation system is for added protection against injury resulting from a possible electrical insulation failure within the tool.Using an extension leadAlways use an approved extension lead suitable for the power input of this tool. Before use, inspect the extension lead for signs of damage, wear and aging. Replace the extension lead if damaged or defective.When using an extension lead on a reel, always unwind the lead completely. Use of an extension lead not suitable for the power input of the tool or which is damaged or defective may result in a risk of fire and electric shock. o reduce the risk of electric shock, we recommend the use of a residual current device (rated 30mA or less).This appliance is not intended for use by persons (including children) with reduced physical, sensory or mental capabilities, or lack of experience and knowledge unless they have been given supervision or instruction concerning the use of the appliance by a person responsible for their safety.Children should be supervised to ensure that they do not play with the appliance.
CHARGING A BATTERY
WARNING! THE CHARGER SHOULD BE PROTECTED BY A RESIDUAL CURRENT DEVICE (RATED AT 30MA OR LESS).WARNING! DO NOT COVER OR PLACE ANY OBJECT ON TOP OF THE CHARGER; PLACE THE CHARGER AWAY FROM HEAT SOURCES.
- Connect the charger to the power supply and the LED will flash green showing power is being supplied to the charger.
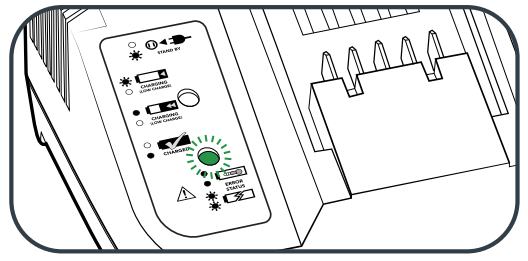
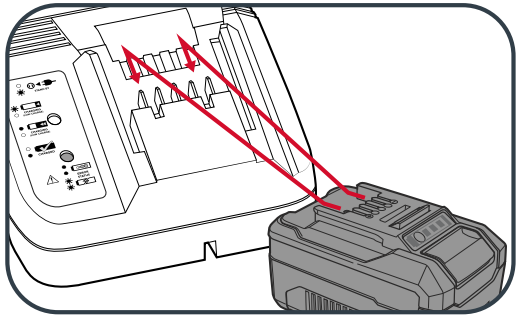
- Align and then slide the ribs on the battery into the recess in the charger.
- The red LED will illuminate while the battery charges.
- The green LED will illuminate once the battery is charged.
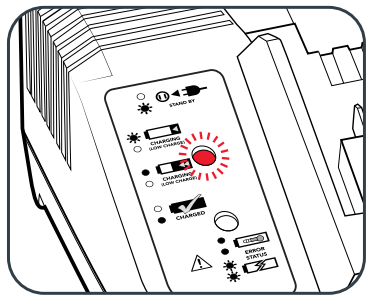
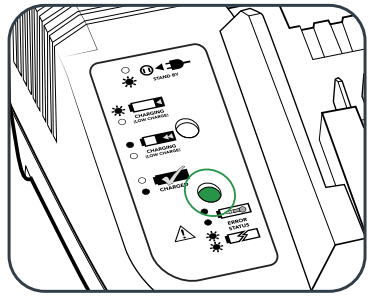
| Charger LED Indicator Lights | |
| LED Indicator | Situation |
| GREEN (Flashing) | Stand By (no battery pack is inserted) |
| RED (Flashing) | Battery is charging (low charge) |
| RED (Illuminated) | Battery is fast charging (mid charge) |
| GREEN (Illuminated) | The battery is 85% – 100% charged and is ready for use. |
| BOTH(Illuminated) | The battery pack is too hot or too cold (charging will begin automatically when the battery reaches the correct charging temperature). |
| BOTH (Flashing) | The battery is defective, charging is no longer possible. Do not charge. Contact Ozito Customer Service. |
Mounting The Charging Unit On A WallThe charging unit can be mounted to a wall or workbench. The correct dimensions for drill holes can be found on the back of the charging unit; a template for the mounting hole locations can also be found on the Ozito website.Note: When mounting on a wall you must use suitable screws, e.g.M3 pan-head screws, in order to prevent damage to the housing and risk of falling.
ONLINE MANUALScan this QR Code with your mobile device to take you to the online manual.

http://www.ozito.com.au/PXBP-400
MAINTENANCE
- Disconnect the charger from the power source before cleaning.
- Keep the charger in a dry place out of reach of children.
- If the enclosure of the charger requires cleaning, do not use solvents. Use a dry, soft cloth only to wipe down the surface. Never let any liquid get inside the charger; neverimmerse any part of the charger.
- There are no other parts inside the charger that require maintenance. Do not take the charger apart. If the charger is damaged, contact your supplier or the manufacturer.
WARRANTY
IN ORDER TO MAKE A CLAIM UNDER THIS WARRANTY YOU MUST RETURN THE PRODUCT TO YOUR NEAREST BUNNINGS WAREHOUSE WITH YOUR BUNNINGS REGISTER RECEIPT. PRIOR TO RETURNING YOUR PRODUCT FOR WARRANTY PLEASE TELEPHONE OUR CUSTOMER SERVICE HELPLINE:Australia 1800 069 486New Zealand 0508 069 486TO ENSURE A SPEEDY RESPONSE PLEASE HAVE THE MODEL NUMBER AND DATE OF PURCHASE AVAILABLE. A CUSTOMER SERVICE REPRESENTATIVE WILL TAKE YOUR CALL AND ANSWER ANY QUESTIONS YOU MAY HAVE RELATING TO THE WARRANTY POLICY OR PROCEDURE.The benefits provided under this warranty are in addition to other rights and remedies which are available to you at law. Our goods come with guarantees that cannot be excluded by law. You are entitled to a replacement or refund for a major failure and for compensation for any other reasonably foreseeable loss or damage. You are also entitled to have the goods repaired or replaced if the goods fail to be of acceptable quality and the failure does not amount to a major failure. Generally you will be responsible for all costs associated with a claim under this warranty, however, where you have suffered any additional direct loss as a result of a defective product you may be able to claim such expenses by contacting our customer service helpline above.
36 MONTH REPLACEMENT WARRANTYYour product is guaranteed for a period of 36 months from the original date of purchase and is intended for DIY (Do It Yourself) use only. If a product is defective it will be replaced in accordance with the terms of this warranty. Warranty excludes consumable parts.WARNINGThe following actions will result in the warranty being void.
- If the tool has been operated on a supply voltage other than that specified on the tool.
- If the tool shows signs of damage or defects caused by or resulting from abuse, accidents or alterations.
- Failure to perform maintenance as set out within the instruction manual.
- If the tool is disassembled or tampered with in any way.
OZITO Australia/New Zealand (Head Office)25 Fox Drive, Dandenong South, Victoria, Australia 3175.
References
[xyz-ips snippet=”download-snippet”]