
![]()
POWER BANK/JUMP STARTER SAFETY WARNINGS12V 400AOJS-800
INSTRUCTION MANUAL
SPECIFICATIONS
Output: 12VPeak Current: 400ALi-Po Battery: 11.1V, 2.5Ah, 27.75WhStart Current: 200A – 5 Sec.Weight: 0.35 kg

STANDARD EQUIPMENT

 POWER BANK/JUMP STARTER SAFETY WARNINGS
 WARNING! Save all warnings and instructions for future referenceWARNING! Read all safety warnings and all instructions. Failure to follow the warnings and instructions may result in electric shock, fire and/or serious injury.Power Bank
- The power bank is not fully charged out of the carton. First, read the safety instructions and then follow the charging notes and procedures.
- For optimum performance avoid low discharge cycles. Charge the power bank frequently.
- Use and store the power bank in dry conditions with low humidity between 0-40°C, ideally at 15°C. Avoid exposing the power bank to direct sunlight.
- Do not keep the power bank in places where temperatures are liable to reach over 40°C, such as in a car, metal shed, or similar that is in direct sunlight.
- Do not ignite the power bank or expose it to fire. There is a risk of explosion!
- Do not exhaustively discharge batteries. The exhaustive discharge will damage the battery cells. The most common cause of the exhaustive discharge is long-term storage and continued use of low-charge batteries. Always store the power bank with some charge. Charge the power bank every 4 months to restore the charge. Stop working as soon as the performance of the power bank falls noticeably or the electronic protection system triggers.
- Protect the power bank from overloads. Overloads will quickly result in overheating and cell damage inside the battery housing without this overheating being apparent externally.
- Avoid damage and shocks. Do not use the power bank which has been dropped from a height of more than one meter or strong external impact, even if the housing of the power bank appears to be undamaged. The battery cells inside the power bank may have suffered serious damage.
- Use only original battery packs. The use of other batteries may result in injuries, explosions, and a fire risk.
- Protect your rechargeable battery against moisture, rain, and high humidity. Moisture, rain, and high humidity can cause dangerous cell damage. Never charge or use batteries that have been exposed to moisture, rain or high humidity.
- Never attempt to open the power bank for any reason. If the plastic housing of the power bank is damaged, do not use the power bank.
- When a power bank is not in use, keep it away from other metal objects, like paper clips, coins, keys, nails, screws or other small metal objects, that can make a connection from one terminal to another. Shorting the battery terminals together may cause burns or a fire.
- Under abusive conditions, liquid may be ejected from the battery; avoid contact. If accidental contact occurs, flush with water and seek medical help immediately. Liquid ejected from the battery may cause irritation or burns.
- Do not use a power bank that is damaged or modified. Damaged or modified power banks may exhibit unpredictable behavior resulting in fire, explosion or risk of injury.
- Never service damaged battery packs. The service of battery packs should only be performed by the manufacturer.
- Do not disassemble Battery. This may result in a risk of electric shock, electrocution, or fire.
- Protect the power bank charger and its cable from damage and sharp edges. Have damaged cables repaired by an authorized service agent before use.
- Keep the power bank and charger out of children’s reach.
- Do not use damaged power bank chargers.
- Do not use the supplied power bank charger to charge other electronic devices.
- The power bank may become warm during use. Allow the power bank to cool to room temperature before commencing with the charging.
- Do not over-charge the power bank. Do not exceed the maximum charging times.
- Charge the power bank in dry conditions with low humidity between 10-40°C. Avoid exposing the power bank and charger to direct sunlight.
- Do not use the power bank which has suffered deformation during the charging process or shows any other signs of abnormalities including, excessive curvature of the housing, gassing, hissing, or cracking.
- Never fully discharge the power bank. A complete discharge of the power bank will lead to premature aging of the battery cells.
- Never charge the power bank unsupervised.
- Do not cover or place any object on top of the charger, place the charger away from heat sources.
- An extension cord should not be used unless necessary. Use of an improper extension cord could result in the risk of fire, electric shock or electrocution.
- Do not disassemble the charger. This may result in a risk of electric shock, electrocution, or fire.
- To reduce the risk of electric shock, unplug the charger from the outlet before attempting any cleaning. Removing the power bank will not reduce this risk.
- Do not use the power bank or the battery charger near vapors and inflammable liquids.
- Do not submerge the power bank in water. Do not use the power bank if any contact with liquid.
- During charging, the battery must be placed in a well-ventilated area.
- Never use or charge the power bank if you suspect that the last time, they were charged was more than 12 months previously. There is a high probability that the battery pack has already suffered dangerous damage (exhaustive discharge).
Jump Starter
- Protect Jump Starter from overloads. Overloads will quickly result in overheating and cell damage inside the battery housing without this overheating being apparent externally. Do not attempt to jump-start a car more than 4 times in 10 minutes. The number of times that you can attempt to start the engine (max. 10) varies according to the ambient temperature, the condition of the battery you want to start, and the charge level of the jump start power bank battery.
- If fewer than 3 LEDs are illuminated, the jump start is not available.
- Never connect to the vehicle bodywork. Make sure that the connector on the jump start cable is securely connected to the device socket. If the connection is loose during jump starting, the connector could melt as a result of the high current.
- The poles on the vehicle battery must be clean and the clamps of the jump start cable must be securely attached to the battery poles.
- Do not connect the clamps of the jump start cable together during jump-starting Short circuit.
- At very low temperatures a number of jump start attempts may be required before the car starts up. Allow one minute waiting time between each attempt. Remove the equipment within 30 seconds after a successful jump-start as far as possible.
- If you carry out any work in the engine bay of a vehicle, watch out for rotating and moving parts.
- During jump-starting, it is imperative not to wear any items of clothing made of synthetic materials in order to avoid spark formation caused by electrostatic discharge.
- Only grasp clamps by the insulated surfaces.
- Make sure the vehicles are in either Neutral (Manual) or Park (Auto) with the handbrake on.
- Do not leave either engine running unattended.
- Keep away from children as they could potentially strangle or injure themselves.
- Keep children away from the work area
- People with pacemakers should consult their physician(s) before use. Electromagnetic fields in close proximity to heart pacemakers could cause pacemaker interference or pacemaker failure. Caution is necessary when near coil, spark plug cables, or distributor of running engine. The engine should be off during distributor adjustment.
- Do not point the light directly at a person’s face. Avoid staring at the light.
Risk of Fire & Deflagration
- Do not use the jump starter in environments where explosions may occur, such as in environments with ignition sources, flammable vapors, gases, dust or similar.
- Ensure that the jump start cable is not damaged.
- Do not short circuit the jump starter.
- Do not shorten or extend the jump start cable.
- Do not wear clothing made of synthetic materials during charging. They could generate sparks due to electrostatic charge.Risk of Explosion & Chemical Burns
- Do not start a battery if it is cracked or damaged.
- Do not lean over the battery. The electrolyte from the discharged battery is also liquid at low temperatures.
- Wear protective gloves and safety glasses when working on the battery. Do not touch damaged or leaking cells. Consult SDS if contact has been made.
- Do not allow battery acid to make bodily contact. In the event of contact with battery acid immediately flush the applicable areas with plenty of clean water and consult a doctor.
- Never jump-start a vehicle if the battery is frozen as the battery may explode. If the sides ofthe battery bugles, it is likely frozen.
- Car batteries discharge hydrogen gas, which may ignite from flying sparks. Ensure that thejump start cable is connected in the correct order to reduce the risk of sparks.
- Only run the engine in a well-ventilated area to ensure toxic exhaust gas does not build up.
- Remove any vent caps on non-maintenance free batteries be very careful as battery acid is highly corrosive
- Only use jump starters as prescribed in the manual.Avoid flames and sparks. Explosive gas is released from the car battery during jump starting. If you smell an acrid odor of gas, there is an acute danger of explosion. Ventilate the room immediately and thoroughly. Refer to the instructions issued by the car battery manufacturer. Refer to the information and instruction issued by the vehicle manufacturer.
Risk of Electric Shock
- Ensure the ignition switch is in the OFF position on the vehicle while connecting leads.
- Do not use the jump start cable if it shows signs of wear or damage.
- Turn off the lights and power-draining functions (such as the stereo and interior light) to help ease the strain off the charged battery
- Ensure that the terminal clamps do not touch. Contact between live connections may result in sparks, electrocution, fire, severe personal injury or even death.
- Ensure that there is no contact between the bodies of the vehicles and that no such contact occurs. Vehicles in contact with each other could establish a ground connection and result in personal injury to the user or bystanders.
- When disconnecting the clamps, ensure that that the two clamps do not come into contact with the rotating parts of the engine compartment.
- Do not expose jump starter to rain or wet conditions.
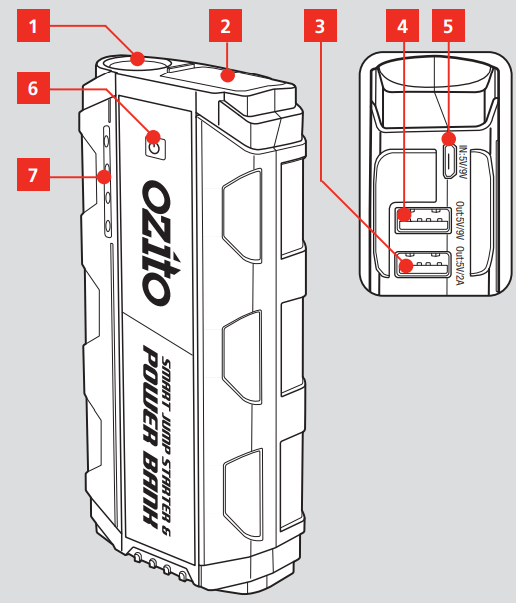
KNOW YOUR PRODUCT
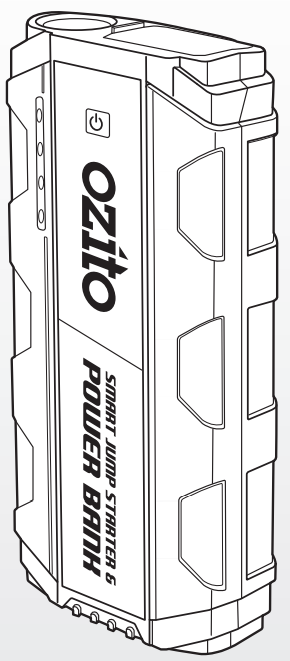
12V JUMP STARTER & POWER BANK
- LED Torch
- Jump Starter Connection
- 5V/2A USB Outlet
- 5V/9V USB Outlet
- Micro USB Charging Inlet
- On/Off Button
- Battery Capacity LED’s
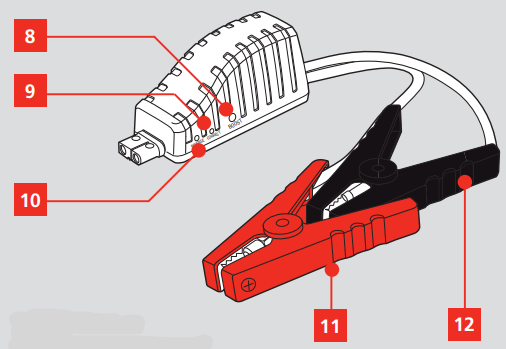
- BOOST Button
- CORRECT Status LED
- REVERSE Status LED
- Red Positive Terminal Clamp (+)
- Black Negative Terminal Clamp (–)
ONLINE MANUALScan this QR Code with your mobile device to take you to the online manual.

http://www.ozito.com.au/products/OJS-800
CHARGING THE POWER BANK
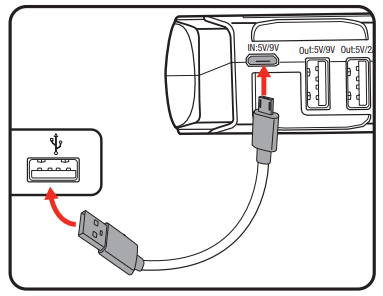
WARNING! READ AND UNDERSTAND THE WARNINGS BEFORE SETUP AND CHARGING.Connecting to a USB OutletYou can charge up the jump starter power bank via the micro USB charging inlet with the supplied USB charger cable on any standard USB outlet (e.g. the charger of a smartphone). Check that the voltage on the rating plate is the same as your supply voltage before you connect the USB charger. We recommend that you charge up the equipment every 4 months.
WARNING! THE JUMP STARTER POWER BANK OUTLETS MUST NOT BE USED WHILE CHARGING IS IN PROGRESS.
- Connect supplied USB Charge Cable to the Micro USB Charging Inlet and the other end to a USB Charger (not included).
- Connect the USB Charger into a mains power outlet and the Jump Starter Power Bank will charge.Note: The Battery Capacity LEDs will flash during charging and indicate the charge status. The unit will become warm during the charging process, this is normal.
- Charging is complete when all LED’s are illuminated. Disconnect the unit from the USB charger.
Note: The charging time will depend on the charger output. Use the charge time as a guide for the time taken to fully charge.
| Charger Output | Charge Time |
| 5V/1A | 39 Hrs |
| 5V/1.5A | 5 Hrs |
| 5V/2.4A | 3.5 Hrs |
| 9V/2.0A | 2 Hrs |
WARNING! DO NOT OVER-CHARGE THE POWER BANK! DO NOT EXCEED THE MAXIMUM CHARGING TIMES. IT WILL RESULT IN CELL DAMAGE. DO NOT LEAVE BATTERIES IN THE CHARGER FOR DAYS ON END. NEVER CHARGE THE POWER BANK UNSUPERVISED.
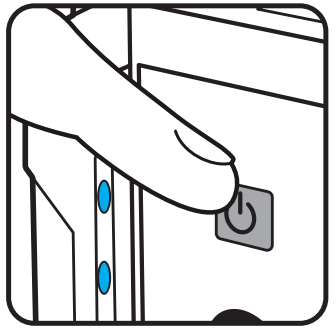
Battery Capacity LED’sPressing the On/Off Button briefly will illuminate the Battery Capacity LED’s, the number of LED(s) that are illuminated indicate the current charge level of the Li-Po battery.4 LED’s illuminated = 100%1 LED illuminated = >25%0 LED illuminated = <25%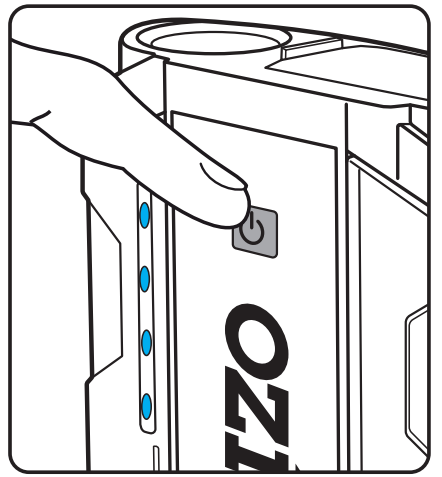
OPERATION
LED TORCH & USB OUTLETS
LED Torch
WARNING! DO NOT LOOK INTO THE LED TORCHLIGHT BEAM.
- Press the ON/Off Button for 3 seconds – the LED Torch will be illuminated.
- Press the On/Off Button again – the LED The torch will continuously flash (strobe light).
- Press the On/Off Button again – the LED Torch will flash as an “SOS” Morse code signal lamp.
- Press the On/Off Button again to switch the LED Torch off.
USB Outlets: WARNING! CHECK THE VOLTAGE AND CURRENT RATINGS OF THE DEVICE YOU WANT TO CONNECT (E.G. MOBILE PHONE, LAPTOP). OBSERVE THE OPERATING INSTRUCTIONS FOR THE DEVICE.
The supply time varies according to the level of the charge of the jump starter power bank, the level of power consumption and the intensity of use of the connected device. The battery needs charging when the remaining charge is 25% (1 LED illuminates).The USB Outlets can be used in parallel. Please ensure that the cumulative output current does not exceed 5A.
5V/2A USB Outlet – Max. 2A
- Connect appropriate (or the supplied 2-in-1) USB cable to the USB Outlet on the jump starter power bank and then to the device you want to connect.
- Press the jump starter power bank On/Off Button 5V/9V USB Outlet
Note: If charging does not work with this outlet, this means that either the device or the cable is not supported. In this case, use the 5V/2A USB Outlet for charging, as described above.
- Connect the supplied 2-in-1 Micro/Mini USB Cable to the 5V/9V USB Outlet on the jump start power bank and then to the device you want to connect.
- Press the jump starter power bank ON/OFF Button.
- The parameters required for charging will be determined at the USB outlet and the connected device will be charged up.Depending on the charger cable and the device being charged, the charging time with the 5V/9V USB Outlet may be shorter than with the 5V/2A USB Outlet.
JUMPSTART
WARNING! JUMP STARTING ONLY WITH THE SUPPLIED JUMP START CABLE AND 12 VOLT LEAD-ACID BATTERIES IN MOTOR VEHICLES WITH MAXIMUM PETROL ENGINE CAPACITIES OF 3000 CCA. WARNING! CHECK JUMP START CABLE AND CLAMP FOR DAMAGE BEFORE EVERY USE. DO NOT USE IF CABLE OR CLAMP INSULATION IS MISSING OR DAMAGED AND WIRE IS EXPOSED. WARNING! ONLY THE JUMP START CABLE ISALLOWED TO BE CONNECTED DURING JUMP STARTING. ANY POWER SUPPLY TO A CONNECTED THE DEVICE, E.G VIA THE USB OUTLET, MUST BE DISCONNECTED FIRST.
Connecting to a Vehicle BatteryBefore connecting make sure the vehicle’s battery terminals are really clean as grease and dust. The battery MUST be disconnected prior to cleaning. Check the battery and connections for any cracks or damage before proceeding with cleaning. To help ensure a good connection of the jump start cable clamps, clean the battery terminals with a solution of baking soda and water, and wipe the battery terminals with a cloth to remove any dirt and grease.Refer to the instructions in the vehicles owner’s manual for the car radio etc. Ensure that all the vehicle’s electronics are turned OFF and that the ignition is turned OFF.Check that at least 3 Battery Capacity LEDs are illuminated. The jump starter power bank temperature must be within the range of + 5 °C – + 40°C and the ambient temperature during jump-starting within the range of – 15°C – + 40°C.
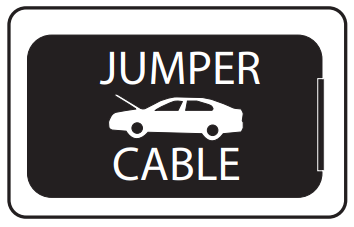
- Pull open the Jump Start Connection cover, plug the Jump Start Cable into the opening.Note: A Red LED will illuminate if not securely connected or has insufficient charge.
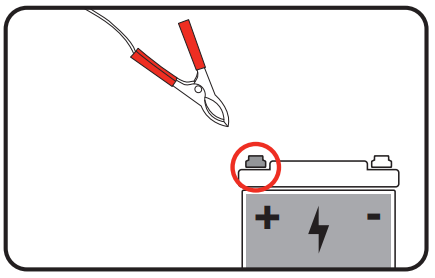
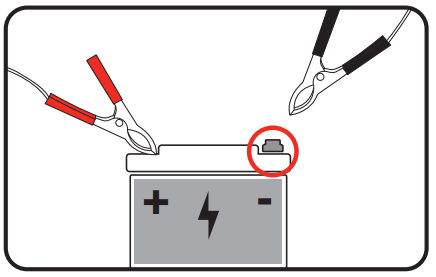
- Connect the red positive terminal clamp (+) to the positive (+) pole on your vehicle 12V battery.
- Connect the black negative terminal clamp (–) to the negative (–) pole on your vehicle 12V battery.Ensure both clamps are secure. WARNING! DO NOT CONNECT TO THE VEHICLE BODYWORK.
OPERATION (cont.)
JUMPSTART (cont.)
- Ensure the Jump Start Power Bank is tucked away securely in the engine bay and will not be able to fall as a result of vibrations during the jump-start operation. The unit must not be allowed to come within the range of moving parts.
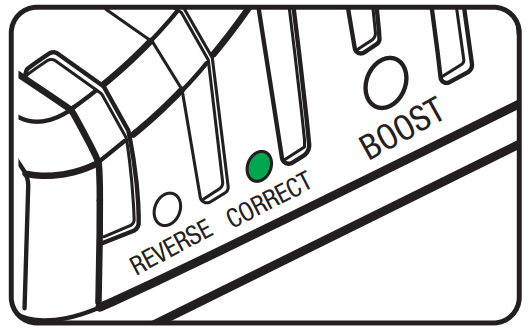
- Refer to the status leds on the JumpStart Cable.• CORRECT Status LED Illuminates GreenAll the existing connections are OK and the vehicle can be started within 30 seconds. • CORRECT Status LED Flashes GreenAll the existing connections are OK, but the car battery charging status is very low. Press the BOOST Button and wait until the green LED comes on permanently. Start the vehicle within 30 seconds.• CORRECT Status LED Flashes Green and Red AlternatelyThe jump start function is deactivated after 4 or more attempts within 10 minutes to protect the device and automatically activates after 10 minutes.• REVERSE Status LED Illuminates RedAn acoustic warning sounds. The clamps of the jump start cable are wrongly connected to the car battery, i.e. with reverse polarity.Remove the clamps and connect them to the car battery again but with the correct polarity and in accordance with the previous instructions.• No Status LED Illuminated, an Acoustic Warning SoundsCheck all the connections, especially that the clamps are connected to the car battery with the correct polarity. If all the connections are OK, the cause is probably a defective car battery.Press the BOOST Button and wait until the CORRECT Status LED illuminates green. Start the vehicle within 30 seconds. Replace the defective car battery as soon as possible.
- As soon as the engine is running, remove the Jump Start Cable from the unit and then remove the Red Positive Terminal Clamp (+) from the car battery first, followed by the Black Negative Terminal Clamp (–).
- Let the engine run. The alternator will charge the vehicle battery.
 • CORRECT Status LED Flashes GreenAll the existing connections are OK, but the car battery charging status is very low. Press the BOOST Button and wait until the green LED comes on permanently. Start the vehicle within 30 seconds.
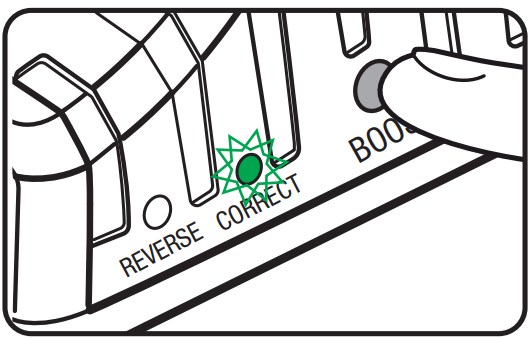 • CORRECT Status LED Flashes Green and Red AlternatelyThe jump start function is deactivated after 4 or more attempts within 10 minutes to protect the device and automatically activates after 10 minutes.• REVERSE Status LED Illuminates RedAn acoustic warning sounds. The clamps of the jump start cable are wrongly connected to the car battery, i.e. with reverse polarity.Remove the clamps and connect them to the car battery again but with the correct polarity and in accordance with the previous instructions.
 • No Status LED Illuminated, an Acoustic Warning SoundsCheck all the connections, especially that the clamps are connected to the car battery with the correct polarity. If all the connections are OK, the cause is probably a defective car battery.Press the BOOST Button and wait until the CORRECT Status LED illuminates green. Start the vehicle within 30 seconds. Replace the defective car battery as soon as possible.
Note: At very low temperatures a number of jump start attempts may be required before the car starts up. Allow one minute waiting time between each attempt.Note: The number of times that you can attempt to start the engine (max. 10) varies according to the ambient temperature, the condition of the battery you want to start and the charge level of the jump starter power bank battery.
MAINTENANCECleaning
- If the enclosure of the unit requires cleaning, do not use solvents. Use a moist, soft cloth only. Never immerse any part of the Jumpstarter power bank into liquid.
- Keep terminal clamps clean and dry at all times.
StorageStore the equipment and its accessories in a dark and dry place at above freezing temperature. The ideal storage temperature is between +5 and 40°C. Observe the enclosed safety information with detailed information about storage. Since the battery reacts if the temperature is too high (above +40°C) or too low (below 0°C), do not keep thebattery permanently in a vehicle. For transporting in a vehicle, place the equipment in a suitable location where it cannot move in response to an abrupt change in speed and/or direction. Keep the equipment in its original packaging.
WARRANTYIN ORDER TO MAKE A CLAIM UNDER THIS WARRANTY YOU MUST RETURN THE PRODUCT TO YOUR NEAREST BUNNINGS WAREHOUSE WITH YOUR BUNNINGS REGISTER RECEIPT.PRIOR TO RETURNING YOUR PRODUCT FOR WARRANTY PLEASE TELEPHONE OUR CUSTOMER SERVICE HELPLINE:Australia: 1800 069 486New Zealand: 0508 069 486
TO ENSURE A SPEEDY RESPONSE PLEASE HAVE THE MODEL NUMBER AND DATE OF PURCHASE AVAILABLE. A CUSTOMER SERVICE THE REPRESENTATIVE WILL TAKE YOUR CALL AND ANSWER ANY QUESTIONS YOU MAY HAVE RELATING TO THE WARRANTY POLICY OR PROCEDURE.The benefits provided under this warranty are in addition to other rights and remedies which are available to you at law.Our goods come with guarantees that cannot be excluded at law. You are entitled to a replacement or refund for a major failure and for compensation for any other reasonably foreseeable loss or damage. You are also entitled to have the goods repaired or replaced if the goods fail to be of acceptable quality and the failure does not amount to a majorfailure.Generally, you will be responsible for all costs associated with a claim under this warranty, however, where you have suffered any additional direct loss as a result of a defectivethe product you may be able to claim such expenses by contacting our customer service helpline above.3 YEAR REPLACEMENT WARRANTY*Your product is guaranteed for a period of 36 months from the original date of purchase. If a product is defective it will be replaced in accordance with the terms ofthis warranty. Warranty excludes consumable parts, for example, valve adapters and accessories.*This product is intended for DIY use only and the replacement warranty covers domestic use.
WARNINGThe following actions will result in the warranty being void.If the tool has been operated on a supply voltage other than that specified on the tool.If the tool shows signs of damage or defects caused by or resulting from abuse, accidents, or alterations.Failure to perform maintenance as set out within the instruction manual.If the tool is disassembled or tampered with in any way.Professional, industrial, or high-frequency use.
SPARE PARTSSpare parts can be ordered from the Special Orders Desk at your local Bunnings Warehouse.For further information, visit www.ozito.com.au or contact Ozito CustomerService: Australia 1800 069 486New Zealand 0508 069 486E-mail: [email protected]
DESCRIPTION OF SYMBOLS
| Volts | Amperes | ||
 |
Regulatory Compliance Mark (RCM) |  |
Warning |

|
Read Instruction Manual | Cold Cranking Amps |
CARING FOR THE ENVIRONMENT Power tools that are no longer usable should not be disposed of with household waste but in an environmentally friendly way. Please recycle where facilities exist. Check with your local council authority for recycling advice.
 Recycling packaging reduces the need for landfills and raw materials. The reuse of recycled material decreases pollution in the environment. Please recycle packaging where facilities exist.Check with your local council authority for recycling advice.
OZITO Australia/New Zealand (Head Office) 25 Fox Drive, Dandenong South, Victoria, Australia 3175.0221
References
[xyz-ips snippet=”download-snippet”]