![]()

PACKAGE CONTENT
1 X MAIN CONSOLE1 X LITHIUM BATTERY1 X MICRO-SD CARD1 X USB CHARGING CABLE1 X AV CABLE1 X HAND STRING1 X MANUAL1 X EXTRA JOYSTICK CONTROL (optional)1 X MINI-HDMI CABLE (for model# HT947-HD only)
NAME & FUNCTIONS

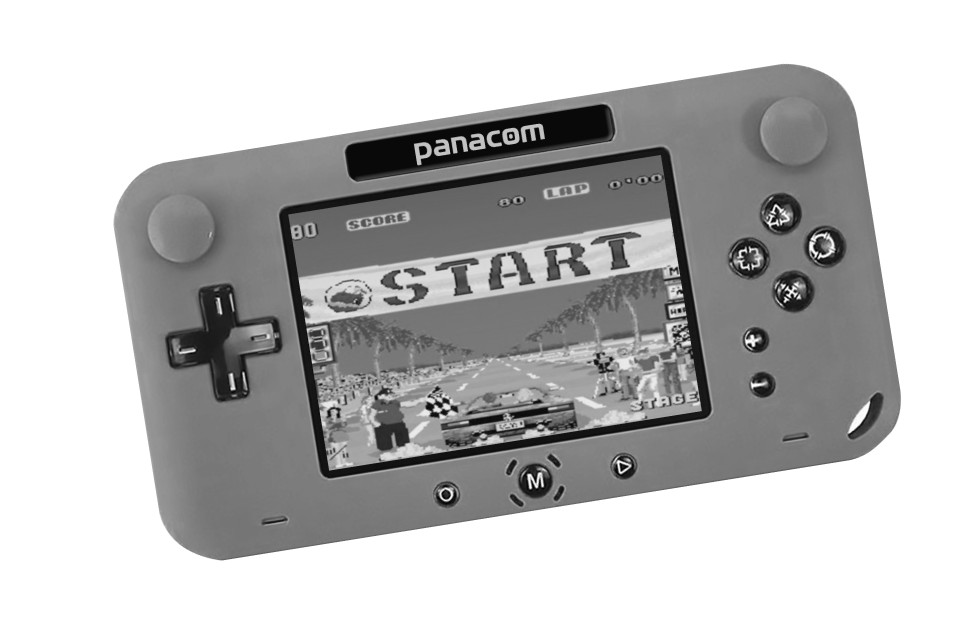
1) ON/OFF: switch from left to right side to turn on the machine.2) START: press to star/pause gameplay or to go next step sometimes.3) MENU: press to call out the POP-UP menu to realize functions as BACK GAME, SAVE, LOAD or EXIT.4) SELECT: press to select game mode, single-player or two-player(when available). Under CPS1 or other ARCADE game roms,press this key to realize “insert coin” function.5) EARPHONE JACK: sound output to standard 3.5mm earphones when needed.6) SPEAKER: loudspeaker of console’s sound.7) LED INDICATOR: to indicate the on/off state and charging state. The two upper lights in green mean “ON” and the two lower lights in red mean undercharging and will turn to green color when full charge. No light at all means “OFF”.8) DIRECTIONAL BUTTONS: press to control the 8 directions such as Left, Right, Up & Down, Upper Left, Upper Right, Lower Left & Lower Right.9) 3D DIRECTIONAL JOYSTICK: steer to control the 8 directions such as Left, Right, Up & Down, Upper Left, Upper Right, Lower Left & Lower Right.10) MINI-HDMI OUTPUT: to project the game screen on big TV screen in HD resolution (ONLY available for model# HT947-HD)11) Micro-USB PORT: to charge the console with USB charging cable or to connect an extra joystick control.12) AV OUTPUT: to project the game screen on big TV screen.13) SCREEN: LCD display area of console.14) 3D ACTION JOYSTICK: universal function control of fight, jump, shoot, accelerate etc. subject to different game design.15) ACTION BUTTONS: function control of fight, jump, shoot, accelerate etc.16) ENTER/CONFIRM: press button “0” to enter or confirm.17) BACK/RETURN: press button “X” to back or return.18) VOLUME UP: press to increase the sound volume.19) VOLUME DOWN: press to decrease the sound volume.20) BATTERY COMPARTMENT: to install 3XAAA batteries or one BL-5C lithium battery optional.21) MICRO-SD(TF) CARD SLOT: to install a MicroSD card with games.NOTE: THE FUNCTION OF THE “START” BUTTON MAY VARY AMONG DIFFERENT TYPES OF GAME ROM, SUCH AS MD, SFC, FC, CPS1, GBA, GG, GC, SMS ETC.
BATTERY INSTALLATION
• Use your fingernail to pry out the whole back cover of the console following the “OPEN” direction indicated on the cover.• Insert a BL-5C lithium battery or 3XAAA batteries correctly following the polarity indicated inside the battery compartment.• Close the back cover of console firmly.WARNINGS! Please remove the lithium battery or AM batteries out of the console if it will not be used for a long period and store them in a cool dry place.
MICRO-SD(TF) CARD USAGE
• Open the back cover of console.• Take out the lithium battery or AAA batteries and the MicroSD card slot will be seen under the lithium battery.• Insert a MicroSD card by pushing into the slot and push again to eject it.• To install own games,please prepare your favorite game roms that should be supported by this console and copy the selected game roms into the folder named “ROMS” under the MicroSD card (path: TF card:\ROMS\*.*).NOTES: game types supported by this console include MD/SFC/CPS1/FC/GB/G-BA/GBC/GG/SMS/SG. Due to many factors,not all games downloaded from internet can run 100% smoothly and perfectly in this console.
HOW TO RECHARGE THE CONSOLE
When the system is in low voltage status,it’s required to recharge the console. Simply connect the USB cable by one end to the console and the other end to any 5V power source such as mobile phone charger, PC USB port, power bank, electrical outlet etc.
IMPORTANT NOTE: battery recharging function is ONLY available for using lithium battery.
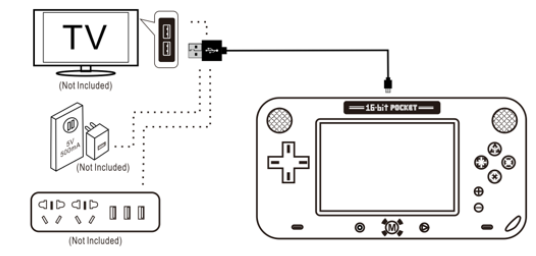
TV CONNECTION
• Connect one end 2.5mm plug of A/V cable to the console and the other RCA terminals to the A/V input of TV set.• Turn on the TV set and switch TV source to be A/V-in.• Power on the console and then the screen will be projected to TV.
START TO USE
1. POWER ON: make sure the lithium battery or 3XAAA batteries installed correctly, then switch the “ON/OFF” button from left to right side, and then the console will be powered on.2. SELECT GAME TYPE: on the main menu screen, scroll the directional buttons left and right to select the desired game type and press the “ENTER” button ”![]() ” to enter the game list.
” to enter the game list.

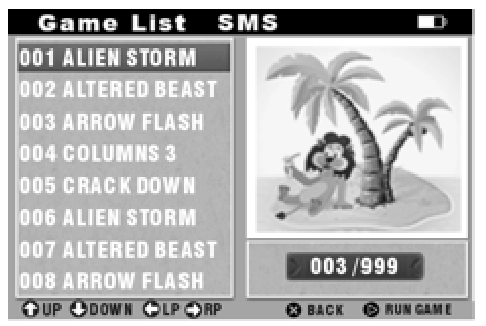
3. SELECT INDIVIDUAL GAME: scroll directional buttons up and down on the game list screen to select the desired game and press “START” button ” ![]() ” to load the game.
” to load the game.
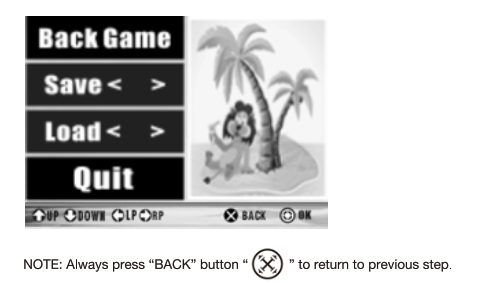
4.EXIT GAME: after entering the game, press “MENU” button to call out the POP-UP menu. Scroll directional buttons up and down to select the action command such as: BACK GAME, SAVE, LOAD & QUIT and press “ENTER” button ” ![]() ” to confirm the action.
” to confirm the action.
WARNINGS & PRECAUTIONS
1. Please do NOT disassemble or try to fix the product and its related parts & components at your own discretion.2. Please do NOT press the screen display with overmuch force.3. Avoid liquid splash over the product and its related parts & components.4. Please do NOT store the product in an area of wetness,dust and dirt.5. Please remove the lithium battery or AAA batteries from the product if it will not be used for a long period and store them in a cool & dry place.6. Always use the product in a well-ventilated and well-lit area ONLY.7. Disconnect recharging when using this product to avoid danger.8. Please do NOT use the product for a long period continuously. It’s recommended to take a 10-15-minute rest every hour of playing.9. When feeling drowsy,weak,weary or tired,please IMMEDIATELY stop using the product and take a rest. Or please consult the doctor when your eyes are uncomfortable.10. Keep the product,battery and all other accessories out of reach of children under 6 years to avoid any accident.11. It’s recommended to use the product under supervision or watch of adults.12. Recommended age of use: 6 years up.
INTERNATIONAL WARRANTY
Terms and Conditions1. Panacom warrants the operation of this product to be free from any manufacturing and/or material defect for a period of 6 months from the date of purchase by the user.2. This warranty is limited to the repair and/or replacement of this product, according to our own criterion, free of charge within the stipulated term and it does not extend to consequential or incidental damages to other products that may be used with this unit.3. The warranty shall be voided in the following cases: a) repair or attempt to repair by third parties not authorized by the company. b) in case of performing any type of cut in connection cables, plugs, connectors, or other adapters different from the original ones provided by the company.4. To make this warranty effective, you shall contact the Authorized Service Center of your country and they shall carry out the pertinent procedure. In order to start the necessary procedure to get said warranty, you shall hand in the Original Purchase Invoice where the purchase date, dealer name and product identification shall be stated clearly.5. Transportation, freight, stay and/or insurance expenses, if any, are not covered by this warranty.REPAIR SERVICETo ask for customer service please call 0810-888-7262.
[xyz-ips snippet=”download-snippet”]