
Non-Contact Forehead IR ThermometerUser Manual

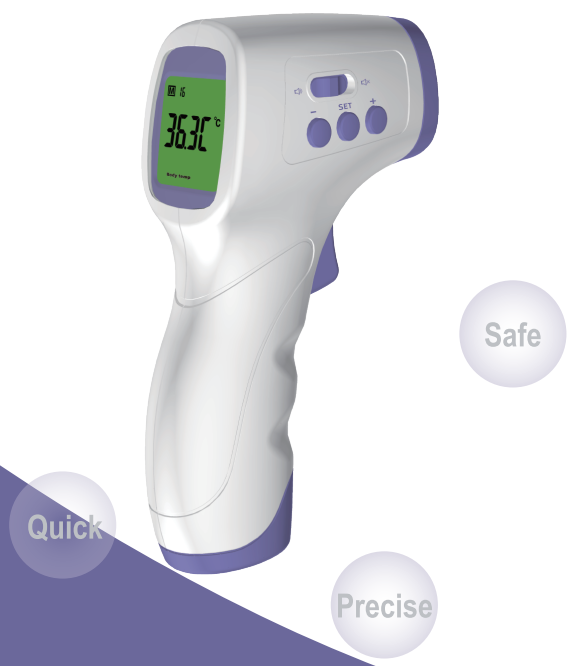
Buttons and Screen
- Measurement Trigger
- “2 Button
- Set Button
- “+” Button
- Buzzer Switch
- Display
Product Overview
Product Name: Infrared ThermometerProduct Model: V11Measuring Method: Non-contact measurement
Dimension92mm*45mm*150mm (L*W*H)
Technical Specification
Body Temp Range: 32°C ~ 42°CSurface Temp Range: 0 ~ 60°CResponse Time: 0.5sAccuracy (Body Mode): ±0.2°CAccuracy (Surface Mode): ±1 °CMeasuring Distance: 2 ~5 cmData Memory: 32 measurementsOperating Temp: 10°C ~ 40°CStorage Temp: -20°C ~ 60°CRelative Humidity: 10%-90% RH operating, <80% RH storageAuto Power Off: 15sBacklight with 3 different colors: Green/Yellow/RedPower Supply: DC3V, 2*AAA Battery
Temperature Measurement
When take the temperature of the person, using the Non-contact Body Infrared Thermometer keeping 2 to 5 cm distance between the Infrared thermometer and the forehead, press the measurement trigger, the screen displays the measured temperature after the beep sounds.
Function and Operation
- HibernationIf there is no operation for 15 seconds after power-on, the screen goes to sleep. Press any key to wake up.
- Temperature Unit SettingLong press “Set” for 2 seconds, the device enters the setting mode. Press the “+” button continuously, when the screen displays “unit”, press “Set” to make “unit” flash. Then press the”+” button or “-” button to select the display unit of C (Celsius) or F (Fahrenheit) and press the “Set” button to exit the setting mode.
- Temperature Measurement Mode SettingLong press “Set” for 2 seconds, the device enters the setting mode.Press the “+” button continuously, when the screen displays “type”, press “Set” to make “type” flash. Then press “+” or “-” to choose body mode or surface mode. Press “Set” to exit the setting mode.
- Fever Alarm SettingLong press “Set” for 2 seconds, the device enters the setting mode.Press the “+” button continuously, when the screen displays “ALL” or “AL H”, press “Set” to make “ALL” or “AL H” flash. Then press “+” or “-” to set a high temperature. Press “Set” to exit the setting mode.When the measured temperature is higher than the alarm temperature, the device has an alarm prompt; “ALL” is the low fever alarm, and alarm temperature range: 36.5 C – 38 C .” AL H” is the high fever alarm, alarm temperature range: 38 C – 39.5 C.
- Temperature CalibrationWhen you think there is an error in the temperature measurement, temperature calibration should be performed. According to the measured temperature and the known correct temperature, obtain the measurement difference.Long press “Set” for 2 seconds, the device enters the setting mode.Press the “+” button continuously, when the screen displays “CAL”, press “Set” to make “CAL” flash. Then press the “+” or “-” button to set the temperature compensation difference. Press “Set” to exit the setting mode.
- Clear Data MemoryLong press “Set” for 2 seconds, the device enters the setting mode.Press the “+” button continuously, when the screen displays “CLR”, press “Set” to make “CLR” flash. Then press the”+” button continuously until “DONE” is displayed, then press “Set” to clear data memory.
- Restore Factory SettingsLong press “Set” for 2 seconds, the device enters the setting mode.Press the “+” button continuously, when the screen displays “RESt”, press “Set” to make “RESt” flash. Then press the “+” button continuously until “DONE” is displayed, then press “Set” to restore the factory settings.
- View Historical Measurement DataThe measured data is automatically stored, press “+” or’-” button, view previously measured data, the maximum data storage capacity is 32 measurements.
- Beep SettingsToggle the Buzzer Switch to turn the beep on or off.
Working ConditionAmbient Temp: 10°C ~ 40°CRelative Humidity: 15% ~ 85%Atmospheric Pressure: 70KPA-106KPAPower: DC3V (2 x “AAA” Battery)
Battery InstallationWhen the screen shows “Battery Symbol” is empty, which means the battery is under a low power condition.Operation: Open the lid and change the batteries, taking great care with the correct position. A mistake with this could cause damage to the product.
Note: Do not use rechargeable batteries. Use disposable batteries only.
Cautions
The Infrared thermometer must be used under the working conditions required in this manual. Please use it carefully.
- Don’t remove the Infrared thermometer from the measurement area until the beep sound is over.
- Place Infrared thermometer in the same position, because different positions may cause deviations in the thermometer reading.
- The measured temperature may vary from people’s skin types and thickness.
- When measuring, ensure the forehead is not covered by hair, perspiration, cap, and scarf, otherwise, the measured temperature will be below.
- Don’t drop or knock the device, and do not use it if damaged.
- The screen can be wiped and disinfected with an alcohol cloth. Keep the device away from water or other liquids.
- Please do not use batteries that are not mentioned.
- Please do not expose this product to the sun.
Troubleshooting
- The screen displays the message “HI”Possible Cause: The measurement result is greater than 43°C.Solution: Read the manual in detail or re-measure it.
- The screen displays the message “LO”Possible Cause: The measurement result is less than 32°C.Solution: Read the manual in detail or re-measure it.
Package Contents
 report this ad
Non-Contact Forehead Infrared Thermometer * 1Manual * 1Neutral Box * 1
[xyz-ips snippet=”download-snippet”]