
PATENT PENDING Nurture Right Instructions
CAUTIONS:
Thoroughly clean the incubator after each use. Then fully open the grey air vent and plug the incubator into power to run dry (with no added water) for 24 hours to ensure incubator is thoroughly dry before storage.
- Digital Control Function

Function How to operate
Explanation
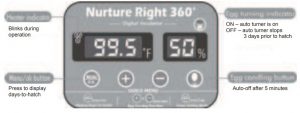
Display days to hatch Press The screen will display “d-# #” which refers to the remaining days to hatch day. Egg turing test Press +Test the egg turner several times after inserting the eggs to ensure that every egg can turn smoothly. Egg condling Press The lamp will automatically turn off after 5 minutes. Temp.& hatch days objustment Press and hold 3 second Refer to the “Adjusting Temperature and Hatch Days” section. Reset factory setting Press and hold 5 second +Reset to factory settings. - Choosing the Right Location for Your IncubatorIncubation room environment can have a considerable effect on hatch rate. The incubator needs to be placed in a room with stable temperature between 74°-80°F.Pay attention to the room temperature to ensure that it doesn’t drop below 72°F particularly at night. Do not place the incubator near a window to avoid directsunlight and drafts. Do not use the incubator on the floor. Not enough fresh air is available close to the ground due to the CO2 concentration.
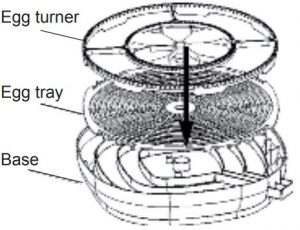
- Assembling the Incubatora) Place the egg tray onto the base, making sure the tray sits flat and level.b) Fit the egg turner onto the “D-shaped” shaft of the turner motor located in the center of the incubator base.c) Plug the egg turner cord (coming out from the base) into the socket located on the back of the incubator top. Connect the power supply unit to the incubator topd) Place the top onto the incubator base, ensuring the clearwindow is completely closed. It’s important to align the two notches on the bottom of the clear window with the two sockets on the base.
- Adjusting Temperature and Hatch Days This incubator is factory pre-set to 99.5°F and 21 hatch days for chicken eggs.Upon plugging the incubator into power, the timer will immediately begin countdown from 21 days and the temperature will gradually increase to 99.5 °F. During this time, the heater indicator light will blink – this is normal.To change the temperature, press and hold the “MENU” button for 3 seconds, and the pre-set “99.5” °F will blink on the screen. Then, use the “+” or “-” buttons to adjust the temperature.After completing the temperature adjustment, press the “MENU” button again to enter hatch days setting mode, and the pre-set “d – 21” will blink on the screen.Then use “+” and “-” to adjust the hatch days. When finished, press the “MENU” button once more to exit the setting mode.The incubator will then start to run using the new settings.During the initial warm up period, the “Low Temperature” alarm may be triggered as the unit slowly warms up to 99.5°F. This is normal due to the cooler starting temperature of the eggs, water, and ambient air inside the incubator. To disable the alarm, press the “MENU” button once.
- Controlling Humidity The humidity in this incubator can be roughly adjusted by adding water to oneor both water pots via the external water filling port and can be further adjusted via the air vent knob to achieve the required humidity level.Day 1 until 3 days before hatch day: To prepare the incubator for the first stage of incubation, fill water pot “A” and open the grey air vent to halfway. Then wait for 2-3 hours for the humidity to fully stabilize, to achieve a humidity around 50% (48-55%is acceptable) which is suitable for most poultry.Last 3 days before hatch day: To prepare the incubator for the final stage of incubation, remove the red plug from water pot “B” and add water to water pot “B” in addition to water pot “A”. Next, open the grey air vent fully. Then wait 2-3 hours for the humidity to fully stabilize, to achieve a humidity around 70% (65-75% is acceptable) which is suitable for most poultry.WARNING: This incubator is only to be used with the power supply unit provided. · This incubator must be placed in an area where it is out of the reach of animals. · Do not use this incubator on the floor. Not enough fresh air is available close to the ground due to the CO2 concentration. · This incubator is not a toy. Children should not play with the incubator and must be supervised by an adult when using it.IMPORTANT NOTE:When in use, the air vent cannot be fully closed. The air vent should be to set 1/2 open for first 18 days. If the incubator is not at 48-55% humidity with the 1/2 open setting, the vent can be further closed to increase humidity. However, the vent must remain at least 1/3 open for first 18 days and fully open for the last 3 days to ensure adequate ventilation for the eggs.Step 01:Pot B Fill water pot: Pot A e.g. Chicken eggs: – fill water pot “A” for days 1-18 – fill water pots “A” and “B” for days 19-21Step 02: Adjust grey air vent knob and wait for 2-3 hours for the humidity to fully stabilize. Close the vent to increase humidity or open the vent to decrease humidity.1/2 openTo ensure adequate ventilation, open the vent to at least 1/3 open for the first 18 days, although 1/2 open is recommended.Fully openTo ensure adequate ventilation, the air vent MUST be fully opened for the last 3 days of incubation.The red plug on water pot “B” is used to prevent the warm air from leaking out. Do not remove it until 3 days prior to hatch day.When adding water, slowly and carefully pour the water to 2/3 or 3/4 of the height of the water pot. Take care when adding water to water pot “A” to not spill any water into water pot “B” to prevent the humidity from spiking.Inspect the water pot every 24 hours and refill as needed. Do not let the incubator run without water!To reduce the impact of cold to the eggs, using warm distilled water (80-90°F) is recommended.After adding water, the humidity may fluctuate. Allow 2-3 hours for the humidity to fully stabilize before making any further adjustments.
- Inserting Eggs and TurningBefore setting eggs, ensure the incubator has been run for 4-5 hours with warm water added to water pot “A”. Also allow stored eggs to naturallywarm up for 6-8 hours to room temperature prior to setting them into theincubator. This will minimize dew condensation on the egg surface.Eggs need to be set lying flat with their pointed ends facing inwards towardsthe center of the incubator. Ensure there is a gap on the side of each egg. This will allow for smooth rolling. After setting the eggs, conduct a turning test to check if each egg is sitting correctly and can turn smoothly. Conduct the test run by pressing the “+”and “-” buttons at the same time. To make observation easier, the sides of the eggs can be marked with a pencil mark “X”.Next, replace the cover. The clear window must be completely flush with the base and the two notches on the lid must be properly aligned with the sockets on the base to maintain the air seal. Otherwise, the warm air will leak out causing an internal temperature fluctuation.The timer will begin the countdown from 21 days immediately upon pluggingthe unit in. After running the incubator without eggs for several hours to allow it to stabilize, the timer will need to be reset to the full incubation period. To ensure that the timer is accurate to 21 days, reset the timer after inserting the eggs. To reset the incubator, press and hold the “Menu” and “-“buttons for 5 seconds. The incubator will reset to exactly 21 days andrestart the countdown from 21 days.
- Using the Built-In Egg CandlerRemove the lid and place it next to the incubator base, taking care not to unplug the egg turner cord. Then gently place the large end of egg onto the candling zone. Press the candling button and observe the interior of the egg.
- Dimming room light will make observation easier.
- Lease take special care to avoid giving shocks or vibration to the egg.
- Excessive shaking or turning during candling can cause the egg to die of stress. -Since the room temperature is much lower than that of the incubator,candling should be completed within 8 minutes.
- The low temperature alarm may be trigged during candling since opening the incubator will cause a temperature loss. To disable the alarm, press the “MENU” button once. After closing the lid the temperature will gradually return to 99.5°F.
- Preparing for HatchingWhen the days-to-hatch countdown reaches 3 days prior to hatch, the egg turner will automatically stop turning the eggs and the egg turner indicator light will be OFF. This is a reminder to remove the egg turner from incubator base and to increase the humidity.Open the incubator and slowly and gently lift the egg turner up out of the motor shaft (egg turner is detachable), and then close the incubator. The eggs do not need to be removed in order to remove the egg turner. The egg turner must be removed 3 days prior to hatch to allow enough space for the chicks to exit the shell, otherwise chicks may become stuck in the shell. Gently lift upward to remove the egg turner from the base Remove the red plug from water pot “B”, fill both water pot “A” and “B”, and adjust the air vent knob to achieve a higher humidity around 70%.Avoid opening the lid frequently. Every time the lid is opened to remove the chicks, the humidity level will fall dramatically and will take time to return to around 70%. Therefore do not open the lid more often than every 6 hours unless absolutely necessary. Chicks can be removed from the incubator after 24 hours when they are fully dry and fluffed but can remain in the incubator up to 2 days after hatching. As some chicks may be late to hatch,the unhatched eggs can remain in the incubator up to 2 extra days until the end of day 23.
- Returning to Factory SettingWhen the hatch is complete, the timer will countdown to 0 days but will not automatically reset to 21 days. To start a new countdown timer for a subsequent hatch, reset the timer after putting in new eggs, otherwise the egg turner will not operate automatically.Resetting the incubator will return it to the factory settings of 99.5°F and 21 hatch days. To reset the incubator, press and hold both “Menu” and “-”buttons for more than 5 seconds. The incubator will beep and the display will blink one time, indicating that the incubator has successfully been reset.The timer will then restart the countdown from 21 days.
- Cleaning the IncubatorDisconnect the incubator from the main power supply before cleaning. Wipe all internal surfaces with a disinfectant solution using a damp cloth. Then wipe dry with a clean cloth. Ensure that all electrical parts are kept dry during cleaning. Do not immerse any electrical parts!After cleaning the incubator, plug the incubator into power to run dry (with no added water) for 24 hours to ensure it is thoroughly dry before storage.
- Calibrating Temperature & HumidityThe built-in calibration function is for resetting the incubator temperature or humidity reading with an external thermometer or hygrometer. As the incubator is already calibrated at the factory, recalibration is not recommended without first verifying that the temperature or humidity reading is incorrect.
 c) Plug the egg turner cord (coming out from the base) into the socket located on the back of the incubator top. Connect the power supply unit to the incubator top
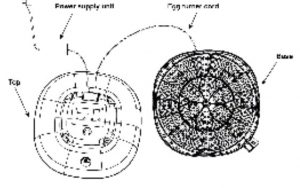 d) Place the top onto the incubator base, ensuring the clearwindow is completely closed. It’s important to align the two notches on the bottom of the clear window with the two sockets on the base.
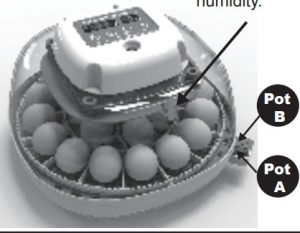 Step 01:Pot B Fill water pot: Pot A e.g. Chicken eggs: – fill water pot “A” for days 1-18 – fill water pots “A” and “B” for days 19-21Step 02: Adjust grey air vent knob and wait for 2-3 hours for the humidity to fully stabilize. Close the vent to increase humidity or open the vent to decrease humidity.1/2 openTo ensure adequate ventilation, open the vent to at least 1/3 open for the first 18 days, although 1/2 open is recommended.
 Fully openTo ensure adequate ventilation, the air vent MUST be fully opened for the last 3 days of incubation.
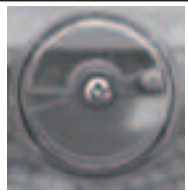 The red plug on water pot “B” is used to prevent the warm air from leaking out. Do not remove it until 3 days prior to hatch day.When adding water, slowly and carefully pour the water to 2/3 or 3/4 of the height of the water pot. Take care when adding water to water pot “A” to not spill any water into water pot “B” to prevent the humidity from spiking.Inspect the water pot every 24 hours and refill as needed. Do not let the incubator run without water!To reduce the impact of cold to the eggs, using warm distilled water (80-90°F) is recommended.After adding water, the humidity may fluctuate. Allow 2-3 hours for the humidity to fully stabilize before making any further adjustments.
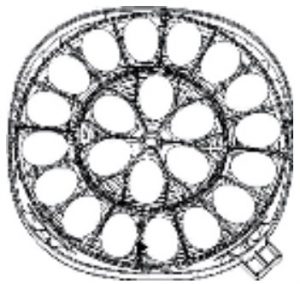 After setting the eggs, conduct a turning test to check if each egg is sitting correctly and can turn smoothly. Conduct the test run by pressing the “+”and “-” buttons at the same time. To make observation easier, the sides of the eggs can be marked with a pencil mark “X”.Next, replace the cover. The clear window must be completely flush with the base and the two notches on the lid must be properly aligned with the sockets on the base to maintain the air seal. Otherwise, the warm air will leak out causing an internal temperature fluctuation.The timer will begin the countdown from 21 days immediately upon pluggingthe unit in. After running the incubator without eggs for several hours to allow it to stabilize, the timer will need to be reset to the full incubation period. To ensure that the timer is accurate to 21 days, reset the timer after inserting the eggs. To reset the incubator, press and hold the “Menu” and “-“buttons for 5 seconds. The incubator will reset to exactly 21 days andrestart the countdown from 21 days.
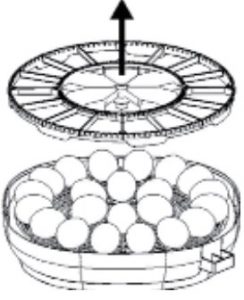
For further assistance, please contact Questions@mannapro.com
[xyz-ips snippet=”download-snippet”]