PATPET Remote spray trainer
Owner's Manual
Please read the quick start before beginning.
Thanks for purchasing!The dog training collar is designed to let dogs live safely, happily and get along with people more harmoniously.
WARNINGContainer may explode if heated.Do not expose to heat or store at temperatures above 45°C or 120°F.Do not puncture or incinerate container.Use with adequate ventilation.Keep out of reach of children.
WARNINGDo not use with aggressive dogs.Aggressive dogs can cause severe injury and even death to their owner and others. If you are unsure whether this product is appropriate for your dog, please consult your veterinarian or certified trainer. This product is only for use with healthy dogs.
CAUTIONSafety during on-leash training.It is vitally important that you and your dog remain safe while learning during on-leash training. Your dog should be on a strong leash, long enough for him to attempt to chase an object, but short enough for him not to reach a road or other unsafe area. You must also be physically strong enough to restrain your dog when he tries to chase.
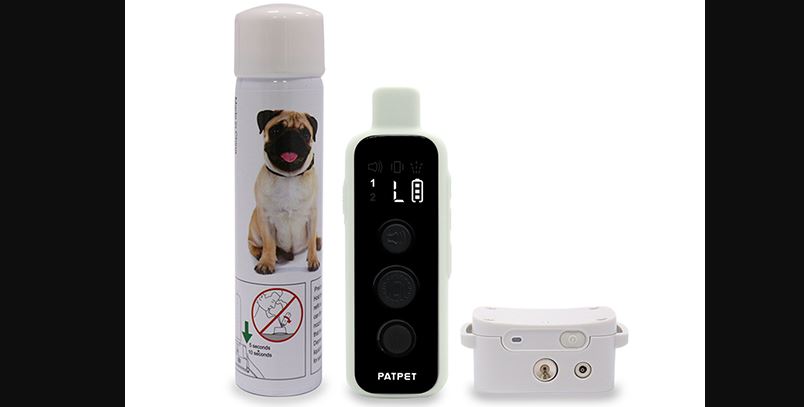
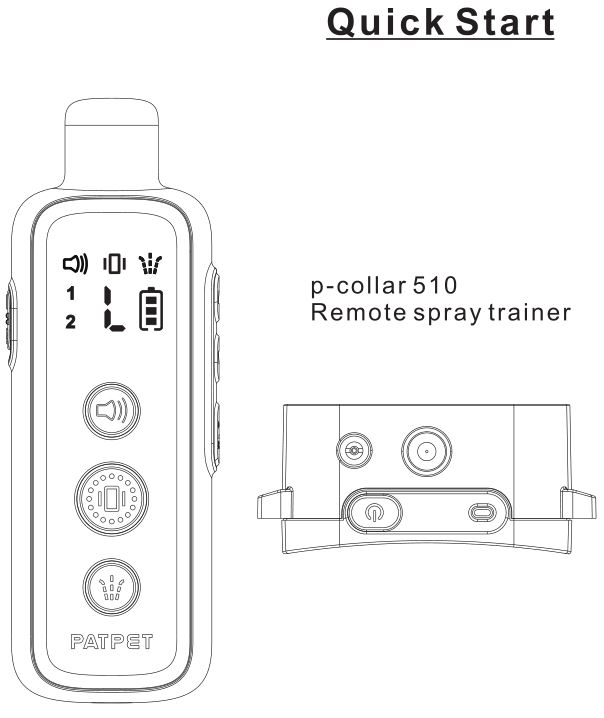
Overview

Setting Up the Product
Before you can use the Dog Training Collar, you must set up the product as below steps:
- Charging the Remote and the Receiver Collar.
- Prepare the Remote and turn it on.
- Prepare the Receiver Collar and turn it on.
- Function test, test function of buttons before wearing it on dog.
- Pair the Remote and the Receiver Collar, pair them when the product lose its code or pair for a second collar.
Charging the Remote and the Receiver Collar
- Plug in and fully charge the Remote and the Receiver collar. For the initial charge, be sure to charge it for4 hours. Subsequent charges only take 2-3 hours.
- When full charged, the red LED on the Receiver Collar will become green. The Battery Display of the Remote will stop cycling and appear full.
- Please replace the rubber cover when the Receiver Collar is full charged.
Tips:
- Excessive charging will shorten battery life. Only charge them when batteries are low.
- When you’re not using the collar, please turn it off to increase the battery life.
Note:Please use the Output: DC 5V 500-B00mA USB charger to charge the product.Don’t use a charger that does not meet the USB specifications to charge the product.
Prepare the Remote
Turn ON/OFF the Remote
- Long press the ON/OFF button to turn the remote ON.
- LCD will be lighted, and show the information of current channel, battery power and levels. If not, please charge the remote.
- Long press the ON/OFF button to turn the remote OFF.
Prepare the Receiver
Turn on the Receiver Collar
- Press the
 Button the Green LED light comes on.
 - In normal mode, the Green LED will flash every 4 seconds, indicating the Receiver Collar is on and ready to receive a signal from the Remote.
Turn off the Receiver Collar
Press and hold the ![]() Button until the Red LED light shuts off {This takes approximately 3 seconds}.
Button until the Red LED light shuts off {This takes approximately 3 seconds}.
Replenish the receiver with Citronella Refill
Please confirm that the receiver is turned off and put the receiver underneath, With the Citronella Refill tank facing down, align it withthe receiver’s inflation valve and press firmly for about 15 seconds to fill the receiver.

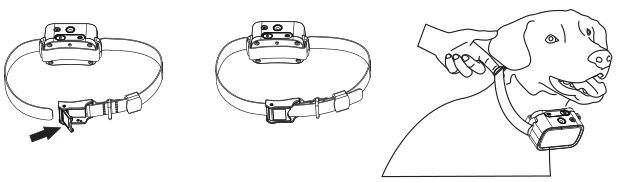
Assembly the Receiver CollarReferring to the image below, wear the collar on the dog’s neck and keep the spray valve aligned with the dog’s face.
NOTE:To extend the life of the batteries, please turn the Receiver Collar off when it is not in use.
Function Test
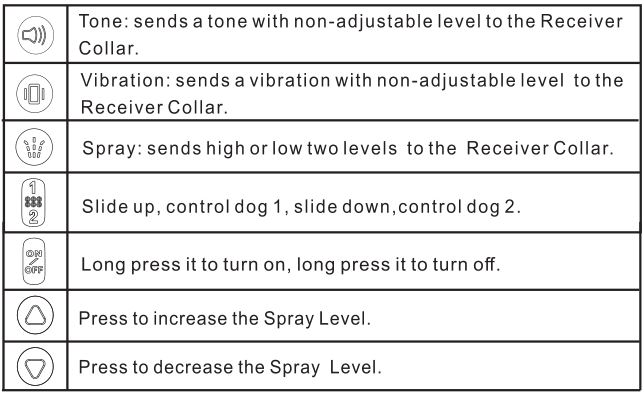
- Hold the receiver and press the and button on the remote to test whether the Tone and Vibration are normal.
- Hold the receiver and press the button on the remote to test if the spray is normal. You can press the and button to adjust the intensity level of the spray. The “H” means the spray is larger, The “L” means the spray is smaller, The “0” means close the spray.
Warning:Do not face the spray valve on your face and eyes.
Pair the Remote and the Receiver Collar
- Use the i switch on the Remote to select Dog 1 .
- With the Remote turned on and the Receiver Collar turned off, press and hold the ON/OFF Button on the Receiver Collarfor4-5 seconds.
- The receiver’s Red & Green LED will blink for about 10 seconds indicating that it is ready for pairing.
- Press and hold the remote’s Tone Button and Vibration Button at the same time for 2-3 seconds, the Green Led on the Receiver Collar will blinkfor5times indicating successful pairing.
Pairing a Second Collar with the Remote
Use the Button on the Remote to select Dog 2. Then follow the above pairing steps from 2-4.
Collar Fitting
Please fit the collar properly so that the receiver press firmly against the dog’s skin. When properly fitted, you should be able to put a finger in between the Receiver Collar and dog’s neck.

Too loose: The Receiver Collar will move around the dog’s neck, Will affect spray position and effect.
Too tight: It may cause dog’s to breathe hard.
Device Information
Product Specification
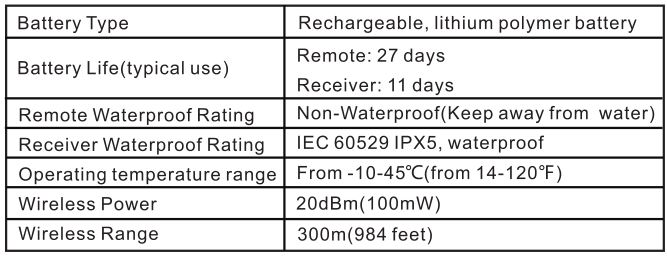
The unit need to be charged under any of below situations
- The indicator light on the Receiver Collar is emitting a red color every 4 seconds or flashes rapidly.
- The 3 bar indicator on the Remote LCD shows just 1 bar.
- The indicator light on the Remote or Receiver Collar will not come on.
- The indicator light on the Remote or Receiver Collar comes on momentarily when any of the Mode Buttons is pressed.
Others
Warranty and repair information
1-Year Limited Lifetime WarrantyThe original purchaser for this unit is provided with 1-YEAR WARRANTY.The warranty begins from the date of purchase. For the first year, coverage is for both Parts and Labor on warranty repair services.
Accessories such as straps and batteries are covered for the first year only. After the first year, the Limited Lifetime Warranty covers Parts only and does not cover Labor Fees and Accessories. Al I shipping fees incurred, the cost of Accessories after the first year, and Labor fees associated with out of warranty repair work, are the customer’s responsibility. Labor fees will be variable depending on the extent of the work re qui red. The Limited Lifetime Warranty expires 5 years after a model is discontinued from production.
To Qualify for the WarrantyAll products must provided a proof of purchase is required to initiate repair work under warranty. We strongly recommend keeping the original receipt. If a proof of purchase is not available at the time of service, we will estimate the age of unit by the serial number. Serial number estimates can differ from the actual purchase date. A serial number estimate is the only method of determining an approximate date of purchase without a proof of purchase.
Not Covered Under WarrantyWe DO NOT offer warranty for products that have been bought secondhand or as a resold product. We DO NOT replace defective units or provide refunds for products purchased from us after 30 days from the date of purchase. Issues of replacement and refunds on units purchased less than 30 days from an authorized dealer must be addressed to the dealer directly. If the products purchased from an authorized dealer are after 30 days from the date of purchase, please send the units to us for service and repair. We DO NOT cover the cost of repairs and replacements due to misuse by the owner or dog, improper maintenance, and/or lost units. Any water damage on the Water Resistant remote and the Water Resistant Receiver of our product series will not be covered. All replacement costs for either the remote or receiver will be the owner’s responsibility. The warranty is void if the unit has been altered or an unauthorized person has damaged the unit while attempting repair work. We reserve the rig ht to retain and dis card any parts or accessories that have been found damaged upon replacement and repair.
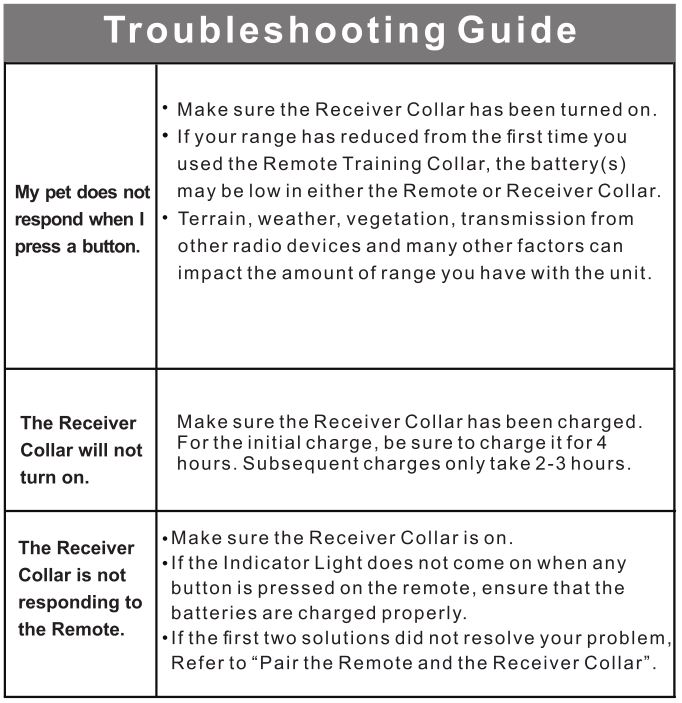
Procedure for Repair WorkIf the unit is malfunctioning, please refer to the “Troubleshooting Guide” in the quick start before sending it back for Service. The cost of shipping products under warranty back is the customer’s responsibility. We are not responsible for units damaged or lost in transition. We are not responsible for loss of training time or inconvenience while the unit is in for repair work. We do not provide loaner units or any form of compensation during the repair period. A copy of the sales receipt showing the purchase dale may be required before warranty work is initiated. Please include a brief explanation outlining the problem and include your name, address, city/state/zip code, daytime phone number, evening phone number, and email address.
ComplianceFCC-USAThis device complies with part 15 of the FCC Rules. Operation is subject to the following two conditions:(1) This device may not cause harmful interference.(2) this device must accept any interference received, including interference that may cause undesired operation.
CAUTION: Modification or changes to this equipment not expressly approved by manufacturer may void the user’s authority to operate the equipment.
Note: This equipment has been tested and found to comply with the limits for a Class B digital device, pursuant to part 15 of the FCC Rules. These limits are designed to provide reasonable protection against harmful interference in a residential installation. This equipment generates uses and can radiate radio frequency energy and, if not installed and used in accordance with the instructions, may cause harmful interference to radio communications. However, there is no guarantee that interference will not occur in a particular installation. If this equipment does cause harmful interference to radio or television reception, which can be determined by turning the equipment off and on, the user is encouraged to try to correct the interference by one or more of the following measures:
- Reorient or relocate the receiving antenna.
- Increase the separation between the equipment and receiver.
- Connect the equipment into an outlet on a circuit different from that to which the receiver is connected.
- Consult the dealer or an experienced radio/TV technician for help.
![]()
Shenzhen Patpet Technology Co., Ltdhttps://patpet.com/Become a dealer: [email protected]After-service: [email protected]Facebook @PatpetDogCollarYoutube Video Guide
![]()
References
[xyz-ips snippet=”download-snippet”]