
8.5QT CERAMIC NON-STICK XXLAIR FRYER W/ACCESSORIESInstructions & RecipesMODEL PDAF8TX-2
Meet Paula Deen

Culinary icon Paula Deen is a self-made entrepreneur who learned her savory secrets from her grandmother. She started her career in the food industry with a small catering company called The Bag Lady, but the business quickly outgrew her home kitchen. Taking a leap of faith, she opened her first restaurant, The Lady and Sons, which has since become a tourist hot spot in Savannah, GA. With her huge personality, delectable recipes, and heart of gold, Paula next found herself in talks with TV execs after a friend introduced her to some influential people in the business. The rest, as they say, is history. In addition to her television success, Paula has sold more than 11,000,000 copies of her 14 cookbooks and launched the Paula Deen Network, an interactive digital portal that combines cooking, lifestyle, and game shows with great recipes, meal-planning tools, and more.
Congratulations!
My love for fried food is documented in every one of my cookbooks, and just rattling off some of my favorite dishes—fried chicken, fried green tomatoes, fried okra, and fritters—it makes my mouth water y’all.
It’s no secret that over the past few years I have been bringing healthier food into my life. After having lost 40 pounds, I want to maintain my trim figure, so I have been avoiding fried foods. However, I will never, ever completely give up my favorites, so I limit my Southern-fried treats to one day a week. This is challenging because so much Southern food is fried.
When I was introduced to air-frying, I was skeptical. I honestly didn’t fully understand the concept: no oil, less fat? But what about the crunch and texture I love from frying? I was pleasantly surprised when I tried the air fryer for the first time. I prepared my favorite recipe, and I tasted the same delicious flavor I know and love—and the food was crispy without the oil! Testing one recipe after another, I found that the air fryer is a healthyand easy alternative to preparing a variety of recipes that call for frying.
I’ve worked with my team to create a larger air fryer that is easy to use and will cook fantastic meals. Grill, bake, or fry, this air fryer does it alland is the answer to preparing quick and healthy meals. I now can enjoy my favorite foods more often without feeling guilty.
I’m staying on a healthy track cooking with my air fryer, and I encourage y’all to do the same. Thanks for your purchase, and I know y’all, too, will love over fifty great recipes in this booklet to get started. Love and air-fried dishes,

WHAT’S INCLUDED
Air Fryer

Instruction Manual &Recipes

DividerUSE– Place inside the chamber to divide foods while cooking.CARE– Hand washing is recommended.
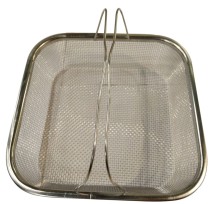
Mesh BasketUSE– Place in the bottom of the chamber to make fried foods such as french fries.CARE– Hand washing is recommended.

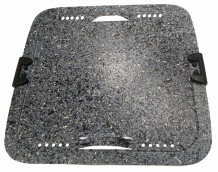
Cooking InsertUSE– Place in the bottom of the chamber to give a crispy finish to food.CARE– Hand washing is recommended.
Griddle InsertUSE– Place in the bottom of the chamber to make pancakes, bacon, eggs, etc.CARE– Hand washing is recommended.

Grill InsertUSE– Place in the bottom of the chamber to make food with a grilled finish.CARE– Hand washing is recommended.
IMPORTANT SAFEGUARDS
When using electrical appliances, basic safety precautions should be followed as follows:
- Read all instructions before first use.
- This appliance is designed for household use only.
- Do not place the appliance against a wall or against another appliance. Leave at least 5 inches of free space on the back and sides and 5 inches of free space above the appliance.
- Do not place anything on top of the appliance.
- Do not use the appliance for any purpose other than described in this manual.
- Do not leave the unit unattended when in operation.
- Any accessible surfaces may become hot during use.
- Do not place the appliance on or near combustible materials, such as a tablecloth or curtain.
- The appliance needs approximately 30 minutes to cool down before safely handling or cleaning.
- Do not cover the air inlets and air outlets when the appliance is working.
- Do not immerse the housing in water or rinse under the tap due to the electrical and heating components.
- Never use the air fryer without the basket in place.
- Keep all ingredients in the basket to prevent any contact with the appliance’s heating elements. Do not overfill the basket.
- During hot air frying, hot steam is released through the air outlets. Keep your hands and face at a safe distance from the steam and from the air outlets. Also, be careful of hot steam and air when you remove the pan from the appliance.
- Do not touch the cooking chamber, insert, or the inside of the air fryer during and immediately after use, as they get very hot. Only hold the food basket by its handle. Always use oven mitts. Unit is hot!
- Keep all cords away from hot surfaces.
- Keep the appliance and its cords out of the reach of children
- Do not use any unauthorized person to replace or fix a damaged main cord.
- Do not use the appliance if there is any damage to the plug, cord, or other parts.
- Check that the voltage indicated on the appliance fits the voltage for your outlet.
- Do not connect the appliance to an external timer switch.
- Immediately unplug the appliance if you see dark smoke coming out of the appliance. Wait for the smoke emission to stop before you remove the pan from the appliance.
- Keep all ingredients in the cooking chamber to prevent contact with the heating elements.
- Do not let any liquid enter the appliance (aside from cooking liquids added to the pan) to prevent electric shock or shortcircuiting.
- Do not touch the inside of the appliance while it is operating, it will be very hot.
- Do not use with an extension cord, it must be plugged into a wall outlet.
- Always unplug the appliance when not in use.
- SAVE THESE INSTRUCTIONS.
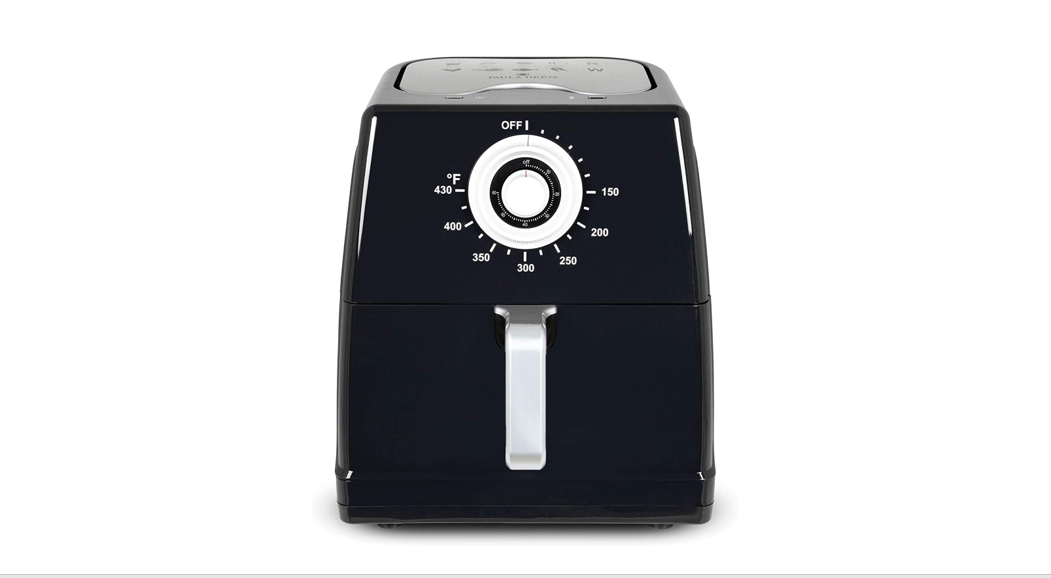
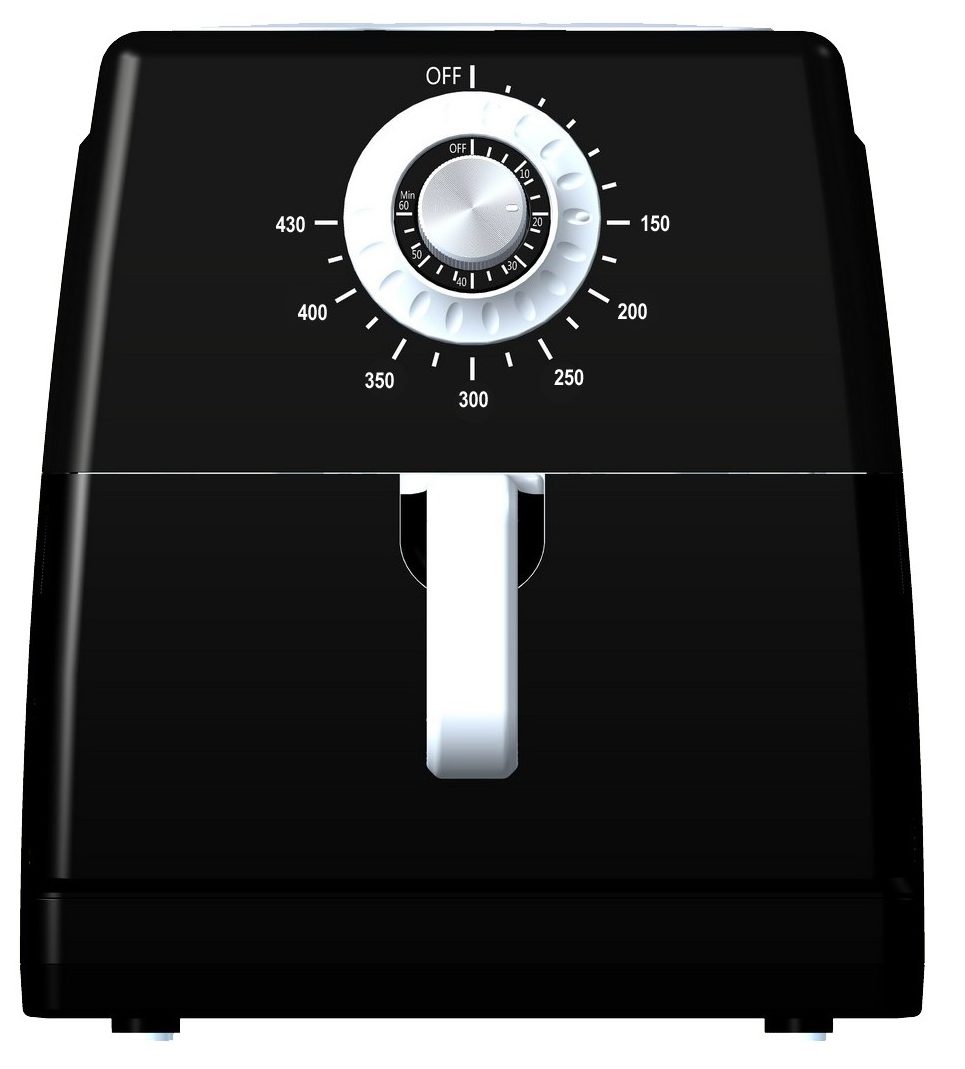
PARTS DESCRIPTION

- Temperature Light
- Timer Light
- Temperature Control Knob
- Timer Knob
- Pan Handle
- Cooking Chamber
- Main Body
- Air Inlet
- Cooking Insert
- Cooking Chamber
AUTOMATIC SWITCH-OFF
The appliance has a built-in timer. It will automatically shut off the appliance when it has counted to zero. You can manually switch off the appliance by turning the timer knob counter-clockwise to zero.
BEFORE FIRST USE
- Remove all packaging materials, stickers, and labels.
- Clean the cooking chamber and accessories with hot water, dishwashing liquid, and a non-abrasive sponge.
- Wipe the inside and outside of the appliance with a cloth.
USING THE APPLIANCE
- Place the appliance on a stable, horizontal, and even surface.
- Remove the cooking chamber from the air fryer and place the cooking insert in the pan.
- Place the ingredients on top of the cooking insert, if desired spritz with cooking oil for a crispier finish. NOTE: Do not over fill the cooking chamber (for amounts, see “Paula’s Suggested Cooking Temperatures” chart on page 11), as it may affect the quality of the food.
- Slide the cooking chamber back into the air fryer. Never use the cooking chamber without the cooking insert in it.
- Turn the temperature control knob to the proper temperature.
- Determine the required preparation time for the ingredient.
- To switch on the appliance, turn the timer knob on to the required preparation time.
- The red power light and the green heating light will go on; the air fryer quickly begins the cooking process. the timer will start to count down the set preparation time. During the cooking cycle, the green eating light will turn off from time to time. This indicates that the heating element is maintaining the set temperature.TIP: Add 3 minutes to preparation time if the appliance is cold. If you want, you can also reheat the appliance without any ingredients inside. Turn the timer knob for more than 10 minutes and then turn back to preheat. Then fill the cooking chamber and turn the timer knob to the required preparation time.CAUTION: Do not touch the cooking chamber during and for 30 minutes after use, because it will be very hot. Hold the cooking chamber ONLY by the handle.
- Some ingredients may require shaking halfway through the preparation time. At the halfway point, pull the cooking chamber out of the appliance by the handle and shake it. Then slide the cooking chamber back into the air fryer.
- When you hear the timer bell, the set preparation time has elapsed. Pull the cooking chamber out of the appliance and place it on a heat-proof surface. NOTE: You can also switch off the appliance manually by turning the timer control knob to 0
- Check to make sure the ingredients are ready. If the ingredients are not fully cooked, simply slide the cooking chamber back into the appliance and set the time for a few extra minutes.
- Empty the cooking chamber into a bowl or onto a plate. To remove large or fragile ingredients, lift the ingredients out of the basket using tongs. The cooking chamber and the ingredients are hot after air frying. Depending on the moisture content of the ingredients in the air fryer, steam may escape from the pan.
CLEANING
- Remove the main plug from the wall outlet and let the appliance cool down for at least 30 minutes.NOTE: Remove the cooking chamber to let the Air Fryer cool before cleaning.
- Clean the appliance after every use. Do not clean the cooking chamber and the inside of the appliance with any metal kitchen utensils or abrasive cleaning materials, as this may damage the non-stick coating of them.
- Wipe the outside of the appliance with a moist cloth.
- Clean the cooking chamber and accessories with hot water, some liquid detergent, and a non-abrasive sponge. You can remove any remaining food residue with degreasing liquid.
- Clean the inside of the appliance with a non-abrasive sponge. Clean the heating element with a cleaning brush to remove any food residue
STORAGE
- Unplug the cord.
- Make sure all parts are clean and dry.
PAULA’S SUGGESTED COOKING
| Ingredients | Suggested Amount | Temp (°F) | Time (Minutes) | Additional Information |
| Fries | ||||
| Thin frozen fries | 1 pound | 430 | 15 minutes | Spritz with oil, Shake 2 times |
| Thick frozen fries | 1 pound | 430 | 20 minutes | Spritz with oil, Shake 2 times |
| Potato wedges | 1 pound | 430 | 25 minutes | Spritz with oil, turn once |
| Meat | ||||
| Hamburger | 1/2 inch thick 4oz. | 385 | 10 minutes | Turn once |
| Steak | 1-1 1/4 inch steak medium rare | 385 | 12- 14 minutes | Turn once |
| Pork Chops | 1-inch boneless pork chops | 385 | 12 minutes | Turn once |
| Poultry | ||||
| Frozen chicken wings | 10 wings | 340 | 25 minutes | Spritz with oil, Shake 2 times |
| Frozen chicken tenders | 6 tenders | 340 | 15 minutes | Turn once |
| Frozen chicken nuggets | 10 nuggets | 340 | 12 minutes | Shake 2 times |
| Fish | ||||
| Shrimp | 10 shrimp | 340 | 12 minutes | Spray and turn once |
| Frozen fish fingers | 4 fish fingers | 340 | 12 minutes | Turn once |
| Frozen crab cakes | 4 cakes | 340 | 12 minutes | Shake 2 times |
| Vegetables | ||||
| Frozen green beans | 2 cups | 380 | 10 minutes | Spritz with oil, Shake 2 times |
| Baked Potato | 2 potatoes | 380 | 45 minutes | |
| Frozen onion rings | 1 pound | 380 | 15 minutes | Spritz with oil, Shake 2 times |
| Baked Goods | ||||
| Frozen quiche | 6 mini quiche | 295 | 15 minutes | |
| Frozen pretzels | 2-5 ounces | 295 | 6 minutes | Spritz with oil, turn once |
| Frozen cinnamon rolls | 4 rolls | 295 | 15 minutes | |
| Pizza | ||||
| Frozen thin crust pizza | 1- 6 inch | 340 | 15 minutes | |
| Frozen thick crust pizza | 1- 6 inch | 340 | 20 minutes | |
| Frozen pizza bites | 8 | 340 | 12 minutes |
Paula’s Quick Tips
- Any food that can be cooked in a conventional, convection, microwave, or toaster oven can be cooked in your air fryer.
- Smaller ingredients usually require a slightly shorter cooking time than larger ingredients.
- Shaking smaller ingredients halfway during the preparation time optimizes the end result and can help prevent unevenly fried ingredients.
- For a crispy texture, spritz vegetable, olive or non-stick oil over ingredients in the cooking chamber.
- Place a glass, silicone, or metal oven-safe dish in the cooking basket when baking a cake or frying fragile or filled ingredients.
- Frozen foods, such as fries, chicken nuggets, and fish sticks can be prepared by following Paula’s Suggested Cooking Temperatures on page 11.
Deep-Fried Mac and Cheese
Serves 6
Ingredients3 cups Plain bread crumbs for dredgingFlour, for dredging4 large eggs, beatenOil for sprayingFor The Mac N Cheese1-pound elbow macaroni2 cups grated cheddar cheese½ cup sour cream4 tablespoons butter, cut into pieces½ teaspoon salt½ teaspoon pepper1 cup milkPreparation
- Cook macaroni according to package instructions.
- Drain and rinse with cold water. Let the pasta drain and cool for several minutes.
- Heat a Dutch oven with the milk and butter over medium heat.
- Whisk in the sour cream till smooth, then stir in the cheeses stirring till melted and smooth.
- Stir in the drained macaroni. Pour into a shallow baking dish and chill for at least 2 hours.
- Cut macaroni and cheese into squares.
- Dredge each Cheesy Mac square in flour, then egg, and then bread crumbs. Roll to coat each square.
- Place each square on a baking pan lined with parchment paper. Spray tops of squares with oil.
- Working in batches place in the cooking chamber careful not to overcrowd, (6-8 depending on the size.)
- Close chamber; set temperature for 400 degrees, and timer for 5 minutes.
- When cook time is complete, open the chamber and turn squares; spray again with oil and close the basket.
- Set timer for 5 minutes. When cook time is complete, open the chamber and Repeat with remaining squares; serve warm.
Fried Green Tomatoes with Vidalia Onion Relish
Serves 2-4
Fried Green Tomato Ingredients1 large firm green tomato, cut into ¼-inch slices1 cup buttermilk1 cup all-purpose flourParchment PaperVidalia Relish Ingredients2 white onions diced½ cup mayonnaise½ cup rice wine vinegar2 tablespoon brown sugar2 tablespoon fresh chives, choppedVidalia Relish Preparation
- Mix all ingredients together in a bowl.
- Cover with plastic wrap and let marinate for a few hours.
Fried Green Tomato Preparation
- Slice the tomatoes ¼ inch thick.
- Lay them out in a shallow baking pan and sprinkle with salt.
- Place slices in a colander and allow time for the salt to pull the water out of the tomatoes, approximately 30 minutes.
- Working, in batches of 4, dip tomatoes into the buttermilk, then dredge them into the flour with a dash of pepper.
- Line air fryer with parchment paper.
- Spray slices with oil on each side and place them in the air fryer basket.
- Set temperature to 400 degrees, and time for 5 minutes. Close chamber.
- When cook time is complete, open chamber turn slices over, spray with oil; close chamber.
- Set timer for 3 minutes.
- When cook time is complete, open chamber turn slices again; close chamber.
- Set timer for 2 minutes; set aside and keep warm.
- Repeat with remaining slices.
- Serve hot with relish on the side.
Naked Hot Chicken Wings
Serves 4
Ingredients2-pounds chicken wings, cut at the joint to yield a wingette and a drumette from each wing1 teaspoon Kosher Salt1/8 teaspoon Cayenne pepper2 tablespoons peanut oil1 stick butter5oz. Paula Deen Hot Sauce (sold separately)
Preparation
- In a small saucepan over medium heat, heat butter, and hot sauce just until butter melts; keep warm on the stovetop.
- Wash wings thoroughly, pat dry, and place in a bowl. Add oil, salt, and cayenne pepper.
- Thoroughly coat the wings and working in batches of about 8 wings, place them in the chamber; close chamber.
- Set temperature to 400 degrees, and timer for 25 minutes. Shake occasionally and spritz with oil once during the cooking time.
- When cook time is complete, open the chamber and toss the fried chicken in the buffalo sauce and remove with a slotted spoon.
- Repeat with the remaining chicken.
Southern Fried Chicken
Serves 2-4
IngredientsPaula Deen House Seasoning (sold separately or see recipe)2 ½ lbs. chicken, cut into pieces2 cups self-rising flour1 cup hot sauce3 large eggs
Preparation
- In a medium-sized bowl, beat the eggs together with the hot sauce.
- Season the chicken well with the House Seasoning.
- Working in batches of 2-3, dip the seasoned chicken in the egg, then coat well with flour.
- Place on a baking tray lined with parchment paper.
- Spray the top of the chicken pieces with oil, set them into a chamber.
- Spray the chicken pieces again; close the chamber.
- Set temperature for 350 degrees, and timer for 15 minutes.
- When cook time is complete, turn the chicken, and spray again; close the chamber.
- Set timer for 10 minutes. When cook time is complete, open chamber, turn chicken spray with oil again; close chamber.
- Increase the temperature to 400 degrees, Set timer for 7 minutes.
- When cook time is complete, and the chicken has reached an internal temperature of 165 degrees, remove it to a serving platter and cover it to keep warm.
- Repeat with remaining chicken.
Fried Pork Chops with Tomato Gravy
Serves 2
Ingredients2 bone-in center-cut pork chops, 1-inch thick, ½ pound each¼ teaspoon garlic powderOil for spraying4 tablespoons olive oil4 tablespoons unsalted butter2 tablespoons finely chopped onion¼ cup all-purpose flour1 ½ cups whole milk1 ½ cups chicken broth or water1 can (14 ½ oz.) tomatoes, drained
Preparation
- Lightly sprinkle the chops on both sides with salt, pepper, and garlic powder.
- Spray each chop on both sides and place it in the chamber; close chamber.
- Set temperature for 400 degrees, and timer for 10 minutes.
- When cook time is complete, open the basket, turn the chops and spray again.
- Set timer for 10 additional minutes.
- While chops are cooking, add butter to a small skillet and melt.
- Add onions and cook, stirring until softened, about 5 minutes.
- Go ahead and reduce the heat if the onions start to brown too quickly.
- Sprinkle the flour over the onions and cook, stirring, 1 minute.
- Slowly whisk in the milk, then the broth or water. Simmer mixture until thickened, about 5 minutes.
- Whisk in the tomatoes, ½ teaspoon salt, and ¼ teaspoon black pepper.
- Spoon the sauce over pork chops and serve.
Bacon-Wrapped Shrimp
Serves 2-4
Ingredients16 jumbo shrimp, butterflied16 chunks Monterey Jack cheese1 serrano pepper, thinly sliced16 bacon strips, cookedToothpicksBarbecue sauce
Preparation
- Place shrimp, seam-side down, on a cutting board.
- Stuff 1 shrimp with a piece of cheese and pepper; close the shrimp, wrap it with a piece of bacon, and secure with a toothpick.
- Repeat the last step again with the remaining shrimp.
- Place shrimp in the air fryer 5 at a time. Spray with oil.
- Close chamber; set temperature to 400 degrees. Set timer for 5 minutes.
- Shake chamber several times.
- If the bacon is not cooked crispy enough spray with oil and cook for 2 minutes longer.
- Serve with barbecue sauce for dipping.
Fried Catfish
Serves 2-4
Ingredients4 catfish filetsSalt1 cup buttermilk2 tablespoons hot sauceOil for spraying1 cup flour1 cup yellow cornmeal1 teaspoon crab boil seasoning1 teaspoon garlic powder
Preparation
- Season the catfish fillets on both sides with salt and pepper.
- Mix together buttermilk and hot sauce in an 8×8 casserole dish.
- Add cat fish fillets, making sure they are completely covered by the liquid.
- Let soak while you prepare the other ingredients.
- Prepare a baking sheet with parchment paper.
- Whisk together the flour, cornmeal, crab seasoning, garlic powder in another casserole dish.
- Remove the catfish from the buttermilk, letting excess drip off, and dredge on both sides with the cornmeal mixture, matting it down to help adhere.
- Place coated fillets on a baking pan and spray with oil on both sides, sprinkle with a little more cornmeal mixture, and place in refrigerator to set up for 30 minutes.
- Place 2 fillets in the chamber spray well with oil; close basket.
- Set temperature for 400 degrees, and timer for 10 minutes.
- When the cooking time is complete, open the chamber, gently turn fillets, and spray with oil; close the chamber.
- Set timer for 5 additional minutes, or until golden brown and cooked through.
- Repeat with remaining fillets.
- Serve warm.
French Fries
Serves 2-4
Ingredients2 Russet Potatoes, peeled and cut into friesOil for fryingSea salt
Preparation
- Soak cut potatoes in a bowl of ice water for at least 15 minutes.
- Pat the potatoes dry with paper towels.
- Place fries in the chamber, in a single layer, not crowding; close chamber.
- Set temperature for 320 degrees, and timer for 10 minutes, (this is to remove moisture from the fries).
- When cook time is complete, spray well with oil, and sprinkle with salt; close chamber.
- Set temperature to 400 degrees and set a timer for 10 minutes more.
- Shake occasionally, adding more spray if you like.
Perfect Sweet Potato Fries
Serves 2
Ingredients1 sweet potato, peeled and washed1 tablespoon extra-virgin olive oil½ teaspoon kosher salt½ teaspoon Cajun seasoning1 teaspoon maple syrup
Preparation
- Cut potato into ¾ inch matchsticks.
- In a shallow glass baking dish toss the potatoes with the remaining ingredients.
- Lay potatoes in the chamber, careful not to overlap.
- Spray well with oil.
- Set temperature to 400 degrees, set a timer for 5 minutes. Shaking chamber occasionally.
- After 5 minutes, turn all potatoes and set for 5 minutes longer.
- Remove fries from the chamber and allow to cool slightly.
Fried Cherry Walnut Pies
Filling Ingredients:1 cup granulated sugar2/3 cup light corn syrup1/3 cup butter, melted2 large eggs1 ½ cups chopped walnuts1 teaspoon vanilla extract1/8 teaspoon salt½ cup finely chopped dried cherriesCrust Ingredients2 pre-made pie crusts1 egg, beatenFlour for dustingConfectioner’s sugar, for garnishOil for spraying
Preparation
- In a cold saucepan, combine the granulated sugar, corn syrup, melted butter and eggs.
- Stir in walnuts, vanilla and salt. Bring to a boil over medium heat.
- Reduce the heat, and simmer for 10 minutes. Stir in the cherries. Cool for 20 minutes.
- On a lightly floured surface, unroll 1 pie crust. Cut circles from the dough using a 4-inch cutter.
- Re-roll and cut circles from the dough scraps. Stack the dough circles between pieces of waxed paper.
- Repeat the procedure with the remaining pie crusts.
- Place 1 circle on a flat surface and lightly brush the edges of the crust with the beaten egg yolk.
- Place 1 heaping tablespoon of walnut mixture in the center of the circle. Fold the dough over the filling, pressing the edges to seal.
- Repeat with the remaining rounds and walnut mixture.
- Working in batches of 2, spray each side of pies and place in the chamber; close chamber.
- Set temperature for 400 degrees, and timer for 5 minutes. When cook time is complete, open the chamber, turn pies, and spray again with oil.
- Set timer for 3 minutes. When cook time is complete, remove pies to a platter and lightly dust immediately with the confectioner’s sugar.
- Repeat with remaining pies.
Fried Peach Pie
Serves 4
Ingredients1 can 8oz. can crescent dinner roll dough4 tablespoon peach pie filling¼ cup ready-to-use vanilla frostingOil for spraying
Preparation
- Layout 4 triangles on a work surface and place 1 tablespoon of the peach pie filling in the center of each triangle.
- Top each one with the other 4 triangles and crimp edges with a fork to seal.
- Spray oil on 2 pies, on both sides, and place in the chamber; close chamber.
- Set temperature for 400 degrees, and timer for 5 minutes. When cook time is complete, open basket and turn pies and spray with oil; close chamber.
- Meanwhile, put frosting in a small microwaveable bowl, and microwave for 25 seconds.
- When cook time is complete, open the chamber, remove pies to a serving platter, and drizzle with frosting.
- Repeat with the remaining 2 pies.
LIMITED ONE YEAR WARRANTY
This warranty covers all defects in workmanship or materials in the mechanical and electrical parts arising under normal use and cares in this product for a period of 12 months from the date of purchase provided you are able to present a valid proof-of-purchase. A valid proof-of-purchase is a receipt specifying the item, date purchased, and cost of the item. A gift receipt showing the item and date of purchase is an acceptable proof- of purchase. The product is intended for household use only. Any commercial use voids the warranty.This warranty covers the original retail purchaser or gift recipient. During the applicable warranty period within normal household use, we will repair or replace, at our discretion, any mechanical or electrical part which proves defective or replaces the unit with a comparable model. Shipping and handling costs are not included for warranty replacements and are the responsibility of the customer.
To obtain service under the terms of this warranty, send an email to or call our customer care department at 312-526-3760 (Monday- Friday 10:00 AM-4:00 PM CST). Please provide the model number listed on the bottom of this page when contacting us.THIS LIMITED WARRANTY COVERS UNITS PURCHASED AND USED WITHIN THE UNITED STATES AND DOES NOT COVER:
- Damages from improper installation.
- Damages in transit.
- Defects other than manufacturing defects.
- Damages from misuse, abuse, accident, alteration, lack of proper care and maintenance, or incorrect current or voltage.
- Damage from service by other than authorized dealer or service center.
- Shipping and handling costs.
- This warranty gives you special legal rights and you may also have other rights to which you are entitled which may vary from state to state.
Manufacturer does not assume responsibility for loss or damage to the return shipment. We recommend that you keep your original packaging should you require repair service. Before returning product please contact our customer care department for return authorization. When returning the product for repair please include your full name, return address, email, and daytime phone number. Also, include a brief description of the problem you are experiencing and a copy of your sales receipt or other proof of purchase in order to validate warranty status.
MODEL PDAF8TX-2
[xyz-ips snippet=”download-snippet”]