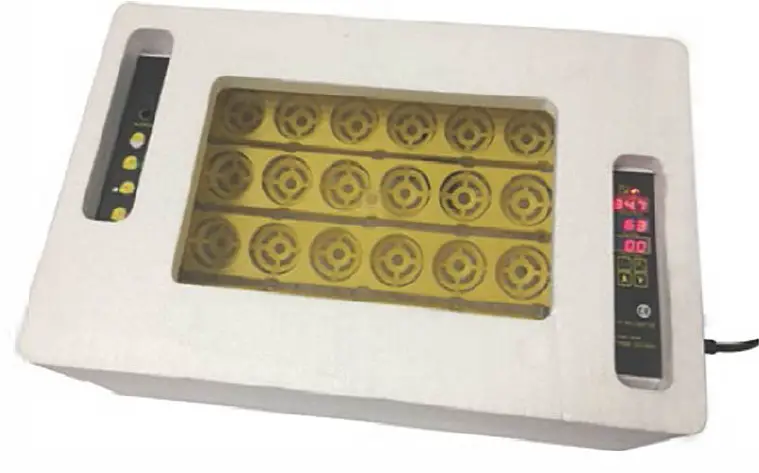
Pawever Pets PPEGGINB24A Fully Automatic Digital Egg Incubator
INSTALLATION
- Insert one end of power cord into the socket on the device.
- Ensure that the egg troy matches the motor shaft connector.
- Ensure that the egg troy matches the slots on both sides.

- Ensure that the fan, temperature display, function keys and heater are functional.If the ambient temperature goes below 20°C, place the protective foam around the incubator.
- Add water to preheat the incubator for 20-30 minutes.


OPERATION
Selecting Fertilised Eggs
- Fertilised eggs must be fresh -within 4-7 days after laying is the best. The best temperature for saving fertilised eggs is 10-15°C.
- Ensure the eggshell has no deformity, cracks or spots.
- Generally, disinfection is not required and may reduce the hatching rate.
Incubation Process
- Place in the incubator with the narrower end facing down.
- Proper operation and careful observation are required during the incubation.Ensure you add water to the machine every 1 to 2 days (depending on the environment and the quantity of water inside the machine).
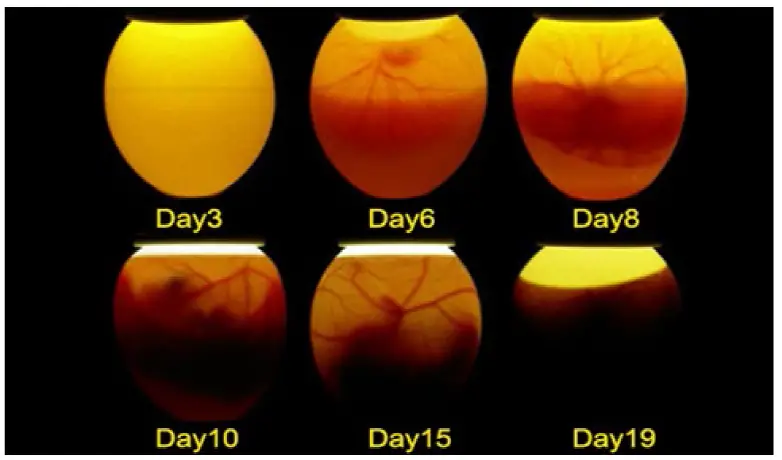
- Test the eggs for the first time after 5 to 6 days to confirm fertilisation and identify, the unfertilised eggs, scattered yellow eggs and dead eggs.Do NOT test during the first 4 days or the incubator and egg surface temperature may decline sharply and affect the eggs’ early development.
- Test the eggs for the second time after 11 to 12 days to check the development of the embryo. A well-developed embryo is enlarged, with blood vessels inside and the air chamber is large and sharply demarcated.
- Test the eggs for the third time after 16 to 17 days. A well-developed embryo will be large and little light will be visible when light is shone from the wider end.If it’s a dead egg, the blood vessels in the egg will be blurred, parts near the air chamber will be yellow and the boundary between the egg and the air chamber will be unclear.
- Increase humidity and decrease temperature during the hatching period in order to prevent water from evaporating too quickly in the eggs. This will regulate the humidity and temperature while avoiding dehydration. The temperature should be no higher than 37.5°C on day 19-21.
Controller
| 1.Settings | 6. Humidity display |
| 2.Up | 7.Days remaining |
| 3.Down | 8.Heating indicator |
| 4.Reset | 9. Setting indicator |
| 5.Temp. display | 10. Water dispenser |
Testing Incubator for the first time
- Set up the in cubator as per Installation
- Turn the incubator on.
- An alarm indicating low temperature/humidity will sound. this is normal: press any button to cancel the alorm.
- Operate the in cubator and fill the water channels: the humidity reading will increase.
- Place the eggs in the incubator with the narrower end facing down.
- Press the reset button to check the automatic egg turning function. It turns for 10 seconds every 2 hours.
Setting the temperature
- Press SET once.
- Use the up and down buttons to select the desired temperature.
- Press “SET” once more to exit.
The recommended temperature to set is 37.6’C.
Setting the temperature alann (AL and AH)Low temperature alarm (AL)
- Press and hold SET for 3 seconds.
- Press SET to toggle options until •AL• appears in the temperature display.
- Use the up and down buttons to select the desired temperature alorm settings.
High temperature alarm (AH)
- Press and hold SET for 3 seconds.
- Press SET to toggle options until “AH” appears in the temperature display.
- Use the up and down buttons to select the desired temperature alorm settings.
It is recommended to leave these parameters at the factory default of1 °C above or below the set temperature.
Setting the humidity alann (AS)
- Press and hold SET for 3 seconds.
- Press SET to toggle options until •fJ,S” appears in the temperature display.
- Use the up and down buttons to set the desired humidity alarm settings.
It is recommended to leave these parameters at the factory default of 45%.
Calibrating temperature sen110r reading (CS)If the thermometer’s reading is too high or Low, it con be adjusted.
- Press and hold SET for 3 seconds.
- Press SET to toggle options until ·cs” appears in the temperature display.
- Use the up and down buttons to set the desired
The factory default is 0°C (a calibration will be offset from this value).
Setting maximum and minimum temperature (HS and LS)This determines the maximum and minimum temperature selectable to prevent accidental out-of-range temperature selection.
- Press and hold SET for 3 seconds.
- Press SET to toggle options until •HS” (high temperature setting) or ·Ls” (low temperature setting) appears in the temperature display.
- Use the up and down buttons to set the desired maximum or minimum temperature.
The factory defaults are 39.5°C HS and 30°C LS.
Incubating tips
Egg and incubator hygiene
- Proper hygiene is essential to achieve good hatching results. Poor hygiene can cause early death in chicks.
- Only clean eggs should be used for incubation. Dirty eggs are potential carriers of diseases that thrive and multiply in the ideal heat and moisture conditions of the incubator. If you need to incubate dirty eggs, wash them first in warm water (44- 49″C) that contains disinfectant at a rate recommended by the manufacturer (most household disinfectants ore suitable) and dry the eggs quickly after washing using separate paper towels.
- Do not soak eggs for long)er than four minutes (this can affect fertility) and do not soak eggs in cold water (this encourages bacterial penetration through the eggshell).
- Fumigating eggs immediately after collection also helps with hygiene. A suitable fumigant is formaldehyde gas. which is made by mixing 1 part (by weight) of potassium permanganate (Condy’s crystals) with 1.5 parts (by volume) of formalin (see Table 1 for the correct amounts for each application). Place the chemicals in a dish on the floor of the incubator. Place the potassium permanganate into the dish and pour the formalin over it. Shut the incubator door quickly and vacate the room.
- For proper fumigation, run the machine normally with the correct temperature and humidity. After 20 minutes, open the vents or the door and air the machine for a few minutes. Again, vacate the room.
Healthy stock
- It is important that eggs from only a healthy flock are used for hatching, as some diseases can be transmitted through the egg. The egg-transmittable diseases to be most aware of are salmonella infections, fowl typhoid and Mycoplasma gallisepticum.
- Eggs laid by birds infected with disease may fail to hatch. Of those that do hatch, some birds may die during brooding and the survivors may act as carriers and infect healthy chicks.
- Do not add eggs from unknown sources to make up numbers, as you risk infecting your flock.
Breeding stock nutrition
- The egg provides a complete food store for proper embryo development except gaseous oxygen, which enters the egg through pores in the shell Breeding stock must be fed a well-balanced diet to fully meet the embryos’ nutrient requirements.
- The deficient nutrients are usually vitamins or minerals. A deficiency of these in the breeders’ diet may not show any ill effects in the breeders, though hatchability may be affected, which is why different categories are fed specific diets. Nutritional deficiencies, such as a lack of riboflavin, are the main causes of embryo mortality during the middle stage of incubation O.e. between the 12th and 14th days}.
- Hens’ vitamin and mineral requirements for laying eggs are lower than those of breeders. The breeder’s diet should begin six to eight weeks before hatching eggs are required, with particular attention to vitamin A. D3, riboflavin, pantothenic acid, biotin, folic acid, vitamin 812 and the mineral manganese.
| Deficient ent | Reailt |
| Riboflavin | Leads to poor hatchability with a highincidence of malformed embryos, which are excessively moist. |
| Pantothenic acid | Lowers hatchability and causes a high incidence of apparently normal embryos to die over the lasttwo or three days ofincubation. |
| Biotin,chol ne and manganese | Leads to abnormaldevelopment of the embryo and a condition known as enlarged hock/slipped Achilles tendon. |
| 812 | Leads to a rapid decrease in hatchability and progressively poorer survivalof chicks that do hatch. |
TROUBLESHOOTING
| Problem | Probable causes | Action |
| 1. Too many clears or infertile eggs | (a) Wrong proportion of males to females | (a) Check mating ratios according to breeder’s recommendations |
| (b) Maleis undernourished | (b) Ensure cockerels feed separately, otherwise hens may eat allthe feed | |
| (c) Interference among males during mating | (c) Do not use too many males; always rear breeding males together; erect tempora&r solid partitions between bree ing pens or inside large pens | |
| (d) Damaged combs and wattles among males | (d} Ensure housingis comfortoble and
proer drinking fountainsare provided for reeding pens |
|
| (e) Male istoo old | (e) Replace old birds | |
| (f) Male is sterile | (f) Replace with another male | |
| (g) Eggs kept toolong or under the wrong conditions before setting | Do not keep hatchin eggs longer t an seven days; store em in a cool temperature (10-15.6°C) at relative humidity around 75-80% | |
| 2. Blood rings,which indicate very early embryonic death | (a) Incubator temperature too highor low | (a) Check thermometers,thermostats and electricity supply |
| (b) Incorrect fumigation procedure | (b) Use the correct amountof fumigant. Do not fumigate between 24 and 96 hours after setting | |
| (c) As inl(g) | (c) As inl(g) | |
| 3. Chicks deadin- shell | (a) As in 2(a) | (a) As in 2(a) |
| (b) Eggs not properly turned | (b} Turn the eggs regularly atleast three to five times a day, reversing direction each time | |
| (c) Breedingstocks’ nutrition is deficientif deaths are highin days 10 to14 | (c) Ensure breeding stocks have adequate nutritionin food supply | |
| (d) Ventilationinsufficient | (d} Increase ventilation | |
| (e) Infectious diseases | (e) Useeggs only from healthy stock; ensure that hatchery has adequate hygiene practices |
|
4.Piped eggs faiing to hatch |
(a) Insufficient moisturein the incubator | (a) Increase the evaporating surface of water or spray additional water | |
| (b) Too much moisture at earlier stages |
(b) Check moisture readings |
||
| (c) Nutrition problem | (c) Check flock feeding | ||
| Hatching too soon | (a) High temperature | (a) (b) (c) Check temfcerature settings and ensurethe regulation is working | |
| Hatching toolate | (b) Low temperature | ||
| Sticky chicks | (c) Likely high temperature | ||
| 5. Malformed chicks | (a) High temperature | (a) As in 2(a) | |
| (b) Low temperature | (b) As in 2(a) | ||
| (c) Eggs set incorrect% or not properly turned a er setting | (c) As in 3(b}; also, take care to set the eggs wider end up | ||
| 6. Spraddling chicks | Hatching trays too smooth | Use wire-meshed tray floors or cover slippery floors with burlap or other similar material | |
| 7. Weak chicks | (a) Incubator or hatching unitis overheating | (a} As in 5 | |
| (b) Setting small eggs | (b) Only set eggs ofa uniform size | ||
| 8. Smallchicks | (c) Too little moisture in incubator | (c) As in 4 | |
| (d) Too much fumigantleft
in hatcher |
(d) As in 2(b} | ||
| 9. Chicks breathing heavi y | (e} Too much moisture in hatcher | (e) As in 4 | |
| (f) Possiblyinfectious disease | (f) Send chicks to a veterinarian for diagnosis | ||
| (g) Low average temperatureduring period of incubation | (g} As in 2(a} | ||
| 10. Mushy chicks | (h) Incubator has poor ventilation | (i) Omphalitis (navelinfection} | |
| (h) As in 3 (d} | () Careful y clean out and fumigate theincubator using formaldehyde at high strength; disinfect all equipment | ||
| 11. Hatch not coming off evenly | Eggs too diverse in age or size | Set eggs atleast once a week and never retain hatching eggs longer than 10 days before setting; incubate only average-size eggs |
Frequently Asked Questions
How do I store eggs?Eggs must settle for at least 24 hours if sent through the post to allow the air cell inside to return to its normal size. Eggs should always be stored with the narrower end down.If you receive eggs that are getting old, you may only let them settle overnight.
When will the incubator be ready to use?The incubator should run for at least 24 hours and ideally a week before placing the eggs in them so that you can be familiar with its operation and make any necessary adjustments.Note that the incubator’s internal temperature is not the same as the egg’s internal temperature. The temperature in an incubator will vary over time, rising and lowering. The temperature inside the egg will be an average of the incubator’s temperature over time.
How long does it take to incubate chicken eggs?The incubation period for chicken eggs is 21 days. You should turn your eggs at least three times a day for the first 18 days and stop turning after the 18th day (or use a hatcher if you have eggs from different days in the same machine).This allows the chick time to orient itself inside the egg. After day 18, keep the incubator closed except to add water. This will help bring the humidity up to help the chicks hatch.
What are the appropriate temperature and humidity?Fan forced incubator: 37.5°C measured anywhere in the incubator. Humidity: 55% for the first 18 days, 60-65% for the lost 3 days in the hatcher.
How can I tell my thermometer is accurate?The incubator’s thermometer will be accurate, and you con observe the results of the first hatch and adjust accordingly for future hatches if the temperature appears to have been slightly too high or too low. It is recommended to keep notes on everything you do during the incubation period so as you learn, you’ll have these notes to look back on.You con also adjust the thermometer by comparing with a calibrated thermometer as described in CaUbrattng tempered.re sensor reading (CS).
How do I check humidity?humidity is checked by woy of o hygrometer (wet-bulb thermometer) in conjunction with o regular dry-bulb” thermometer. A hygrometer is simply o thermometer with o piece of wick attached to the bulb. The wick hangs in water to keep the bulb wet (hence the nome •wet bulb thermometer”). When you read the temperature on the thermometer and hygrometer, you must then compare the readings too chart to translate from wet-bulb/dry-bulb reading to “percentage humidity”.
- 60% humidity reads about 30.5°C on a wet-bulb ot 37.5°C.
- 60% humidity reads about 31.6°C on o wet-bulb at 38.6°C.
- 80% humidity reads about 33.8°C on a wet-bulb ot 37.5°C.
- 80% humidity reads about 35°C on a wet-bulb ot 38.6°C.
Getting your humidity to become as accurate as your temperature is nearly impossible. It is almost completely impossible with o small incubator.Try to get your humidity as close os you con – within 10-15% is usually sufficient.
How do I regulate humidity?To regulate humidity. you need to change the surface area of water in your incubator.Surface area is the amount of surface of water exposed to air in your incubator. The depth of water has no bearing on the humidity in the incubator (unless the depth is zero).If the humidity is too low in your incubator, add surface area. Place another pan of water in the incubator or some small wet sponges.This will help; alternatively, you can spray the eggs with a fine mist. To decrease the humidity, remove surface area. Use small containers of water or undo some of the things you’ve added.The humidity will need to be adjusted differently depending on the season and outside conditions
IN THE BOX
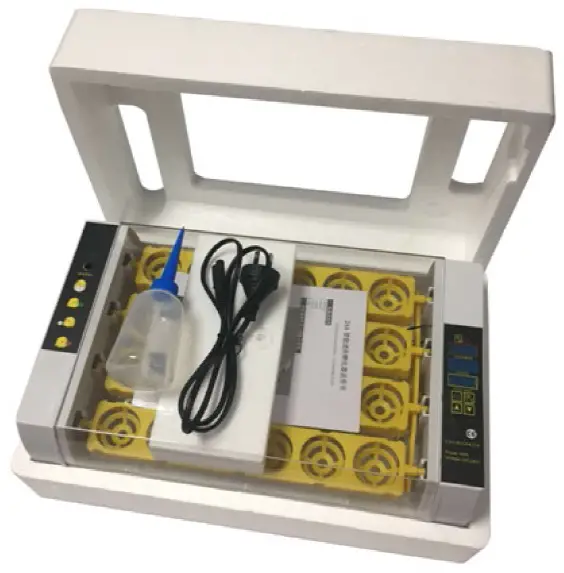
- 1 x Incubator
- 1 x Quick start guide
- 1 x Protective foam
- 1 x Power cord
- 1 x Water kettle
Need more information?This is a Quick Start Gulde, and we hope thot this has given you the assistance needed for a simple set-up. For the most up-to-date guide for your product. as well as any additional assistance you may require, head online to help.kogan.com
report this ad[xyz-ips snippet=”download-snippet”]