
Daybreak DJ Alarm Clock User Manual

Please read and understand all instructions before us.
iPhone and iPod are trademark of Apple Inc., registered in the U.S. and other countries.
“Made for iPod” and “Made for iPhone” mean that an electronic accessory has been designed to connect specifically to iPod or iPhone, respectively, and has been certified by the developer to meet Apple performance standards. Apple is not responsible for the operation of this device or its compliance with safety and regulatory standards. Please note that the use of this accessory with iPod or iPhone may affect wireless performance.
IMPORTANT SAFETY INSTRUCTIONS
- Read these instructions.
- Keep these instructions.
- Heed all warnings.
- Follow all instructions.
- Do not use this apparatus near water or moisture.
- Clean only with a dry cloth.
- Do not block any ventilation openings. Install in accordance with the manufacturer’s instructions.
- Do not push objects into apparatus vents or slots because fire or electric shock hazards could result.
- Ventilation should not be impeded by covering the ventilation openings with items such as newspapers, table cloth, curtains, etc.
- Do not install near any heat sources as radiators, heat registers, stoves, or other apparatus (including amplifiers) that produce heat.
- Place apparatus in a stable location so it will not fall causing product damage or bodily harm.
- Do not defeat the safety purpose of the polarized plug. A polarized plug has two blades with one wider than the other. The wider blade is provided for your safety. If the provided plug does not fit into your outlet, consult an electrician for replacement of the obsolete outlet.
- Operate the apparatus only from the low level audio line output jack of the computer or of an audio device.
- Protect the power cord from being walked on or pinched particularly at plugs, convenience receptacles, and the point where they exit from the apparatus.
- Only use attachments/accessories specified by the manufacturer.
- Unplug this apparatus during lightning storms or when unused for long periods of time.
- The apparatus shall be disconnected from the mains by placing the power/standby switch in the standby position and unplugging the power cord of the apparatus from the AC mains receptacle.
- The socket-outlet shall be installed near the equipment and shall be easily accessible.
- To prevent risk of fire or electric shock, avoid overloading wall outlets, extension cords or integral convenience receptacles.
- Use proper power source as described in the instructions or as marked on the product.
- Refer all servicing to qualified service personnel. Servicing is required when the apparatus has been damaged in any way, such as power-supply cord or plug is damaged; liquid has been spilled or objects have fallen into the apparatus, the apparatus has been exposed to rain or moisture, does not operate normally, or has been dropped.
CAUTION:
- RISK OF ELECTRIC SHOCK DO NOT OPEN.
- TO PREVENT THE RISK OF ELECTRIC SHOCK, DO NOT REMOVE COVER (OR BACK). NO USER-SERVICEABLE PARTS INSIDE. REFER SERVICING TO QUALIFIED SERVICE PERSONNEL.
- The lightning flash with arrowhead, within an equilateral triangle, is intended to alert the user to the presence of uninsulated “dangerous voltage” within the products enclosure that may be of sufficient magnitude to constitute a risk of electric shock to persons.
- The exclamation point within an equilateral triangle is intended to alert the user to the presence of important operating and maintenance (servicing) instructions in the literature accompanying the appliance.
WARNING
TO PREVENT THE RISK OF ELECTRIC SHOCK, DO NOT REMOVE COVER (OR BACK). NO USER-SERVICEABLE PARTS INSIDE. REFER SERVICING TO QUALIFIED SERVICE PERSONNEL.
TO PREVENT FIRE OR SHOCK HAZARD, DO NOT EXPOSE THIS UNIT TO RAIN OR MOISTURE. THE UNIT SHALL NOT BE EXPOSED TO DRIPPING OR SPLASHING AND THAT NO OBJECTS FILLED WITH LIQUIDS, SUCH AS VASES, SHALL BE PLACED ON UNIT.
Battery Warning Statement:
- Do not mix old and new batteries (replace all batteries at the same time).
- Do not mix alkaline, standard (carbon-zinc), or rechargeable (ni-cad, ni-mh, etc.) batteries.
ENVIRONMENTAL PROTECTION RECOMMENDATION
At the end of its working life, this product should not be disposed of with standard household Waste, but rather dropped off at a collection point for the disposal of Waste Electrical and Electronic Equipment(WEEE)for recycling. This is confirmed by the symbol found on the product, user manual or packaging.
Note:
This equipment has been tested and found to comply with the limits for a Class B digital device, pursuant to part 15 of the FCC Rules. These limits are designed to provide reasonable protection against harmful interference in a residential installation.
This equipment generates, uses and can radiate radio frequency energy and, if not installed and used in accordance with the instructions, may cause harmful interference to radio communications.
However, there is no guarantee that interference will not occur in a particular installation. If this equipment does cause harmful interference to radio or television reception, which can be determined by turning the equipment off and on, the user is encouraged to try to correct the interference by one or more of the following measures:
- Reorient or relocate the receiving antenna.
- Increase the separation between the equipment and receiver.
- Connect the equipment into an outlet on a circuit different from that to which the receiver is connected.
- Consult the dealer or an experienced radio/TV technician for help.
Caution to user:
Any changes or modifications to the product not expressly approved by the party responsible for compliance could void the user’s authority to operate the equipment.
PRODUCT OVERVIEW
FRONT VIEW
REAR VIEW

![]()
CONTROL FUNCTIONS
![]()
POWER ON/ OFF THE SPEAKER
Use ONE of the following options to power the speaker:
AC Adapter (Power Outlet)
Connect the power adaptor cord into the DC jack of the speaker, then plug the power adapter into a power outlet.
Press [ POWER / SOURCE] button to power on the speaker. Press and hold the button to turn off the speaker.
Batteries
Insert 6 x AA batteries (not included) as illustrated into the battery compartment.Press [POWER / SOURCE] button to power on the speaker.
Note:
All 6xAA batteries are required in order for the speaker to operate normally. If there is a power shortage, the inner 2 AA batteries will act as a backup source to prevent the loss of display time and settings during power failure.
When using batteries, the charging function of the speaker will not charge your iPod or iPhone. Must use the power adapter (included) for charging.
SETTING THE CLOCK (STANBY mode)


SETTING THE ALARM (STANBY mode)
To set the alarm, turn off the speaker by pressing and holding down the [ POWER/ SOURCE] button.
ALARM SOURCE
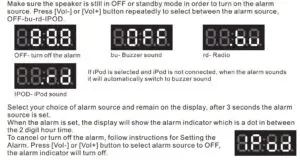
ALARM OPERATION
- When the alarm sounds, the alarm indicator will flash and the volume will increase gradually. It will continue to sound and last for one hour.
- To stop the alarm, press the button. The alarm indicator will remain illuminated and the alarm will sound again at the same time the following day.
- To snooze, press [SNOOZE] button to activate snooze function, the alarm will sound again approximately after nine minutes.
- To cancel the alarm, follow instructions for Setting the Alarm. Press [Vol-] or [Vol+] buttonto select alarm source to OFF, the alarm indicator will turn off.
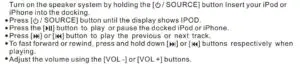
USING THE iPOD/iPHONE
Note:
- The iPod or iPhone will charge when using AC power adapter during standby or power on mode.
- The clock will automatically sync to the time of the docked iPod or iPhone. Auto time syncwill not work with some older model iPods. (Reference package for compatible model)
- It is advisable to avoid charging the iPod when listening to the radio as it may interfere with the radio reception.
SETTING THE RADIO
PRE-SET RADIO STATIONS

CONNECTING TO OTHER AUDIO SOURCES
The system is compatible to play other audio sources such a MP3 player, portable CDplayer or other auxiliary devices through the AUX IN jack.
- Press the[POWER/ SOURCE ] button repeatedly until “ ” is shown on the display.
- Connect the auxiliary devices using a 3.5mm jack cable into the “ ” jack of the speaker.
- Control the settings directly from the connected auxiliary device to play, pause or adjustthe volume.
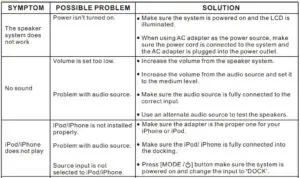
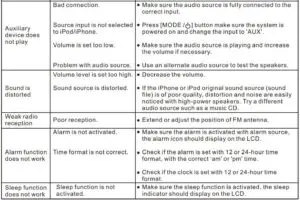
TROUBLESHOOTING GUIDE
LIMITED WARRANTY
Kinyo Company Inc. (KINYO) warrants this product to the original purchase against defects in material and workmanship for a period of one (1) year from the date of purchase. Kinyo will, at its option, repair or replace the defective product at no cost to you during the warranty period.
The warranty will not apply if the unit has been subject to accident, misuse, abuse, diassembly, altered or operated contrary to the instructions contained in the accompanying manual.
To obtain warranty service, proof of purchase, in the form of retail receipt, bill of sale or invoice must be presented as evidence that the unit is within the warranty period. The product must be packaged either in its original package or in such a way as to reasonably protect it from shipping damage. Properly fill out the warranty card with description of problem. Send the product freight prepaid or deliver to:
ATTN: SERVICE DEPT. KINYO COMPANY INC. 14235 LOMITAS AVE., LA PUENTE, CA 91746
ONE YEAR LIMITED WARRANTY CERTIFICATE
This warranty is only valid in the United States of America.
Read More About This Manual & Download PDF:
Daybreak-DJ-Alarm-Clock-User-Manual-
report this adDaybreak-DJ-Alarm-Clock-User-Manual-
Questions about your Manual? Post in the comments!
[xyz-ips snippet=”download-snippet”]