
![]() REMOTE AIR 4PD2-M1/M2/M3PDMOVIE Wireless Follow Focus System
REMOTE AIR 4PD2-M1/M2/M3PDMOVIE Wireless Follow Focus System
Welcome To Use REMOTE AIR 4

Notice For Use
- REMOTE AIR 4 is professional three-channel wireless follow focus system. It can simply and quickly to control the focus, zoom, and iris of the film Lens or the SLR Lens.
- Before using the product, please read the instructions earnestly or watch the teaching videos for learning the using skills of the products. If there are any direct or indirect adverse effects due to operational errors, our company will not assume any responsibility.
- Please do not dismantle, repair or refit the internal structure of the product without authorization. If the product is damaged or cannot use normally due to the above improper operation, our company has the right to refuse the maintain.
- If you need technical support or the product has any problem, please contact us.
E-mail:[email protected]FACEBOOK:https://www.facebook.com/pdmovie.com.cn/Website:www.pdmovie.com
Configuration list
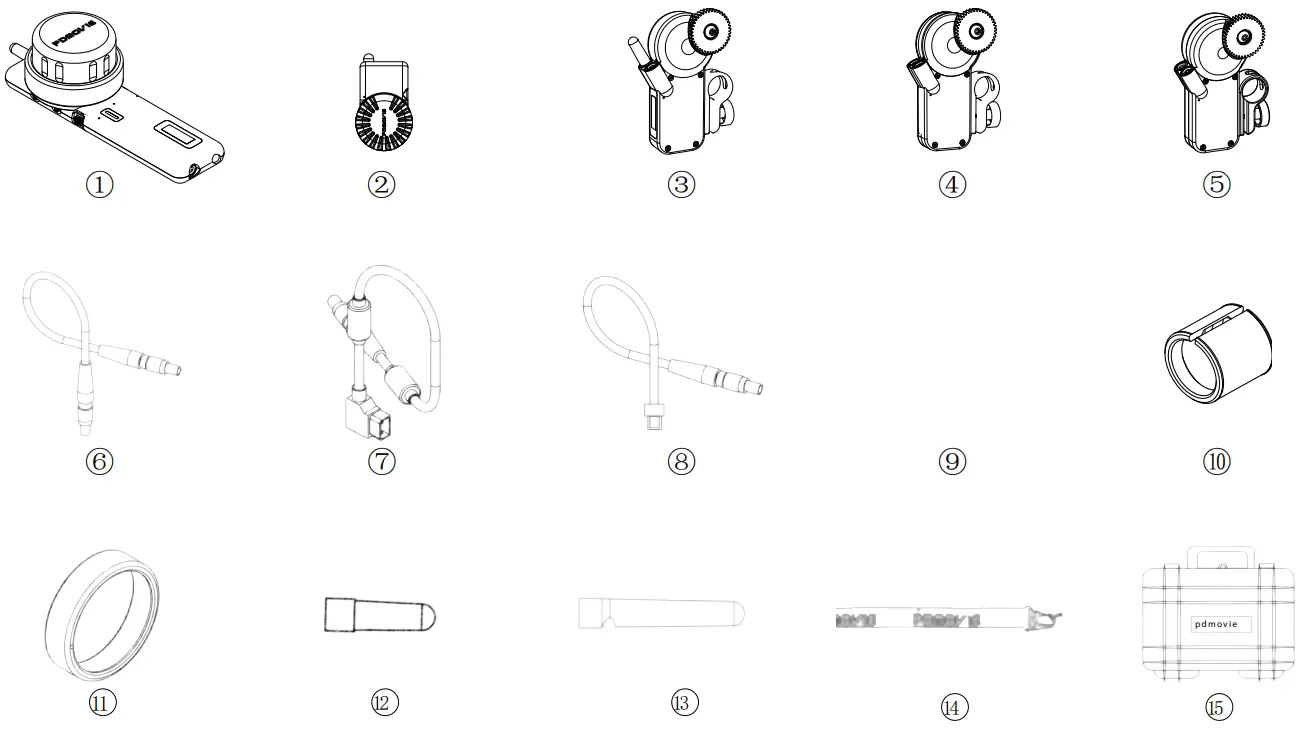
| Serial number | Name | PD2-M1 | PD2-M2 | PD2-M3 |
| 1 | Controller (PD2-HT) | 1 | 1 | 1 |
| 2 | Bluetooth controller (PDL-TC-AF) | 1 | 1 | 1 |
| 3 | Receiver motor (PD-RX) | 1 | 1 | 1 |
| 4 | Slave motor (PD-MX) | — | 1 | 1 |
| 5 | Big Torque Slave motor RD-MP) | — | — | 1 |
| 6 | Slave Motor Cable 0 Am (6 pin) | — | 1 | 2 |
| 7 | D-Tap Power Cable 0.7m (6 pin) | 1 | 1 | 1 |
| 8 | USB Charging Cable 0.9m (4pin) | 1 | 1 | 1 |
| 9 | Micro USB Charging Cable | 1 | 1 | 1 |
| 10 | 15mm/19mm Adapter Ring | 1 | 2 | 3 |
| 11 | Glow in the Dark Marking Disk | 2 | 2 | 2 |
| 12 | Short Antenna | 2 | 2 | 2 |
| 13 | Long Antenna | 2 | 2 | 2 |
| 14 | Rope | 1 | 1 | 1 |
| 15 | Safety Box | 1 | 1 | 1 |
Three-channel can be paired with slave motor PD-MX/PD-MP to use.
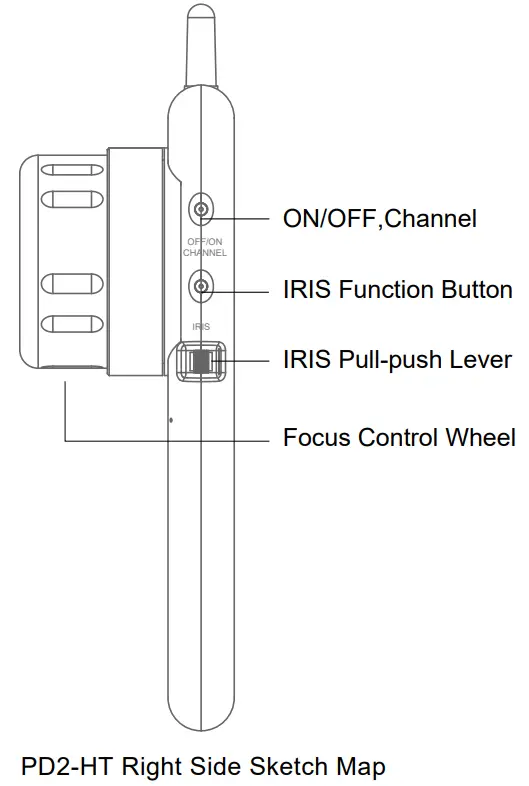
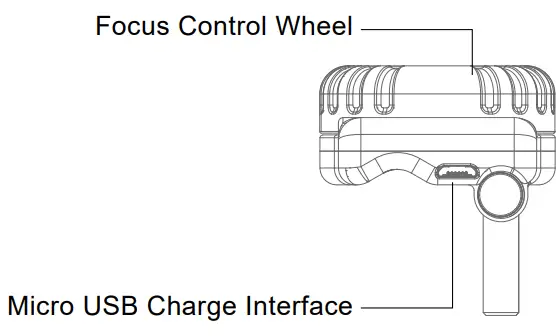
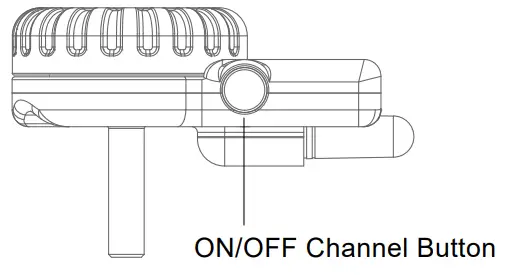
Product Sketch Map Controller
 |
 |
 |
 |
Bluetooth controller
 |
 |
 |
|
 |
 |
Instruction Manual
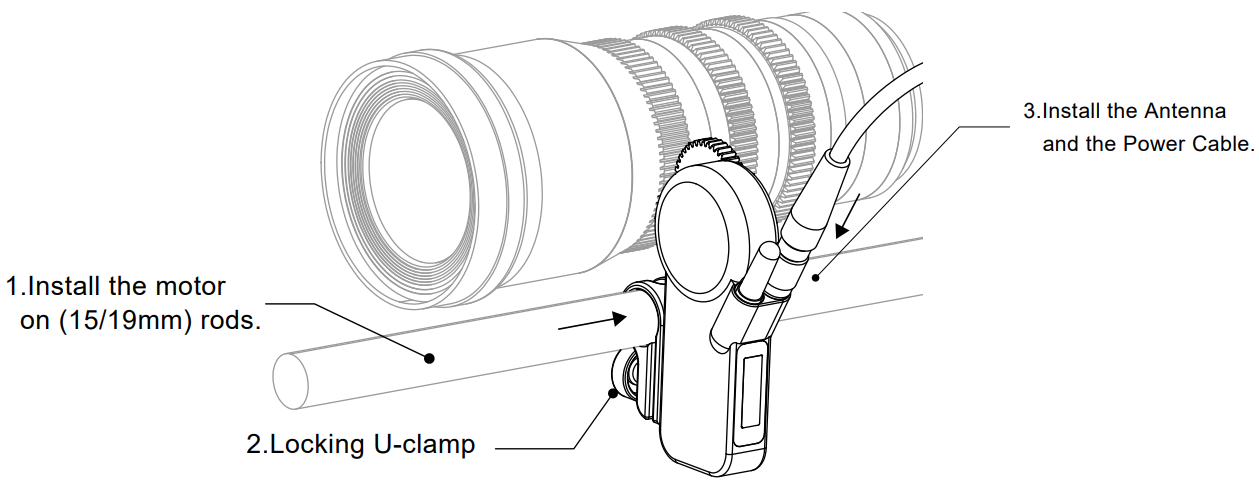
1. Install MotorInstall the motor on 19mm or 15mm (using the adapter) rods. At the same time, the motor gear stuck on the lens gear. Then install the antenna to the main motor PD-RX.
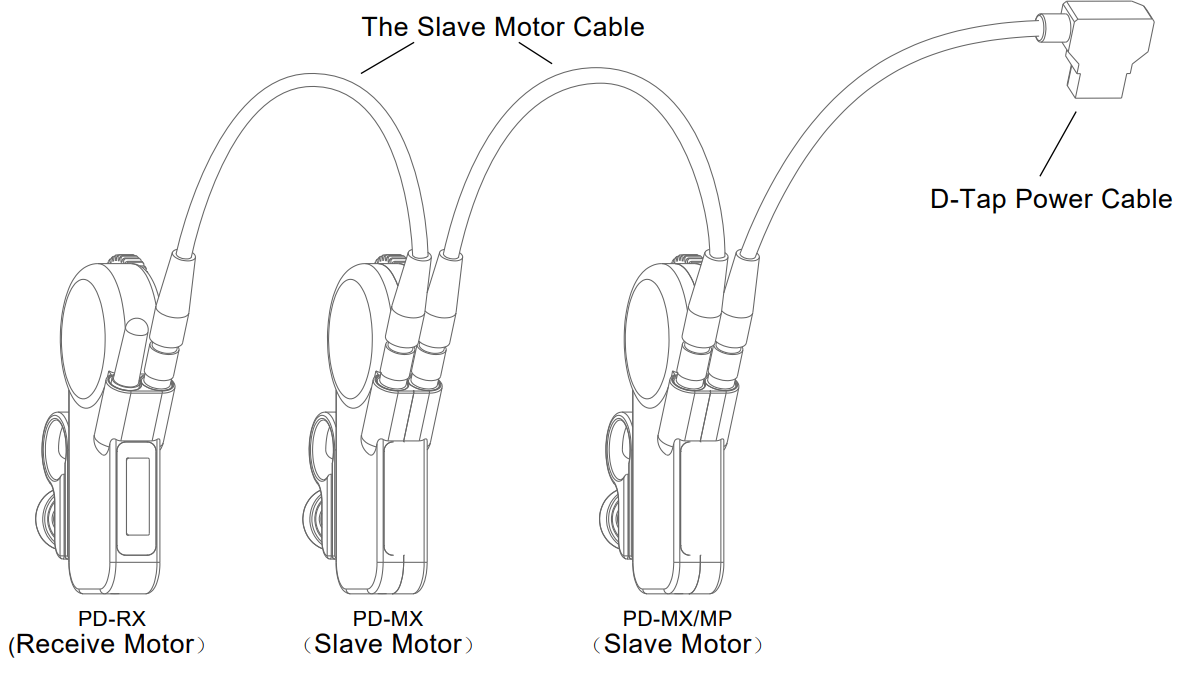
2. ConnectionPD2-M1(Single Channel):PD-RX(Receiver Motor)connect with the D-Tap Power Cable. Then, the D-Tap Power Cable connects with V-mount Power Cable.PD3-M2(Double Channel): PD-RX(Receiver Motor)and PD-MX(Slave Motor)are connected by slave motor cable,PD-MX(Slave Motor)connect with the D-Tap Power Cable. Then, the D-Tap Power Cable connects with V-mount Power Cable.PD2-M3(Three Channel): PD-RX (Receive Motor) and PD-MX1 (Slave Motor 1) and PD-MX2 (Slave Motor 2) are connected by two parts of slave cables. PD-MX2 (Salve Motor 2) connects with the D-Tap power cable, and the D-tap power cable connects with the V-mount power supply. 7-20V interface on the motor is used for power supply and signal transmission, it can be connected according to the most convenient location.
Set-Up
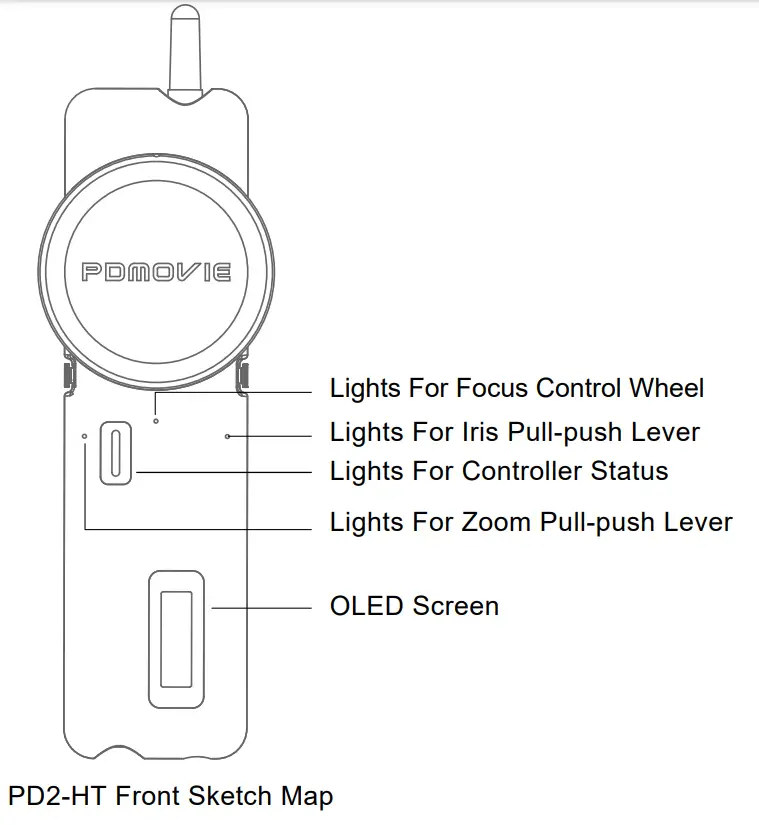
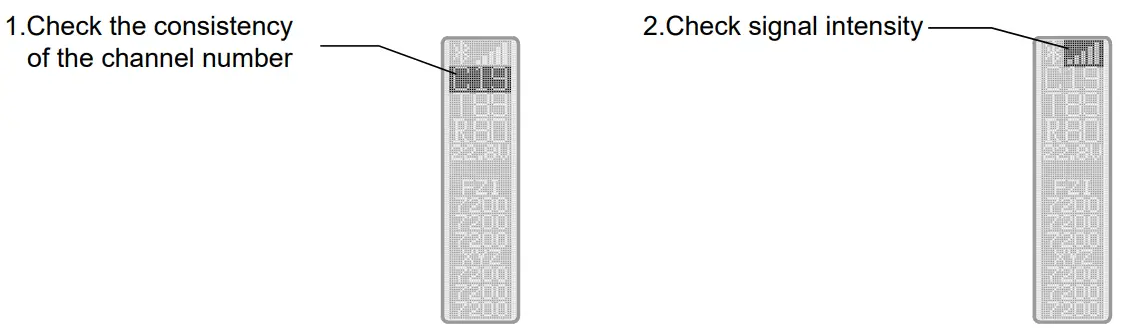
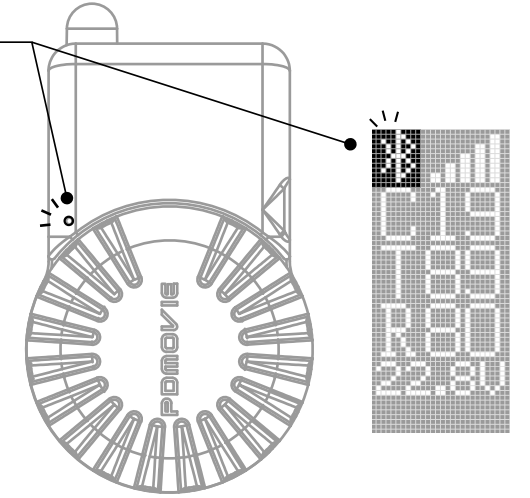
3. Powering on (turn on the controller and the motor)Press the ON/OFF button on the right side of the controller for three seconds, until the screen is bright and then loosen the button. The motor does not need to turn on or turn off, it will turn on automatically when power supply. It will turn off automatically when outage.4. Set up the signal channel, the motor connects to the controller.Check the info at the OLED monitor on the controller and master motor to see if they are at the same signal channel. In case of inconsistency, you can adjust the controller or the signal channel of the motor. check whether is the signal lattice on the top of the right screen or not when the signal channel is consensus. If there has an indication, that has been successfully connected.
Adjusting method for motor and controller channel: Click the Channel button once to awakening the regulation channel function unitl the channel numeral blink. Then click the Channel button for changing the channel. Channel digital flicker will automatically return to normal after 5 seconds when non-operation. (Usethe same process to change the controller and the motor’s channel)
5. Set up the control channel1. The controller has three control parts, it can control three channels. The hand-wheel is controlling the FOCUS (Red light), the left side of the push-pull lever controls the ZOOM(Greenlight) and the right side of the push-pull lever controls the IRIS (Blue light). The push-pull lever on both sides can be set to green or blue according to the control needs.The control channel can change by double click the button on both sides. (Specific reference: schematic and channel list) 2. Check the color of the state indicator light on the front of the motor, confirm whether the motor is in the corresponding control channel. Quickly double-click the channel button of the motor to switch the control channel. The motor setup channel is a non-sequence.
| Times of click on the buttons | Channel | The color of the indicator light | Control |
| Al | Red | Focus | |
| G2 | Green | Zoom | |
| B3 | Blue | Iris | |
| Y4 | Yellow | Channel 4(standby) | |
| C5 | Cyan | Channel 5(standby) | |
| P6 | Purple | Channel 6(standby) |
6. Calibrate Lens Stroke(1): Long press the FOCUS, ZOOM, or IRIS button on the controller for three seconds, until the motor rotates. The motor will auto-calibration of lens stroke. Multiple motors will be detected simultaneously when multiple channels are used.
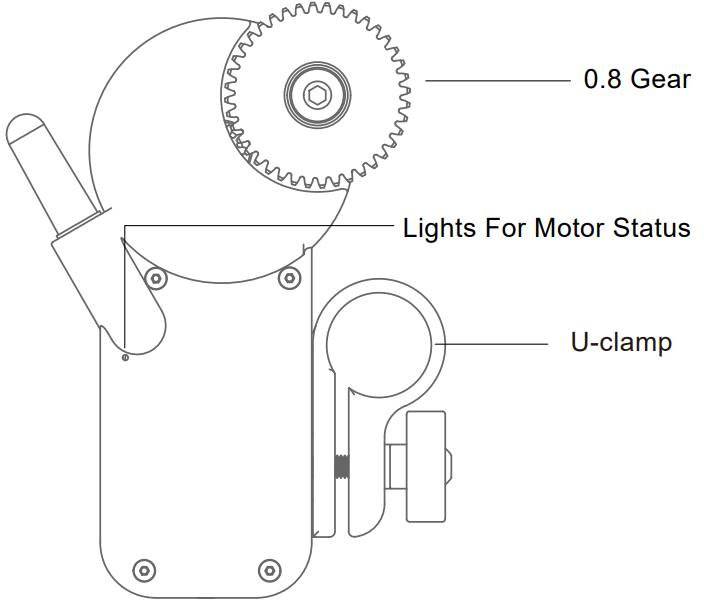
 (2): Long press the button on the bottom of the motor for three seconds, until the motor rotates. The motor will auto-calibration of lens stroke. When multiple channels are used, the motor needs to be operated one by one. OFF/ON CHANNEL

(3)Manually calibration:
- Turn on the motor.
- When the motor gear and the lens gear are completely matching, turn the lens to the starting point and stop for 0.5 seconds.
- Then turn the lens to the end and stop for 0.5 seconds.
- Finally, turn the lens back a little bit. The manual calibration is done. (The lens of the focusing infinite position can reference the numerical setting of the infinity and the nearest focal length.)
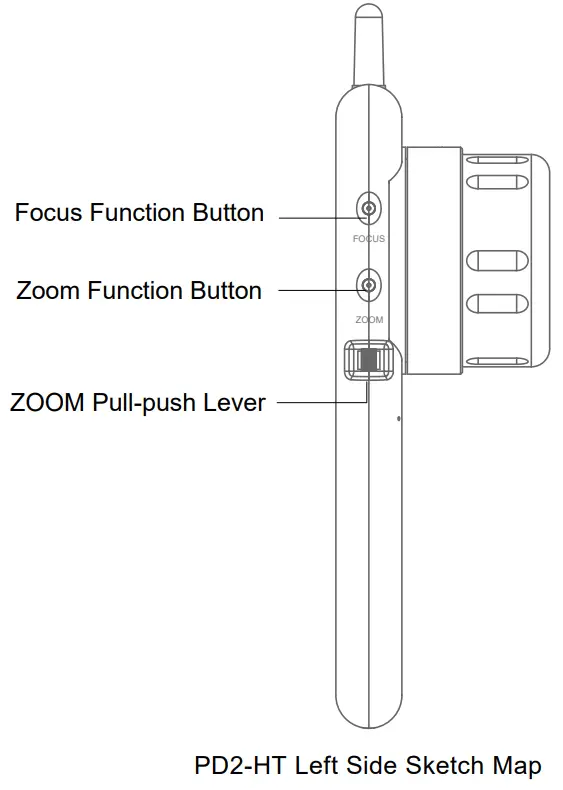
7. UsePlease turn the hand-wheel and push-pull lever of the controller for checking the corresponding motor in normal use. The rotation speed and direction can change by the motor or controller. For more detail, please read the button instruction table on the controller and motor. for three seconds.
Controller PD2-HT Instruction Table Of Button
| Button | Times of click on the buttons | Function |
| ON/OFF
|
Switch signal channel | |
| Turn-ON/OFF | ||
| FOCUS ZOOM IRIS | Calibration lens stroke | |
| Lens travel limit | ||
| Switching control channel | ||
| Switched ZOOM and IRIS controlled parts | ||
| Control speed of Pull-push Lever | ||
| Switch Motor Rotate Direction |
Motor Instruction Table
| Times of click on the buttons | Function |
| Switch signal channel/Terminal calibration | |
| R1 G2 B3 –Switching control channel | |
| Y4 C5 P6–Switching the standby channel (Reserve Function) | |
| Restore the lens stroke when power o / Remove the lens stroke.① | |
| FAST/MEDIUM/SLOW–Switch Motor Rotate Speed② | |
| Calibration Lens Stroke | |
| Switch Motor Rotate Direction | |
| Turn on the Bluetooth | |
| ① Cancel the calibrated stroke: Do not need to restart the motor, just press four times of buttons to reset the stroke manually; Restore the lens stroke when power off: When the motor is suddenly powered off, please press 4 times button to restart the calibration stroke. | ② The Light Flash quickly: The quickest speedThe Light Flash Slowly: The middle speedThe Lights On The slowest speed. |
Bluetooth Control
1. Turn on the Bluetooth controller and motorPress the OFF/ON button on the Bluetooth controller for three seconds, until the screen isbright. The PD-RX (Receive motor) will turn on automatically when connect with the power.

2. Bluetooth ConnectAfter the Bluetooth controller is turned on, the indicator lights will flash quickly for 60 seconds, which means the Bluetooth is being searched. When the Bluetooth connection is successful, the controller indicator light is bright, and the Bluetooth logo on the motor display is on.
| 1. Searching Bluetooth: Blinking fast 60s. | 2. Connect successfully: Brightening |
 |
 |
3. CalibrationPress the OFF/ON button of the Bluetooth controller once, then press it again and hold on, until the motor’s running. Then, the motor automatically calibrates the lens stroke.Other calibration methods can be referred to as “Instruction Manuals Set Up → 6 → (2) or (3)”.4. UseTurn the hand-wheel of the Bluetooth controller to check the motor can be used normally or not. (Note: The Bluetooth controller only control the single channel, the receiver motor must be set in the focus control channel, the motor state indicator is red)
Bluetooth Controller PDL-TC-AF Instruction Table Of Button
| Times of click on the buttons | Function |
| TURN ON/OFF | |
| Lens travel limit | |
| Calibration lens stroke | |
| Activation Bluetooth | |
| Switch Motor Rotation |
|
Residual electricity |
The color of the indicator light |
|
100%-75% |
WHITE |
|
74%-50% |
GREEN |
|
49%-25% |
YELLOW |
| 24%-0% |
RED |
5. REMOTE AIR APPThe motor can control by IOS system APP. Please search PDMOVIE or REMOTE AIR, then download the APP from the Apple store.
| ONE | 1. Turn on the AIR 4 controller | 2. Initiate Bluetooth of phone | 3. Turn on the APP* (Mobile automatic connect thecontroller) | 4. Use the AIR 4 controller to connect the receivermotor |
| TWO | 1. Turn on the receiver motor | 2. Initiate Bluetooth of phone |
3. Turn on the APP* (Mobile automatic connect the motor) |
*Before opening the APP, please make sure the APP did not run, if so, please close the APP then reopen it again. |
App introduction information or video obtained by PDMOVIE official website/ FACEBOOK/ YOUTUBE. Or find it from the APP interface – “SET” – “HELP”.
supplementary Specification
- The 0.8M gear is the standard configuration of the motor. If need 0.4M/0.5M/0.6M motors’ gear, please contact our after service or purchase in PDMOVIE official AliExpress store directly.
- If the motor has any problems in the calibration process, please press the Channel button once for stopping the calibration.
- The distance of Bluetooth control is 10 meters, and Bluetooth controller PDL-TC-AF is mainly used for single-person shooting.
- When controlling the SLR Lens, it suggests the motor rotation speed of being adjusted to medium or slow. It is the best control speed for SLR shoot.
- Recommend the SLR camera lens user using manual calibration for calibrating.
- The standard configuration of the power supply is the B port power cable of the V-Mount battery. The normal operating voltage of the motor is between 7V~20V. After sells service supports the service of changing the cable and so on.
- The standard configuration of the power supply is the B port power cable of the V-Mount battery. The normal operating voltage of the motor is between 7V~20V. After sells service supports the service of changing the cable and so on.
- The normal working time of the controller PD2-HT is 30 hours. If there is insufficient power in the work, the mobile power supply with USB 5V output can be used for charging. The normal charge for 60 minutes can be full.
- The normal working time of Bluetooth controller PDL-TC-AF is 8-10 hours. If the controller lack working power, it can use the USB5V output or other mobile power for charging. The normal charge time is 20-25 minutes.
- When the motor’s calibration does not coincide with the original calibrated, please check the controller PD2-HT or PDL-TC-AF’s s blinking light To, If the current channel color and white blinking mean a setting the A-B point. If you want to cancel the A-B point limit, please press the corresponding button once.
- Battery maintenance: Recommend checking the power consumption every month to ensure that the battery has enough power when you do not use the battery. When the equipment is in a state of low power or no electricity for a long time, it will lead to a smaller capacity of the battery. Overcharging or over-discharging for a long time will cause loss to the battery. It is recommended that the user keep the device power at 50~74%.
Warranty and Upgrade.
REMOTE AIR 4 offers a free upgrade program and one year warranty for hardware. PDMOVIE dealer will also offer you the same service or you can directly call PDMOVIE.
![]()

https://www.facebook.com/pdmovie.com.cn/
PDMOVIE Technology Co., Ltd.Web: www.pdmovie.comE-mail: [email protected]Facebook: www.facebook.com/pdmovie.com.cn
Room 3-709, Building 6, Huoju Technopark, No.10 West St, Huangzhuang, Jiangmen, Guangdong. China. 529030©2018 PDMOVIE All rights reserved.
References
[xyz-ips snippet=”download-snippet”]