
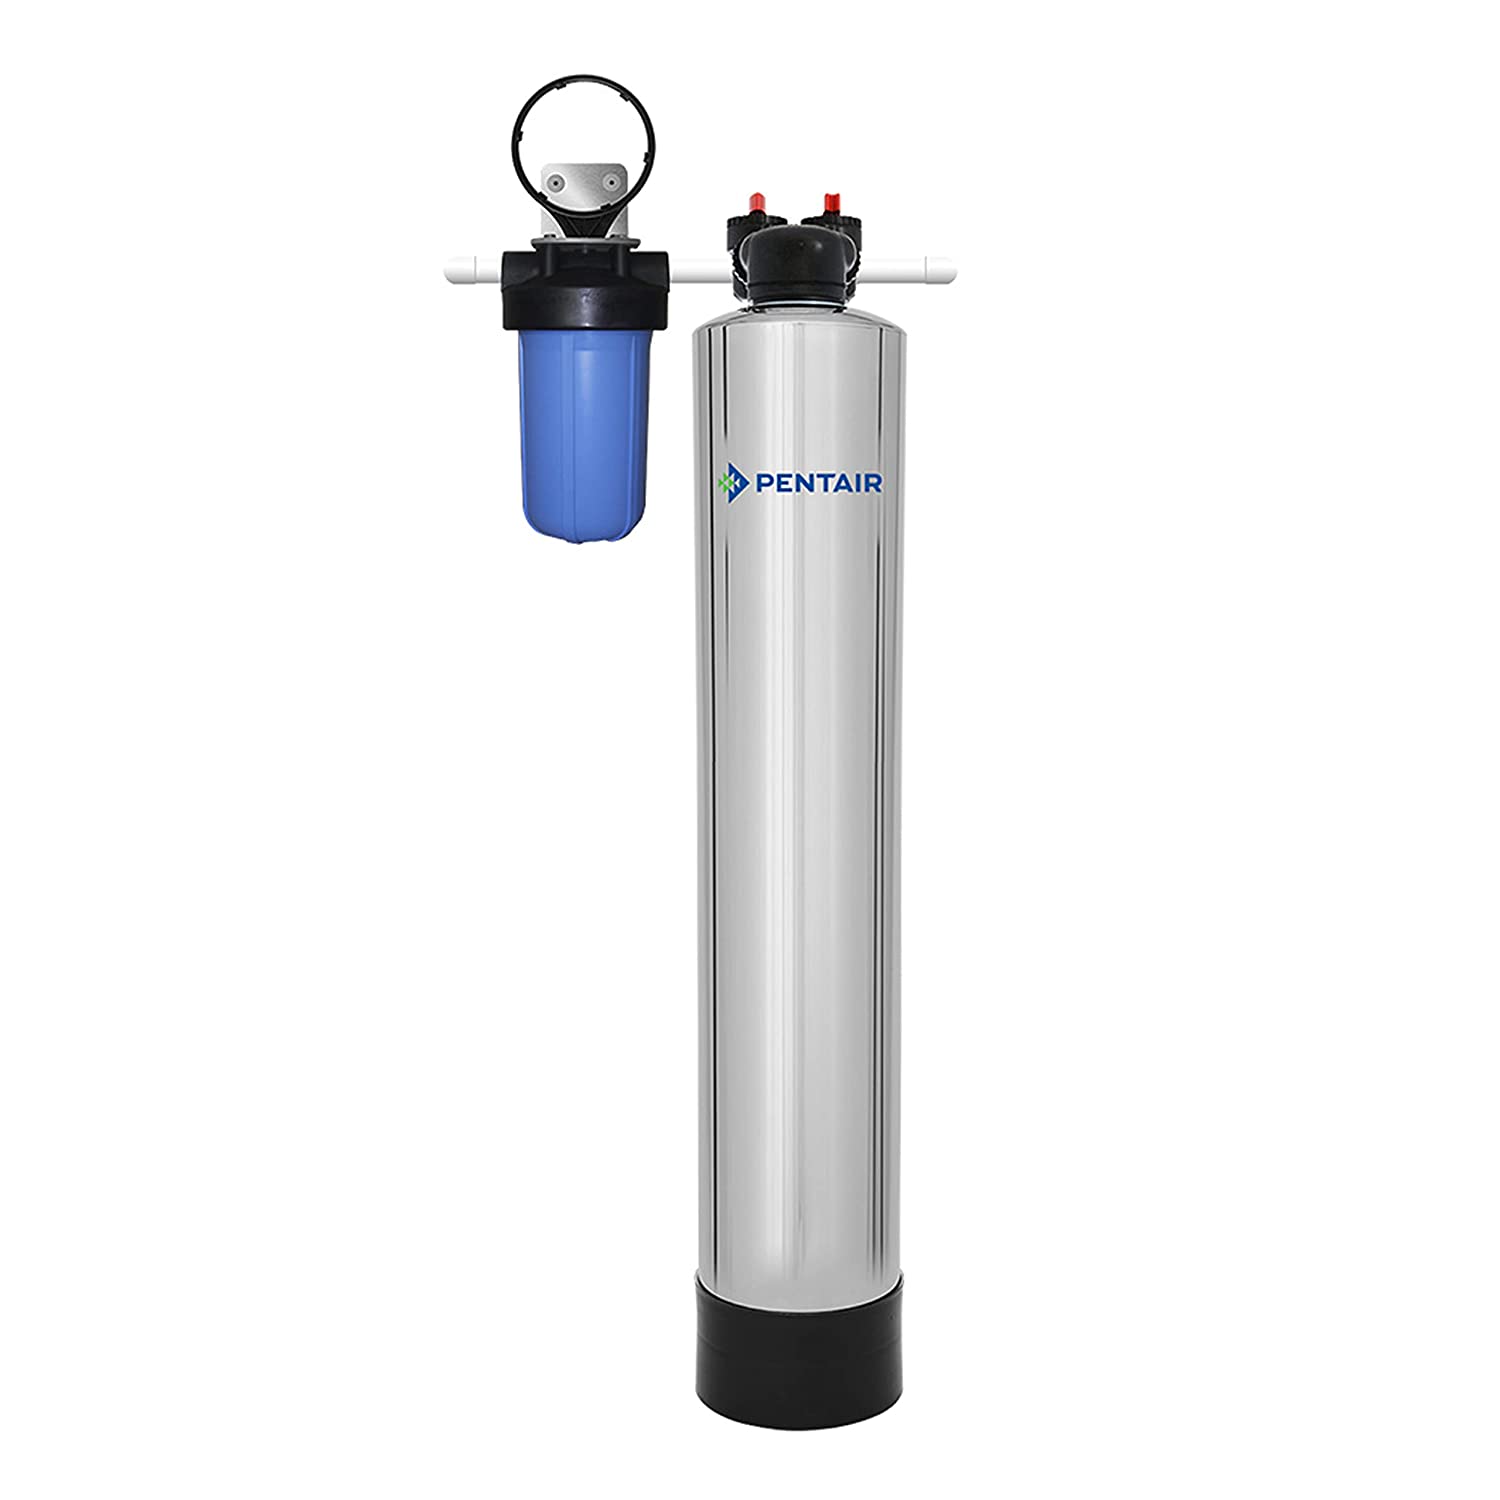
PENTAIR PC1000-P Whole House Water Filter System
IMPORTANT INFORMATION
- Read these instructions carefully and determine the location of all system components before beginning installation.
- Check all applicable plumbing, building, and electrical codes for installation compliance.
- Install the system on the main water supply.
- The use of plumber’s tape and/or pipe thread seal paste will be needed on all threaded connections.
- To condition all water in the home, install the Carbon Water Filter System close to the water supply inlet, and upstream of all other plumbing connnections, except outside water pipes. Outside faucets should remain on unfiltered water.
WARNING
If this or any other system is installed in a metal (conductive) plumbing system, i.e. copper or galvanized metal, the plastic components of the system will interrupt the continuity of the plumbing system. As a result any errant electricity from improperly grounded appliances downstream or potential galvanic activity in the plumbing system can no longer ground through contiguous metal plumbing. Some homes may have been built in accordance with building codes, which actually encouraged the grounding of electrical appliances through the plumbing system. Consequently, the installation of a bypass consisting of the same material as the existing plumbing, or a grounded “jumper wire” bridging the equipment and re-establishing the contiguous conductive nature of the plumbing system, must be installed prior to your systems use.
CAUTION
When adding a filtration/softening system to homes/buildings supplied by well water, the system should be installed following the pressure tank. DO NOT USE this system for pneumatic or hydro pneumatic applications. If you are using a booster pump, then install this system following the booster pump. If you have questions, please call customer service.
PRODUCT OPERATION AND SPECIFICATIONS
| Specification Description | PC600-P | PC1000-P |
| Rated Service Flow Rate | 8 GPM | 12 GPM |
| Peak Flow Rate | 12 GPM | 16 GPM |
| Minimum Working Pressure | 25 PSI | |
| Maximum Working Pressure | 80 PSI | |
| Maximum Vacuum | 5 inch/127 mm Hg | |
| Operating Temperatures | 36˚F – 120˚F | |
| pH Range | 6-11 |
COMPLETE PARTS LIST
Note: The parts supplied are intended to accommodate a variety of water supply lines. Additional fittings may be needed to fit to your plumbing. Visit pentair.com to view our full line of installation kits.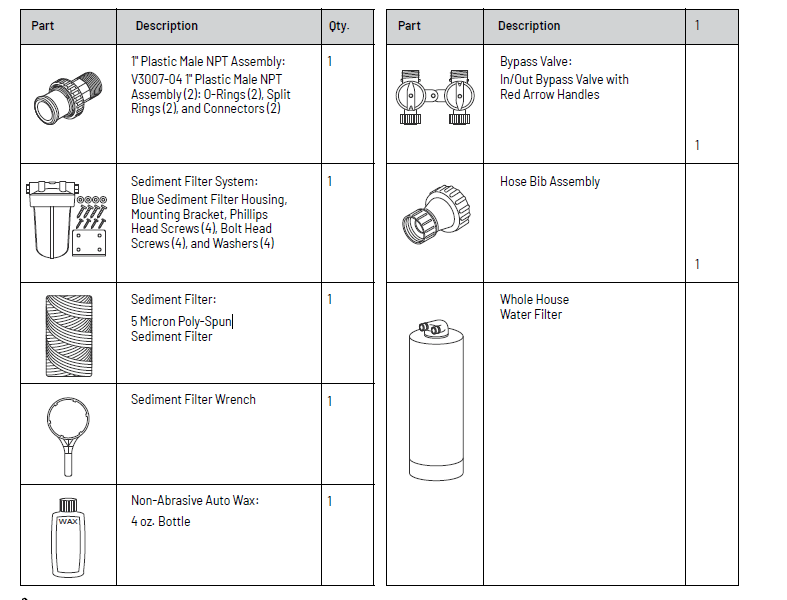 INSTALLATION OVERVIEW
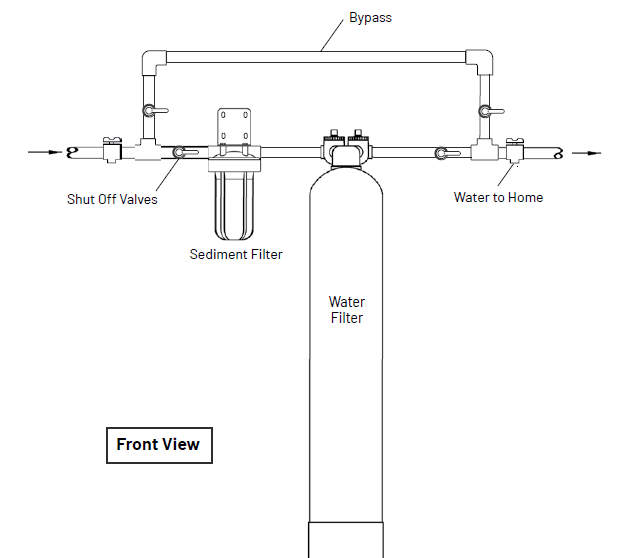
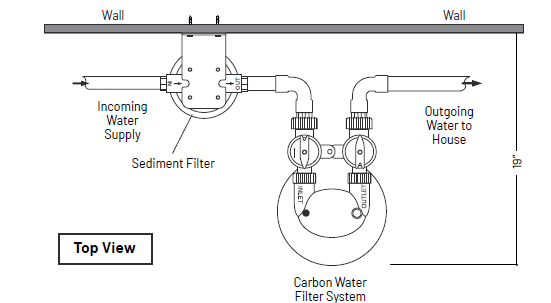
Note:
Sediment filter position is at the discretion of your professional installer. As a general guideline, the sediment pre filter is typically installed in the “pre” position (as shown above) for well water applications. For city water applications, the sediment filter is typically installed in the “post” position after the Carbon Water Filter System. Whole House Water Filter System.
PRE-INSTALLATION
Note: Head may come loose in transit. Please check head by tightening clock wise, hand tighten only, no more than 1/4 turn. Head may not move at all or less than 1/4 turn.
Bypass Valve Installation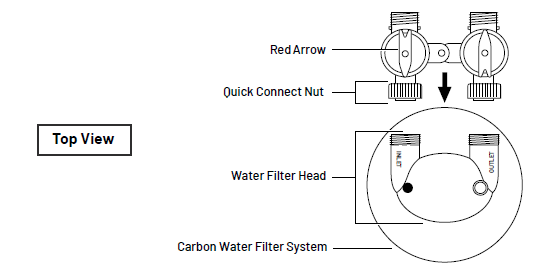
Figure 2The bypass valve comes pre-assembled and ready to install with the o-rings, split rings, and quick connect nuts. Push the bypass valve into the head of the Carbon Water Filter System with the unthreaded ends oriented toward the tanks and hand-tighten the quick connect nuts.
Note: The bypass valve(s) included with this system are designed for multiple water systems. This may result in the arrows on the bypass valve(s) pointing differently than shown. If the arrows on your bypass valve(s) do not match the diagram, remove the red arrows by pulling them straight up, turn them 180˚ to match the drawing, and push them back down onto the stem.
MEDIA SOAK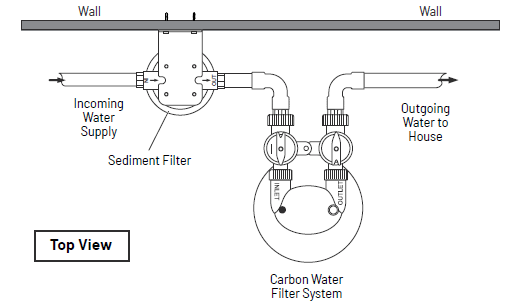
Carbon Soak/Rinse
Note
Steps 1-3 should be done prior to installation
- Locate the carbon filter tank and the hose bib attachment.
- Attach the hose bib attachment to “Inlet” side of the carbon filter. Attach garden hose to the hose bib and turn water slowly until water flows outa of the outlet of the tank (a stream of water about the size of a pencil). Allow this water to flow out for 15 minutes.Note: The first few gallons of water could look black and cloudy due to the carbon fines, this is a normal occurrence.
- After 15 minutes, turn water off for 1 minute. Then turn water on for fully for 1 minute, and then turn off and wait 1 minute. Continue this process until water comes out of the outlet clear. complete, remove hose bib attachment.
- Should you lose water pressure while completing step 3, turn water off, and allow the tank to settle with no water usage. Repeat step 3, but reduce how fast you flush the tank.
Note: Should you need to perform the above steps after the tanks are connected to the home plumbing, it is recommended to use an outside garden hose spigot or faucet with an aerator to perform the rinsing procedure.
WARNING: For 72 hours after installation, try not to use a high demand of water (multiple fixtures at one time). This can cause the media to float and could restrict water pressure. Should this happen, stop using the water and allow the tank to sit undisturbed (no water flow) for 15 minutes. Then resume a lower water usage.
SEDIMENT FILTER INSTALLATION
Note: Sediment filter position is at the discretion of your professional installer. As a general guideline, the sediment pre filter is typically installed in the “pre” position (as shown above) for well-water applications. For city water applications, the sediment filter is typically installed in the “post” position after the Carbon Water Filter System Tank.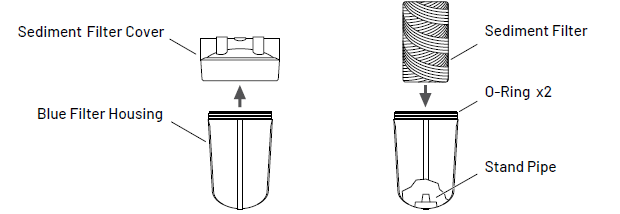
Part 1
- Unscrew the cover from the blue filter housing.
- Remove the plastic covering from the sediment filter.
- Place the sediment filter onto the stand pipe in the blue filter housing and set aside.

Part 2
- Shut off the water.
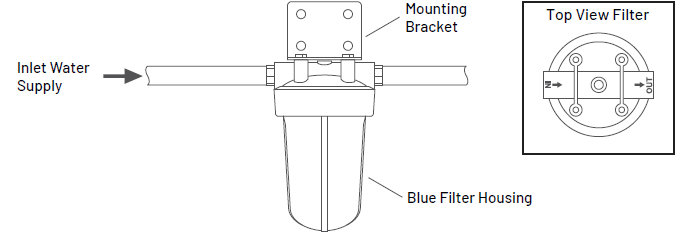
- Attach the filter cover to the mounting bracket using the supplied bolt head screws and washers. Make sure to properly orientate the IN and OUT to match your flow pattern.
- Attach the mounting bracket to the wall using the supplied phillips head screws.
- Hand tighten the blue filter housing and then, using the supplied filter wrench, lightly snug the housing making sure not to over-tighten (counterclockwise).
- Determine the size of your inlet water supply line.
CARBON WATER FILTER SYSTEM TANK INSTALLATION
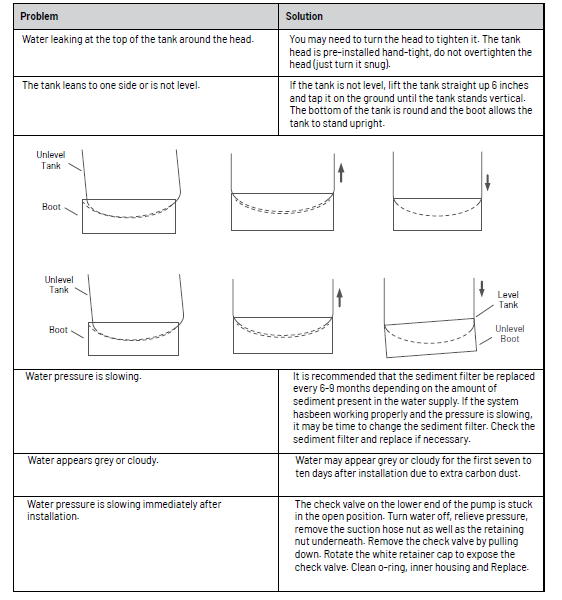
- Level the Carbon Water Filter System Tank.Note: See “Troubleshooting” section on tips for leveling the tank. If the tank is not level, lift the tank straight up 6 inches and tap it on the ground until the tank stands vertical. The bottom of the tank is round and the boot allows the tank to stand upright.
- Determine the size and material of your incoming water supply line and choose the appropriate plumbing required to adapt to the 1” male NPT Assembly.Note: Visit Pentair.com/homewater to view our full line of installation kits.CAUTION: Do not any of the fittings during installation.Note: The fitting below is designed with a ¼” give to allow for proper pipe alignment. It will not leak and is intended to have some flexibility.
- Install the fittings into the INLET and OUTLET sides of the bypass valve. Follow the diagram supplied with the fitting.
- Connect the incoming water supply from the sediment filter to the fitting on the INLET side of the bypass valve.
- Connect the outgoing water supply to the OUTLET side of the bypass valve.


BYPASS VALVE OPERATIONS
Figure A shows the system “in service” which allows water to flow in and out of the tank. In this position the system would be considered ON.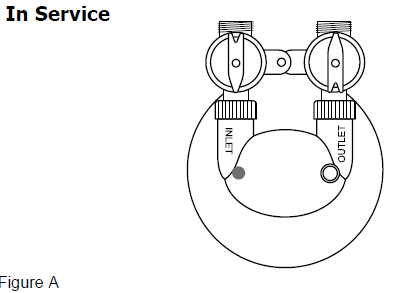
Figure B shows the system “in bypass” which will direct water straight to the home without going in and out of the tank. In this position the system would be considered OFF.
COMPLETE THE INSTALLATION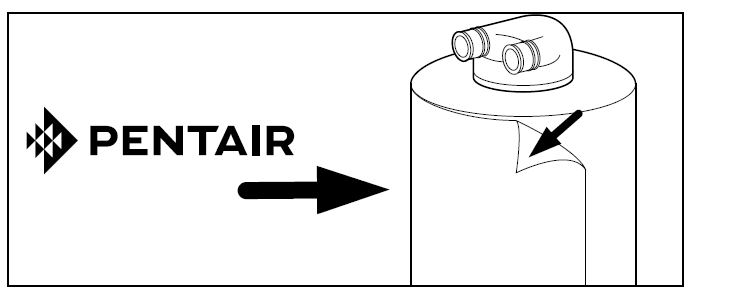
- Turn on main water supply and check for leaks.
- Peel off the protective plastic wrap from the stainless steel tank jacket(s)
- Add the Pentair logo sticker(s) in the desired location on the tank.
- Wax stainless steel tank jacket(s) with wax provided (or any other non-abrasive auto wax) a minimum of 1-2 times per year or as needed based on the installed environment.
CAUTION: Avoid high flow rates such as bathtub, utility sinks, hose bibs, multi-headed showers, body sprayers, or anything that is considered high flow for the first 72 hours to avoid flow restrictions caused by carbon blockage of the top basket inside the carbon tank.CAUTION: Carbon dust may be released into the water lines of the house/building during the first few days of water use after carbon tank installation. The carbon dust is harmless, but may give the water a gray appearance that should diminish within a week or 10 days depending on water use.
MAINTENANCE
Media ReplacementYour Pentair® PC600-P / PC1000-P Premium Whole House Water Filter requires care and cleaning after a period of 5 years. Replacement media and instructions can be ordered on-line at Pentair.com/homewater or by calling 877-842-1635. Model numbers for replacement media are PC600-R or PC1000-R.Sediment FilterIt is recommended that the sediment filter be replaced every 6-9 months depending on the amount of sediment present in the water supply. If the system has been working properly and the pressure is slowing, it may be time to change the sediment filter. Check the sediment filter and replace if necessary.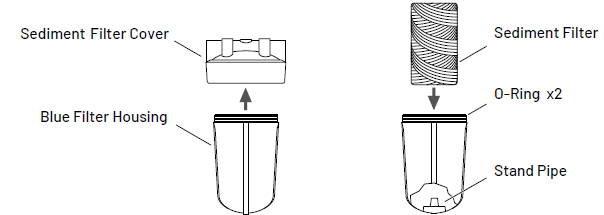
Replacing the Sediment Filter
- Turn off the main water supply to the sediment filter system and bypass all tanks.
- Run a faucet (cold water) inside the house to relieve the pressure. Leave the faucet open.
- Unscrew the blue filter housing clockwise using the supplied filter wrench.
- Remove the existing sediment filter and discard.
- Remove the o-rings and wipe the upper groove clean. Lubricate two new o-rings with a coating of clean silicone grease. Replace both o-rings. Be sure to press the upper o-rings down into the groove with two fingers.Note: This step is important to ensure the proper filter seal. Make sure the upper o-rings is seated level in the groove. If the o-ring appears damaged, stretched, or crimped it should be replaced.
- Place a new sediment filter onto the stand pipe in the blue filter housing.
- Screw the blue filter housing onto the filter cover hand tight. Lightly snug the housing with the spanner wrench making sure not to over-tighten.
- Turn on the main water supply slowly to allow the sediment filter system to fill with water and expel air from lines. Put tanks back in service (out of bypass).
- Check for leaks.
TROUBLESHOOTING
Note: If you have experienced a Boil Alert or require your system to be sanitized, please go to pentair.com/assets/pwsboilalert for product sanitization instructions.
Product Warranty and Registration App
For details on your Pentair product warranty, please visit pentair.com/assets/residential-filteration-warranty
Send to:Pentair2361 Mason Avenue, Suite 100 Daytona Beach, FL 32117 Phone: 1.800.842.1635PRODUCT CERTIFICATIONz
PRODUCT CERTIFICATION
Certified By IAPMO R&T to NSF/ANSI Standard 42 for the reduction of Chlorine Taste & Odor, structural integrity & NSF/ANSI 61 for material safety.
The NaturSoft® system is DVGW DW-9191 certified for 99.6% hard water scale prevention.![]()
References
[xyz-ips snippet=”download-snippet”]