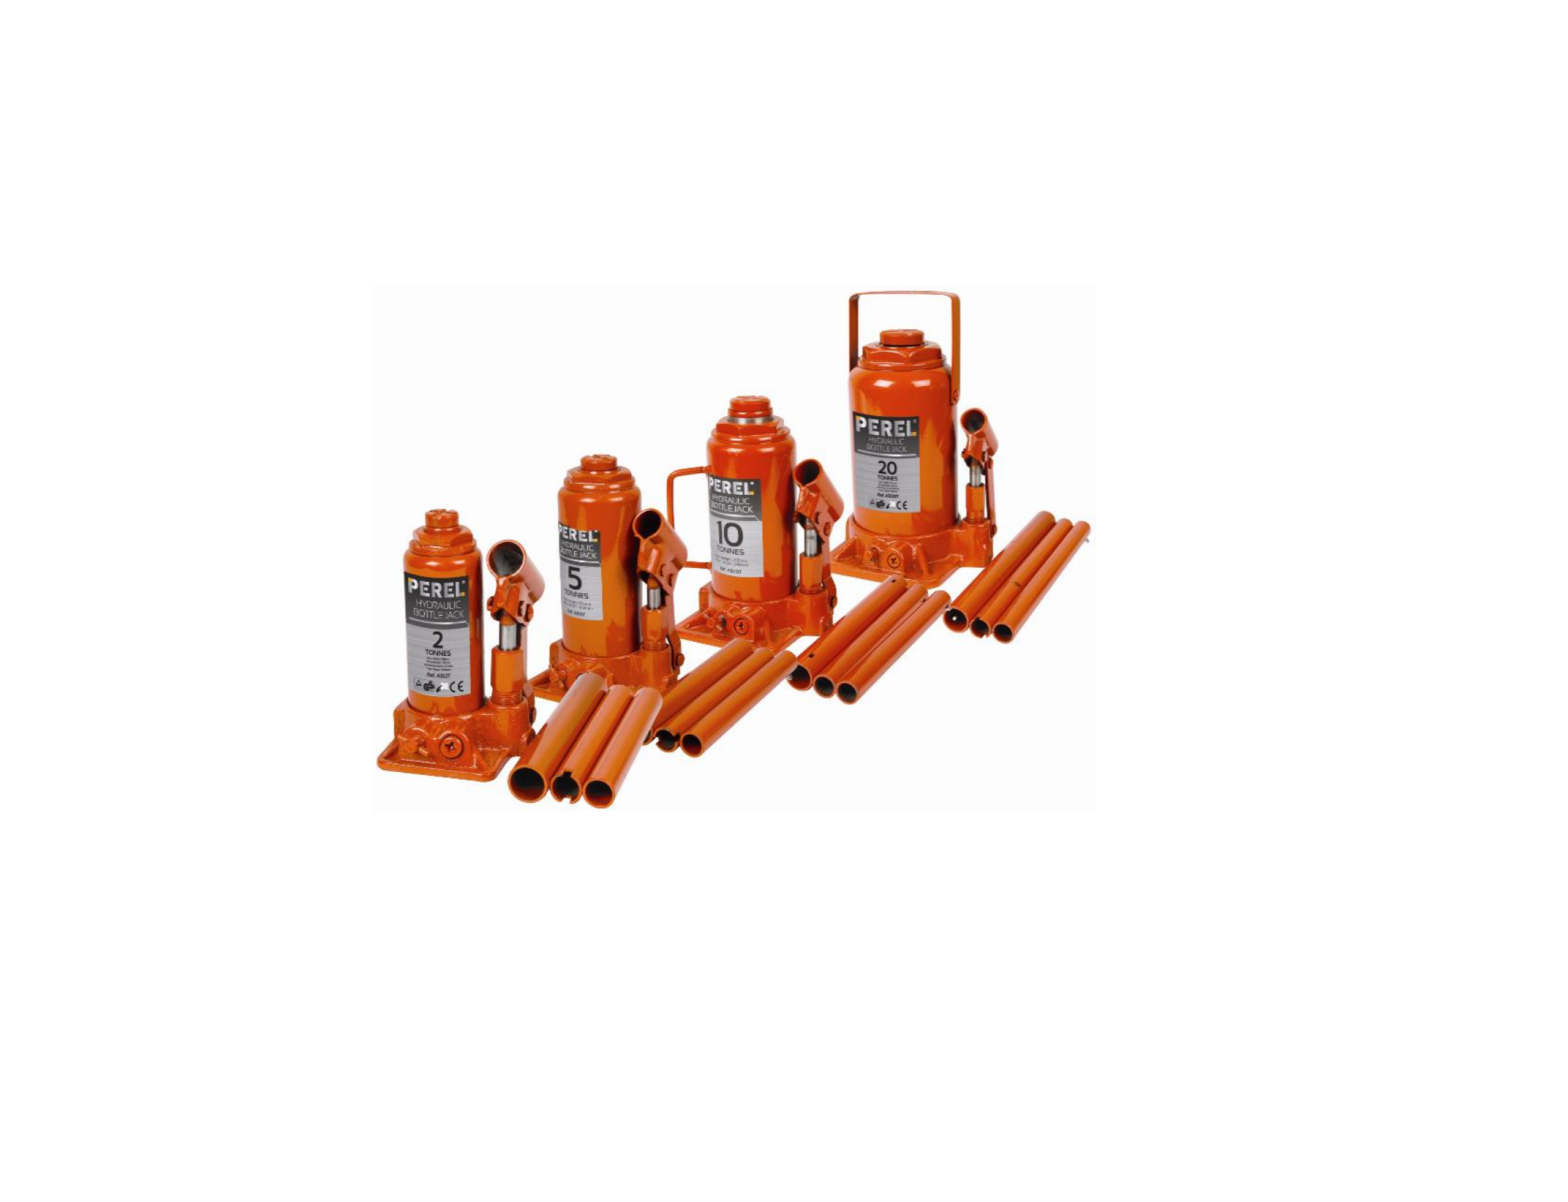
PEREL ABJ5T Hydraulic Bottle Jack
Introduction
 To all residents of the European UnionImportant environmental information about this productThis symbol on the device or the package indicates that disposal of the device after its lifecycle could harm the environment. Do not dispose of the unit (or batteries) as unsorted municipal waste; it should be taken to a specialized company for recycling. This device should be returned to your distributor or to a local recycling service. Respect the local environmental rules. If in doubt, contact your local waste disposal authorities.Thank you for choosing Perel! Please read the manual thoroughly before bringing this device into service.If the device was damaged in transit, do not install or use it and contact your dealer.
Safety Instructions
 |
Read and understand this manual and all safety signs before using this appliance. |
 |
Year of actual construction. |
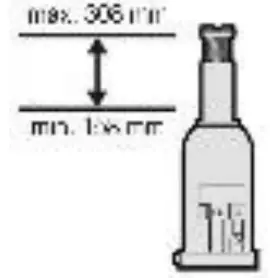 |
Minimum height + maximum height. |
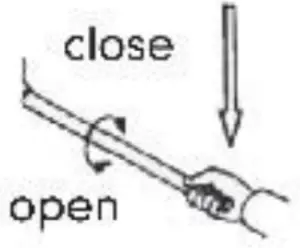 |
Basic operation: open/close. |
 |
This device is for lifting purposes only. Once the vehicle is lifted to the desired height it must be supported by a pair of jack stands with the appropriate rating. Never work under or near a load that is only supported by this device. Do not use the jack for continuous support e.g. to level a trailer, camper, building structure… or to move a vehicle. |
 |
Always chock wheels that are in contact with the floor in both directions. |
 |
WARNING – It is not allowed to work under the raised load unless it is secured by a suitable means. |
- This device can be used by children aged from 8 years and above, and persons with reduced physical, sensory or mental capabilities or lack of experience and knowledge if they have been given supervision or instruction concerning the use of the device in a safe way and understand the hazards involved. Children shall not play with the device. Cleaning and user maintenance shall not be made by children without supervision.
- Only use the jack on a flat and steady surface that is capable of supporting the weight of the jack and its load. Never exceed the indicated load limit.
- Inspect the device for damage before each use. Do not use when damage (broken, bent, cracked parts) is noticed. Contact your local dealer for spare parts. Only use original spare part. When the jack was subjected to a shock load, stop using it and contact your local dealer for inspection.
- Only use the jack on vehicles of which the lift points on frame and/or underbody are compatible with the saddle of the jack. Check the user manual that came with the vehicle to determine location and type of lift points. Incompatibility may cause structural damage to vehicle and/or jack.
- Do not attempt to move the vehicle and never enter or climb on the vehicle while it is supported by the jack.
- Make sure the area under the vehicle is clear before lowering. · All modifications of the device are forbidden for safety reasons. Damage caused by user modifications to the device is not covered by the warranty.
- The lifetime of the jack is 2 years after its first use.
- Never use the jack to lift persons.
- If the generated force exceeds 400 N, the jack must be operated with an additional person.
- It is necessary that the operator can see the jack and load at all times during use.
General Guidelines
- Refer to the Velleman® Service and Quality Warranty on the last pages of this manual.
- All modifications of the device are forbidden for safety reasons. Damage caused by user modifications to the device is not covered by the warranty.
- Only use the device for its intended purpose. Using the device in an unauthorised way will void the warranty.
- Damage caused by disregard of certain guidelines in this manual is not covered by the warranty and the dealer will not accept responsibility for any ensuing defects or problems.
- Nor Velleman nv nor its dealers can be held responsible for any damage(extraordinary, incidental or indirect) of any nature (financial, physical…) arising from the possession, use or failure of this product.
- Keep this manual for future reference.
Overview
Refer to the illustrations on page 2 of this manual.
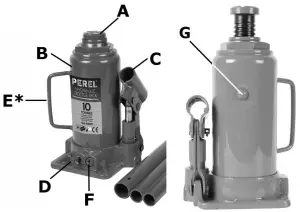
| A | saddle |
| B | pump body |
| C | handle socket |
| D | release valve |
| E* | carrying handle |
| F | overload valve |
| G | oil filler plug |
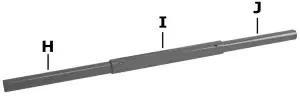
| H | upper handlebar |
| I | middle handlebar |
| J | lower handlebar |
Installation
 WARNING
Always comply with the safety instructions.
Before Use
- It is possible that during shipment of the device air gets trapped inside the hydraulic system causing malfunctioning. Turn the release valve 1 turn counterclockwise and push the saddle all the way down.Note:o The open end of the lower handlebar can be used to turn the release valve.
- Place the pump body upright and remove the oil filler plug. · Mount the handle: insert the upper handlebar in the middle handlebar and make sure the spring snaps into place. Insert the lower handlebar into the middle handlebar and again make sure the spring snaps into place. The handle is now ready
- Insert the lower handlebar end of the handle into the socket.
- Quickly pump 6-8 full strokes to remove air in the system.
- Close the oil filler plug.Note:o The overload valve is calibrated to the maximum load. Never adjust this overload valve.
To Raise a Vehicle
- Turn the release valve clockwise until it is closed tightly.
- Place the vehicle in gear (or in Park (P) for vehicles with automatic transmission) and chock the wheels that remain in contact with the floor in both directions.
- Locate the lift points of the vehicle (refer to the vehicles’ owner’s manual) and make sure they are compatible with the saddle of the jack. Do not use the jack if saddle and lift points are not compatible to avoid structural damage to vehicle and/or jack.Note:o Always centre the load on the saddle to avoid damage to the jack.
- Insert the handle into the socket and pump until the jack is almost touching the lift point. Verify that the saddle is centred and good contact with the lift point is assured. Note: o The saddle can be raised about 6 cm by turning it counterclockwise
- Continue pumping handle until the vehicle is raised to the desired height. Immediately support the vehicle by a pair of jack stands (not incl.). Never work under a vehicle that is only supported by the floor jack!
- When jack stands are in place, lower the floor jack slightly (see instructions below) until the vehicle rests on the jack stands. To Lower the Vehicle
- Remove the handle from the socket and use the open end of the lower handlebar to turn the release valve slowly counterclockwise.Note:o When the vehicle is on jack stands, first lift the vehicle until the jack stands can easily be removed.
- For storage, close the release valve by turning it completely clockwise.
Care and Maintenance
- The jack shall be repaired and maintained in accordance with the manufacturer’s instructions. Maintenance and repair shall only be carried out by a qualified person.
- When the jack is not in use or for storage, lower the saddle completely to prevent corrosion. Always store the floor jack in an upright position to avoid oil leakage.
- Keep the jack clean and keep all moving parts well lubricated. Remove excessive grease and dirt from the outside.
- To check oil level, lower the saddle completely and open the oil filler plug. Oil level must be just below the filler hole. Add oil when oil level is too low. Recommended oil: SAE 10.
- The oil should be replaced once a year. To replace the oil, open the oil filler plug and remove the release valve completely by turning it counterclockwise. Be careful not to contaminate the inside of the hydraulic system! Remove and refill via the oil filler plug hole.Note:o Use of improper oil or other fluid can cause serious damage to the internal parts of the jack!o Take appropriate safety measurements when handling oil.o Dispose of used oil in accordance with local regulations.
- Close the filler hole with the oil filler plug.
- Re-install and close the release valve completely.
- Pull the saddle all the way up than open the release valve to lower the saddle. Force the saddle to lower faster. Close the release valve and repeat this procedure a couple of times to ensure proper oil distribution.
Troubleshooting
Jack will not raise/lift load/lift load to full height Jack lowers under load
- The weight of the load is higher than the max. indicated load for the jack. Use a suitable jack.
- Release vale is open. Close it tightly by turning it clockwise. Check whether dirt prevents the release valve to be closed completely. Remove the release valve and clean it.
- Inspect oil level and add/replace oil when necessary.
- Remove air from hydraulic system.
- If above steps do not solve the problem, there is something wrong with the hydraulic system itself. Contact your local dealer for service and support.
Jack will not lower
- When there is load on the jack and it will not lower, remove the load by carefully lifting it with a second jack.
- Never apply excessive force (e.g. use a hammer) on the saddle to lower it.
- Check the oil level too much oil will block the hydraulic system.
- Dirt may block the release valve. Remove and clean it and replace the oil.
- Remove air from hydraulic system.
- Make sure the system is sufficiently greased.
Weak lifting
- This is possibly be caused by dirty oil replace the oil.
- Close the release valve tightly by turning it clockwise. Check whether dirt prevents the release valve to be closed completely. Remove the release valve and clean it.
- Remove air from hydraulic system.
Unloaded saddle slowly moves up
- Remove air from hydraulic system.
Technical Specifications
| ABJ2T | |
| rated load height | 2000 kg |
| minimum | 158 mm |
| lifting | 90 mm |
| extension screw | 60 mm |
| maximum | 308 mm |
| weight | 2.59 kg |
| ABJ5T | |
| rated load height | 5000 kg |
| minimum | 197 mm |
| lifting | 125 mm |
| extension screw | 60 mm |
| maximum | 382 mm |
| weight | 3.6 kg |
| ABJ10T | |
| rated load height | 10000 kg |
| minimum | 205 mm |
| lifting | 125 mm |
| extension screw | 60 mm |
| maximum | 390 mm |
| weight | 5.8 kg |
| ABJ20T | |
| rated load height | 20000 kg |
| minimum | 244 mm |
| lifting | 145 mm |
| extension screw | 60 mm |
| maximum | 449 mm |
| weight | 9.8 kg |
Use this device with original accessories only. Velleman nv cannot be held responsible in the event of damage or injury resulting from (incorrect) use of this device. For more info concerning this product and the latest version of this manual, please visit our website www.velleman.eu. The information in this manual is subject to change without prior notice.
| © COPYRIGHT NOTICEThe copyright to this manual is owned by Velleman nv. All worldwide rights reserved. No part of this manual may be copied, reproduced, translated or reduced to any electronic medium or otherwise without the prior written consent of the copyright holder. |
 report this ad
References
[xyz-ips snippet=”download-snippet”]