PEREL Wifi Weather Station Outdoor User Manual
Introduction
 To all residents of the European Union Important environmental information about this productThis symbol on the device or the package indicates that disposal of the device after its life cycle could harm the environment. Do not dispose of the unit (or batteries) as unsorted municipal waste; it should be taken to a specialized company for recycling. This device should be returned to your distributor or to a local recycling service. Respect the local environmental rules.If in doubt, contact your local waste disposal authorities.Thank you for choosing Perel! Please read the manual thoroughly before bringing this device into service. If the device was damaged in transit, do not install or use it and contact your dealer.
Safety Instructions
![]() Read and understand this manual and all safety signs before using this appliance.
Read and understand this manual and all safety signs before using this appliance.
- This device can be used by children aged from 8 years and above, and persons withreduced physical, sensory or mental capabilities or lack of experience and knowledge if they have been given supervision or instruction concerning the use of the device in a safe way and understand the hazards involved. Children shall not play with the device. Cleaning and user maintenance shall not be made by children without supervision.
- This product is exclusively intended for the field of application described in thismanual. This product should only be used as described within these instructions.
- Do not expose the appliance to extreme temperatures, vibration or shock. · The indoor main unit is not watertight and should only be used indoors. Choose a dry and shady installation spot for the main unit. The outdoor sensor may be used and installed outdoors.
General Guidelines
- Refer to the Velleman® Service and Quality Warranty on the last pages of this manual.
- All modifications of the device are forbidden for safety reasons. Damage caused by user modifications to the device is not covered by the warranty.
- Only use the device for its intended purpose. Using the device in an unauthorised way will void the warranty.
- Damage caused by disregard of certain guidelines in this manual is not covered by the warranty and the dealer will not accept responsibility for any ensuing defects or problems.
- Nor Velleman nv nor its dealers can be held responsible for any damage(extraordinary, incidental or indirect) of any nature (financial, physical…) arising from the possession, use or failure of this product.
- Keep this manual for future reference.
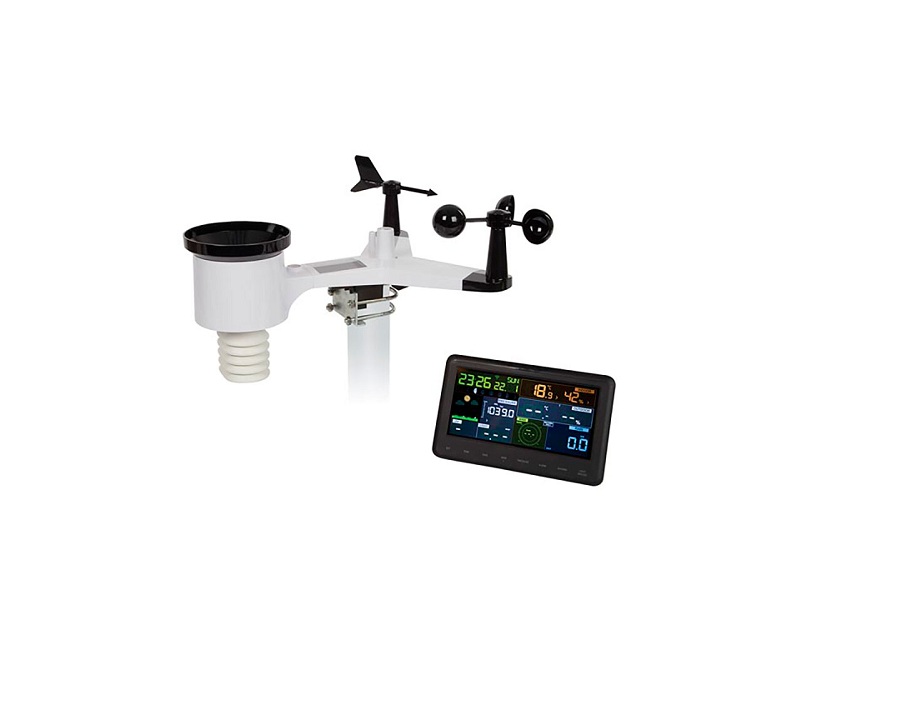
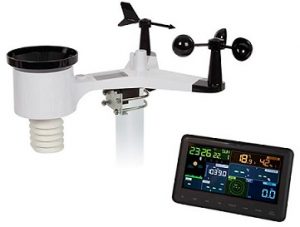
Overview
Refer to the illustrations on page 2 of this manual.
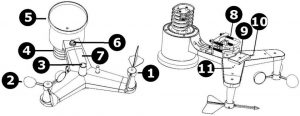
Sensor
|
1 |
wind vane |
|
2 |
wind speed sensor |
|
3 |
UV sensor |
|
4 |
thermo-hygro sensor |
|
5 |
rain collector |
|
6 |
bubble level |
|
7 |
solar panel |
|
8 |
U-bolt |
|
9 |
battery compartment |
|
10 |
reset button |
|
11 |
LED indicator |
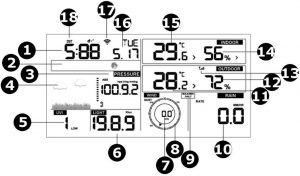
Display
|
1 |
Time |
|
2 |
Moon phase |
|
3 |
Barometric pressure |
|
4 |
Weather forecast |
|
5 |
UV index |
|
6 |
Light |
|
7 |
Wind speed |
|
8 |
Wind direction |
|
9 |
Max/min daily |
|
10 |
Rain fall |
|
11 |
Outdoor temperature |
|
12 |
Outdoor humidity |
|
13 |
RF icon |
|
14 |
Indoor humidity |
|
15 |
Indoor temperature |
|
16 |
Date |
|
17 |
Wifi icon |
|
18 |
DST |
Installation
Sensor
Assembling the Wind Vane and AnemometerSlide the wind vane onto the shaft and tighten the screw, making sure the vane will spin freely.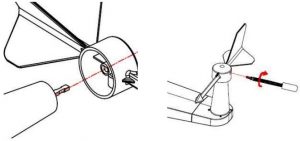 Do the same with the anemometer.
 Powering the Outdoor SensorThe outdoor sensor requires two AA/R6 batteries. Open the battery compartment of the weather station. Insert the battery observing the correct polarity and re-insert the battery door.
 We recommend using lithium or alkaline batteries. Rechargeable batteries are not recommended as they have lower voltages, do not operate well at wide temperature ranges and do not last long, resulting in poorer reception.Synchronizing the Sensor and Weather StationBefore mounting the outdoor sensor, please refer to the chapter 5.2 Synchronizing the Sensor and Weather Station below.Mounting the Outdoor SensorThe mounting assembly includes two U-bolts and a bracket that tightens around a 1 to 2″ diameter pole (not included) using the four nuts.
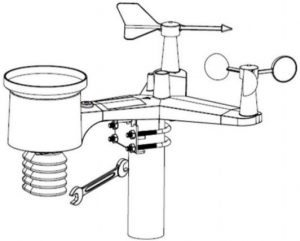
Mount the sensor so that the wind directions (N, E, S and W) on the sensor are matching with the real cardinal directions. Permanent wind direction errors will occur when the sensor is not mounted correctly. Also, use the bubble level next to the rain sensor as a guide to verify that the sensor is level.Resetting/Transmission LEDReset the outdoor sensor in the unlikely event it is not transmitting.
- With an open-ended paperclip, press and hold the reset button on the sensor for three seconds to completely discharge its circuit.
- Remove the batteries from the batter compartment and cover the solar panel. Leave the sensor to rest for 5 minutes as this will drain the voltage.
- Re-insert the batteries and re-synchronize with the console (see below).
Weather Station
Powering the Weather StationThe weather station requires three AAA/R03 batteries as back-up power in case of power interruption. Open the battery compartment of the weather station. Insert the batteries observing the correct polarity and re-insert the battery door.Connect the weather station to the mains using the included power adapter or an exact equivalent.Installing the Weather StationInstall the weather station indoors in a dry and shady spot, away from direct sunlight or rain.
Synchronizing the Sensor and Weather Station
Synchronizing the Sensor and Weather StationKeep the outdoor sensor close to the weather station for 30 minutes. Spin the wind cups to simulate wind, and hold the rain collector under a dripping tap to simulate rain.Once the weather station is receiving data, follow the mounting instructions for the outdoor sensor.To Obtain the Best Wireless CommunicationTo ensure proper communication, mount the outdoor sensor in a vertical position.Also, wireless communication is susceptible to interference, distance, walls and metal barriers. Mind following points:
- Electromagnetic Interference (EMI). Keep the weather station away from EMI, e.g. computer monitors and TV sets.
- Radio-Frequency Interference (RFI). Devices operating at a 433 MHz frequency willaffect the wireless communication between the outdoor sensor and the weather station. You may need to relocate those devices to avoid interference.
- Line of Sight Rating. This weather station is rated at 100 m line of sight. However, you will typically get 30 m due to environmental barriers.
- Metal Barriers. Keep in mind that radio waves will not pass through metal barriers such as armoured concrete.
Following is a table of barrier vs. reception factor as a guide.
| Barrier | Signal Reduction |
| glass | 5-15 % |
| plastics | 10-15 % |
| wood | 10-40 % |
| brick | 10-40 % |
| concrete | 40-80 % |
| metal | 90-100 % |
Settings
Key Function
| Key | Description |
| SET |
|
| TEMP. |
|
|
RAIN |
|
| WIND + |
|
|
PRESSURE – |
|
| ALARM |
|
| MAX/MIN |
|
| LIGHT/SNOOZE |
|
Notes:
- Press WIND + and PRESSURE simultaneously to reset the weather station and clear all records. All user settings will return to default.
- Press TEMP. to skip the RF signal reception.
- In setting mode, press WIND + or PRESSURE to set the value.
- Press LIGHT/SNOOZE or wait 30 seconds to exit the setting mode.
Setting Mode
Hold SET pressed for 2 seconds to enter the setting mode. The basic settings can now be performed in following order.Beep Press WIND + or PRESSURE to select on (beep at every key press) or off (beep off).
Max/Min Daily Press SET again. Press WIND + or PRESSURE to activate/deactivate the max/min daily function (default: on + clear at 00:00 every day).Time/Date
 Press SET again to set the time. Press WIND + or PRESSURE to set the values. The setting sequence is: 12/24 h
 ![]() hour
hour ![]() minute
minute ![]() DD-MM/MM-DD
DD-MM/MM-DD ![]() year
year ![]() month
month ![]() dayPressure
dayPressure
- Absolute vs. Relative PressureHold PRESSURE pressed to select the absolute or relative pressure.
- Pressure Graph Rate of ChangeThis graphic is shown on the left of the barometric pressure and signifies the difference between the daily average pressure and the 30-day average in hPa.

- Pressure HistoryPress PRESSURE to select the 12 h/24 h/48 h/72 h pressure average.·
- Relative Pressure CalibrationPressure conditions should be compared only at sea-level conditions. To determine the relative pressure for your location, locate an official reporting station near you (the internet is the best source for real-time barometer conditions, such as weather.com or wunderground.com), and set your weather station to match the official reporting station.

Light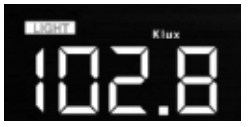 Press SET again to select the light unit (lux, fc, w/m², default: w/m²).Temperature
 Press SET again to select the outdoor temperature unit (°C or °F, default: °C). In normal mode, press TEMP. to view wind chill, heat index and dew point temperature. Hold TEMP. pressed to register a new transmitter.Note that an out-of-range temperature will be displayed as –.-.Wind Speed
 Press SET again to select the wind speed unit (km/h, mph, knots, m/s, bft, default: km/h). In normal mode, press WIND + to view the wind/gust and wind direction.Rain
Press SET again to select the rainfall unit (in/mm, default: mm). In normal mode, press RAIN to view the rain rate, event, rain day, rain week, rain month and rain total. Hold RAIN pressed to reset the current displayed rain value.Moon Phase
Press SET again to select the Northern or Southern hemisphere.
Alarm Mode
- Alarm Value 1. Press ALARM to display the high alarm.
- Press ALARM again to display the low alarm.Press RAIN to select the display rate or day rain alarm data.Press WIND + to display the wind or gust alarm data.Press ALARM or LIGHT/SNOOZE to return to normal mode.
 Press RAIN to select the display rate or day rain alarm data.Press WIND + to display the wind or gust alarm data.Press ALARM or LIGHT/SNOOZE to return to normal mode.
Alarm Mode Setting
- Hold ALARM pressed to enter the alarm setting mode.
- Press WIND + or PRESSURE to activate/deactivate the alerts and adjust the alert values.
- Press SET to confirm and move to the next item.
- Press ALARM to switch the alarm on or off.When the alarm is triggered, the triggering source icon, the icon for the high value and the icon for the low value will be flashing.
- Press ALARM or LIGHT/SNOOZE to return to normal mode.
Alarm Setting Sequencetime alarm ![]() indoor high temperature
indoor high temperature ![]() indoor low temperature
indoor low temperature ![]() indoor high humidity
indoor high humidity![]() indoor low humidity
indoor low humidity ![]() outdoor high temperature
outdoor high temperature ![]() outdoor low temperature
outdoor low temperature ![]() outdoor high humidity
outdoor high humidity ![]() outdoor low humidity high wind
outdoor low humidity high wind ![]() rain rate high
rain rate high ![]() rain day high
rain day high
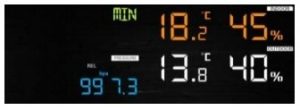
Max/Min Mode
- Press MAX/MIN to display the maximum data.Press TEMP. to view wind chill, heat index and dew point temperature. Press RAIN to view rain rate, rain day, rain week and rain month maximum.Press WIND + to view wind and gust maximum. Hold PRESSURE pressed to view the absolute and relative maximum pressure.
- Press MAX/MIN again to display the minimum data.Press TEMP. to view wind chill and dew point temperature.Hold PRESSURE pressed to view the absolute and relative minimum pressure.Hold MAX/MIN pressed to reset all maximum or minimum values.
- Press MAX/MIN or LIGHT/SNOOZE to return to normal mode.
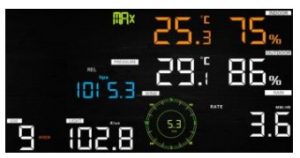 Press TEMP. to view wind chill, heat index and dew point temperature. Press RAIN to view rain rate, rain day, rain week and rain month maximum.Press WIND + to view wind and gust maximum. Hold PRESSURE pressed to view the absolute and relative maximum pressure.
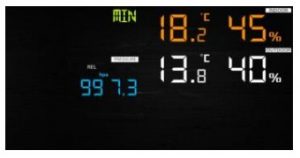 Press TEMP. to view wind chill and dew point temperature.Hold PRESSURE pressed to view the absolute and relative minimum pressure.Hold MAX/MIN pressed to reset all maximum or minimum values.
Calibration
- Hold TEMP. and MAX/MIN pressed to enter the calibration mode.Press WIND + or PRESSURE to set the values.Press SET to confirm and move to the next item.Press ALARM to reset any adjusted value.
- Press LIGHT/SNOOZE to exit the calibration mode.The setting sequence is:Indoor temperature offset indoor humidity offset outdoor temperature offset outdoor humidity offset absolute pressure offset wind direction offset wind speed factor rain factor
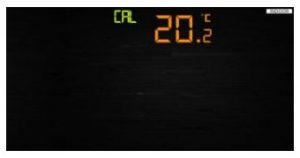 Press WIND + or PRESSURE to set the values.Press SET to confirm and move to the next item.Press ALARM to reset any adjusted value.
Other Functions
Factory Reset/Memory Clearance
- Remove the power by removing the batteries and disconnecting from the mains.
- Re-apply the power by connecting the appliance to the mains.
- Wait for the appliance to Initialize.
- Hold WIND + and PRESSURE pressed simultaneously to reset the weather station and clear all records. All user settings will return to default.
- Re-insert the batteries into the appliance.
Registering a New TransmitterHold LIGHT/SNOOZE pressed to register a new transmitter.BacklightThe display will only be permanently backlit when the appliance is powered through the mains. Adjust the backlight intensity with LIGHT/SNOOZE.When the appliance is powered through batteries, the display backlight will switch off after 15 seconds to reduce power consumption.Tendency ArrowsThese arrows allow you to quickly determine temperature or pressure tendency.
| Arrow | Humidity | Temperature |
Pressure |
|
| rising | > 3 % | ≥ 1 °C/2 °C | > 1 hPa | |
| steady | ≤ 3 % | < 1 °C/2 °C | ≤ 1 hPa | |
| falling | > 3 % | ≥ 1 °C/2 °C | > 1 hPa |
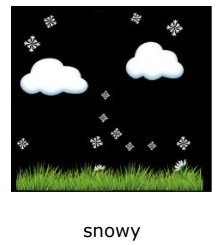
Wireless Signal IndicatorThis indicator displays reception quality. If no signal is lost, the indicator will display 5 bars; if the signal is lost once, four bars will be displayed.Weather ForecastWeather forecast is indicated by weather symbols. Note that the appliance needs at least one month of atmospheric pressure registration to learn the barometric pressure over time.


 Note that weather forecasts are just predictions and that errors in predictions are normal.SnoozeWhen time alarm has been triggered, the alarm will sound and the alarm icon will flash for 120 seconds. Press LIGHT/SNOOZE to silence the alarm for 10 minutes. The alarm will sound again when that time is up. Press any key except LIGHT/SNOOZE to stop the alarm.
Internet Connection
Please visit the product page on www.velleman.eu and refer to the online manual.
Care and Maintenance
Cleaning
- Before starting any cleaning or maintenance activities, unplug the appliance from its power source.
- Wipe all exterior surfaces of the appliance clean with a soft cloth dampened with a soap and water solution. Do not immerse or submerge any part of the appliance in water or any other liquid. Never use solvents or cleaning agents containing petroleum (petrol, kerosene, oil), paint thinner, turpentine, alcohol, or ammonia.Maintenance
- This appliance does not need any maintenance. Do not open exterior casing of the appliance. There are no user-serviceable parts inside. Opening or visible attempts to open or repair the appliance may void any guarantee and/or cause damage to the product or personal injury. Storage
- Store the appliance and its accessories in its original package in a clean and dry area.
Technical Specifications
| Temperature | |
| Indoor range | -10 °C to 60 °C |
| Outdoor range | -40 °C to 60 °C |
| Indoor accuracy | – |
| Outdoor accuracy | +/- 1 °C |
| Humidity | |
| Indoor range | 10-99 % |
| Outdoor range | 10-99% |
| Indoor accuracy | +/-5% |
| Outdoor accuracy | +/-5% |
| Wind | |
| Speed range | 0-50 m/s |
| Speed accuracy | .+/- 1 m/s (v < 5 m/s), +/- 10 % (v > 5 m/s) |
| Air pressure range | 700-1100 hPa |
| Measuring interval | |
| Indoor | 60 s |
| Outdoor | 16 s |
| Transmission distance | ± 100 (open area) |
| Dimensions | |
| Main unit | 188 x 118 x 21 mm |
| Sensor | 338 x 296 x 214 mm |
| Weight | |
| Main unit | 240 g |
| Sensor | 580 g |
| Power supply main unit | |
| Power adapter (incl) | 5 VDC, 1 A |
| Battery (not incl.) | 3 x LR03 |
| Power supply sensor | |
| Battery (not incl.) | 2 x LR6 |
| built-in solar panel | |
| Frequency | |
| Weather Station | 868.3 MHz |
| Wi-Fi | 2412-2472 MHz |
| FM radio | – |
| DCF | – |
| Max. RF power transmission | < 20 mW |
Use this device with original accessories only. Velleman nv cannot be held responsible in the event of damage or injury resulting from (incorrect) use of this device. For more info concerning this product and the latest version of this manual, please visit our website www.velleman.eu. The information in this manual is subject to change without prior notice.RED Declaration of Conformity Hereby, Velleman NV declares that the radio equipment type WC224 is in compliance with Directive 2014/53/EU.
Velleman® Service and Quality WarrantySince its foundation in 1972, Velleman® acquired extensive experience in the electronics world and currently distributes its products in over 85 countries. All our products fulfil strict quality requirements and legal stipulations in the EU. In order to ensure the quality, our products regularly go through an extra quality check, both by an internal quality department and by specialized external organisations. If, all precautionary measures notwithstanding, problems should occur, please make appeal to our warranty (see guarantee conditions).General Warranty Conditions Concerning Consumer Products (forEU):
- All consumer products are subject to a 24-month warranty on production flaws and defective material as from the original date of purchase.
- Velleman® can decide to replace an article with an equivalent article, orto refund the retail value totally or partially when the complaint is valid and a free repair or replacement of the article is impossible, or if the expenses are out of proportion.You will be delivered a replacing article or a refund at the value of 100%of the purchase price in case of a flaw occurred in the first year after thedate of purchase and delivery, or a replacing article at 50% of thepurchase price or a refund at the value of 50% of the retail value in caseof a flaw occurred in the second year after the date of purchase anddelivery.
Not covered by warranty:
– All direct or indirect damage caused after delivery to the article (e.g. by oxidation, shocks, falls, dust, dirt, humidity…), and by the article, as well as its contents (e.g. data loss), compensation for loss of profits;– Consumable goods, parts or accessories that are subject to an aging process during normal use, such as batteries (rechargeable, non- rechargeable, built-in or replaceable), lamps, rubber parts, drive belts… (unlimited list);– Flaws resulting from fire, water damage, lightning, accident, natural disaster, etc.…;– Flaws caused deliberately, negligently or resulting from improper handling, negligent maintenance, abusive use or use contrary to the manufacturer’s instructions;– Damage caused by a commercial, professional or collective use of the article (the warranty validity will be reduced to six (6) months when the article is used professionally);– Damage resulting from an inappropriate packing and shipping of the article;– All damage caused by modification, repair or alteration performed by a third party without written permission by Velleman®.
- Articles to be repaired must be delivered to your Velleman® dealer, solidly packed (preferably in the original packaging), and be completed with the original receipt of purchase and a clear flaw description.
- Hint: In order to save on cost and time, please reread the manual and check if the flaw is caused by obvious causes prior to presenting the article for repair. Note that returning a non-defective article can also involve handling costs.
- Repairs occurring after warranty expiration are subject to shipping costs.
- The above conditions are without prejudice to all commercial warranties. The above enumeration is subject to modification according to the article (see article’s manual).
References
Local Weather Forecast, News and Conditions | Weather Underground
National and Local Weather Radar, Daily Forecast, Hurricane and information from The Weather Channel and weather.com
Details â Own brands â Velleman â Wholesaler and developer of electronics
Velleman â Wholesaler and developer of electronics
[xyz-ips snippet=”download-snippet”]