Pet Nail GrinderUser Guide
Madel: PLNG00lPlease read this User Guidebefore using the product and retain for reference.
Safety Precautions
! Warning
- Dispose of all packaging materials properly. Some items may be packed in polybags; these bags could cause suffocation; keep away from children and pets.
- Please fully charge the product before the first use.
- To reduce the risk of injury, please keep close supervision when an appliance is used near children.
- Do NOT immerse the product in water at any time as it may damage electronic components.
- Do NOT disassemble the unit other than as instructed in this User Guide. Contact our customer service immediately for further instructions.
- Do NOT use the grinder for anything other than its intended use.
- Do NOT modify the grinder.
- Do NOT operate any appliance ii the unit is malfunctioning or hos been damaged.
- Unplug the product when charging is completed.
- Do NOT use in wet or humid environments.
- If the charging port of this device gets wet, do not connect to only chargers.
- Do NOT allow pets to chew on or swallow any parts. Tips for using this nail grinder
- For excessively long nails first cut off tip with a manual nail trimmer, then grind.
- Make sure your pet is comfortable with the nail grinder sound by powering it on near before applying.
- Due to less speed, noise and vibration, younger pets may be more comfortable with the low grinding level which may minimize wheel heat and wear.
- Trimming your pet’s nails using this product requires both hands. Therefore, it may be helpful to have assistance in those instances where pet requires restraint.
- Always keep pet hairs away from spinning ports. If hairs ore accidentally caught in the spinning wheel, immediately turn the power off and untangle hairs.
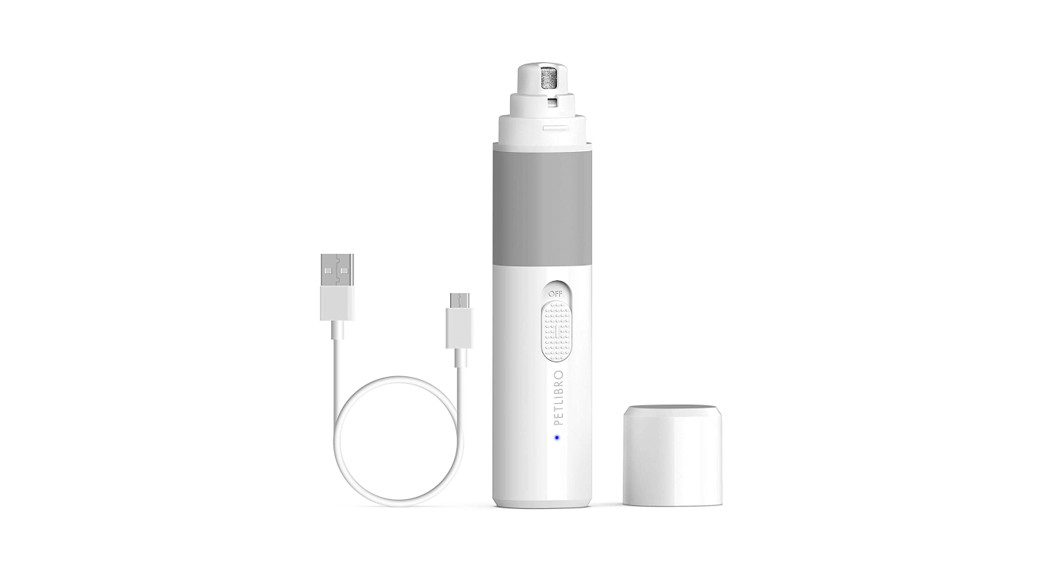
Product Diagram
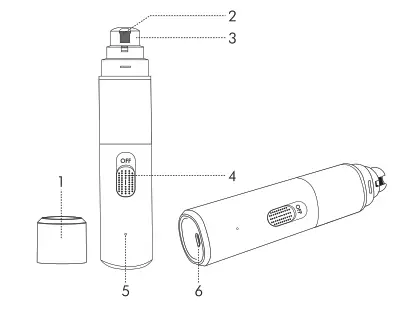
- Cop
- Grinding Wheel
- Protective Sleeve
- Power/Level Switch
- LED Indicator
- Micro USB Charging Port
What’s in the Boxl x Pet Nail Grinderl x Micro USB Cablel x Replacement Grinding Wheell x User Guide Kit
How To Use
- Charging the Nail GrinderBefore charging, make sure the product is power off and that the charging port is clear ond dry.
 The LED indicator will stay solid red during charging and turn to solid blue when it’s completed.Note:Connect the product to power when the LED indicator flashes red indicating a low battery.
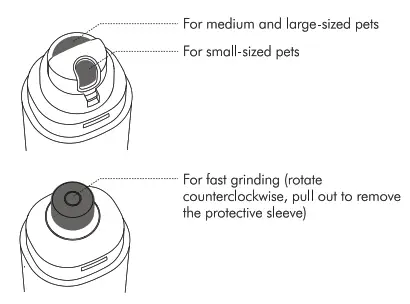
 - Selecting the Grinding PortRemove the cap, choose the suitable port for grinding:

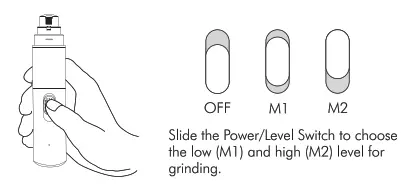
- Selecting the Grinding Level

- Grinding the Nails


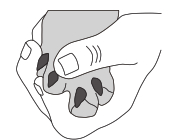
• Gently squeeze the nail between the thumb and pointer finger to extract and further expose the nail. See above for tips regarding longer hair. • Insert a nail into the matching size hole in the protective sleeve or apply it on the grinding wheel directly. • Hold the grinder firmly without applying excessive force.• Gently start grinding from the bottom. Continue up and over nails in a steady upward motion to ensure smooth edge, no more than 2-4 seconds at a time, alternating between nails. It’s not recommended to trim a single nail all at one time.• Continue to grind over edges of nails to remove any roughness. Stop grinding when you get close to the quick (bloodline in the nail). You will see the quick begin to appear when you look at the nail head-on.• Turn the grinder power off when grinding is done.Tips:l) Before grinding, show the grinder to your pet, let it smell and listen to the grinder sound to avoid fears.2) Start with low level, switch to high level after a while.3) Reward your pet after the grinding.4) Do not use the product when charging.
Replacing the Grinding Wheel
It’s recommended to replace the grinding wheel when it’s worn.
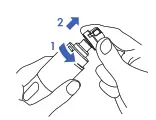 |
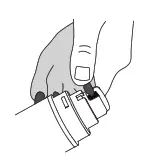
Step l . Rotate the protective sleeve counterclockwise to unlock, pull out to remove |
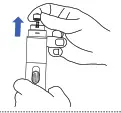 |
Step 2. Pull the grinding wheel straight out. |
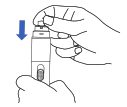 |
Step 3. Plug in a new grinding wheel and press down to install. |
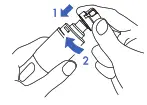 |
Step 4. Align the concave slot, press the protective sleeve down, and rotate clockwise to lock. |
Note:Never clean the nail grinder or replace the grinding wheel with a motor ON.
Cleaning & Care
Clean the product surface by wiping with a waler or mild soap solution-moistened cloth or towel. Air dry after cleaning. Note: Do NOT touch the switch with a wet cloth or hand.
Specifications
| Input | DC 5V I lA |
| Model | PLNG00l |
| Material | ABS |
| Charging Port | Micro USB |
| Battery Type | Rechargeable Lithium battery |
| Battery Capacity | 2000mAh |
| Motor Rotation Speed | Ml: 9,000 RPMM2: l 0,000 RPM |
| Charging Time | Appr. 3.5 hours |
| Operating Time | Appr. 7 hours |
| Operating Temperature | -30°C-50°C I -22°F- l 22°F |
| Dimensions | 16.5x 3.5 x 3.2cm / 6.5 x l .4 x 1.3in |
| Net Weight | 190g/ 6.70oz |
Warranty
- 12-month warranty
- Life-time supportPlease contact our customer service at [email protected] for warranty extension or any questions about the product.For more information, please visit www.petlibro.cam.

Scan for more detailswww.petlibro.com
©Libro Corp. All Rights Reserved.Manufacturer: Shenzhen Libro Technology Co., LimitedAddress: Building 3, Cloud Park, Shenzhen, Chino, 518129Made in China
![]()
This device complies with Part 15 of the FCC Rules. Operation is subject to the following two conditions: (l) this device may not cause harmful interference, and (2) this device must accept any interference received, including interference that may cause undesired operation.
[xyz-ips snippet=”download-snippet”]

 The LED indicator will stay solid red during charging and turn to solid blue when it’s completed.Note:Connect the product to power when the LED indicator flashes red indicating a low battery.