

PHENYX PRO Wireless Microphone System
Technical Support & Warranty Information
Our Warranty to you:Phenyx Technology (“Phenyx”) warrants Phenyx products against evident defects in material and workmanship for a period of one year from the date of original purchase for use. This warranty is valid exclusively in the US and applies only to the original owner. If you discover a defect covered by this warranty, Phenyx will repair or replace the product at our sole discretion using new or refurbished components. Performance of repairs or replacements under this Warranty is subject to registration of your product at www.phenyxusa.com/registerproduct.
Product failures not covered by this warranty:This warranty covers defects in manufacturing that arise from the correct use of the device. It is limited to defects in materials or workmanship and does not cover electrical or mechanical damage resulting from abuse, misuse, unauthorized modification, lack of reasonable care, extreme heat, cold, damage due to natural forces, or corrosive environments. This warranty does not cover the normal wear and tear on covers, housing, connectors, and accessories.
Limits of liability:If your Phenyx product fails or does not perform as warranted, your sole recourse shall be to replace or repair it as described above. Phenyx will not be liable to you or anyone else for any damages that result from the failure of this product. These damages include, but are not limited to, the following: lost profi ts, lost savings, lost data, damage to other equipment, and incidental or consequential damages arising from the use of or inability to use this product. IN NO EVENT PHENYX SHALL BE LIABLE FOR MORE THAN THE AMOUNT OF YOUR PURCHASE PRICE, NOT TO EXCEED THE CURRENT LIST PRICE OF THE PRODUCT.
How to obtain service under this warranty:Please contact us at [email protected] or [email protected] with any questions or concerns about your products and a Phenyx Pro representative will contact you to provide assistance. You can also reach us through Facebook page http://www.facebook.com/phenyxusa/, our official website: www.phenyxusa.com, or our shopping website: www.phenyxpro.com.
Thank you for purchasing the PHENYX PRO PTU-7000 Quad Channels Professional Wireless Microphone System.
This booklet includes a description of features and a step-by-step guide to operate this unit. Please read this manual carefully to ensure proper use and operation, and keep this for future reference.
System Description
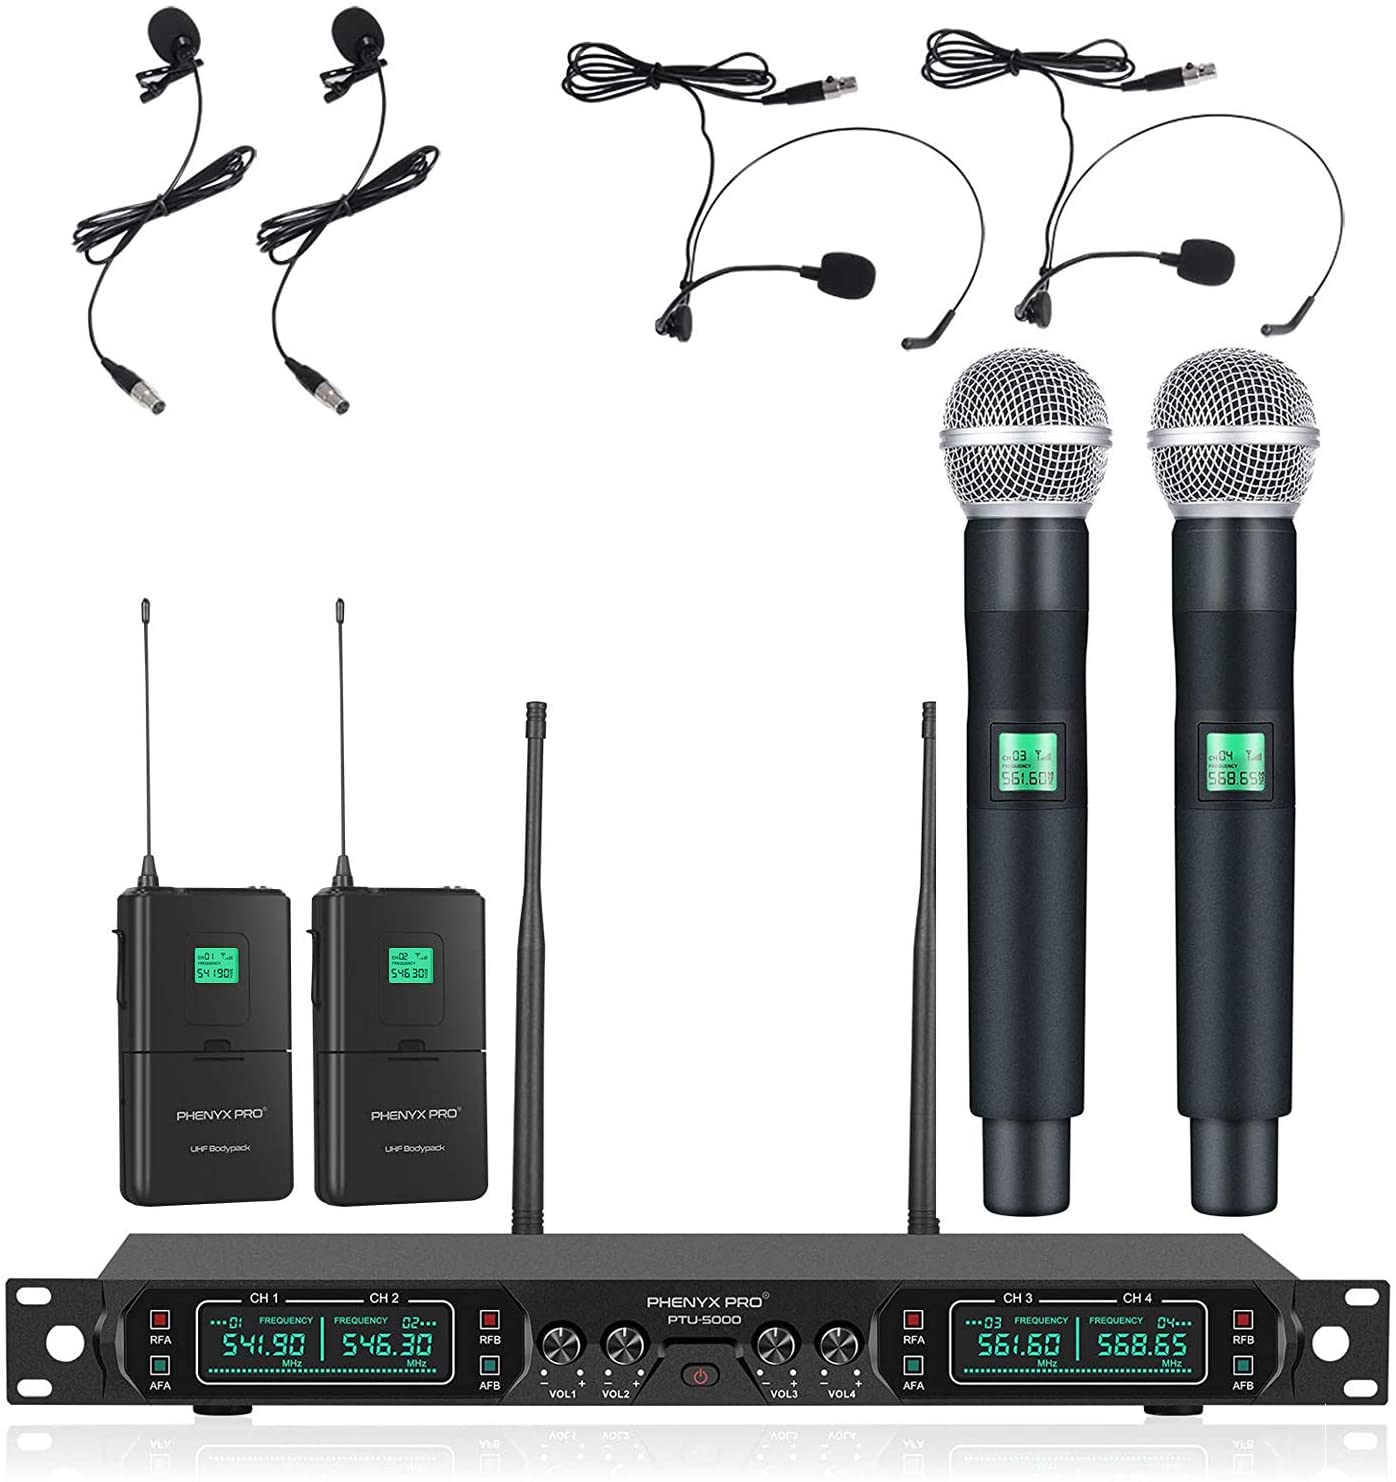
Box contents
- 1 x 4-Channel UHF wireless receiver with mixed XLR and 1/4″ outputs
- 4 x Antenna
- 8 x AA battery
- 1 x Power adapter
- 1 x 6.5mm audio cable
- 1 x User’s manual
PTU-7000A:
- 4 x UHF wireless handheld microphone
- 4 x Anti-rolling ring
PTU-7000B:
- 4 x UHF wireless bodypack
- 4 x Wireless headset microphone
- 4 x Wireless lapel microphone
System Overview
Phenyx Pro PTU-7000 wireless microphone system delivers superior sound quality and professional features. It is designed for a wide range of professional application with 4 x 40 selectable frequency channels, automatic frequency scanning, Tone Lock squelch circuit, and automatic transmitter pair up, ideal for professional setup in occasions like live shows, weddings, church, DJs, conference meetings, public address etc.Working distance is up to 100m/328ft operating distance in wide open space. For longer distance, please avoid metal blocks, multiple walls, and other electronics devices.
Specifications
Overall System
| Carrier frequency range (Depends on local regulations) |
UHF 530 – 580 MHz |
| Frequency Stability | 0.003% |
| Dynamic Range | >105dB |
| Frequency Response | 50Hz-18kHz |
| Audio Output Level | ¾ i nterface: 0-500mV; XLR Interface: 0 – 500mV |
| Working distance | 100m/328ft |
| XLR Interface | 0-500mV |
| Operating temperature | -10°C- +50°C |
Receiver
| Output impedance | XLR connector: 2000 |
| RF sensitivity | -105dBm |
| Image rejection | >110dB |
| Spurious rejection | >90dB |
| Power | 5W |
| Power requirement | DC 12- 15V, Current: 300mA, External power adaptor |
| Dimension | 210mm x 160mm x 45mm |
| Weight | 775g (27.3oz) |
Handheld & Bodypack Transmitter
| Modulation Mode | FM |
| Maximum Deviation | 75kMz |
| Handheld Dimension | 249mm x 51 mm (9.8 x 2 in) |
| Handheld Weight | 306g (10.8oz) (without batteries) |
| Power Requirement | 2 AA alkaline batteries (for each transmitter) |
| Battery Life | At least 8 hours with original batteries included |
Operating Instructions
Set Up
- Install fresh batteries in the transmitters (fresh to the section relative to the specific transmitter you are using).
- Connect the AC power adapter to a wall outlet and to the back of the receiver.
- Screw antenna A, B,C,D in, and position them 60 degrees apart from each other.
- Connect one of the five outputs available at the back panel to the next stage in your system. Typically, use the .¼” output to connect to unbalanced equipment such as consumer level receivers, amplifiers, and mixers. Connect to professional equipment using the XLR output (cable not included).
- Make sure the volume of your speaker is off, turn on the receiver and the transmitters. Press SET button for IR synchronization. For auto scan feature, long press SET button until a circle shown on the LCD screen, then wait until the auto scan process complete and a frequency is set. The system will automatically select the least-interference best signal channel. For manual frequency selection feature, press UP or DOWN button select desired group number and channel number. Phenyx Pro recommends using the auto scan function for optimal operation result.
- Press SET again after frequency selection, and you will see LCD screen shows “F —“status.Aim the transmitter’s IR window at the receiver’s IR window, and they will pair up automatically within several seconds. Once the pair up is completed, channel and group number will be shown on the LCD screen of the transmitters, which should match that on the receiver.
- You can use multiple receivers at the same time, and set all the transmitters to different channels. Theoretically, up to 50 receivers (200 channels) can be used at the same time. Phenyx Pro recommends no more than 10 receivers (100 channels) to be used together.
- For lock function, long press UP button and you will see “L ON” on the screen, which means that the system is in lock status. Long press UP button again “LOF” on the screen, which means that the system is unlocked and you can change frequency.
Operation
- The receiver antennas should be kept away from any metal surface.
- Before inserting the batteries, please make sure that they are inserted according to the correct polarity.
- For better result, keep the transmitters at least 2′ away from the receiver but within the transmitter’s range ( 100m/328ft). Keep the transmitters in a direct line of sight of the receiver whenever possible.
- Electronics devices such as mobile phones, radios, and other transmitting devices may interfere with the wireless system transmitters. Please keep transmitter and receiver away from those devices and other possible interfering sources.
Receiver
FRONT PANEL
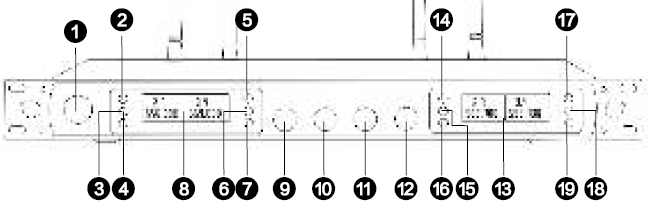
- Power Switch
- UP button: CHA incremental selection
- SET button: CHA infrared synchronization setup
- DOWN button: CHA decremental selection
- UP button: CHB incremental selection
- SET button: CHB infrared synchronization setup
- DOWN button: CHB decremental selection
- LCD display
- Volume control for CHA
- Volume control for CHB
- Volume control for CHC
- Volume control for CHD
- LCD Display
- UP button: CHC incremental selection
- SET button: CHC infrared synchronization setup
- DOWN button: CHC decremental selection
- UP button: CHO incremental selection
- SET button: CHO infrared synchronization setup
- DOWN button: CHO decremental selection
BACK PANEL

Transmitters
Handheld Microphone 
- IR Window (Play to the infrared transmitter signal to the frequency synchronization)
- LCD display
- Power switch
Battery compartment When turn on the transmitter, the battery power icon is on the right of the LCD display.
If the battery icon indicates that battery power is low, the batteries must be displaced to maintain normal operation.
There is a MUTE icon on the LCD display. When short press the power switch, the handheld transmitter will turn into MUTE status. Please press again to unmute the handheld microphone or long press the switch to turn the transmitter off.
Bodypack
The Phenyx UHF bodypack is to be used with the Phenyx lavalier microphones & headsets 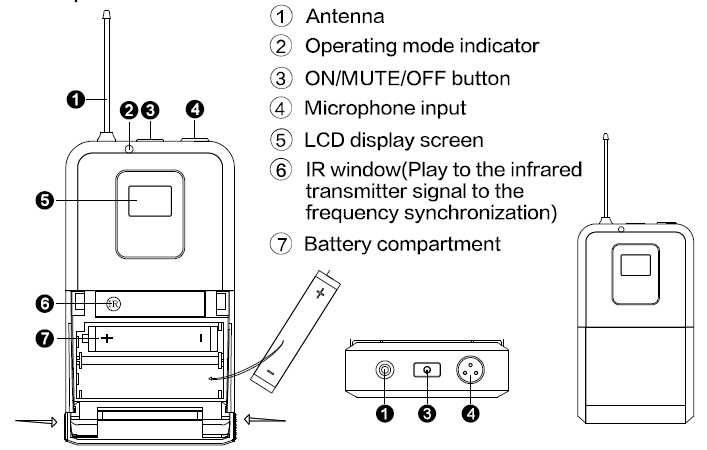
Set Up:
- Secure the bodypack to clothing, belt or pocket.
- (a) For a lavalier microphone, clip the microphone to clothing about 1 foot under the mouth.(b) For a headset, install headset comfortably on head so the microphone can be placed close to the mouth.
- Connect the microphone audio connector to the bodypack microphone input (4)
- Turn the bodypack on by press the ON/MUTE/OFF button. The operating mode indicator (2) will light up (green), indicating that the bodypack is on.
- Press SET button on receiver. You will see LCD screen shows ” F —” status. Open the battery compartment cover, and aim the transmitter’ s IR at the receiver’ s IR window. Once the pair up is completed, you can see the same group and channel number display on the receiver screen and the bodypack screen.
- Press up or down button to select the desired frequency, then align the two IR windows and press “SET” to confirm setting and pair up again.
- Press (3) again, operating mode indicator will turn red, which indicates that bodypack is on MUTE. Long press (3) to turn off the bodypack.
[xyz-ips snippet=”download-snippet”]