PHILIPS Air Purifiers
PARTS

Important
Safety
Read this user manual carefully before you use the appliance, and save it for future reference.
Danger
- Do not let water or any other liquid or flammable detergent enter the appliance to avoid electric shock and/or a fire hazard.
- Do not clean the appliance with water, any other liquid, or a (flammable) detergent to avoid electric shock and/ or a fire hazard.
- Do not spray any flammable materials such as insecticides or fragrance around the appliance.
- The water in the water tank is not suitable for drinking. Do not drink this water and do not use it to feed animals or to water plants. When you empty the water tank, pour the water down the drain.
Warning
- Check if the voltage indicated on the bottom indicated at the rear of the appliance corresponds to the local power voltage before you connect the appliance.
- If the power cord is damaged, you must have it replaced by Philips, a service center authorized by Philips, or similarly qualified persons in order to avoid a hazard.
- Do not use the appliance if the plug, the power cord, or the appliance itself is damaged.
- This appliance can be used by children aged from 8 years and above and persons with reduced physical, sensory or mental capabilities or lack of experience and knowledge if they have been given supervision or instruction concerning use of the appliance in a safe way and understand the hazards involved.
- Cleaning and user maintenance shall not be made by children without supervision.
- Children should be supervised to ensure that they do not play with the appliance.
- Do not block the air inlet and outlet, e.g. by placing items on the air outlet or in front of the air inlet.
Caution
- This appliance is not a substitute for proper ventilation, regular vacuum cleaning, or use of an extractor hood or fan while cooking.
- If the power socket used to power the appliance has poor connections, the plug of the appliance becomes hot. Make sure that you plug the appliance into a properly connected power socket.
- Always place and use the appliance on a dry, stable, level, and horizontal surface.
- Leave at least 20cm free space behind and on both sides of the appliance and leave at least 30cm free space above the appliance.
- Do not place anything on top of the appliance and do not sit on the appliance.
- Do not place the appliance directly below an air conditioner to prevent condensation from dripping onto the appliance.
- Make sure all filters are properly installed before you switch on the appliance.
- Only use the original Philips filters specially intended for this appliance. Do not use any other filters.
- Avoid knocking against the appliance (the air inlet and outlet in particular) with hard objects.
- Always lift or move the appliance by both handles at the sides of the appliance.
- Do not insert your fingers or objects into the air outlet or the air inlet to prevent physical injury or malfunctioning of the appliance.
- Do not use this appliance when you have used indoor smoke-type insect repellents or in places with oily residues, burning incense, or chemical fumes.
- Do not use the appliance near gas appliances, heating devices or fireplaces.
- Always unplug the appliance after use and before filling water, cleaning, or carrying out other maintenance.
- Do not use the appliance in a room with major temperature changes, as this may cause condensation inside the appliance.
- To prevent interference, place the appliance at least 2m away from electrical appliances that use airborne radio waves such as TVs, radios, and radio-controlled clocks.
- When the appliance is not used for a long time, bacteria may grow on the filters. Check the filters after a long period of disuse. If the filters are very dirty, replace them (see the chapter “Replace the filters”).
- The appliance is only intended for household use under normal operating conditions.
- Do not use the appliance in wet surroundings or in surroundings with high ambient temperatures, such as the bathroom, toilet, or kitchen.
- The appliance does not remove carbon monoxide (CO) or radon (Rn). It cannot be used a safety device in case of accidents with combustion processes and hazardous chemicals.
- Clean the water tank every day to keep it clean.
- Only fill the water tank with cold tap water. Do not use ground water or hot water.
- Do not put any substance other than water in the water tank. Do not put fragrance in the water tank.
- If you do not use the humidification function for a long time, clean the water tank and NanoCloud rotary humidification wick tray, and air dry the NanoCloudrotary humidification wick.
- If you need to move the appliance, disconnect the appliance from the power supply first. Then empty the water tank and water tray. Carry the appliance horizontally by the handles on both sides of the appliance.
- Unplug the appliance during filling and cleaning.
You Air Washer
Congratulations on your purchase, and welcome to Philips!To fully benefit from the support that Philips offers, register your product at www.Philips.com/welcome.The Philips Air Washer brings fresh, humidified air to your house for the health of your family. It offers you advanced evaporation system with NanoCloud technology, using a special humidification filter which adds H2O molecules to the dry air, and produces healthy humid air without formation of water mist. Its humidification filter retains bacteria, calcium and other particles from the water. It delivers only pure humidified air in your home. No more dry air in the winter season or from the air conditioning.Read this user manual carefully before you use the appliance, and save it for future reference.
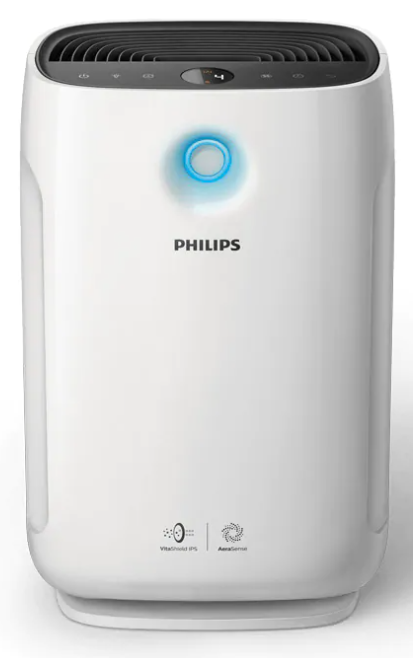
Product overview (fig. a)
A Control panelB Water tankC Wick supportD Water trayE NanoCloud rotary humidification wick (FY5156)F Wick wheelG Back panelH Pre-filterI NanoProtect filter (FY1114)J Air outlet
Controls Overview (fig. b)
K Air humidity light ring (HU5931 only)L Child lock buttonM Timer buttonN Fan speed buttonO On/off buttonP Humidity level buttonQ Temperature buttonR Light on/off buttonS Display ScreenT Reset button
Get started
Installing the NanoProtect filter
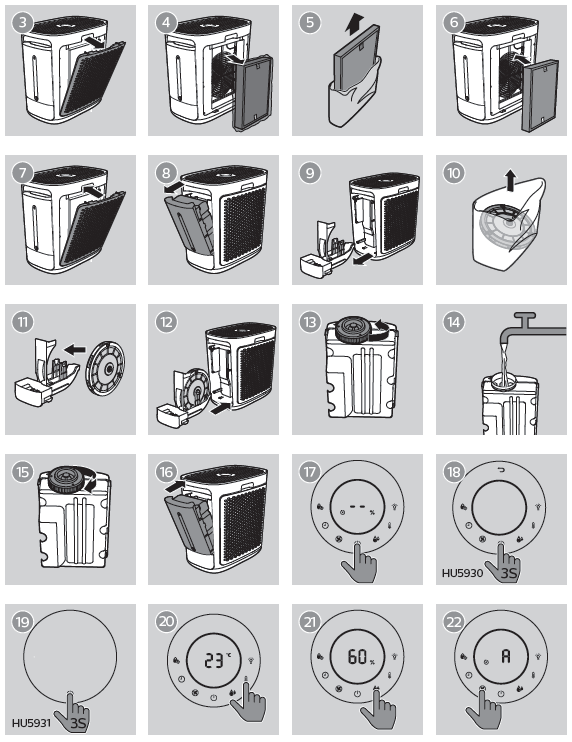
The appliance comes with the NanoProtect filter fitted inside. Remove the packaging of the filter before using the appliance. Remove the NanoProtect filter, unpack it, and place it back into the appliance described as follows:
Note
- Make sure that the side with the tag is pointing towards you.
- The pre-filter is fitted inside of the back panel.
- Pull the top part of the back panel towards you to release it from the appliance (fig. c).
- Remove the NanoProtect filter from the appliance (fig. d).
- Remove all packaging materials of the NanoProtect filter (fig. e).
- Place the NanoProtect filter back into the appliance (fig. f).
- To reattach the back panel, mount the panel onto the bottom of the appliance first, and then push the top of the panel against the appliance (fig. g).
Preparing for humidification
- Pull out the water tank (fig. h).
- Pull out the water tray (fig. i).
- Remove all packaging material of the NanoCloud rotary humidification wick (fig. j).Note The humidification wick has been assembled on the wick wheel upon purchase.
- Place the wick wheel on the wick support (fig. k).Note When placing the wick wheel on the wick support, make sure that the projections on the wick wheel falls into the corresponding grooves.
- Place the water tray back into the appliance (fig. l).
- Turn the top cap of the water tank anti-clockwise to unscrew it (fig. m).
- Fill the water tank with cold tap water (fig. n).
- Turn the top cap clockwise to tightly lock it onto the water tank (fig. o).
- Place the water tank back into the appliance (fig. p).
Use the appliance
Switching on and off
- Put the plug in the power socket.The appliance sounds. For HU5931, all lights go on once and then go out again.
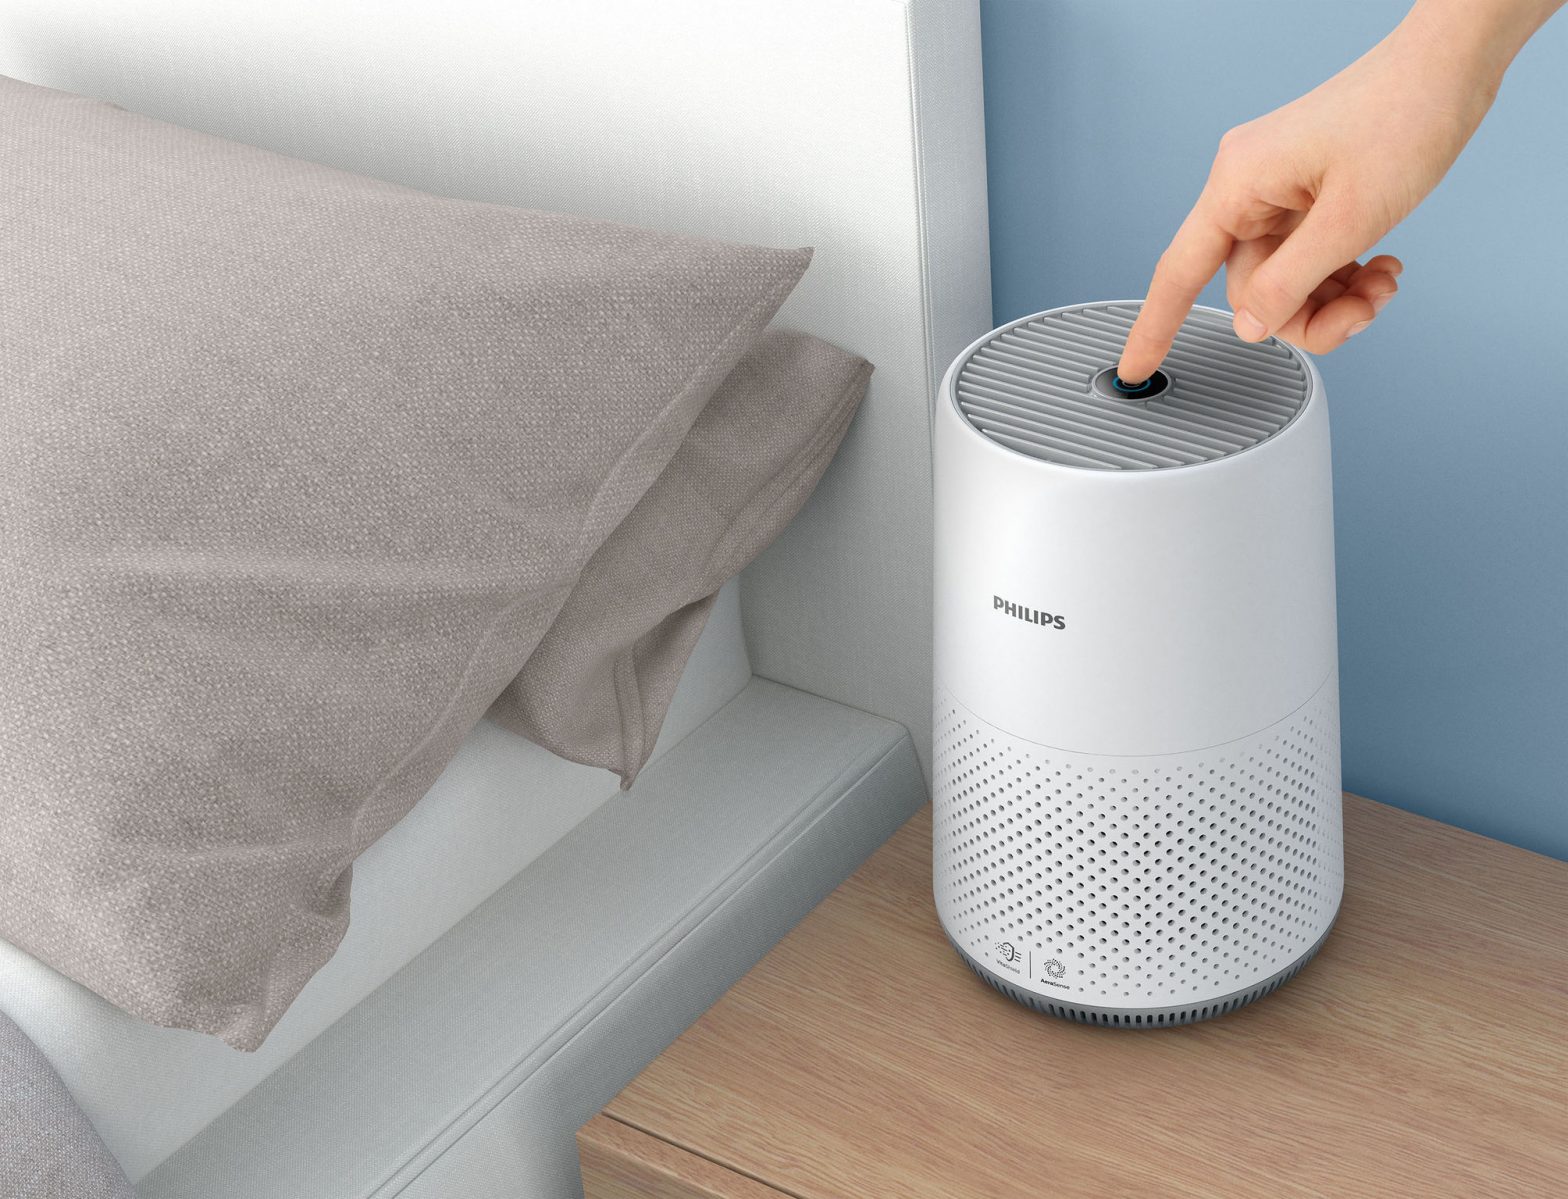
- Touch to switch on the appliance (fig. q).The appliance operates under the auto fan speed by default, and the default humidity setting is ” “.The current humidity level will display on the screen.
- Touch and hold for 3 seconds to switch off the appliance (fig. r & s).
Note After the appliance is switched off by the on/off button , if the plug is still in the power socket, the appliance will operate under the previous settings when it is switched on again.
Tip
- Touch the light on/off button to turn on or off the indicator lights and display screen.
- Touch the temperature button once and the current temperature will display on the screen for 3 seconds. After that the current humidity level will display (fig. t).
Setting the humidity level
Touch the humidity button repeatedly to set the desired air humidity to 40%, 50% or 60% (fig. u).
Note
- When the humidity level ” ” is chosen, the humidity light ring will be off. The appliance will keep humidifying the room until the ambient humidity level reaches 70%RH.
- In the auto mode, the appliance will operate under fan speed 1 when the target humidity level is reached. In the manual fan speed mode, the appliance will continue to operate under the chosen fan speed.
- When the target humidity level is reached, the wick wheel will stop rotating. It will start rotating again when the humidity drops below the target level.
- If you want to increase the humidity level quickly, you can select a higher fan speed.
- For HU5931, the air humidity light ring indicates whether the target humidity level is reached. It lights up blue when the humidity level is reached and red when the ambient humidity is below the preset setting.
Changing the fan speed
AutoIn auto mode, the appliance selects the fan speed in accordance with the ambient air humidity.Touch the fan speed button to select auto (fig. v).
ManualTouch the fan speed button repeatedly to select the desired fan speed (1, 2, 3 or 4) (fig. w).Note Fan speed 4 is available for HU5931 only.
Setting the timer
With the timer, you can let the appliance operate for a set number of hours. When the set time has elapsed, the appliance will automatically switch off.
- Touch the timer button repeatedly to choose the number of hours you want the appliance to operate (fig. x).
- The timer is available from 1 to 8 hours.
To deactivate the timer function, touch the timer button repeatedly until displays on the screen (fig. y).
Setting the child lock
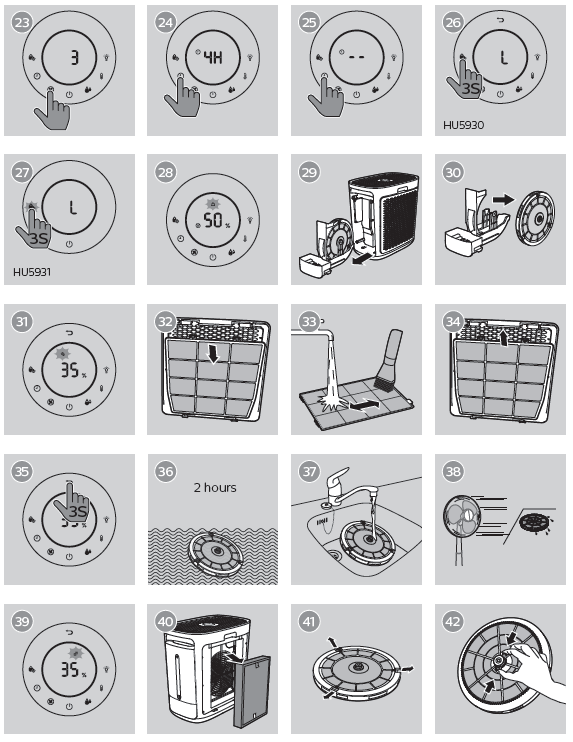
- Touch and hold the child lock button for 3 seconds to activate child lock (fig. z & {).
- “L” displays on the screen and the appliance beeps.
- For HU5931, the child lock icon blinks 3 times.
- When the child lock is on, all the other buttons are not responsive.
- Touch and hold the child lock button for 3 seconds again to deactivate child lock.
Using the light on/off function
With the light on/off button, you can switch on or off the display screen, the air humidity light or the buttons if desired.
- Touch the light on/off button once, all the lights will be off.
- All buttons are off except the and buttons (for HU5931).
- Touch the light on/off button again, all the lights will be on again.
Water level
The water level in the water tank is visible through the water level window on the water tank.When there is not enough water in the water tank, the water refill light flashes to indicate that you have to refill the water tank (fig. |).
Note When there is no water in the water tank, the wick wheel will stop rotating. In the auto mode, the appliance will operate under fan speed 1. In the manual fan speed mode, the appliance will continue to operate under the chosen speed. When the water tank isrefilled with water, the wick wheel will start rotating again.
Cleaning
Note
- Always unplug the appliance before cleaning.
- Never immerse the appliance in water or any other liquid.
- Never use abrasive, aggressive, or flammable cleaning agents such as bleach or alcohol to clean any part of the appliance.
- Only the pre-filter and NanoCloud rotary humidification wick are washable. The NanoProtect filter is not washable nor vacuum cleanable.
Cleaning schedule
| Frequency | Cleaning method |
| When necessary | Wipe the surface of the appliance with a soft dry cloth. |
|
Every week |
Rinse the water tank, the water tray and the NanoCloud rotary humidification wick. |
|
When the cleaning icon lights up |
Clean the pre-filter. |
| Descale the NanoCloud rotary humidication wick with the water and white vinegar or citric acid. |
Cleaning the body of the appliance
Regularly clean the inside and outside of the appliance to prevent dust from collecting.
- Wipe away dust with a soft dry cloth from the body of the appliance.
- Clean the air outlet with a soft dry cloth.
Cleaning the water tank, water tray and NanoCloud rotary humidification wick
Note Cleaning the water tank, water tray and NanoCloud rotary humidification wick every week to keep them hygienic.
- Pull out the water tank (fig. h).
- Pull out the water tray (fig. }).
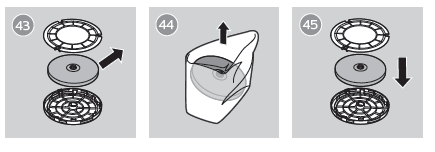
- Take the wick wheel off the wick support (fig. ~).
- Rinse the water tank, water tray and NanoCloud rotary humidification wick under a running tap.Note
- Do not take the NanoCloud rotary humidification wick off the wheel during cleaning.
- Do not scrub the NanoCloud rotary humidification wick or place it under direct sunlight.
- If necessary, use a mild detergent to clean the water tank and water tray.In this case, rinse the water tank and water tray thoroughly.
- Wipe the outside of the water tank and water tray dry.
- Place the wick wheel on the wick support (fig. k).Note When placing the wick wheel on the wick support, make sure that the projections on the wick wheel falls into the corresponding grooves.
- Place the water tray back into the appliance (fig. l).
- Place the water tank back into the appliance (fig. p).
Cleaning the pre-filter
| Filter alert light status | Follow this |
| Cleaning light goes on (fig. ) | Clean the pre- filter |
NoteOnly the pre-filter and NanoCloud rotary humidification wick are washable. The NanoProtect filter is not washable.
- Pull the top part of the back panel towards you to release it from the appliance (fig. c).
- To remove the pre-filter, press the two clips down and pull the filter towards you (fig. €).
- Wash the pre-filter under a running tap. If the pre-filter is very dirty, use a soft brush to brush away the dust (fig. ).
- Air dry the pre-filter.Note: Make sure that the pre-filter is completely dry. If it is still wet, bacteria may multiply in it and shorten the lifetime of the pre-filter.
- After the pre-filter is completely dry, place it back into the back panel (fig. ‚).
- Touch and hold the reset button for 3 seconds to reset the pre-filter cleaning time (fig. ƒ).
Descaling the NanoCloud rotary humidification wick
| Filter alert light status | Follow this |
|
Cleaning light goes on (fig.) |
Descale the NanoCloud rotary humidification wick |
- Pull out the water tank (fig. h).
- Pull out the water tray (fig. }).
- Take the wick wheel off the wick support (fig. ~).
- Soak the NanoCloud rotary humidication wick in cleansing agent (e.g diluted white vinegar, Citric acid solution) for two hours.Note• Please use mid or acid cleanser• White vinegar (5% acetic acid) mix with equal amount of water• 4L water + 24g citric acid• If there are white deposits (limescale) on the lter, make sure that the side with the white deposits is immersed in the water.• Do not take the NanoCloud rotary humidication wick off the wheel during descaling.
- Let the NanoCloud rotary humidication wick soak in the solution for 2 hours (fig. „).
- Rinse the NanoCloud rotary humidification wick under the tap to rinse away vinegar residues. During rinsing, turn the wick so that both front and back are rinsed (fig. …).
- Air dry the NanoCloud rotary humidification wick (fig. †).Note Do not put the NanoCloud rotary humidification wick under direct sunlight.
- Touch and hold the reset button for 3 seconds to reset the NanoCloud rotary humidification wick cleaning time (fig. ƒ).
Replace the filter and wick
Understanding the healthy air protect lock
This appliance is equipped with the healthy air protect lock to make sure that the Nano protect filter and the humidification wick are in optimal condition when the appliance is operating. When the Nano protect filter and the humidification wick are almost expired, the replacement light starts to flash to indicate that they need to be replaced.If you do not replace the filter and wick in time, the appliance will stop operating and get locked.
Replacing the NanoProtect filter
Note The NanoProtect filter is not washable nor vacuum cleanable.
Filter alert light status Follow thisFilter replacement light starts Replace the NanoProtect filterflashing (fig. ‡)
- Remove the used NanoProtect filter from the appliance (fig. ˆ).Note• Do not touch the pleated filter surface, or smell the filter as it has collected pollutants from the air.• Wash your hands after disposing of the used filters.
- Remove all packaging material of the new NanoProtect filter (fig. e).
- Place the new NanoProtect filter into the appliance (fig. f).
- Touch and hold the reset button for 3 seconds to reset the NanoProtect filter lifetime counter (fig. ƒ).
Replacing the NanoCloud rotary humidification wick
| Filter alert light status | Follow this |
|
Filter replacement light starts flashing (fig. ‡) |
Replace the NanoCloud rotary humidification wick |
- Take the wick wheel off the wick support (fig. ~).
- Unfasten the locks on the edge of the wheel (fig. ‰).
- Grip the snap-fit components on the other side of the plate to release the wick from the wheel (fig. Š).
- Take the used NanoCloud rotary humidification wick out (fig. ‹).
- Remove all packaging material of the new NanoCloud rotary humidification wick (fig. OE).
- Place the new NanoCloud rotary humidification wick in the wick wheel, and then fasten the locks on the wick wheel (fig. ).
- Place the wick wheel on the wick support (fig. k).NoteWhen placing the wick wheel on the wick support, make sure that the projections on the wick wheel falls into the corresponding grooves.
- Place the water tray and water tank back into the appliance.
- Touch and hold the reset button for 3 seconds to reset the NanoCloud rotary humidification wick lifetime counter (fig. ƒ).
Troubleshooting
This chapter summarizes the most common problems you could encounter with the appliance. If you are unable to solve the problem with the information below, contact the Consumer Care Center in your country.
| Problem | Possible solution |
|
The appliance does not work even though it is plugged in. |
• The filter replacement light has been flashing but you have not replaced the NanoProtect filter, and the appliance is now locked. In this case, replace the filter and reset the filter lifetime counter. • The water refill light flashes. Make sure the water tank is properly installed and there is enough water in the water tank. |
| The appliance does not work even though it is switched on. |
The appliance is working but the buttons are not responsive. Check if the child lock is on. |
| There are some white
deposits on the NanoCloud rotary humidification wick. |
The white deposits are called scale and they consist of minerals from the water. Scale on the NanoCloud rotary humidification wick affects the humidifying performance, however it does not harm your health. Follow the cleaning instructions in the user manual. |
| No air comes out of the air outlet. |
Plug the appliance into the power supply and switch on. |
| The airflow that comes out of the air outlet is
significantly weaker than before. |
• The pre-filter is dirty. Clean the pre-filter (see the chapter “Cleaning”). • Make sure that you have removed all packaging material of the NanoProtect filter. |
|
It takes a long time to reach the target humidity level. |
NanoCloud technology evenly distributes invisible water vapour into your room. In dry conditions moisture from the Air Washer will be absorbed by walls, furniture, and other items in your room. Ventilation of dry outside air will also increase the time it takes to reach the target humidity. |
| Problem | Possible solution |
| I do not see water vapor coming out of the appliance. Is it working? | When mist is very fine, it is invisible. The appliance has a NanoCloud humidification technology, which produces healthy humid air from the outlet area without formation of water mist. Therefore, you cannot see the mist. |
|
The appliance produces a strange smell. |
The first few times you use the appliance, it may produce a plastic smell. This is normal. However, if the appliance produces a burnt smell, contact your Philips dealer or an authorized Philips service centre. The appliance may also
produce an unpleasant smell when one of the filters is dirty. In this case, clean or replace the filter concerned. |
|
The appliance is extra loud. |
• You have not removed all packaging material of the filters. Make sure that you have removed all packaging material.
• Change the fan speed to lower fan speed level. |
| The appliance still indicates that I need to replace a filter, but I already did. |
Perhaps you did not touch and hold the reset button correctly. Plug in the appliance, touch to switch on the appliance, and touch and hold the reset button for 3 seconds. |
Guarantee and service
If you need information or if you have a problem, please visit the Philips website at www.philips.com or contact the Philips Consumer Care Center in your country (you find its phone number in the worldwide guarantee leaflet). Ifthere is no Consumer Care Centre in your country, go to your local Philips dealer.
Order parts or accessoriesIf you have to replace a part or want to purchase an additional part, go to your Philips dealer or visit www.philips.com/support.If you have problems obtaining the parts, please contact the Philips Consumer Care Center in your country (you can find its phone number in the worldwide guarantee leaflet).
Compliance with EMFKoninklijke Philips N.V. manufactures and sells many products targeted at consumers, which, like any electronic apparatus, in general have the ability to emit and receive electromagnetic signals.One of Philips’ leading Business Principles is to take all necessary health and safety measures for our products, to comply with all applicable legal requirements and to stay well within the EMF standards applicable at the time ofproducing the products.Philips is committed to develop, produce and market products that cause no adverse health effects. Philips confirms that if its products are handled properly for their intended use, they are safe to use according to scientific evidence available today.Philips plays an active role in the development of international EMF and safety standards, enabling Philips to anticipate further developments in standardization for early integration in its products.
RecyclingThis symbol means that this product shall not be disposed of with normal household waste (2012/19/EU).Follow your country’s rules for the separate collection of electrical and electronic products. Correct disposal helps prevent negative consequences for the environment and human health.
![]()
References
[xyz-ips snippet=”download-snippet”]