
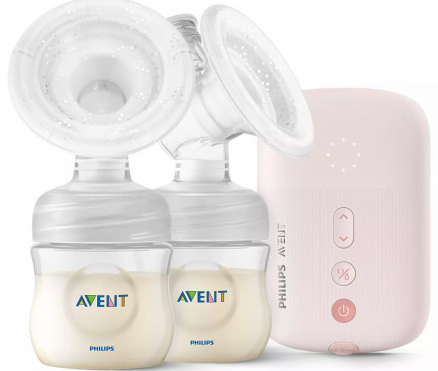
PHILIPS Avent Electric Breast Pump 
Parts
How to Use
Important
Read this user manual carefully before using your Philips Avent single electric breast pump, and save the user manual for future reference. You can also find this user manual at Philips website: www.philips.com/support.
Warning
- Always unplug from the power socket immediately after use.
- Do not use the breast pump while bathing.
- Do not place or store the breast pump where it can fall or be pulled into a bath or sink.
- Do not place or drop the pump motor, silicone tube, and power adapter into water or other liquids.
- Do not reach for a product that has fallen into water. Unplug from the power socket immediately.
- Children should be supervised to ensure that they do not play with the appliance. Place the appliance out of reach from children and pets.
- Before each use, check the breast pump, including the power adapter for signs of damage. Never operate the breast pump if it has a damaged plug, not working properly, has been dropped or damaged, or has been submerged in water.
- The power cord is irreplaceable. Discard it if is damaged, including the power adapter.
- Only use accessories recommended by Philips Avent.
- Only use the power adapter supplied with the product.
- Make sure the breast pump, including the power adapter, is not exposed to extreme heat or placed in direct sunlight.
- Do not use the breast pump outdoors.
- There are no user serviceable parts inside the pump. Do not attempt to open, service, or repair the breast pump yourself.
- The parts of the pump which come directly into contact with milk are personal care items, and should not be shared between mothers.
- Do not attempt to remove the pump body from the breast while under vacuum. Switch the breast pump off, and break the seal between your breast and the pump funnel with your finger, then remove the pump from your breast. You can also pull off the silicone tube from the motor or the cap to release the vacuum.
- Never use while pregnant as pumping can induce labor.
- Never use when sleepy or drowsy.
- This appliances can be used by persons with reduced physical, sensory or mental capabilities or lack of experience and knowledge if they have been given supervision or instruction concerning use of the appliance in a safe way and if they understand the hazards involved.
- This appliance shall not be used by children.
- If expressing becomes painful, stop and consult your breastfeeding advisor or healthcare professional.
- Do not use the breast pump in the presence of flammable an aesthetic mixtures with air, with oxygen, or with nitrous oxide.
- Although the breast pump is compliant with applicable EMC directives, it may still be susceptible to excessive emissions and/or may interfere with more sensitive equipment.
- Make sure not put any products on the pump motor, like pillow, blanket etc. Please make sure pump motor work in well ventilation and heat dissipation condition.
Caution
- The product should not be left unattended when plugged into a power socket.
- Never drop or insert any foreign object into any opening or the silicone tube.
- Do not shorten the silicone tube.
- Before you connect the breast pump to the power, make sure that the voltage of the product corresponds to the local power voltage.
- Wash, rinse, and sterilise the appropriate pump parts before each use.
- Do not use antibacterial, abrasive cleaners, or detergents when cleaning breast pump parts.
- Never put the breast pump motor in water or steriliser, as you can cause permanent damage to the pump.
- If the vacuum generated is uncomfortable or cause pain, switch off the breast pump, break the seal between the breast and the pump funnel with your finger, and then remove the pump fromyour breast. You can also pull off the silicone tube from the motor or the cap to release the vacuum.
- Do not continue pumping for more than five minutes at a time if no result is achieved.
- Never use any accessories or parts from other manufacturers or that Philips Avent does not specifically recommend. If you use such accessories or parts, your guarantee becomes invalid.
- Do not use the breast pump if the silicone diaphragm appears to be damaged or broken. Replace the silicone diaphragm. See chapter “Guarantee and service” for information on how to obtain replacement parts.
- Never use feeding teats as dummies, pacifiers, or soothers. Make sure that the teething baby does not bite the teat too long. The continuous and prolonged bite will damage the teat. For hygiene reasons, replace teats after three months of use. Use only Philips Avent teats and bottles together.
- Cleaning and user maintenance shall not be made by children without supervision.
Electromagnetic Fields (EMF)This Philips appliance complies with all applicable standards and regulations regarding exposure to electromagnetic fields.
Introduction
Congratulations on your purchase and welcome to Philips Avent! To fully benefit from the support that Philips Avent offers, register your product at www.philips.com/welcome.The Philips Avent breast pump provides comfort, convenience for effective expression. Rhythmic Wave Technology, which is designed to mimic baby suckling rhythm. It also has a soft massage cushion, an intuitive design to make whole expression more comfortable and convenient. Healthcare professional says that breast milk is the best nutrition for babies during the first year, combined with solid food after the first six months, Your milk is specially adapted to your baby’s needs and contains antibodies which help protect your baby against infection and allergies. Your single electric breast pump will help you breast-feed longer. You can express and store your milk so that – whether you are out for a few hours, taking a well deserved rest, or back at work – your baby can still enjoy the benefits of your breast milk, even if you cannot be there to give it yourself.
The pump is easy to assemble. You can take it with you anywhere, allowing you to express milk at your own convenience and maintain your milk supply.
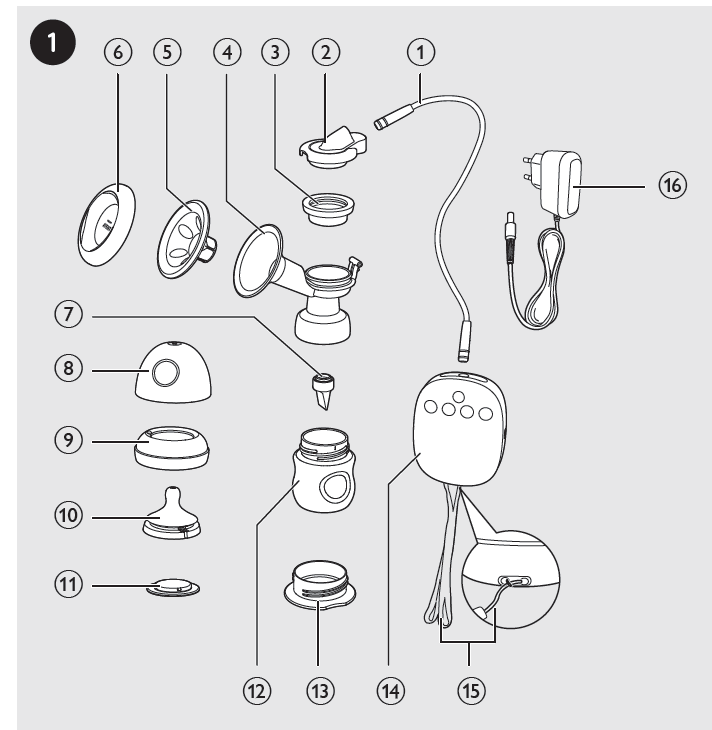
Overview (Fig. 1)
- Silicone tube
- Cap
- Silicone diaphragm (x2) (one for back up)
- Pump body
- Let-down Massage Cushion
- Pump cover
- Valve (x2) (one for back up)
- Dormal cap
- Screw ring
- Teat (0m+)
- Sealing disc
- Bottle (125ml)
- Travel cover
- Pump motor
- Sling
- Power adapter
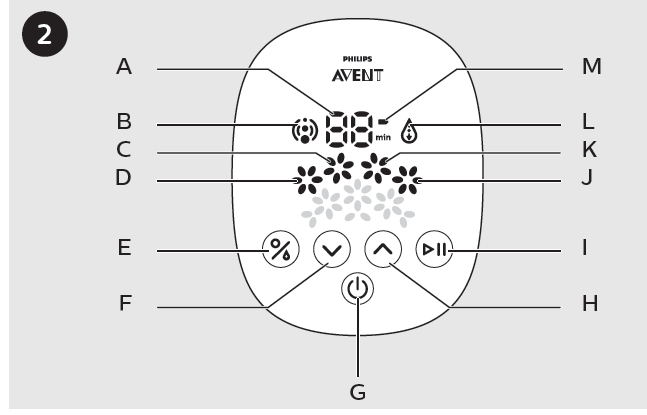
Control panel (Fig. 2)
- Timer
- Stimulation indicator
- Level 2 indicator
- Level 1 indicator
- Mode selection button (selecting the stimulation and expression mode)
- Level down button
- Power button
- Level up button
- Pause/play button
- Level 4 indicator
- Level 3 indicator
- Expression indicator
- Battery indicator
Note: The battery indicator flashes only when in low battery. We recommend you to change the battery as soon as possible.
Cleaning and sterilising
Before you use your breast pump for the first time and for every time, you must disassemble, wash, and sterilise all the breast pump parts that come into contact with your breast milk. (see c, d, e, f, g, l in Overview chapter) Before you use the bottle and its parts for the first time and for every time,you must also disassemble, wash and sterilise. (see h, i, j, k in Overview chapter)
Caution: Never wash or sterilise the pump motor, the silicone tube, the cap, and the power adapter. These components do not come into contact with your breast milk. You can wipe those parts clean with a soft cloth.You can also use the dishwasher (top rack only) or hand wash in warm, soapy water, and then rinse thoroughly. We recommend you to sterilise all the parts contacting with breast milk in our Philips Avent steam steriliser, or by boiling for 5 minutes.
Caution:
- Take care when cleaning the valve and the silicone diaphragm. If it gets damaged, your breast pump will not function properly.
- To clean the valve, rub it gently between your fingers in warm soapy water. Do not insert objects as this may cause damage.
Assembling the electric breast pump
To assemble the pump, follow the steps below.Note:
- Make sure that you clean and sterilise the pump as instructed in this user manual.
- Make sure that you assemble the pump correctly as instructed in this user manual.
- To avoid leakage, remove the residue around the rim before assembling. Put the bottle onto the pump body, and do not overtighten.
- Wash your hand thoroughly before you take sterilised components.
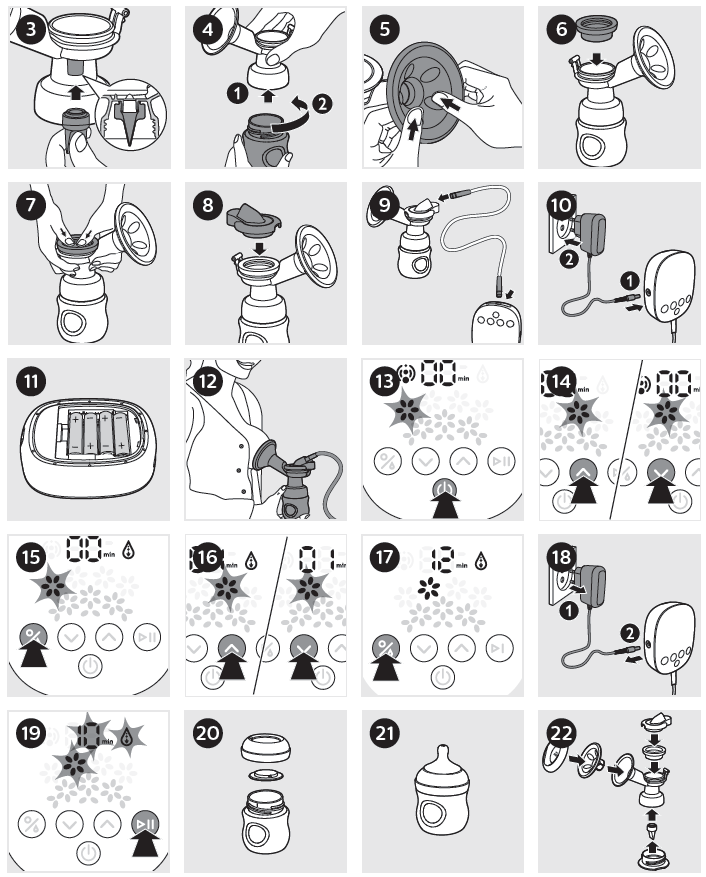
- Insert the valve into the pump body from underneath. (Fig. 3)
- Put the bottle onto the pump body and turn it anticlockwise to fix it. Do not over-tighten when assembling the bottle to the pump body. (Fig. 4)
- Insert the Let-down Massage Cushion into the pump funnel and press the rim to ensure a perfect seal. (Fig. 5)
- Put the silicone diaphragm onto the pump body and press the rim to make sure a perfect seal. (Fig. 6&7)
- Firmly push the cap onto the silicone diaphragm, so that it sites securely on top of the silicone diaphragm. (Fig. 8)
- Connect the silicone tube to the cap and the motor firmly. (Fig. 9)
- Connect the power adapter to the pump motor, and then insert the power plug to the power socket. (Fig. 10)
Note: Only use the adapter provided with this product. Do not use other adapter.
Tip: For battery operation, open the rear cover of the motor unit in the direction indicated by the marks. Insert four new 1.5V AA alkaline batteries into the battery housing. Reattach the rear cover to the motor unit. We recommend you to use rechargeable batteries for long time use. (Fig. 11)
Note: If you have inserted batteries in the battery housing of the pump motor and plug in the adapter, the breast pump will run from the main power supply. The batteries cannot be charged in the unit.
Using the electric breast pump
Before using the pump
- Wash your hands thoroughly, and make sure your breasts are clean. Gently squeeze a little milk from each nipple to make sure that milk ducts are not blocked.
- Make sure you follow the steps in “Cleaning and sterilising” and “Assembling” chapters to clean, sterilise, and assemble the breast pump.
- Relax in a comfortable chair, leaning slightly forward (use cushions to support your back). Make sure that you have a glass of water nearby.
To begin pumping
- Press the assembled pump bodies against your breasts. Make sure that your nipples are centered, so that the massage cushion creates an airtight seal. Make sure that no air escapes; otherwise there is no suction. (Fig. 12)
- Press the power button ( ) to switch on your pump. (Fig. 13) »The display panel lights up for 1 second. The breastpump automatically starts up in stimulation level 1 mode in the first time usage, and the stimulation indicator lights up. The appliance has the memory function to remember the levels for your both stimulation and expression in your latest usage. »»You begin to feel the suction on your breast.Note:
- The timer starts when the appliance is power on. The timer indicator displays 01 after the appliance has been power on for 1 minute. The unit is minute.
- The timer will show total breast pumping time, pause time does not count in.
- If the timer displays over 99 minutes (when it comes to 100 minutes), the machine will shut down automatically.
- You can choose your desired stimulation level to stimulate milk by pressing the level up ( ) and level down ( ) buttons. You can press the level up button to deeper the suction. Press the level down button to lower the suction. There are altogether 4 stimulation levels. (Fig. 14)
- Once your milk starts flowing, you can press the mode selection button ( ) to switch to the expression mode. (Fig. 15)
- After switching to the expression mode, you can choose your desired expression level by pressing the level up ( ) and level down ( ) buttons. You can press the level up button to deeper the suction. Press the level down button to lower the suction. There are altogether 4 expression levels. (Fig. 16) The expression indicator lights up instead of the stimulation indicator.
- During expression, you can switch between the stimulation mode and expression mode by pressing the mode selection button ( ) for better expression (Fig. 17)Note:
- You do not need to use all stimulation/expression levels, only use the levels that are comfortable for you.
- Place the pump motor on a stable and flat surface, or hang up steadily with the included sling, to avoid any accidental drops when in use. If not, this may pull the pump body off from the breast and cause injury.
- If you regularly express more than 125ml per session on each breast, you can use a 260ml/9fl oz Philips Avent bottle to prevent overfilling and spillage.
- If there is no operation on this appliance (such as pause, change stimulation level and expression level) for 30 minutes (including in pause), the appliance will shut down automatically.
- When you have finished expressing, press the power button ( ) to switch off the breast pump and carefully remove the pump body from your breast.Tip:
- After switching off the breast pump, break the seal between the breast and the pump funnel with your finger, and then remove the pump from your breast.
- Disconnect the the power plug to the power socket, and then disconnect the power adapter from the pump motor. (Fig. 18)Tip:
-
- In order to protect the appliance, please always shut down the appliance by pressing the power button instead of plugging off.
-
- Unscrew the bottles from the pump bodies ready for feeding/ storage. Clean the other used parts of the breast pump according to the instructions in chapter ‘Cleaning and sterilising’.Caution:
- Do not continue pumping for more than 5 minutes at a time if you do not succeed in expressing any milk. Try to express at another time during the day.
- If the process becomes very uncomfortable or painful, stop using the pump and consult your breastfeeding advisor.
- Never tilt the breast pump when the milk has reached the maximum line on the bottle. Replace with a new bottle before re-pumping to avoid spillage.
- After expression, please take off the bottle from pump body immediately, then store the bottle with sealing disc.
To pause pumping
This breast pump has a pause function, and you can press the pause button ( ) to pause pumping if at any time the suction becomes uncomfortable, there is a need to change the bottle, reposition the pump on the breast, or a short rest.
- When the breast pump is in a particular stimulation or expression mode, press pause button ( ) will pause the pumping. »»The timer indicator, level indicator, and stimulation/ expression indicator will flash to remind you of the pausing status. (Fig. 19)Note
- When the breast pump is in pause, level down/level up button and stimulation/ expression switch mode button will lose their functions. Only pausing button and power button still work.
- Press the pause button ( ) again to continue the pumping with the stimulation or expression mode selected before pausing.
Storing your breast milk
Caution:
- Never refreeze breast milk.
- Do not mix fresh breast milk to already frozen milk.
- Always discard any left over milk at the end of a feed.Note: Only store breast milk collected with a sterile pump.
- After you have expressed your milk, unscrew the pump bodies from the Philips Avent bottles.
- Store expressed milk in cleaned and sterilised Philips Avent bottles fitted with sealing discs. Put them in the fridge or freezer immediately. (Fig. 20)
- You can store expressed breast milk in the refrigerator for up to 48 hours (not in the door) or in the freezer for up to 3 months.
- Label the bottles with date and time.
- Use up the older milk first.
Philips Avent Natural Bottle provides:
- Easier latch on. The wide breast shaped teat makes it easy for your baby to combine breast and bottle feeding.
- Unique comfort petals. Petals inside the teat increase softness and flexibility without teat collapse.
- Advanced anti-colic valve. Innovative twin valve design reduces colic and discomfort by venting air into the bottle and not baby’s tummy.
Feeding your baby with expressed breast milk
- If you use Philips Avent bottle to store breast milk, make sure to remove the sealing disc and assemble the Philips Avent teat for feeding. (Fig. 21)
- Place the frozen breast milk in the refrigerator to defrost overnight. In case of an emergency, you can defrost the milk in a bowl of hot water. Use up the defrosted breast milk within 24 hours after defrosting.
About heating up the breast milk: Heat the bottle with in a bowl of hot water, or using Philips Avent bottle and baby food warmer to safely heat up the milk.
Caution:
- Remember! Always check milk or food temperature before feeding.
- Never heat breast milk in a microwave as this may destroy valuable nutrients and antibodies. In addition, the uneven heating may cause hot spots in the liquid which could cause burns to the throat.
- Never immerse a frozen bottle in boiling water to avoid crack or split.
Keeping your electric breast pump sterile for travel
After sterilzing all parts, please refer to steps in “Assembling the electric breast pump” to assemble the valve, Let-down Massage Cushion, diaphragm and diaphragm cap on the pump body, then put on the pump cover and screw on the travel cover, which can keep your breast pump sterile for travel. (Fig. 22)
Hints to help you succeed
The single electric breast pump is easy to use. Take some practice, and you will soon get used to expressing milk.
- Choose a time when you are not rushed nor interrupted easily.•• Having your baby or a photograph of your baby nearby can help encourage your milk to flow.
- Before expressing milk, place a warm towel onto your breast, and lightly massage for a few minutes. This encourages milk flow, and ease the pain of your breast.
- Warmth and relaxation can encourage milk flow. Try expressing after a warm bath or shower.
- Try expressing from one breast while your baby is feeding from the other, or continue expressing just after a feed.
Repositioning the pump on the breast from time to time can help stimulate your milk flow.Tip:
- Practice with your pump to find the best pumping techniques for you. If the process becomes painful, stop and consult your breast-feeding advisor.
- We recommend you to use the breast pad to keep your bra clean.
When to express milk
If possible, wait until your milk supply and breast-feeding schedule are well established, unless told otherwise by your doctor or breast-feeding advisor.The exceptions are:
- If you are expressing milk for your baby to be given in hospital.
- If your breasts are engorged (painful or swollen). You can express a small amount of milk before or between feeds to ease the pain, and to help your baby latch on more easily.
- If you have sore or cracked nipples and you may wish to express your milk until they are healed.
- If you are separated from your baby and wish to continue to breastfeed when you are reunited. You should express your milk regularly to stimulate your milk supply.
Right times of the day to express your milk
- Early in the morning when you breasts are full, just before or after your baby’s first feed.
- After a feed, if your baby has not emptied both breasts.
- Between feeds or in a break if you have returned to work.
Storage
- Keep the breast pump out of direct sunlight as prolonged exposure may cause discolouration.
- Store the breast pump and its accessories in a safe and dry place
Compatibility
The Philips Avent electric breast pump is compatible with PhilipsAvent bottles in our range. When you use other Philips Avent bottles, use the same type of teat that was supplied with that bottle. For details on how to assemble the teat and general cleaning instructions, refer to the user manual on our website, www.philips.com/support.
Replacement
BatteriesThis appliance can use both nonchargeable and rechargeable batteries. For instructions on how to replace the batteries see chapter ‘Preparing for use’.
- Different types of batteries or new and used batteries are not to be mixed.
- Batteries are to be inserted with the correct polarity.
- Exhausted batteries are to be removed from the appliance and safely disposed of.
- If the appliance is to be stored unused for a long period, the batteries should be removed.
- The supply terminals are not to be short-circuited.
Ordering accessories
To purchase accessories for this appliance, please visit our online shop at www.shop.philips.com/service.If the online shop is not available in your country, go to your Philips dealer or a Philips service centre. If you have any difficulties obtaining accessories for your appliance, please contact the Philips Consumer Care Centre in your country. You find its contact details in the worldwide guarantee leaflet.
Recycling
- This symbol means that this product shall not be disposed of with normal household waste (2012/19/EU).
- Follow your country’s rules for the separate collection of electrical and electronic products. Correct disposal helps prevent negative consequences for the environment and human health.
Guarantee and service
Philips guarantees its products under correct usage for a period of two year after the date of purchase. If any defect due to faulty materials and workmanship occurs within this two year guarantee period, Philips will repair or replace the product at its expense. For repair or replacement, make sure to provide convincing proof, for instance by means of a receipt, that the day onwhich service is claimed is within the guarantee period. The guarantee only covers the breast pump motor and power adapter. It does not cover nonelectrical parts, accessories and consumable parts. The guarantee does not cover shipping and handling fees, and on-site services fees either. If you need service or information, or if you have a problem, please contact the Philips Avent Consumer Care center. Website: http://www.philips.com/support
Troubleshooting
This chapter summarises the most common problems you could encounter with the appliance. If you are unable to solve the problem with the information below, contact the Consumer Care Centre in your country or visit us online at www.philips.com/support.
| Problem | Solution |
| Lack of suction. | • Check that all components are assembled correctly and that the valve is in positioned correctly.
• Make sure that the cap, the diaphragm, and the Let-down Massage Cushion are fitted securely to the pump body and a perfect seal is created. • The air pressure in your region is too low, this may affect the suction. • Make sure the silicone tube is firmly connected to the cap and the motor, without twisting. |
| No milk being expressed. | • Make sure the pump is assembled correctly, and the suction is created.
• Relax and try again; as expression may improve with practice. • Refer to the “Hints to help you succeed” section. |
| Pain in the breast area when expressing. | • You may be pumping too hard. You do not need to use all the suction that the pump can generate but the comfortable levels. Press the level down button to lower down the suction intensity.
• Consult your health professional/breast-feeding advisor. |
| Milk is drawn up the Let-down Massage Cushion. | • Remove and refit the Let-down Massage Cushion. Make sure that it is installed correctly and firmly.
• Try leaning lightly forward. |
| Problem | Solution |
| Cracking/Discoloring | • Avoid contact antibacterial or abrasive detergents/ cleaners. Combinations of detergents, cleaning products, sterilisation solution, softened water, and temperature fluctuations may cause the plastic to crack. If any crack is found, stop using the pump immediately. Contact Philips Avent Consumer Care center for spare components.
• Food coloring can discolor components, but this will not affect your usage. • Keep all the components away from the source of heat or direct sunlight as it can discolor components. |
| Components are broken or lost. | • Contact Philips Avent Consumer Care center for spare components. See back cover for contact details. |
| Pump does not response. | • Make sure the pump is correctly assembled and press the power button to switch on.
• Make sure the cables between the pump and the power socket are correctly connected. |
| Pump motor display flashes 3 seconds, then shuts down automatically. | • When using the power adapter to supply power, make sure you are using the one Philips provided. Then make sure it is connected properly, then switch the pump on again.
• If you use batteries to supply power, press the power button to switch off. Replace with new batteries and switch the pump on again. • After checking the 2 scenarios above, if the problem persists, contact the Consumer Care center for help. |
| The silicone tube is too loose when it is plugged into machine or cap. | • Change the new back up silicone tube connector. |
![]()
References
[xyz-ips snippet=”download-snippet”]