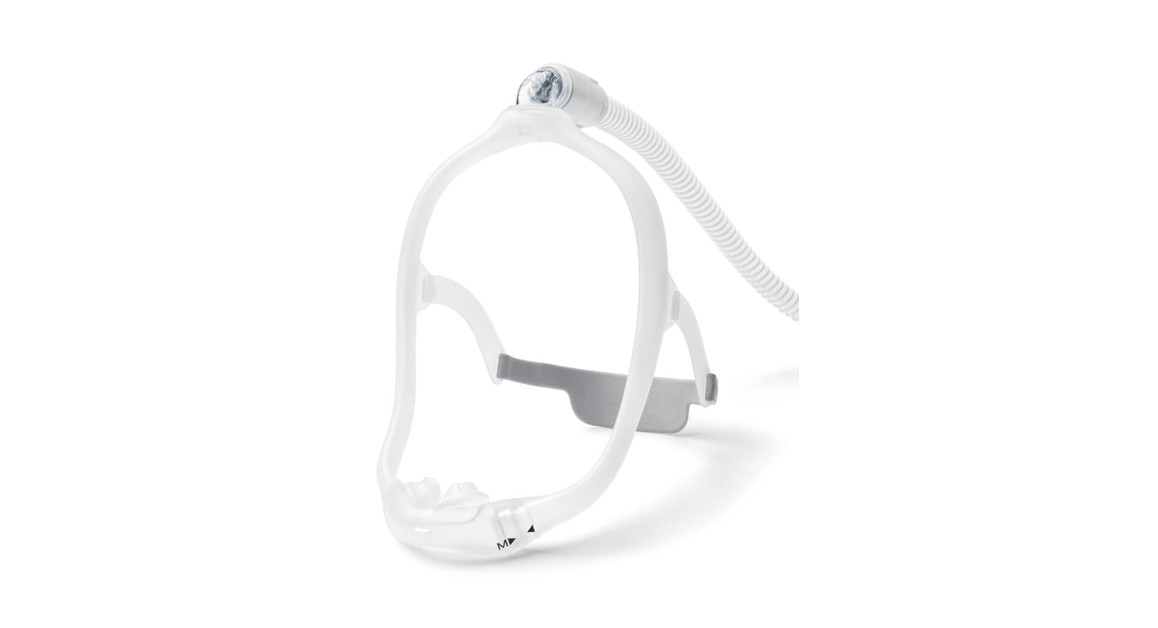
![]() DreamWear Silicone Pillows MaskInstructions for Use
DreamWear Silicone Pillows MaskInstructions for Use
Safety Information
Intended UseThis mask is intended to provide an interface for the application of CPAP or bi-level therapy to patients. The mask is for single patient use in the home or multi-patient use in the hospital/institutional environment. The mask is to be used on patients (>66 lbs/30 kg) for whom CPAP or bi-level therapy has been prescribed.
Caution: U.S. Federal law restricts this device to sale by or on the order of a physician.Notes:
- An electronic copy of these instructions is available at www.philips.com/IFU.
- This mask is not made with natural rubber latex or DEHP.
Warning: Indicates the possibility of danger to the user or operator.Caution: Indicates the possibility of damage to the device.![]() Warnings
Warnings
- This mask is not intended for patients who are dependent on mechanical ventilation for their life support.
- Use of this mask, while the system is not on and operating, may cause rebreathing of exhaled air. Rebreathing of exhaled air for longer than several minutes can in some circumstances lead to suffocation.
- Discontinue use and contact your healthcare professional if any of the following symptoms occur: skin redness, irritation, discomfort, blurred vision, or drying of the eyes.
- Discontinue use and consult your healthcare professional if any of the following symptoms occur: unusual chest discomfort, shortness of breath, severe headache, eye pain, or eye infections.
- Discontinue use and consult your healthcare professional if any of the following symptoms occur: tooth, gum, or jaw soreness. The use of a mask may aggravate an existing dental condition.
- Do not overtighten the headgear straps. Watch for signs of overtightening, such as excessive redness, sores, or bulging skin around the edges of the mask. Loosen the headgear straps to alleviate symptoms.
- Do not block or seal off the exhalation ports.
What’s in the Package

HeadgearA1 Headgear with arms (included)A2 Headgear (contact your provider)Note: The A2 headgear is optional. Contact your healthcare provider for more information. These instructions refer to both A1 and A2 as “headgear” unless otherwise specified.
Other ComponentsB. Elbow with built-in exhalation (Do not block.)C. Tubing quick release (may remain in the CPAP hose)D. Mask frame (available in small (SM), medium (MED), large (LG))E. Fabric sleeves (optional)F. Pillows cushion tipG. Pillows cushion base (Do not insert into nostrils.)H. Pillows cushion platform (available in multiple sizes) with built-in exhalation (Do not block.)
Before Use
- Hand washes the entire mask before use (see Mask Care section).
- Inspect the entire mask. Discard and replace any damaged or worn parts.
![]() Caution: Wash your face. Do not use moisturizer or lotion on your hands or face.
Caution: Wash your face. Do not use moisturizer or lotion on your hands or face.
Achieving the Right Fit
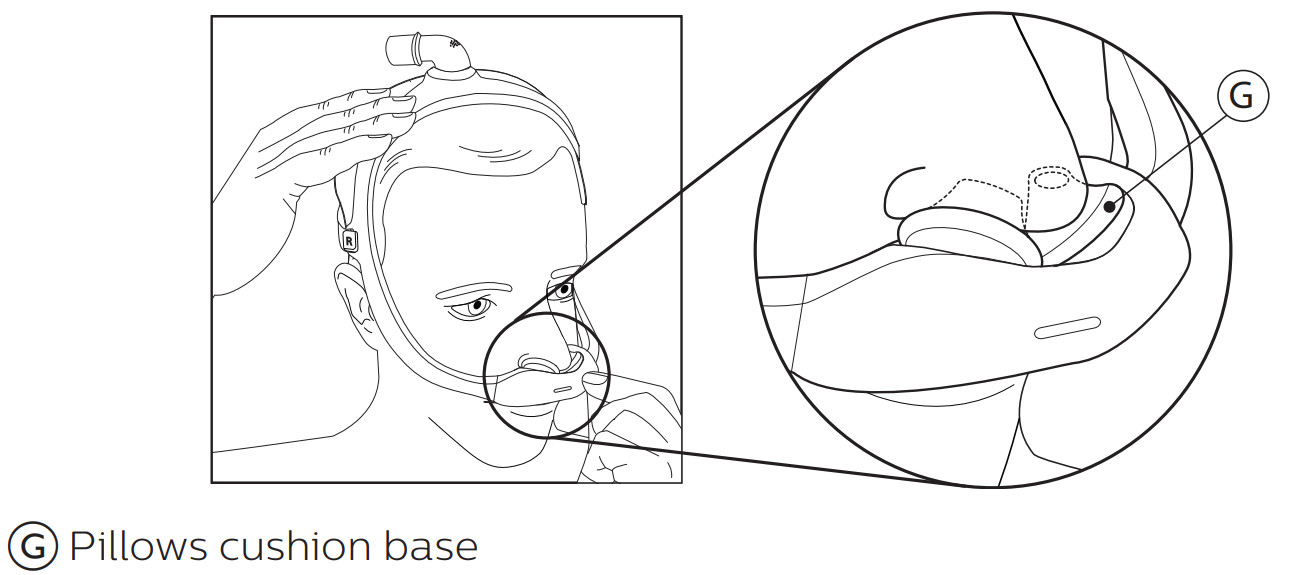
Cushion SizingMultiple cushion sizes are available.
- Place the pillow’s cushion tips into your nostrils.
- Choose the cushion so the pillow’s cushion bases sit comfortably under your nose without any gaps. (See G in the figure below.)
Note: Do not push the pillow’s cushion bases into your nostrils.
Putting on the Mask
- As shown in the figure below, with the mask assembled (see Assembly section), place the cushion under your nose and insert the pillow’s cushion tips into your nostrils.
- Position the frame on the top of your head.Tip: For proper sizing, see Cushion Sizing and Mask Frame Sizing sections.
- Pull the headgear over the back of your head.
 Adjusting the Mask
 - Peel the headgear tabs away from the fabric. Adjust the length of the straps. Press the tabs back against the fabric to reattach.Note: Do not overtighten the headgear. Signs of overtightening include redness, sores, or bulging skin around the edges of the mask.
- Position the mask until it fits comfortably.
- When the mask is worn correctly, the elbow should rest on the top of your head.
 Adjusting the Mask
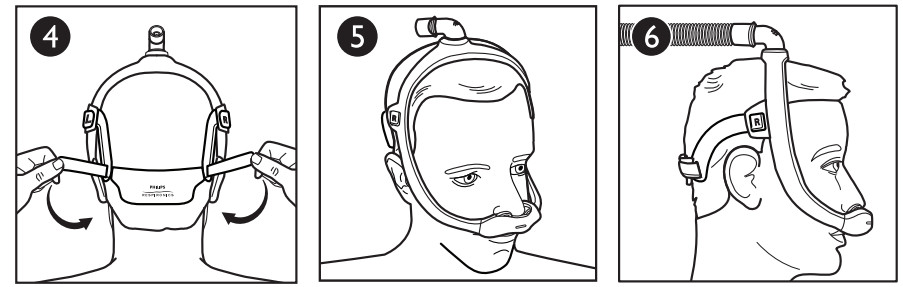
Mask Frame SizingThe mask frame is available in Small (SM), Medium (MED), or Large (LG) sizes.The MED mask frame will comfortably fit most faces. If the MED frame does not fit your face, contact your healthcare provider to see if an SM or LG mask frame would better suit your needs.

Tip: If the mask frame falls backward and is too close to your ears as shown in the figure below, you may need a smaller mask frame.
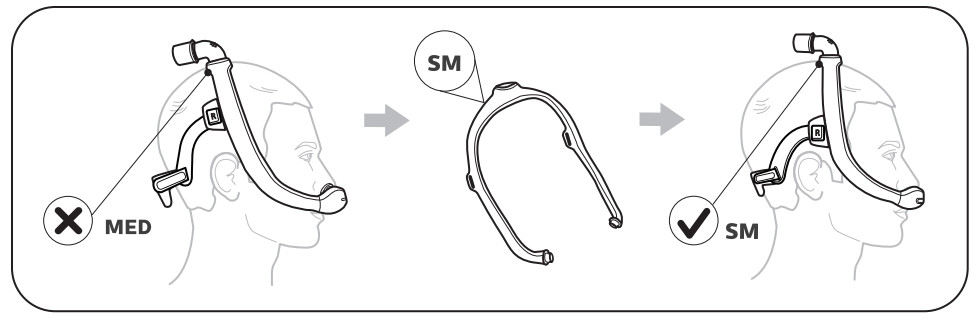 Tip: If the mask frame falls forward on your head and is too close to your eyes as shown in the figure below, you may need a larger mask frame.

Using the Mask
- Connect the CPAP tubing (included with the CPAP device) to the tubing quick release on the elbow.
- Turn the therapy device on, lie down, and breathe normally.
- Assume different sleeping positions and move around until you are comfortable. Some air leaking is normal, but if you notice excessive air leaks, make final adjustments.
Tubing Quick ReleaseThe elbow is equipped with a tubing quickrelease. Pull-on the tubing quick release and it disengages from the elbow and comes loose with tubing 7.

Removing the MaskTo keep your mask adjustments intact, remove the mask by grasping the cushion and pulling it forward, away from your nose. Then pull the cushion and mask up and off your head 8.
Mask Care
Cleaning Instructions![]() Cautions:
Cautions:
- Any deviation from these instructions may impact the performance of the product.
- Do not use bleach, alcohol, cleaning solutions containing bleach or alcohol, or cleaning solutions containing conditioners or moisturizers.
- Do not place the headgear or the fabric sleeves into a clothes dryer.
Hand washes the mask cushion, frame, elbow, and tubing quick-release daily.Hand wash the headgear and fabric sleeves weekly, or as needed.
- Disassemble the mask (see Disassembly section).
- Inspect the entire mask for damage or wear (cracking, crazing, tears, damage resulting in gel exposure, etc.). Discard and replace components as necessary.
- Submerge and hand wash the mask in warm water (80-90°F) with liquid dishwashing detergent.Note: Ensure no air pockets are present inside the mask parts while they are submerged.
- Rinse thoroughly.
- Lay the headgear and fabric sleeves ¡at or line dry. Make sure the entire mask is dry before use.
Dishwashing InstructionsCautions:
- Use only a mild liquid dishwashing detergent to wash the mask.
- Do not use the heated drying cycle on the dishwasher.
- Do not use bleach, alcohol, cleaning solutions containing bleach or alcohol, or cleaning solutions containing conditioners or moisturizers.
In addition to hand washing, the mask may be cleaned in the dishwasher once a week.
- Remove the headgear and the fabric sleeves. Do not wash these parts in the dishwasher.
- Disassemble the mask (see Disassembly section).
- Wash in the top shelf of the dishwasher.
- Air dry. Make sure the mask is dry before use.
Assembly and Disassembly
Assembly
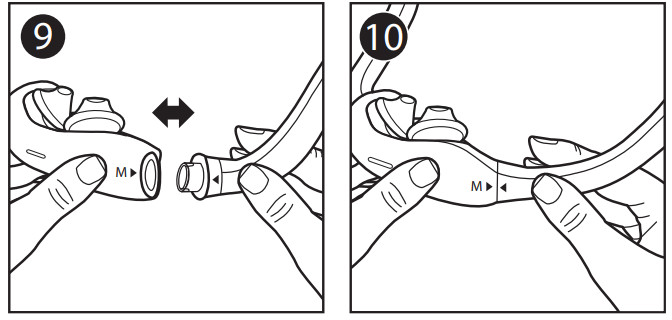
- Align the triangles on the cushion and mask frame. Press the cushion into the frame until it clicks into place. 9 10.Note: The end of the cushion and the opening in the mask frame are “D” shaped. The cushion end should match the frame.
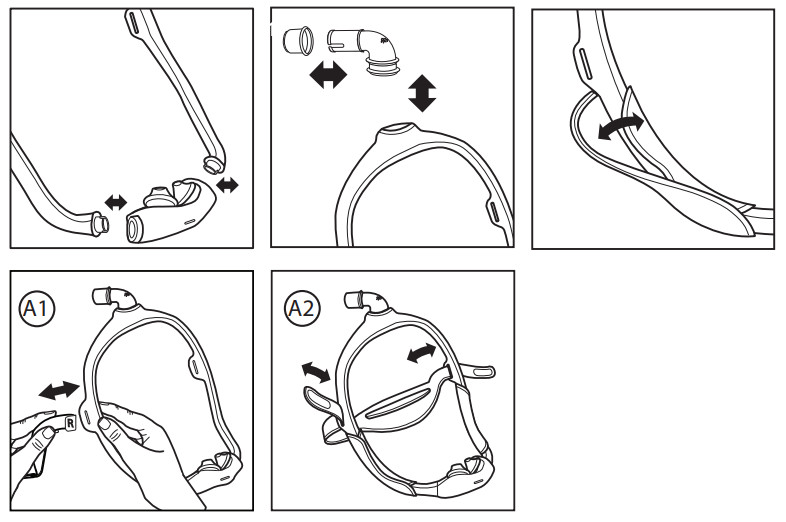
- Insert the elbow into the top of the mask frame.
- Push the tubing quick release onto the elbow until it clicks into place.
- Wrap the fabric sleeves around the mask frame and press the strips together.Note: The sleeve seams should be on the outside of the frame.
- Headgear assembly:• Headgear with arms A1: a. Push the end of the right headgear arm (marked with an “R”) through the right mask frame loop. Repeat on the left side with the left (“L) headgear arm and left frame loop.b. Slide the fabric tabs into the slots on the arms and fold backward.Note: Once the mask is on, the letters should face outward with the “L” on the left side of your head and the “R” on the right side.• Headgear A2: Slide the tabs into the slots on the mask frame and fold backward.Note: The Philips Respironics logo will be on the outside and facing up when correctly assembled.
Disassembly
- Headgear disassembly:• Headgear with arms A1: Gently pull each headgear arm out of the mask frame loop.• Headgear A2: Undo the headgear tabs and pull through the slots in the mask frame.
- Undo the strips on the fabric sleeves and remove them from the mask frame.
- Pull the tubing quick release from the elbow.
- Pull the elbow from the top of the frame.
- Pull the cushion from the mask frame.
Health Care Provider & Clinician Information
Useful LifeThe useful life of the mask depends on the use conditions and maintenance (cleaning, institutional disinfection, and component replacement) of the device. Inspect the mask parts regularly for damage or wear. Replace components as deemed necessary.Multi-Patient UseClean and disinfect the mask daily and between patients when in use in a clinical setting. For multi-patient use in the hospital/institutional environment, use the Disinfection Guide to reprocess the mask between patients. These instructions can be obtained online at www.philips.com/ IFU, or by contacting Philips Respironics Customer Service at 1-800-3456443(USA or Canada), at +1-724-387-4000, or go to www.respironics.com to find your local customer service contact information.
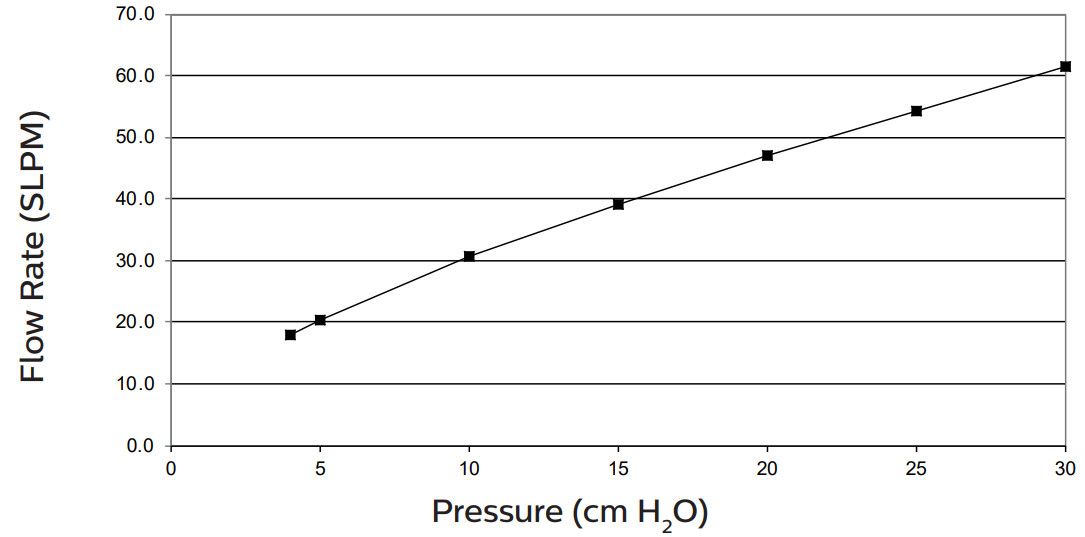
Philips Respironics DreamStation Mask Type and SystemOne Resistance Control SettingsUsing the mask with a Philips Respironics DreamStation or System One device provides optimal comfort. The provider sets this value (X1) on the device.SpecificationsThe technical specifications of the mask are provided for your healthcare professional to determine if it is compatible with your CPAP or bi-level therapy device.Warning: Use outside of these specifications may result in ineffective therapy. The pressure ¡ow curve shown below is an approximation of expected performance. Exact measurements may vary.
Pressure Flow Curve
 Resistance
| Drop-in Pressure (cm H2O) | at 50 SLPM | at 100 SLPM |
| All cushion sizes | 1.2 | 4.2 |
Deadspace84 mLNote: This value represents the largest dead space of the mask.
Sound LevelsDECLARED DUAL-NUMBER NOISE EMISSION VALUES in accordance with ISO 4871A-weighted sound pressure level @ 1 m: 19 dB(A) with an uncertainty of 2 dBA-weighted sound power level: 27 dB(A) with an uncertainty of 2 dB Values determined according to noise test code given in ISO 17510, using the basic standards ISO 3744 and ISO 4871.NOTE: The sum of a measured noise emission value and its associated uncertainty represents an upper boundary of the range of values that is likely to occur in measurements.
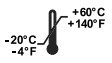
DisposalDispose of the mask and headgear annually.Dispose of this device in accordance with local collections and recycling regulations. For more information, visit www.philips.com/recycling.Storage ConditionsTemperature: -4° F to 140° F (-20° C to 60° C)Relative Humidity: 15% to 95%
Symbols Glossary
Refer to http://www.symbols.philips.com for a description of the symbols used on this device and its packaging.
|
Symbol |
Description |
 |
Caution, consult accompanying documents |
| Unique Device Identifier – Indicates the Unique Device Identifier information. | |
 |
Not Made with Natural Rubber Latex – Indicates that this mask is not made with natural rubber latex. |
 |
Batch code – Indicates the manufacturer’s batch code so that the batch or lot can be identifed. |
 |
Humidity limitation – Indicates the range of humidity to which the medical devices can be safely exposed. |
 |
Catalog number -Indicates the manufacturer’s catalog number so that the medical device can be identified. |
| Electronic instructions for use – Indicates that relevant information for use of the product is available in electronic form. | |
 |
Prescription device |
 |
Manufacturer – Indicates the medical device manufacturer |
 |
Packaging unit – Indicates the number of pieces in the package. |
 |
Temperature limit – Indicates the temperature limits to which the medical device can be safely exposed. |
 |
Philips Respironics SystemOne ResistanceControl Value – Indicates the therapy device comfort setting. |
 |
Medical Device – Indicates that the item is a medical device. |
 |
Date of manufacture – Indicates the date when the medical device was manufactured.Country of manufacture – Indicates the country of manufacture of the product.Note: When applied to the label, “CC” is replaced by the country code. |

Limited Warranty
Respironics, Inc., a Philips company (“Philips Respironics”) provides this non-transferable, limited warranty for the DreamWear Silicone Pillows Mask (“Product”) to the customer who originally purchased the Product directly from Philips Respironics.What this Warranty Covers: Philips Respironics warrants each new product will be free from defects in materials and workmanship and will perform in accordance with the Product specifications under normal and proper use and maintenance in accordance with applicable instructions, subject to the exclusions below.How Long does this Warranty Last: For the product, ninety (90) days from the longer of the date of shipment to the purchaser or date of setup by purchaser for the end-user. The warranty period for accessories, replacement parts, and disposables including, but not limited to, chin straps is ninety (90) days from the date of shipment to the original purchaser.What this Warranty does not cover: This warranty does not apply to any software included with the Product as the software warranty is included in the software license. This warranty does not cover damage or injury whether to the Products, personal property, or persons caused by accident, misuse, abuse, Acts of God, water ingress, repair or alteration by anyone other than Philips Respironics or its authorized service center, failure to operate in accordance with the terms of the operating manual and instructions, lack of reasonable care, the discontinuance of a network (e.g. 2G, 3G, etc.) by a carrier (e.g. ATT, Verizon, etc., or other defects not related to material or workmanship. This warranty is not transferable. If Philips Respironics finds that a Product returned for service or the issue raised is not covered under this limited warranty, Philips Respironics may charge an evaluation fee and return shipping.What Philips Respironics will do: If a Product fails to conform to the warranties set forth above during the applicable warranty period, Philips Respironics will repair or replace the Product or refund the original purchase price, in Philips Respironics sole discretion. Philips Respironics may use new or remanufactured assemblies, components, and parts in repair and new or recertified refurbished devices for replacement.The balance of the original warranty period will apply to any Product or component of a Product repaired or replaced under this warranty.Warranty Disclaimer; Limitation of Liability: EXCEPT AS SET FORTH IN THIS LIMITED WARRANTY, PHILIPS RESPIRONICS MAKES NO WARRANTIES, EXPRESSED OR IMPLIED, STATUTORY OR OTHERWISE, REGARDING THE PRODUCT OR ITS QUALITY OR PERFORMANCE. PHILIPS RESPIRONICS SPECIFICALLY DISCLAIMS THE IMPLIED WARRANTY OF MERCHANTABILITY AND THE IMPLIED WARRANTY OF FITNESS FOR A PARTICULAR PURPOSE. IN NO EVENT WILL PHILIPS RESPIRONICS MAXIMUM LIABILITY UNDER THESE WARRANTIES EXCEED THE ORIGINAL PURCHASE PRICE OR WILL PHILIPS RESPIRONICS BE LIABLE FOR ANY ECONOMIC LOSS, LOSS OF PROFITS, OVERHEAD, OR SPECIAL, INCIDENTAL, OR CONSEQUENTIAL DAMAGES. Repair, replacement, or return of purchase price by Philips Respironics is the original purchaser’s sole and exclusive remedy under this warranty. This warranty gives you specific legal rights, and you may also have other rights that vary from state to state. Some states do not allow the exclusion or limitation of incidental or consequential damages, so the above exclusion and limitations may not apply to you.How to get warranty support: Patients contact your local authorized Philips Respironics dealer and dealers contact Respironics, Inc. at:1001 Murry Ridge LaneMurrysville, Pennsylvania 15668-8550+1-724-387-4000
Respironics Inc.1001 Murry Ridge LaneMurrysville, PA 15668 USA
1147000 R01PBW 8/20/2020© Koninklijke Philips N.V., 2020. All rights reserved.
References
[xyz-ips snippet=”download-snippet”]