
 User manual
This product is only suitable for well insulated spaces or occasional use.

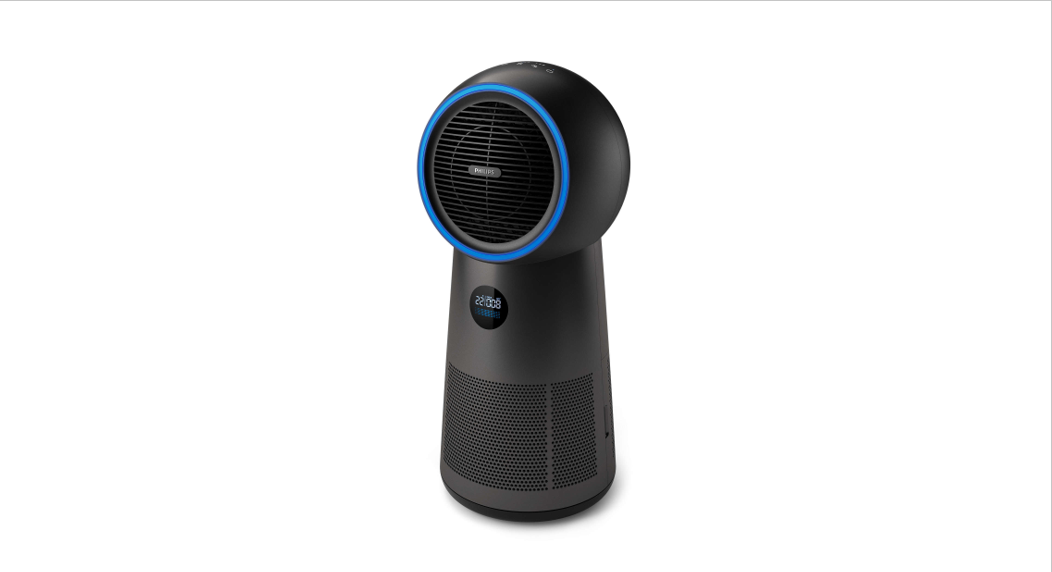
Your 3-in-1: air purifier, fan, and heater
Congratulations on your purchase, and welcome to Philips!To fully benefit from the support that Philips offers, register your product at www.philips.com/welcome.
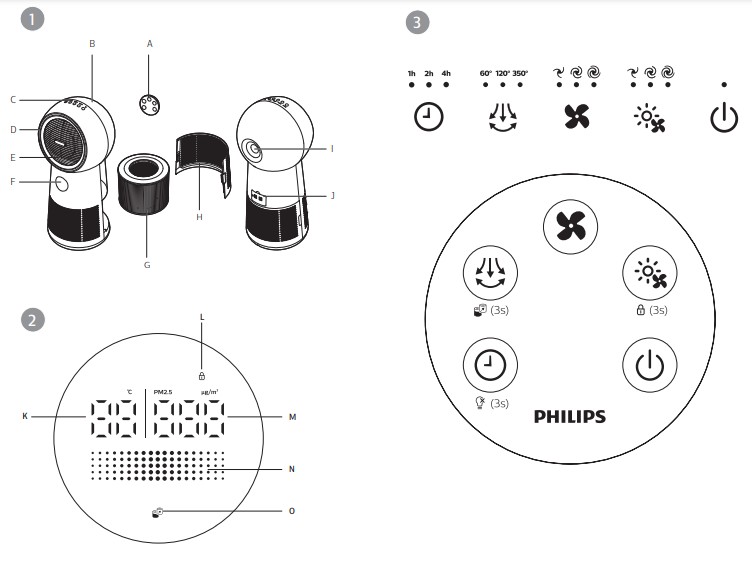
Product overview (fig 1)
| A. Remote control | F. Display screen |
| B. Housing | G. Philips filter (FYM220/30) |
| C. Control buttons | H. Back cover |
| D. Light strip | I. Storage slot for remote control |
| E. Air outlet | J. Air quality sensor |
Display overview (fig 2)
| K. Temperature display | N. Air quality indicator |
| L. Child lock indicator | O. Filter replacement alert |
| M. PM2.5 display |
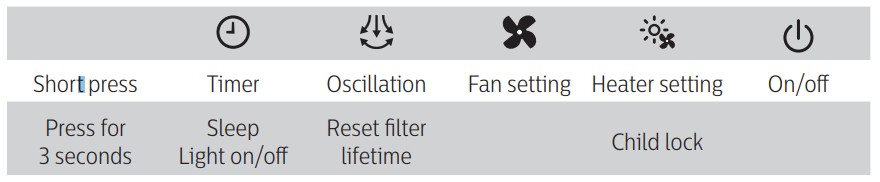
Controls overview (fig 3)
Getting started
Installing the filterNote: Make sure the appliance is unplugged from the electrical outlet before installing the filter.
- To remove the back cover, hold the side of it with both hands and pull. (fig 4).
- Pull the filter from the appliance (fig 5).
- Remove all packaging materials from the filter (fig 6).
- Put the filter back into the appliance (fig 7).
- Reattach the back cover (fig 8).
Setting up the remote control
- Pull out the plastic film on the remote control to activate the battery (fig 9).
- Pair the remote control with the appliance if you have multiple devices in one house (see the chapter “Pairing your remote control”).
Note: Place the remote control in the slot and it snaps in place automatically (fig 10).
Using the 3-in-1: air purifier, fan, and heater
Air quality light
| PM2.5 level | Air quality light color | Air quality level |
| ≤ 12 | Blue | Good |
| 13-35 | Blue-purple | Fair |
| 36-55 | Purple-red | Poor |
| > 55 | Red | Very poor |
Turning on and off
Note:
- Plug the appliance into the power outlet; do not use a power strip.
- If the appliance is running in heating mode when you turn it off, it continues working for a few seconds to exhaust the remaining heat.
- Press
 to switch on the appliance.
 - The display panel lights up, and the appliance shows the PM2.5 level and temperature (fig 11).
- Press to switch off the appliance.
Heater and fan
| Light strip | ||||
| Heater ( |
Low | Medium | High | Red |
| Fan ( |
Low | Medium | High | Blue |
OscillationPress the![]() button, the appliance can oscillate at three angles: 60°, 120°, and 350°.
button, the appliance can oscillate at three angles: 60°, 120°, and 350°.
Setting the timerPress the![]() button repeatedly to set the operating hours of the appliance. The timer is availablefrom 1 to 7 hours.
button repeatedly to set the operating hours of the appliance. The timer is availablefrom 1 to 7 hours.

To deactivate the timer, press the![]() button repeatedly until all the hour indicators are off.
button repeatedly until all the hour indicators are off.
Setting the child lock
- Press and hold the button for 3 seconds to activate the child lock (fig 12).appears on the screen.All the other buttons are unresponsive except on/off.
- Press and hold the button for 3 seconds to deactivate the child lock. disappears.
Sleep, turning light on/off
- Press and hold the button for 3 seconds (fig 13). The display screen dims, rest lights will turn off.
- Press any button to turn all lights on.
Pairing your remote control
- Unplug the appliance from the power outlet and wait for 10 seconds. Plugin theappliance, then within 5 seconds, press the button on the appliance twice (fig 14). The 2h indicator lights up.
- Long press the button for 5 seconds on the remote control within 5 seconds (fig 15). The and indicator of the fan button on the appliance lights up, and the appliance operates in the fan mode, indicating that the pairing is successful (fig 16).Note: If the “2h” indicator is blinking, you must repeat the pairing.
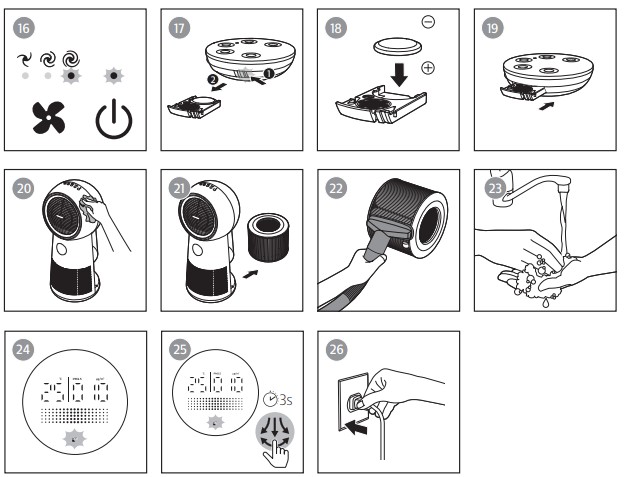
Replacing the battery
- Push the battery bracket edge gently and pull it out of the remote control (fig 17).
- Insert the new battery with correct polarities as indicated (fig 18).
- Put the battery bracket back into the remote control (fig 19).
Cleaning and maintenance
Note: Switch off the appliance and unplug it from the power outlet before continuing.
Cleaning the body of the applianceUse a soft, dry cloth to clean the appliance surface, including the air inlet and outlet.Clean particle sensor surface. Do not open particle sensor cover (fig 20).
Cleaning the filter surfaceClean the filter surface with a vacuum cleaner or brush every two weeks.
- Pull the back cover and remove it from the appliance (fig 4).
- Pull the filter from the appliance (fig 21).
- Clean the surface of the filter with a vacuum cleaner (fig 22).
- Put the filter back into the appliance (fig 7).
- Reattach the back cover (fig 8).
- Wash your hands thoroughly after cleaning the filter (fig 23).
Filter replacement
When the filter replacement alert lights up
Note:
- The filter is not washable or reusable.
- Do not smell the filter because it contains air pollutants.
Replace the filter when![]() lights up on the screen (fig 24).
lights up on the screen (fig 24).
- Replace the filter with a Philips filter (FYM220/30). Follow the instructions in the chapter“Installing the filter”.
- Press to switch on the appliance.
- Press and hold the button for 3 seconds to reset the filter replacement time (fig 25). The filter replacement alert disappears from the screen.
- Wash your hands thoroughly after replacing the filter (fig 23).
Before the filter, replacement alert lights upYou can replace the filter before the filter replacement alert (![]() ) lights up. If you do this, you need to reset the filter lifetime counter manually.
) lights up. If you do this, you need to reset the filter lifetime counter manually.
- Unplug the appliance from the power outlet and wait 10 seconds.
- Plug the appliance into the power outlet (fig 26).
- Within 15 seconds after power on, press and hold the button for 3 seconds to resetthe filter lifetime counter. The filter replacement alert blinks once after successfully resetting the filter.
Troubleshooting
This chapter summarizes the most common problems you could encounter with the appliance. If you are unable to solve the problem with the information below, contact the Consumer Care Center in your country.
| Problem | Possible solution |
| The airflow from the air outlet is significantly weaker than before. | • The surface of the filter is dirty. Clean the surface of the filter (see the chapter “Cleaning and maintenance”). |
| The air quality does not improve even though the appliance has been operating for a long time. | • Check whether the packing material is removed from the filter.• Check whether the filter is installed in the appliance.• Clean the sensor cover surface with mop or vacuum cleaner; Do not open sensor cover or touch inside.• Room size is too large, or the outdoor air quality is poor.For optimum purification performance, close the doors and windows when operating the appliance.• There are indoor pollution sources. Examples include cigarette smoke, cooking fumes, incense, perfume, and alcohol.• Filter has reached the end of life. Replace the filter with a new one. |
| The appliance produces a strange smell. | • The first few times you use the appliance, it may produce a plastic smell. This is normal.• If the appliance produces a burning smell, immediately unplug it and turn it upside down to check whether any foreign objects have fallen into the appliance. If nothing is found, please contact your Philips dealer or an authorized Philips service center.• The filter may produce an odor after being used for a while because of the absorption of indoor gases. It’s recommended that you reactivate the filter by putting it in direct sunlight for repeated use. If the odor remains, replace the filter. |
| The appliance is too loud. | • The noise level is higher if you select high speed.• If anything drops into the air outlet, it may also cause abnormal loud sounds. Immediately turn off the appliance and turn it upside down to remove foreign objects.• If there is an abnormal sound, contact the Consumer Care Center in your country. |
| The appliance still indicates that I need to replace a filter, but I already did. | • Perhaps you did not reset the filter lifetime counter. Switch on the appliance. Then press and hold the |
| The heating function is not working. | • Check whether the air inlet or air outlet is blocked.• Check whether the filter surface is excessively dirty and blocking airflow. If so, the heating function may stop working for protection. |
Information requirements for electric local space heaters
Model identifier(s) AMF220
| Item | Symbol | Value | Unit | Item | Unit |
| Heat output | Type of heat input, for electric storage Local space heaters only (select one) | ||||
| Nominal heat output | P nom | 2.1 | kW | manual heat charge control. with integrated thermostat | [no) |
| Minimum heat output (indicative) | P min | 1,2 | kW | manual heat charge control with loom and/or outdoor temperature feedback | [no) |
| Maximum
continuous teat output |
P max, C | 1.8 | kW | electronic heat charge control with room and/or outdoor temperature feedback | Nes] |
| Auxiliary electricity consumption | f an assumed heat output | [no) | |||
| At nominal heat output | el max | N/A | kW | Type of heat output/room temperature control(select one) | |
| At minimum heat output | el min | N/A | kW | single-stage heat output and no room temperature control | (no) |
| In standby mode | el SB | 0 | kW | Two of more manual stages. no room temperature control | [no) |
| with mechanic thermostat room temperature control | [no) | ||||
| with electronic mom temperature control | Ives) | ||||
| electronic room temperature control plus day timer | (no) | ||||
| electronic room temperature control plus week time: | (no) | ||||
| Other control options (multiple selections possible) | |||||
| room temperature control. null presence detection | [no) | ||||
| room temperature control. Nit open window detection | (no) | ||||
| with distance control option | (no) | ||||
| with adaptive start control | (no) | ||||
| with working lime Imitation | (yes) | ||||
| with black bulb sensor | (no) | ||||
| Contact details | Philips Consumer Lifestyle B.V.Building TC, Tussendiepen 4, 9206 AD Drachten, The Netherlands |

© 2021 Koninklijke Philips N.V.All rights reserved.3000 061 49283
References
[xyz-ips snippet=”download-snippet”]