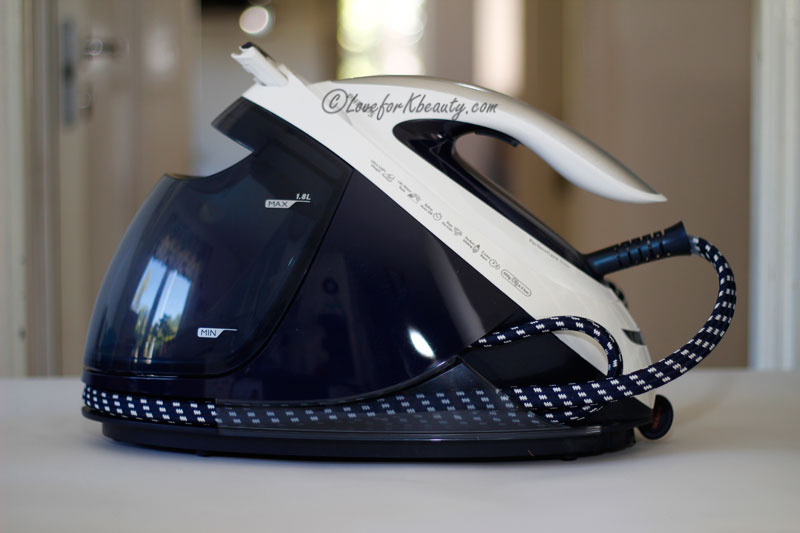
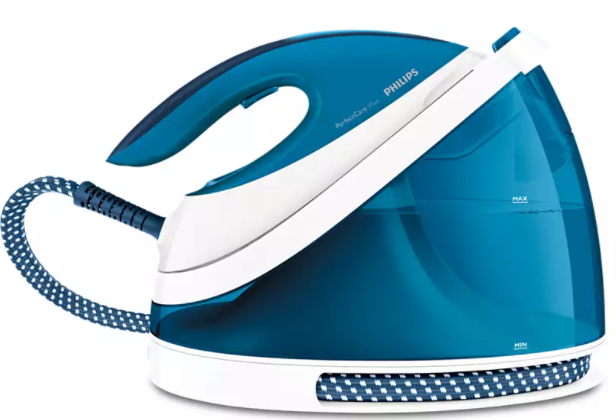
PHILIPS Steam Generator Iron
Introduction
Congratulations on your purchase and welcome to Philips! To fully benefit from the support that Philips offers, register your product at www.philips.com/welcome.This iron has been approved by The Woolmark Company Pty Ltd for the ironing of wool-only products, provided that the garments are ironed according to the instructions on the garment label and those issued by the manufacturer of this iron. R1601. In the United Kingdom, Eire, Hong Kong and India, the Woolmark trademark is a certification trademark.Read this user manual, the important information leaflet, and the quick start guide carefully before you use the appliance. Save them for future reference.
Product Overview
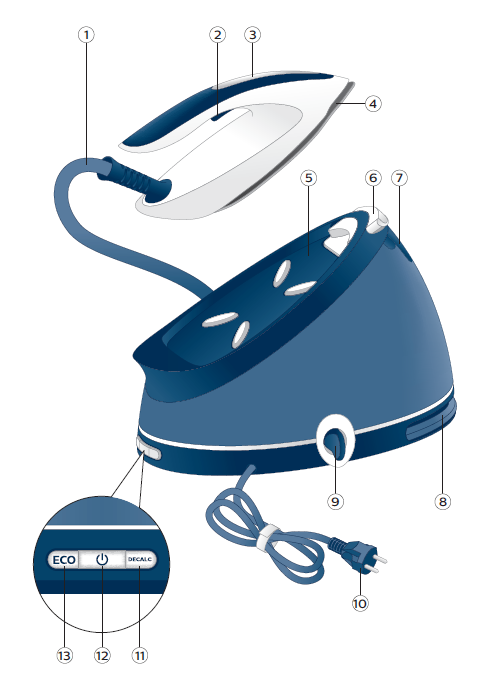
- Steam supply hose
- Steam trigger/Steam boost
- ‘Iron ready’ light
- Soleplate
- Iron platform
- Carry lock release button
- Water tank filling door
- Supply hose storage compartment
- EASY DE-CALC knob
- Mains cord with plug
- DE-CALC light
- On/off button with power-on light and auto-off light
- ECO button with light
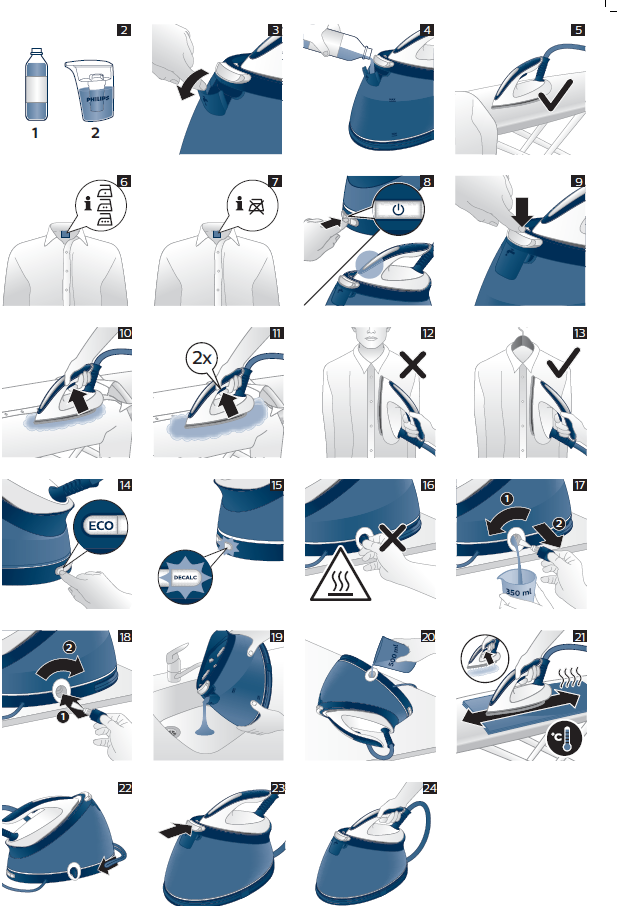
Important: Perform the descaling process regularly for great steam and a prolonged lifetime of the appliance.Recommended water to use: Distilled or demineralized water (Fig. 2) if you live in an area with hard water.
Preparing for use
Type of water to use
This appliance has been designed to be used with tap water. However, if you live in an area with hard water, fast scale build-up may occur. Therefore, it is recommended to use distilled or demineralized water to prolong the lifetime of the appliance.
Filling the water tank
Fill the water tank before every use or when the water level in the water tank drops below the minimum level. You can refill the water tank at any time during use.
- Open the water tank filling door (Fig. 3).
- Fill the water tank up to the MAX indication (Fig. 4).
- Close the water tank filling door (‘click’).
Water tank empty light (specific types only)
When the water tank is almost empty, the ‘iron ready’ light starts to flash (Fig. 5).Fill the water tank and press the steam trigger to let the appliance heat up again. When the ‘iron ready’ light lights up continuously, you can continue steam ironing.
Using the appliance
Optimal Temp technology
Warning: Do not iron non-ironable fabrics.
The Optimal Temp technology enables you to iron all types of ironable fabrics, in any order, without adjusting the iron temperature and without sorting your garments.It is safe to just rest the hot soleplate directly on the ironing board (Fig. 5) without putting back to the iron platform. This will help reduce the stress on your wrist.
- Fabrics with these symbols (Fig. 6) are ironable, for example linen, cotton, polyester, silk, wool, viscose and rayon.
- Fabrics with this symbol (Fig. 7) are not ironable. These fabrics include synthetic fabrics such as Spandex or elastane, Spandex-mixed fabrics and polyolefins (e.g. polypropylene). Prints on garments are not ironable either.
Ironing
- Place the steam generator on a stable and even surface.Note: In order to ensure safe ironing we recommend to always place the base on a stable ironing board.
- Make sure that there is enough water in the water tank (see ‘Filling the water tank’).
- Put the mains plug in an earthed wall socket and press the on/off button to switch on the steam generator. Wait until the ‘iron ready’ light lights up continuously (Fig. 8). This takes approx. 2 minutes.
- Remove the water supply hose from the water supply hose storage compartment.
- Press the carry lock release button to unlock the iron from the iron platform (Fig. 9).
- Press and hold the steam trigger to start ironing (Fig. 10).
- For best ironing results, after ironing with steam, perform the last strokes without steam.
Warning: Never direct steam at people.
For more powerful steam, you can use the turbo steam mode.
- Press and hold the on/off button for 5 seconds until the light turns white.
- The appliance returns to normal steam mode automatically after 15 minutes to save energy.
- Otherwise, to switch back to normal steam mode at any time, press and hold the on/off button for 2 seconds until the light turns blue again.
Steam boost function
Use the steam boost function to remove stubborn creases.
Warning: Hot steam is emitted from the iron. Never attempt to remove wrinkles from a garment while someone is wearing it (Fig. 12). Do not apply steam near your or someone else’s hand.
Safe rest
Resting the iron while rearranging your garmentWhile rearranging your garment, you can rest the iron either on the iron platform or horizontally on the ironing board (Fig. 5). The OptimalTemp technology ensures the soleplate will not damage the ironing board cover.
Cleaning and maintenance
Descaling the appliance
Perform the descaling procedure when the EASY DE-CALC light starts to flash (Fig. 15). This helps to prolong the lifetime of the appliance and optimizes the ironing performance.
Note: If your water is hard, increase the descaling frequency.
Warning: To avoid the risk of burns, unplug the appliance and let it cool down for at least two hours before you perform the descaling procedure (Fig. 16).
Tip: When you perform the descaling procedure, place the appliance on the edge of the table top or near the sink. Water may flow out of the appliance when the EASY DE-CALC knob is being opened.
- Hold a cup (with a capacity of at least 350 ml) under the EASY DE-CALC knob and turn the knob anti-clockwise. Remove the EASY DE-CALC knob and let the water with scale particles flow into the cup. (Fig. 17)
- When no more water comes out of the appliance, reinsert the EASY DE-CALC knob and tighten it
Descaling the soleplate
If you do not descale your appliance regularly, you may see brown stains coming out of the soleplate due to scale particles. Descale the soleplate by following the procedure below. We advise you to perform the procedure twice for better results.
- Make sure the appliance is cool and clean the soleplate with a damp cloth.
- Empty the water tank through the filling door (Fig. 19). Tilt the appliance and remove the EASY DE-CALC knob.
- Pour 500ml distilled water into the DE-CALC opening and tighten the EASY DE-CALC knob (Fig. 20).
- Fill up the water tank halfway. Switch on the appliance and wait for 5 minutes.
- Keep the steam trigger pressed continuously while you iron a few pieces of thick cloth in a back-and-forth motion for 3 minutes (Fig. 21).
- Stop cleaning when no more water comes out of the soleplate or when steam starts coming out of the soleplate.
- Unplug the steam generator and let it cool down for at least two hours. Remove the EASY DE-CALC knob and let the remaining water flow out. Tighten the EASY DE-CALC knob.
Warning: Hot, dirty water (about 100-150 ml) comes out of the soleplate.
Storage
- Switch off the appliance and unplug it.
- Pour the water out of the water tank through the filling door (Fig. 19).
- Fold the supply hose.
- Wind the supply hose inside the supply hose storage compartment (Fig. 22).
- Fold the mains cord and fasten it with the Velcro strip.
- Place the iron on the iron platform and lock it by pushing the carry lock release button (Fig. 23).
- You can carry the appliance with one hand by the handle of the iron when the iron is locked on the iron platform (Fig. 24).
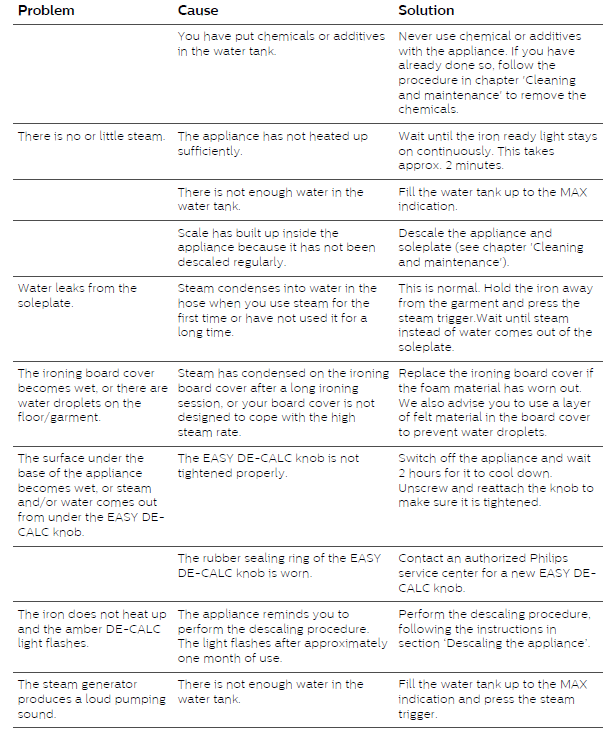
Troubleshooting
This chapter summarizes the most common problems you could encounter with the appliance. If you are unable to solve the problem with the information below, visit www.philips.com/support for a list of frequently asked questions or contact the Consumer Care Center in your country.
Warranty and support
If you need information or support, please visit www.philips.com/support or read the international warranty leaflet.
References
[xyz-ips snippet=”download-snippet”]