![]() Recumbent Cross Trainer OWNER’S MANUAL
Recumbent Cross Trainer OWNER’S MANUAL
 HealthCare International, Inc.PO Box 1509, Langley, WA 98260www.HCIFitness.com360.321.7090
SAFETY PRECAUTIONS
This exercise equipment was designed and built for optimum safety. However, certain precautions apply whenever you operate a piece of exercise equipment. Be sure to read the entire manual before the assembly and operation of this machine.Also, please note the following safety precautions:
- Read all instructions carefully before using the machine.
- Consult your physician or other health care professional before beginning this or any type of exercise program.
- Always wear proper exercise apparel when using the machine.
- If at any time you feel faint, light-headed, or dizzy while operating the machine, stop the exercise immediately. You should also stop exercising if you are experiencing pain or pressure.
- Keep children and pets away from the machine while in use.
- Only one person can use the machine at a time.
- Make sure your machine is correctly assembled before you use it. Be sure all screws, nuts, and bolts are tightened prior to use and retightened periodically.
- Do not operate this or any exercise equipment if it is damaged.
- Keep hands and feet away from any moving parts. Do not insert any objects into any openings.
- Keep clothes, jewelry, or lose items away from moving parts.
NOTE:THE MAXIMUM WEIGHT CAPACITY FOR THE PHYSIO TRAINER CXT IS 300 LBS. (136 KGS)
WARNINGBEFORE BEGINNING ANY EXERCISE PROGRAM CONSULT YOUR PHYSICIAN. THIS IS ESPECIALLY IMPORTANT FOR INDIVIDUALS OVER THE AGE OF 35 OR PEOPLE WITH PRE-EXISTING HEALTH PROBLEMS. READ ALL INSTRUCTIONS BEFORE USING THIS FITNESS EQUIPMENT. WE ASSUME NO RESPONSIBILITY FOR PERSONAL INJURY OR PROPERTY DAMAGE SUSTAINED BY OR THROUGH THE USE OF THIS PRODUCT.
Dear Valued Customer,
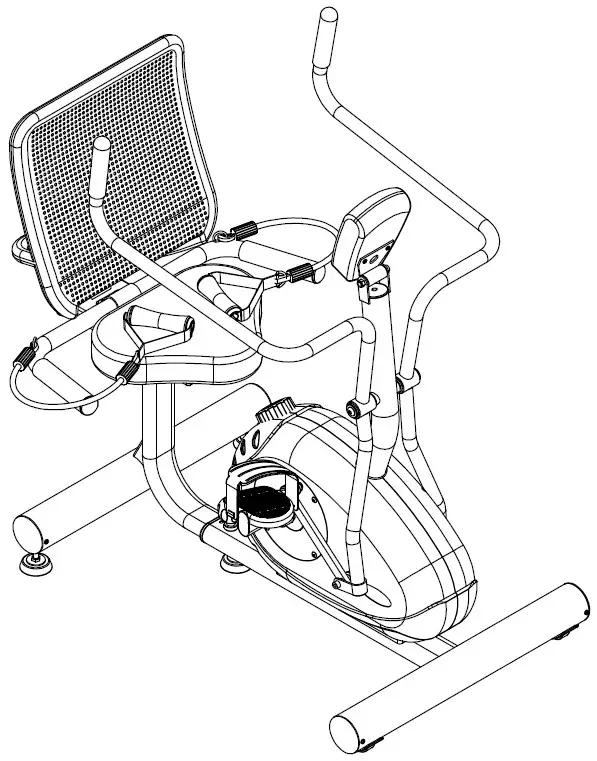
Thank you for your recent purchase of the fully assembled PhysioTrainer CXT Recumbent Cross Trainer from HCI Fitness. We believe that you have purchased one of the highest qualities and Cross Trainers on the market today. We designed the PhysioTrainer CXT to be fun and easy to use for all ages right out of the box! Please review the owner’s manual and product tips to maximize your workout experience.Wishing you the best of luck in reaching your health and fitness goals!
HealthCare International is a leading supplier and distributor of innovative products for Health, Wellness, Fitness & Active Aging. Visit our website – www.HCIFitness.com for information on all of our products.
Warranty Information
(Your Serial Number is found on a white sticker at the rear base of the unit, the front of the user manual, and on the box)Serial #:_________________ Purchase Date:_______________90 Days Frame, 90 Days Moving Parts, 1 Year Non-Moving Parts
Unboxing
Step 1
Take off the top cover of the box and remove the packaging.Step on the lip of the box to flatten the edge so the unit can be wheeled out.
Step 2
Use the seat back handle to lift up the unit.There are wheels on the front of the unit to help you move the PhysioTrainer CXT to your room of choice. Step 3To adjust the seat length: turn the knob to the left and pull up on the knob to release the lock.While holding the knob in the unlocked position, slide the seat out to your preferred setting.Once your seat is in the correct position, you will hear a click. Be sure to lock the seat rail knob by twisting the knob to the right before starting your workout.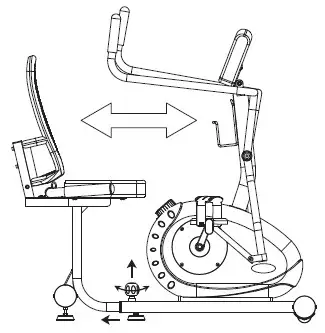 You are now ready to start exercising!
Display Console
SETUP WORKOUT PROGRAMS
Quick Start
- Begin pedaling and the display will start your workout counting upward.
- Press the MODE key to see different workout feedbacks.
- Scan Mode will cycle through all the workout feedbacks.
Exercise for Time:
- Press the MODE key to until the Time Function is indicated.
- Press the SET key to add time to your workout.
- Wait 5 seconds to set your workout time.
- Begin pedaling to start the count down.Press the Reset key to clear the workout time.
Exercise for Distance:
- Press the MODE key to until the Distance Function is indicated.
- Press the SET key to add distance to your workout.
- Wait 5 seconds to set your workout distance.
- Begin pedaling to start the count down.Press the Reset key to clear the workout distance.
Exercise for Distance:
- Press the MODE key until the Distance Function is indicated.
- Press the SET key to add time to your workout.
- Wait 5 seconds to set your workout time.
- Begin pedaling to start the count down.Press the Reset key to clear the workout distance.
Heart-Rate Controlled Exercise:For use with an optional heart rate chest strap. Recommended Model Polar T31
- Check that the Heart symbol is on the top right of the display.
- Press the MODE key to until Pulse Set is indicated.
- Press the SET key to increase the maximum heart rate.
- Wait 5 seconds to set your max heart rate.
- Begin pedaling to start.
- Once the max heart rate is reached, the monitor will beep.
- Reduce speed and resistance to maintain max heartrate
- Press the SET key to increase the max heart rate.Press the Reset key to clear the set heart rate workout.
Change Units:
- Hold the MODE key for 2 seconds.
- Press the SET key to change units. ML = Miles / KM = Kilometers
- Press the MODE key to set the units.
General Maintenance
- Cleaning – Use soap and warm water or antibacterial wipes to clean your unit and pedals.
- Tightening – Periodically inspect your unit to ensure that all screws, nuts, and bolts are tightened and retightened if necessary. Do not overtighten.
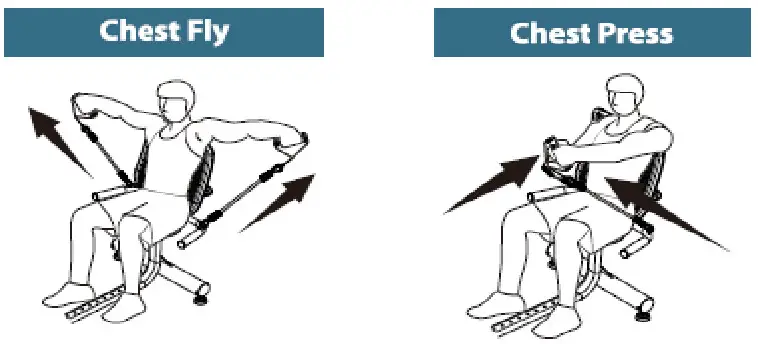
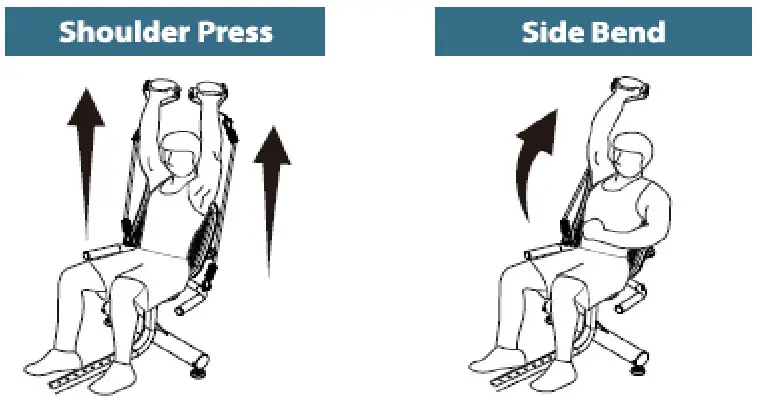
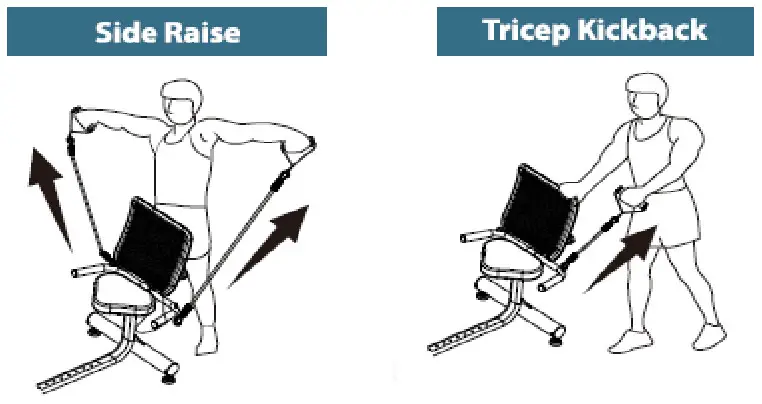
Resistance Band Workouts:
![]()
Resistance Band Workouts
Resistance Safety, Care, and Tips
SAFETY:
- This product is not intended to replace the advice and direction of your healthcare provider. If you have any medical conditions, be sure to check with your healthcare provider before using this product.
- WARNING: IMPROPER USE OF THE RESISTANCE BANDS MAY CAUSE SERIOUS PHYSICALINJURY. Use only as directed by your healthcare provider.
- By continuing the use of RESISTANCE BANDS exercises with your RESISTANCE BANDS product, you assume any and all risk. Please follow all instructions listed below to lessen your risk of injury.
- This product is not a toy and should not be used without adult supervision. Do not chew or allowothers (including pets) in your household to chew on this product. Consult your physician beforeallowing children to exercise.
- Always examine RESISTANCE BANDS before use for nicks, small tears, and punctures or for peeling at each seal that may cause the product to break paying close attention to areas where the product has been attached, wrapped, or secured to an anchoring device. If you find any flaws upon examination, discard the product and replace it before performing any exercises.
- Do not use this product in any manner that may cause them to snap towards the head and cause injury to the eyes. Always wear suitable eye protection during use.
- Remove rings, watches, or other jewelry before using. Beware of long, sharp fingernails or any other objects on the floor or under your shoe that could puncture the product.
- Ensure that the product is securely fitted and/or anchored to accessories, and around the feet when applicable, during use. When holding inside the loop, always hold the seal versus the center of the loop for optimal safety.
- Be sure to use this product in an area free from obstructions that could cause an entanglement that could result in serious injury.
- Do not stretch the product more than 2 times its resting length. This includes each loop individually and/or combined. Over-elongating the product could result in serious injury.
- Do not use this product as a suspension device or while performing bodyweight training exercises that rely on the product to hold your body weight suspended in the air, these are not intended uses and could result in serious injury.
CARE:
- Store product in a box or hang in a dark area. DO NOT expose to direct sunlight or direct heat.
- Remove rings, watches, or other jewelry before using. Beware of long, sharp fingernails or any other objects on the floor or under your shoe that could puncture the product.
- Clean with mild soap and water, dry flat.
Exploded Diagram
report this ad
Parts List
| NO. | Description | Q’ty | NO. | Description | Q’ty |
| 1 | Main Frame | 1 | 39 | Handle Sponge | 2 |
| 2 | Seat | 1 | 40 | Roller | 2 |
| 3 | Dual Action Handle Bar(L) | 1 | 41 | “+” Screw (M4*8L) | 4 |
| 4 | Dual Action Handle Bar(R) | 1 | 42 | Tube 40×80 | 1 |
| 5 | Pedal Foot | 2 | 43 | Plastic Cover | 4 |
| 6 | Back Seat Support | 1 | 44 | “+” Screw ST4x20L | 8 |
| 7 | Seat Handle | 1 | 45 | Rest Leg- 3/8x25L | 3 |
| 8 | Idler Set | 1 | 46 | Knob M16xP1.5x25L | 1 |
| 9 | Idler | 2 | 47 | Bottle holder | 1 |
| 10 | Bearing 6000zz | 2 | 48 | “+” Screw M5x15L | 2 |
| 11 | R-ring R-28 | 4 | 49 | Saddle | 1 |
| 12 | Washer | 2 | 50 | Back Seat | 1 |
| 13 | Screw Round M6xP1.0x10L | 2 | 51 | Screw Round 1/4-20×1 3/4L | 4 |
| 14 | Magnetic Flywheel | 1 | 52 | Washer | 8 |
| 15 | Adjustment Bolt | 2 | 53 | Hexagonal Bolt M6x15L | 4 |
| 16 | Nut 3/8-26x5T | 3 | 54 | Hexagonal Bolt M8x15L | 8 |
| 17 | Pedal Axle | 1 | 55 | Plastic Cover | 2 |
| 18 | Pulley | 1 | 56 | Handle Sponge | 2 |
| 19 | Belt 340-6J | 1 | 57 | Plastic Cover | 1 |
| 20 | Hexagonal Bolt M6x15L | 4 | 58 | Latex Tube | 1 |
| 21 | Nylon Nut M6 | 4 | 59 | Chain Cover(L) | 1 |
| 22 | Bearing 6004zz | 2 | 60 | Chain Cover(R) | 1 |
| 23 | Crank(L) | 1 | 61 | Acrylic Cover | 2 |
| 24 | Crank(R) | 1 | 62 | Plastic Cover | 2 |
| 25 | Screw M8-P1.25x25L | 2 | 63 | “+” Screw ST4x12L | 8 |
| 26 | Pedal(L) | 1 | 64 | “+” Screw ST4.5(3/16)x30L | 6 |
| 27 | Pedal(R) | 1 | 65 | Computer Post | 1 |
| 28 | Magnet | 1 | 66 | Hexagonal Bolt M8x70L | 1 |
| 29 | Nut 3/8-26x3T | 1 | 67 | Nylon nut M8 | 1 |
| 30 | Bushing | 2 | 68 | Computer | 1 |
| 31 | Wahser | 4 | 69 | “+” Screw ST3x10L | 2 |
| 32 | Bushing 1620-10 | 2 | 70 | Tension Knob | 1 |
| 33 | Bushing 0810-05 | 4 | 71 | Hexagonal Bolt M5x12L | 1 |
| 34 | Nylon Nut M8 | 2 | 72 | Sensor+Wire | 1 |
| 35 | Hexagonal Bolt M8x40L | 2 | 73 | Plastic Cover | 1 |
| 36 | Bushing JFM1622-15 | 4 | 74 | Nut Cover | 1 |
| 37 | Washer | 2 | 75 | Wave Washer | 2 |
| 38 | Hexagonal Bolt M8x15L | 2 |
References
[xyz-ips snippet=”download-snippet”]