
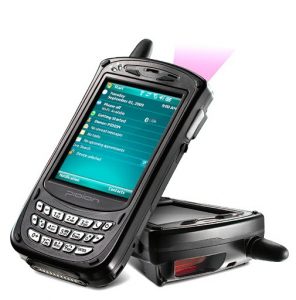
Pidion BIP-5000 Handheld Configuration Manual
Overview
This document includes configuration information related to features available with the purchase of the Pidion BIP-5000 handheld and its expansion modules. This will also reference the BIP-5000 User Manual.
Model Variations (All with 824 Mhz Processor, 128Mb RAM, and Windows Mobile 6.1 Pro):
- MG-1: Bluetooth, IrDA, WiFi, 1D Scanner, Camera, GPS
- MG-2: GPRS, Bluetooth, IrDA, WiFi, 1D Scanner, Camera, GPS
- MG-4: GPRS, Bluetooth, IrDA, WiFi, 1D Scanner, GPS
- MG-6: GPRS, Bluetooth, IrDA, WiFi, Camera, GPS
Introduction
Use this document for help on the following options:
- Installing the Route Manager Shortcut
- Resetting the Device
- Wireless GPRS connection
- GPS Configuration
- BarCode Scanning Setup
If you are not sure which features are available with your handheld, please contact your reseller or ARS.
Installing Route Manager
This handheld is loaded with the standard, Windows Mobile 6.1 Operating System. Setting up the Route Manager shortcut uses the same method documented in Appendix A of the standard RM Handheld User Guide.
The Handheld Device Type/Program to use in Prepare Data Card and Handheld class is the Standard “ARM WiFi” device option.
NOTE: Please refer to the Handheld User Guide for more instructions on preparing a card and creating the shortcut to RM. You can find the manual on www.ARS247.com or contact ARS Support.
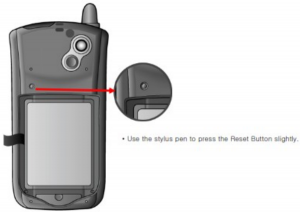
Resetting the Device
Warm Boot
A standard reset can be performed by pressing the tip of the stylus against the “Reset” button located on the back of the handheld, above the battery door:
Cold Boot/Hard Reset
A “Hard” reset (restores handheld to factory specs, removes all software installed, settings, etc) can be performed by pressing the “Reset” button along with the “telephone” button on the keyboard at the same time. Hold down the telephone button until the Pidion boot screen shows.
GPRS Configuration (Cingular/AT&T)
A wireless GPRS connection is required if you will be using wireless data transfers from a remote location. This type of transfer is typically used with the Advanced Communications and RMLive Modules in RMA.
Note: Not all handhelds include GPRS functionality. If you are not sure which features are available with your handheld, please contact your reseller or ARS.
Follow the steps below to successfully configure your handheld for GPRS transfer.
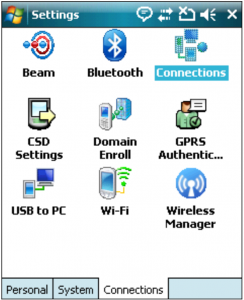
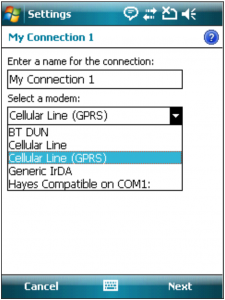
- On the handheld, navigate to Settings > Connections and tap on Connections.

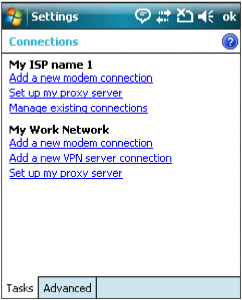
- Tap Add a new modem connection.
- Select Cellular Line (GPRS) and tap Next.NOTE: Enter a unique name for the connection, if desired.
- In the Access point name field, enter: wap.cingular (case sensitive).
- Enter the following information in the Username and Password fields:User name: (all caps)Password: CINGULAR1 (all caps)Domain: Leave blankClick Finish to save the connection settings.Your Pidion BIP-5000 is now configured for wireless GPRS transfers.
- Confirm it is ready by confirming WiFi is disabled, thenlaunching Internet Explorer and opening a website (suchas msn.com).
 NOTE: Enter a unique name for the connection, if desired.
 Your Pidion BIP-5000 is now configured for wireless GPRS transfers.
GPS Logging
The Pidion BIP-5000 handheld also has the capability of capturing GPS Coordinates (by stop) or logging the drivers GPS coordinates throughout the day (for review later).
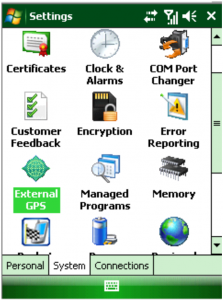
The handhelds doesn’t have any defaults set. But the following options should work: COM Port 8, and the Baud Rate is 19200. You can input these settings by going to Start > Settings > System Tab and then choosing the External GPS option:
 Select the Hardware option on the bottom of the screen. Input COM8 and 19200:
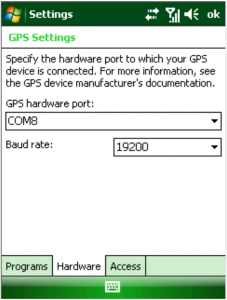 These settings will need to be matched in the Handheld Class settings located in Route Manager:
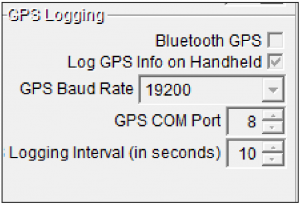
BarCode Scanner Setup
The handheld may also has the capability of scanning BarCodes to ease the driver input of products sold to customer, loading the truck, etc.
The following instructions will assist you with setting up the handheld to have the ability to scan BarCodes.
BarCode Scanner Configuration
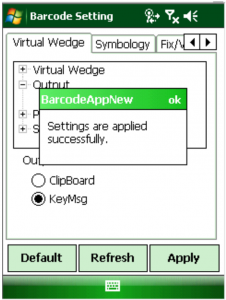
After starting the program, or confirming its running, we will need to verify the Scanner is set to be used as a “Keyboard Wedge” style scanner. This is checked by:
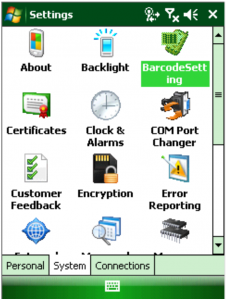
- Go to Start > Settings > System Tab > and click on the “BarCodeSetting” program
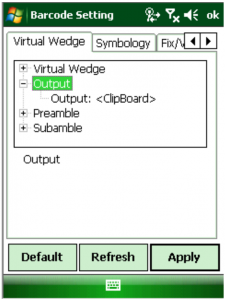
- Choose the the [+] button next to “Output”
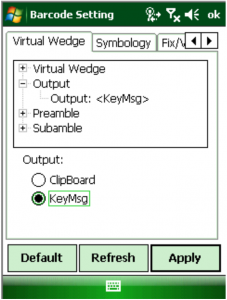
- Then select the “OutPut: option, and choose the “KeyMsg” option at the bottom of the screen:
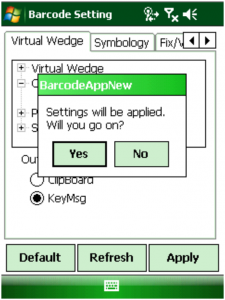
- Next, select the “Apply” button at the bottom of the screen to save the changes.
- Select YES to the apply changes prompt:
- Choose OK on the confirmation prompt:
- Select the OK button in the upper right corner to close the BarCode Settings program and complete the setup process:

Testing the Scanner
After changing the BarCode scanner software so the Output mode is on Key Msg, we can do a quick test to confirm the scanner is functioning:
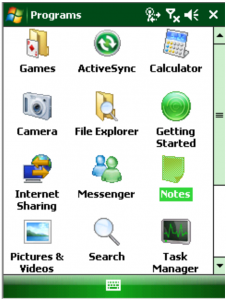
- Click on the Start Menu > Programs and choose the program for “Notes”:
- Choose the “New” option on the bottom left of the screen:
- This will then launch us into a blank note entry screen:
- Now, Scan something with a BarCode to see the results (use either of the grey buttons on the sides of the handheld):Note: This will tell us the actual BarCode read by the handheld.
- Once completed, you can choose the “OK” buttons on the top right of the screen to close out of the Notes program.Route Manager Product Configuration
The BarCode scanned in Step 4 above needs to be input in your Route Manager settings for each product on the Handheld tab, in List > Products > Product Charge Codes, within the “Product UPC Code” field.


 Note: This will tell us the actual BarCode read by the handheld.
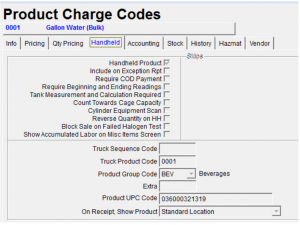
Pidion BIP-5000 Handheld Configuration Manual – Pidion BIP-5000 Handheld Configuration Manual –
[xyz-ips snippet=”download-snippet”]