![]()
Madone/Madone-MUser Guide
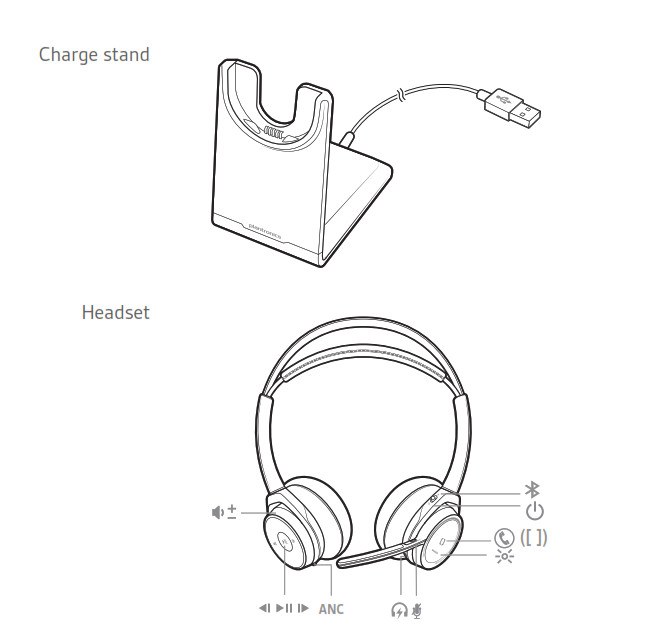
Overview
 |
Volume up/down |
| Track backward | |
 |
Play/pause music |
| Track forward | |
| ANC | Active noise cancelling |
 |
Charge port |
 |
Active call = mute/unmute, call waiting (softphone only). Idle = open mic |
 |
Headset LEDs |
| Call button ([ ]) | |
 |
Power button |
| Bluetooth pair button | |
| USB LEDs | What they mean |
| Red and blue flashes | Pairing |
| Solid Blue | Pairing successful; Connected |
| Blue flashes | On a call |
| Solid red | Mute active |
| Purple flashes | Streaming music/media from computer |
Connect and pair
- Connect to PC
- Your Bluetooth USB adapter comes pre-paired to your headset.1 Insert the Bluetooth USB adapter into your laptop or PC (not docking station).
 2 Headset call control Some softphones require downloading Plantronics Hub for Windows and Mac at plantronics.com/software for headset button functionality.NOTE Plantronics Hub software allows you to customize your headset’s behavior through advanced settings and options.
- Your Bluetooth USB adapter comes pre-paired to your headset.1 Insert the Bluetooth USB adapter into your laptop or PC (not docking station).
- Pair your headset1 To put your headset in pair mode, press and hold the power button towards the Bluetooth icon until you hear “pairing” and the headset LEDs flash red and blue.2 Activate Bluetooth on your phone and set it to search for new devices.• iPhone Settings > Bluetooth > On*• Android Settings > On > Scan for devices*NOTE *Menus may vary by device.3 Select “PLT_Madone.”If necessary, enter four zeros (0000) for the passcode or accept the connection.Once successfully paired, you hear “pairing successful” and the headset LEDs stop flashing.NOTE Your headset can pair with up to 8 devices but only maintain 2 connections simultaneously; this includes the Bluetooth USB adapter.
 2 Headset call control Some softphones require downloading Plantronics Hub for Windows and Mac at plantronics.com/software for headset button functionality.NOTE Plantronics Hub software allows you to customize your headset’s behavior through advanced settings and options.
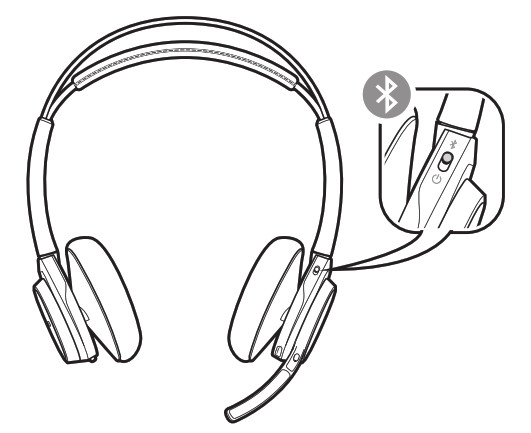 2 Activate Bluetooth on your phone and set it to search for new devices.• iPhone Settings > Bluetooth > On*• Android Settings > On > Scan for devices*NOTE *Menus may vary by device.3 Select “PLT_Madone.”If necessary, enter four zeros (0000) for the passcode or accept the connection.Once successfully paired, you hear “pairing successful” and the headset LEDs stop flashing.NOTE Your headset can pair with up to 8 devices but only maintain 2 connections simultaneously; this includes the Bluetooth USB adapter.
Fit and charge
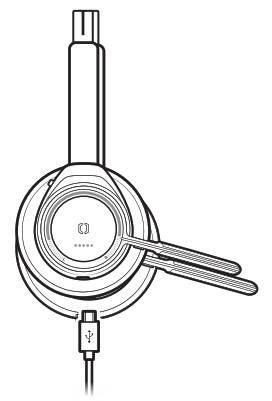
Right or leftTo position the microphone on the right or left side, rotate the microphone boom up and over. Adjust the boom so it points to the corner of your mouth.
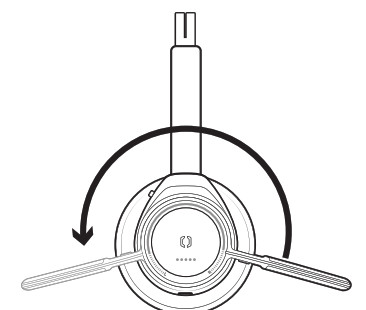
TIP Your headset is smart enough to know what side you are wearing it on and all headset controls including L/R audio channels will switch with your boom side preference.
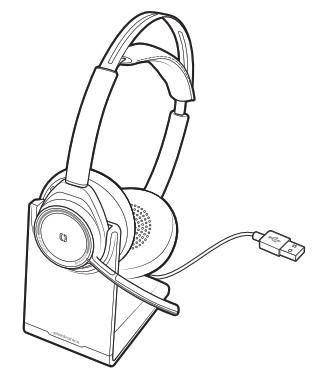
Charge your headsetCharge your headset with the charge stand or the micro USB cable. Choose:• Charge stand
• Micro USB cable
The headset LEDs flash when charging. It takes up to 2 hours to fully charge your headset. The LEDs turn off once charging is complete.
Load software
Some softphones require downloading Plantronics Hub for Windows and Mac for headset button functionality.Load Plantronics Hub for Windows and Mac by visiting plantronics.com/software.
Customize your headsetManage your headset settings by downloading Plantronics Hub for Windows and Mac on your computer or Plantronics Hub for iOS and Android on your phone by visitingplantronics.com/software.
| Plantronics Hub | iOs and Android | Windows and Mac |
| Turn features on/off | X | X |
| Change headset language | X | |
| Update firmware | X | |
| Customize headset settings | X | X |
| View user guide | X |
The Basics

Make/Take/End Calls
Answer or end a callTap the Call ![]() button.
button.
Answer a second callFirst, tap the Call ![]() button to end current call, then tap the Call
button to end current call, then tap the Call ![]() button again to answer new call.Call back last call (smartphone)To dial your last number you dialed, double-tap the Call
button again to answer new call.Call back last call (smartphone)To dial your last number you dialed, double-tap the Call![]() button.
button.
Voice dial (smartphone)If your smartphone has a voice-enabled assistant, press and hold the Call ![]() button for 3 seconds and wait for the phone prompt.
button for 3 seconds and wait for the phone prompt.
Mute/unmute
While on an active call, choose:• Tap the red Mute button• Take off/put on your headset while on an active call (active smart sensors)Mute on reminder*If you have muted an active call and you start to speak, a voice prompt or toast reminds you that you are on mute. Manage your mute settings and mute alerts by downloading Plantronics Hub for Windows and Mac at plantronics.com/software.NOTE *Plantronics Hub for Windows and Mac required. Download at plantronics.com/software Hear your surroundingsTap the red Mute button while not on a call to hear your surroundings.
Volume
Rotate the volume wheel ![]() forward (+) or backward (–) to control the volume.
forward (+) or backward (–) to control the volume.
Play or pause music
Tap the Audio ![]() button.NOTE With smart sensors active, taking off the headset will pause music and putting them on will resume it.
button.NOTE With smart sensors active, taking off the headset will pause music and putting them on will resume it.
Track selection
Tap the Forward button ![]() or Back button
or Back button![]() to control the track selection.
to control the track selection.
Use sensors
Smart sensors respond when you put on or take off your headphones.
| With active sensors | putting on the headset will: | taking off the headset will: |
| Call | answer the call | mute the headset |
| Music/media | resume music/media (if playingprevious to taking off) | pause music/media (if playing) |
| Mute | unmute if on an active call | mute if on an active call |
Disable sensorsTo disable the sensors, hold both the Mute and Call buttons for more than 6 seconds until the LED flashes purple then red. Repeat to reactivate; the LED flashes purple than blue.Reset sensorsYou may need to reset the sensors if they are not working as expected.To reset the sensors, charge your headset on the charge stand for 10 seconds.
ANC
Active Noise Cancelling (ANC) reduces unwanted noise.Slide the switch towards ANC to activate.
More Features
DeepSleep Mode
If you leave your headphones powered on but out of range of your paired phone for more than 7 days, your headset conserves its battery power by entering into DeepSleep mode.Once back in range with your phone, press the Call control ![]() button to exit DeepSleep mode.
button to exit DeepSleep mode.
Pair multiple devices
Your headset can pair with up to 8 devices but only maintain 2 connections simultaneously; this includes the Bluetooth USB adapter.If you choose to pair multiple devices and want to switch devices, manually disconnect a device from the Bluetooth settings menu to allow the headset to connect to a third paired device.Answer calls from a second deviceIt’s easy to answer calls from two devices (including PC softphone).When on a call, you hear a ringtone notification of the incoming call from the second paired device.To answer a second call from the other device, end the current call (tap Call button) so the new call automatically answers.If you choose to not answer the second call, it will go to voicemail.
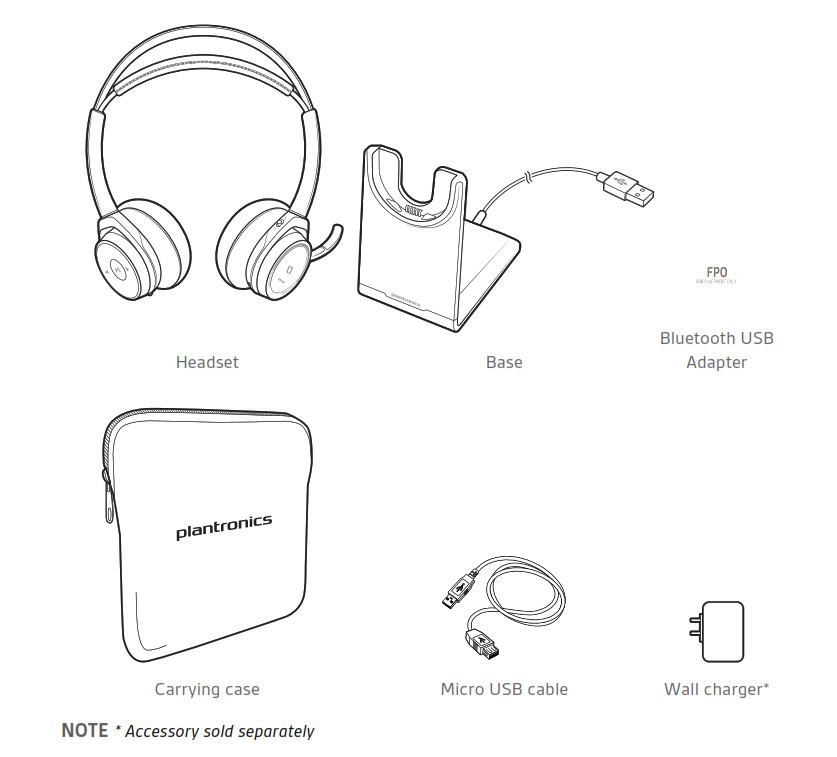
What’s in the box
FCC statement
- This device complies with part 15 of the FCC Rules. Operation is subject to the following two conditions: (1) This device may not cause harmful interference, and (2) this device must accept any interference received, including interference that may cause undesired operation.
- These limits are designed to provide reasonable protection against harmful interference in a residential installation. This equipment generates, uses, and can radiate radio frequency energy and, if not installed and used in accordance with the instructions, may cause harmful interference to radio communications.However, there is no guarantee that interference will not occur in a particular installation.
- If this equipment does cause harmful interference to radio or television reception, which can be determined by turning the equipment off and on, the user is encouraged to try to correct the interference by one or more of the following measures:—Reorient or relocate the receiving antenna.—Increase the separation between the equipment and receiver.—Connect the equipment into an outlet on a circuit different from that to which the receiver is connected.—Consult the dealer or an experienced radio/TV technician for help.
RF exposure warning
This equipment complies with FCC radiation exposure limits set forth for an uncontrolled environment. The equipment must not be co-located or operating in conjunction with any other antenna or transmitter.The measured SAR levels evaluated are in compliance with the FCC RF exposure guidelines.
NOTE: THE GRANTEE IS NOT RESPONSIBLE FOR ANY CHANGES OR MODIFICATIONS NOT EXPRESSLY APPROVED BY THE PARTY RESPONSIBLE FOR COMPLIANCE. SUCH MODIFICATIONS COULD VOID THE USER’S AUTHORITY TO OPERATE THE EQUIPMENT.
IC Radiation Exposure Statement for Canada
This device complies with Industry Canada licence-exempt RSS standard(s). Operation is subject to the following two conditions: (1) this device may not cause interference, and (2) this device must accept any interference, including interference that may cause undesired operation of the device.
Support
NEED MORE HELP?plantronics.com/support
![]() Plantronics, Inc.345 Encinal StreetSanta Cruz, CA 95060United States
Plantronics, Inc.345 Encinal StreetSanta Cruz, CA 95060United States
Plantronics BVSouth Point Building CScorpius 1402132 LR Hoofddorp, Netherlands
© 2014 Plantronics, Inc. Plantronics and Simply Smarter Communications are trademarks of Plantronics, Inc., registered in the US and other countries.Bluetooth is a registered trademark of Bluetooth SIG, Inc. and any use by Plantronics is under license. All other trademarks are the property of their respective owners.Patents pending.XXXXXX-06 (11.14)
Plantronics Stereo Bluetooth Headset User Guide – Plantronics Stereo Bluetooth Headset User Guide –
[xyz-ips snippet=”download-snippet”]