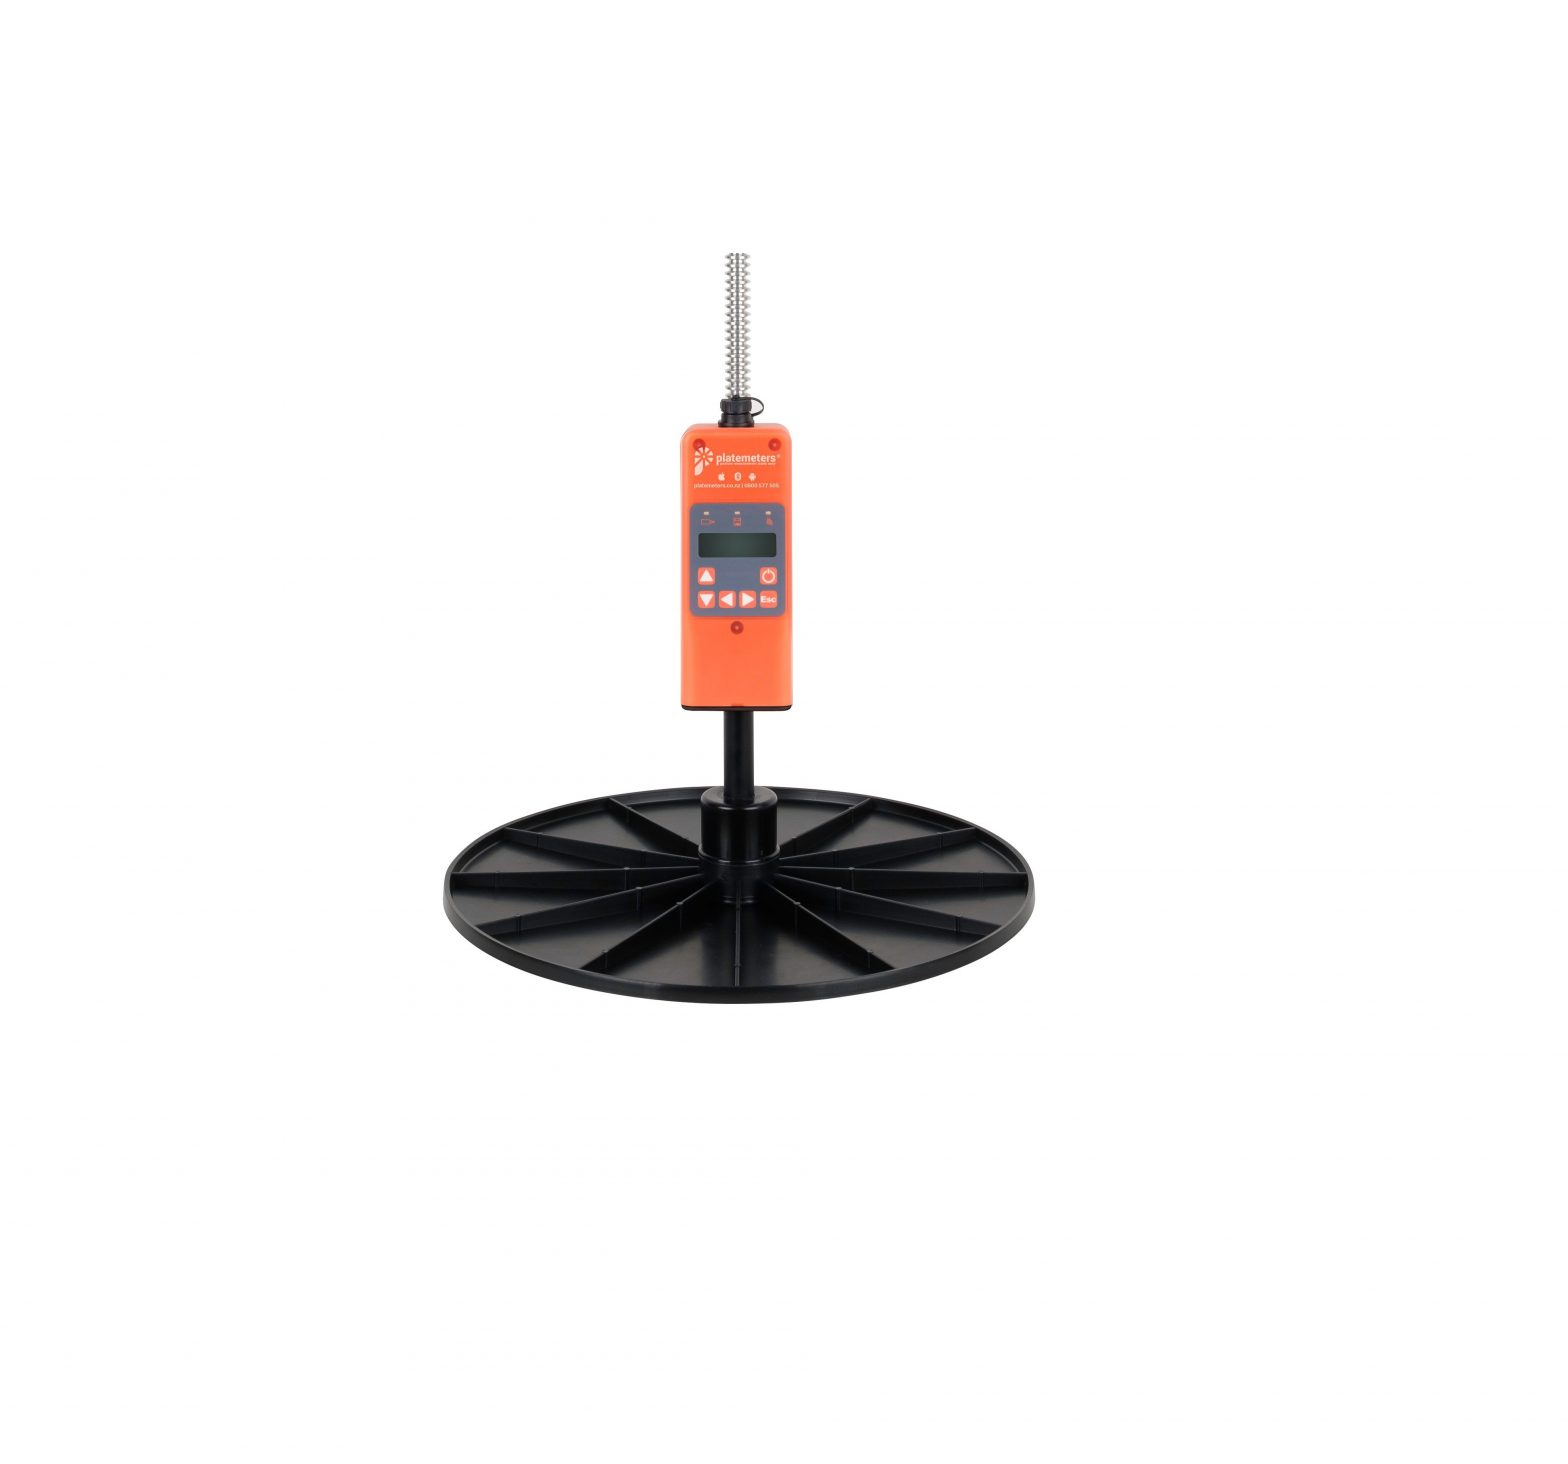
G1000 Bluetooth Platemeter
Thank you for choosing the G1000 Bluetooth Platemeter.The G1000 electronic rising Platemeter provides farmers with an easy, accurate and reliable way to measure and record pasture health and share that information.Getting started is easy
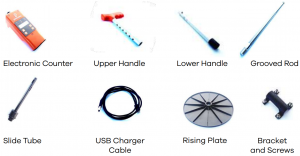
What’s Included
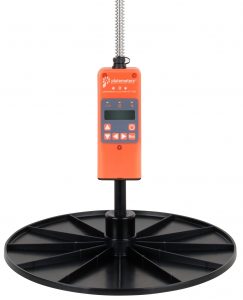
Your Platemeter
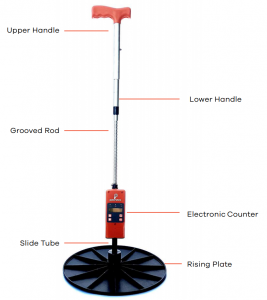
Assembling the Platemeter
Your G1000 Platemeter will come pre-assembled and only requires two steps to be ready for use:
- Attach the Lower Handle to the grooved rod by screwing the two parts together.
- Attach the plastic plate to the bottom of the slide tube by screwing to the thread at the base of the slide tube.
NOTE: Under no circumstances should you ever apply any type of light oil, or lubrication to the platemeter. It is a dry bearing system and any lubricant may damage the platemeter and avoid your warranty.
Platemeter Hardware Basics
Turning the platemeter on and offTo turn the platemeter on, firmly press the power button. ![]() To turn the unit off (at any time) press and hold the power button until the device switches off, which takes about (around three seconds).
To turn the unit off (at any time) press and hold the power button until the device switches off, which takes about (around three seconds).
Navigating menusThis platemeter comes with three inbuilt menu functions. Use the ![]()
![]() arrow buttons to scroll through menu options. Here Below are descriptions of each menu option:
arrow buttons to scroll through menu options. Here Below are descriptions of each menu option:
- BluetoothThis menu option allows you to connect the platemeter to your smartphone or tablet. When the platemeter is turned on, it will automatically start searching for a smartphone that is running the platemeter app.
- Manual measureThe manual measure option allows you to use your platemeter without the app. You can are able to take pasture measurements and the platemeter will calculate your dry-matter.
- CalibrateThe calibrate option enables you to fine-tune the mechanical components of the platemeter if any of the components lose accuracy. Calibrating resets the mechanical components, (in a similar like the way to taring reset scales.).
Downloading the App
For the best experience using your G1000 platemeter, download the Platemeter app for your smartphone by visiting our website www.platemeters.co.nz or by searching for “Platemeters” in the Apple Store or in Google Play.
The app is designed to be simple and intuitive, however if you need any help with the app further is available on the our web site.


Calibrating your Platemeter
The G1000 platemeter uses mechanical parts to take pasture measurement readings. Your new platemeter comes precalibrated so that you can begin using it straight away. However, with regular use of the platemeter some parts can become untuned. If the device does become untuned, the Platemeter may display an error message.
Calibration error messages
“Waiting for platemeter to return to 0 height”This message is displayed when the plate has not fully returned to the base of the grooved rod.
“–ve height, Re-calibrate” / Meter Height = (negative height)This message is displayed when the device detects a measurement below zero. This can occur if the plate is not properly screwed on or if the platemeter has jumped a groove
Calibration solutions
Try the below solutions to get your platemeter calibrated properly.Remove sediment build-up between plate and base of grooved rodRemove any dirt, grass, or other sediment that is preventing the plate from sliding completely to the base of the grooved rod. Any materials preventing the plate from sliding can cause this error message to display
Use the in-built calibration option
- Power on the device and ensure that the plate is at the base of the grooved rod.
- Use the arrow buttons to navigate to 3-Calibrate and press
 to enter.
 - This screen will display the height measurement offset in millimeters. Ideally the offset should read zero, in which case you are fully calibrated. If the reading is not zero, ensure the plate is still at the base of the grooved rod and press to confirm. This will reset the height measurement to zero.
- Press to exit the calibration menu and you are ready to go.
Manually adjust the cog on the back of platemeter counterIf the above methods are unsuccessful, you can manually adjust the cog on the back of the platemeter counter using a flathead screwdriver (or a thin knife, wire, or other sturdy driving tool)
- Lay the platemeter face-down on a table or bench and ensure the plate is positioned firmly at the base of the grooved rod.
- Using a flathead screwdriver (or similar tool) firmly but gently wind the metal cog fitting anti-clockwise. The metal fitting should move while the gear stays still in position.
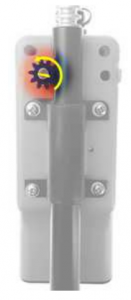
Important: Be careful not to over-wind the metal cog fitting. Over winding can damage the unit. Use a firm but gentle amount of force to wind the fitting anti-clockwise.
For more information about calibrating your platemeter visit: platemeters.co.nz
The Platemeter App
Getting started
The platemeter app enables you to record pasture readings directly into your smartphone via Bluetooth. With the app downloaded on your device, you will need to complete the following to get started.
Create a farm
The first time you open the app, you will need to create a new farm. Select and follow the on-screen instructions. You will need to enter:
A farm name – the name of the farm that you wish to measure pasture for. You may create multiple farms in the app if you own or manage more than one physical farm.
A dry matter equation – grass grows at different rates depending on your region and also the seasonal time of year. The equation uses height measurements to calculate the kilograms of dry matter per hectare (kg DM/ha) in your paddocks. If you are unsure of which equation to use, wWe recommend using the “DairyNZ default for New Zealand”.
For more information about the formulas used in the App, visit platemeters.co.nz
The stock count – The number of active stock that will be grazing the farm. The stock count is used to establish feed targets based on the average consumption of dry-matter per stock unit. This allows you to track feed surplus/deficit within the app reporting feature. The stock count can be changed at any time to adjust for future changes.Daily consumption rate per animal – The target Dry matter consumption per animal. Input the peak consumption rate however, this can be adjusted per walk to reflect changing requirements throughout the season. This is used in conjunction with the stock count to determine the feed demand line.Rotation days – Average rotation length for the season, can be adjusted per walk.Residual – The target residual feed in the paddock post grazing, can be adjusted per walk. Used to calculate the available feed on hand.
Create paddocks
With a new farm created in the app, you will need to add paddocks. Select and follow the on-screen instructions. For each paddock you will need to enter:
A paddock name – the paddock name or number (e.g. RIDGE 1 or 24)Paddock area – the area of the paddock in hectares. The paddock area is used to calculate your feed wedge so accuracy is important. We recommend land-area accuracy of two-decimal places (e.g. 1.97 ha)
Once you have filled in the required fields, tap select ![]() to add the paddock to your paddock list, or
to add the paddock to your paddock list, or ![]() to cancel.
to cancel.
Create additional paddocks by selecting ![]() and repeat until you are finished adding paddocks to the farm. When finished, select the back button
and repeat until you are finished adding paddocks to the farm. When finished, select the back button ![]() to return to the main farm menu.
to return to the main farm menu.
Note: if you need an accurate map of your farm we recommend www.gpsit.co.nz for highly accurate aerial farm maps that can be used for operations planning, health and safety and fertiliser management.
Connecting to the Platemeter
Follow the instructions below to pair the platemeter with your smartphone via Bluetooth.Please note; anytime the counter or your phone powers off the Bluetooth connection will be lost and you will need to reconnect your phone with the platemeter
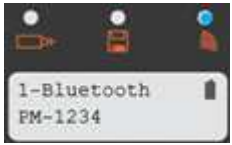
- Turn on your platemeter by pressing . The platemeter will begin searching for a Bluetooth enabled smartphone to connect to. You will notice a blue LED light blinking slowly on the screen while the platemeter searches.
- Take note of the unique Bluetooth name for your platemeter. This is displayed on the platemeter screen while the blue light is blinking. For example: “PM-1234”.
- On your smartphone open the Platemeters app and select the button to start a new pasture-walk.
- Follow the on-screen instructions to continue through the connection process.
Note: You need to Carry your device phone with you on the walk. If the Bluetooth connection is lost during the pasture-walk the App and the device or phone will sound a long tone and you will need to resolve this by reconnecting before continuing the walk. The most likely cause is that your device (phone or tablet) is out of Bluetooth range of the platemeter.
Help: If you have any connection issues check that the Bluetooth receiver on your device is switched on (i.e. not in “flight mode”) or see www.platemeters.co.nz for more information on connecting.
Conducting a pasture-walk
A pasture-walk is the term we use to describe when we are out using the platemeter to collect pasture measurements.
Whether walking the whole farm or an individual paddock the pasture-walk is the basis of the Platemeter App.
- From the main farm menu, tap select to start a new pasture-walk
- Confirm the following details:Name of person taking measurements – this field acknowledges records the person who actually conducted the pasture walk.Stock count – number of active stock on the farmDaily consumption rate – the kg/DM consumed by each animal dailyRotation Days – the number of days in your grazing rotation scheduleResidual – the current target residual in kg/DM Tick ‘Save Farm Settings for future Use’ if you have changed any options and want them saved for next time.
- Select NEXT to continue and you will see the reminder to calibrate. The app will then display your list of paddocks. Connect your platemeter. Select a paddock in the list to start a pasture-walk for that paddock.
- Begin your pasture-walk and be sure to collect a minimum of 30 measurements per paddock.
- Once 30 or more measurements have been taken, select the back button to return to the paddock list.
- On the paddock list, select the next paddock that you would like to start a pasture-walk for.
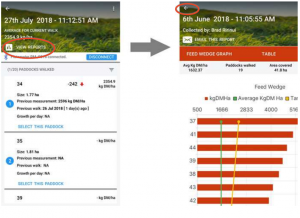
- When you have completed pasture-walks for the farm, select to take you to the reports page. Here you can see your pasture data displayed as a graph and data table.From here you can export the report using the button.
Viewing a report
During a pasture walk you can see the live report via the “VIEW REPORTS” button. You can export the reports and send them via email to the team. Try out these features below.
Using the Platemeter without the Apps
The platemeter can be used to capture pasture data without the app using the inbuilt display to observe show pasture readings.This is useful if you do not have a mobile phone, or if you prefer manually noting down measurements to be used at a later time.
- Turn on platemeter by pressing
- Using the arrow buttons, navigate to 2- Manual Measure
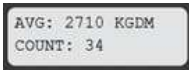
- Press to enter. The screen will display the following:AVG – The average dry-matter of the paddock in KGDM/Ha (kilograms of dry-matter per hectare)COUNT – The number of pasture measurements taken. It is recommended a minimum of 30 measurements are taken per paddock to ensure an accurate final reading.
- Conduct your pasture-walk by taking a minimum of 30 measurements in the paddock. The platemeter will sound a beep for every measurement and a triple-beep when 30 measurements have been recorded. You can now take note of the average pasture reading for the paddock as displayed on the screen.For example:
- Reset the counter by pressing followed by the upward arrow to confirm. The platemeter is now ready to begin measuring the next paddock.
- When finished using the platemeter, power-off by pressing and holding the power button until the unit switches off.
Battery Life and Charging
The electronic counter is powered by a single rechargeable battery, which should give 24-26 hours continuous use between charges. A low battery warning is built in to the counter and might be displayed when switched on.
Depending on frequency of use, the battery life of your platemeter will ensure several weeks of pasture-walks before needing to be recharged. Whether the platemeter is used daily, weekly, or monthly, the unit should be it is recommended that you charged the unit once a month to ensure make sure the battery stays in top good condition.
Charging your platemeter battery
The platemeter can be charged using the USB cable provided.Simply plug the USB cable in to a compatible PC or wall charger.The recommended charge time is 8 hours from flat. Once plugged in to a power source, the screen on the platemeter will read “CHARGING”. When charging is complete, the screen will read “FULLY CHARGED”. When the unit is fully charged, remove the USB charging cable.
Auto-power off feature
To save battery power, the platemeter will power-off automatically after 5 minutes of inactivity (e.g. no measurements taken or buttons pressed). After 5 minutes of no activity has passed, the device will sound a long beep and a final countdown of 5 seconds will appear on the display. To prevent the platemeter from powering-off automatically, press any button on the keypad, when this occurs.
If you need any further information or support, please contact us.

References
Farm Mapping NZ | Land & Orchard Maps | GPS-it Tauranga
Electronic rising platemeters for sale
– Platemeters American Express Apple Pay Mastercard PayPal Shop Pay Visa American Express Apple Pay Mastercard PayPal Shop Pay Visa
Log into Facebook
Electronic rising platemeters for sale
– Platemeters American Express Apple Pay Mastercard PayPal Shop Pay Visa American Express Apple Pay Mastercard PayPal Shop Pay Visa
[xyz-ips snippet=”download-snippet”]