
USER MANUAL VERSION 1.0
Dear Parents & Guardians,
Here at Playzoom, we understand that your child’s education and development are very important. That’s why we’ve added features tailored to help develop the skills that are needed at this stage in their lives and motivate them to be the best they can be. We thank you for trusting us with this important task – helping your child to have fun and learn at the same time!
Sincerely,
The Playzoom Family.To learn more about Playzoom toys, visit playzoom.com
INTRODUCTION
Thank you for purchasing the Playzoom Snapcam Kids Camera. Playzoom Snapcam is a sleek, light weight and durable digital camera for kids to take photos, edit photos, view photos, record digital video movies and play fun games!
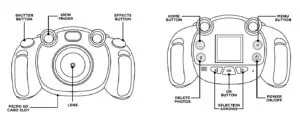
Press this button to turn the camera ON or OFF
Press this button to go to the main menu or to go back to the previous submenu.
Selection Arrows
Press this button to move and make selections.
Press this button to confirm a choice or action.
Press this button to delete the selected file.
Press this button to take a photo to start recording a movie.
Special Effects
Press this button to change special effects during camera/video camera mode.
INCLUDED IN THE PLAYZOOM SNAPCAM PACKAGE
- 1 Playzoom Snapcam Kids Camera
- 1 USB Cable
- 1 Quick Start GuideWARNING: : All packing materials such as tape, plastic sheets, wire ties and tags are not part of this toy andshould be discarded for your child’s safety.
PRODUCT SPECIFICATIONS
Display: 1.54” LCDPicture Resolution: 240 x 240pxPhoto: 0.3m: 640×480, 1m: 1152×864, 2m: 1600×1200, 3m: 2048×1536Movie: 720p (1280×720), VGA (640×450)Memory: Up to 32GB with microSDHC16MB built-in memory (approximately 12 MB free memory for photo/movie storage)Photos: Store up to 200 photos (photo size = 640×480 resolution in JPEG format)Movies: Record up to 5 minutes of movies (movie size – 160 x 120 resolution in Motion JPEG format) Playzoom Snapcam supports up to a 32GB (MicroSD HC) memory card (not included) for memory expansion.
GETTING STARTED
Battery Installation
Note: Adult assembly is required for battery installation.Tools required for battery installation: screwdriver (not included).
- Make sure the Playzoom Snapcam is turned OFF.
- Locate the battery cover on the bottom of the camera. Loosen the single screw using a screwdriver and remove the cover.
- Install 3 new “AAA” batteries. (The use of new alkaline batteries is recommended for maximum performance.)
- Replace the battery cover and tighten the screw.Do not over-tighten screw.
Recommendation:
When the batteries in Playzoom Snapcam run out or are taken out for more than a few minutes, the data in the internal memory may be lost. We recommend using an MicroSDHC memory card (not included) and setting it as the default for saving photos or movies taken by Playzoom Snapcam. If an MicroSD HC memory card (not included) is not used,remember to copy your photos and movies from the camera’s internal memory to a PC before the batteries run out or are taken out.
BATTERY NOTICE
- The use of new alkaline batteries is recommended for maximum performance.
- Install batteries correctly observing the polarity (+ , -) signs to avoid leakage.
- Do not mix old and new batteries.
- Do not mix batteries of different types: alkaline, standard (carbon-zinc) or rechargeable (nickel-cadmium).
- Remove the batteries from the equipment when the unit will not be used for an extended period of time.Please note: To prevent data loss, copy all photos and movies from Playzoom Snapcam to a PC.
- Always remove exhausted batteries from the equipment.
- Do not dispose of batteries in fire.
- Do not attempt to recharge ordinary batteries.
- The supply terminals are not to be short-circuited.
- Only batteries of the same and equivalent type as recommended are to be used.
MicroSD HC MEMORY CARD INSERTION

Playzoom Snapcam supports up to a 32GB (MicroSD HC) memorycard (not included) for memory expansion.
- Make sure the camera is turned OFF.
- Open the battery cover on the bottom.
- Locate the MicroSD HC card slot inside.
- Insert the MicroSD HC card (not included) as illustrated.
- Replace the battery cover and tighten the screw.Do not over-tighten the screw.
TO BEGIN USING PLAYZOOM SNAPCAM CAMER
Press the ON/OFF Button to turn on the camera. After turning on, Playzoom Snapcamwill directly take you to the camera menu screen.
CONNECTING TO A COMPUTER
In order to download your photos, you will need to remove the MicroSD HC Card andinsert it into a card reader. You will be able to transfer your photos to your computer.
- Press the HOME BUTTON
 to go to the Main Menu toselect different activities.
 - Press the CURSOR BUTTONS to selectdifferent modes and press OK BUTTON to enterthe selected mode.
1. CAMERA
In Camera Mode, you can take normal photos, or pictures with funny effects.
- Press the Shutter Button to snap a picture
- Press the Special Effects to apply an effect before snapping a picture.
- Press the OK button to turn on flash
- Press the list button to use the 5 second camera timer
2. VIDEO CAMERA
- In Video Camera Mode, you can take action videos.
- Press the Shutter Button (show button) to start recording.
- Tap the Shutter Button (show button) to start recording.
3. GAMES
ICE CREAM MAKER:

Ice cream maker is a tasty activity for preschool and kindergarten students. Kids go through a step-by-step process selecting different cones, flavors, sauces, whipped cream and toppings! No two ice creams are alike!
SUPER JUMP:
Jump from block to block by selecting the correct color nextin line. Use the left and right arrow keys to navigate to the correct color and select okay to lock in color.
BLOCK BREAKER:

Your objective is to destroy all the blocks to move on to the next level. Collect power ups along the way to help you break all the blocks.
ALIEN INVASION:
The Aliens are invading. Save the planet by solving the math equations by zapping them back to alien craft.
FUZZY PATTERNS:
Solve the fuzzy pattern by selecting the correct fuzz balls that completes the pattern.
4. MULTI-PHOTO MAKER
With the Photo Maker, you can take cool group pictures. First, press the Left or Right cursor button to select a theme. In the selected theme, followthe frames to take different pictures of your friends using the Shutter Button.![]() If you want to set a 5 second timer, select the timer button
If you want to set a 5 second timer, select the timer button ![]() before hitting the Shutter Button.
before hitting the Shutter Button. ![]()
5. GALLERY
You can view your pictures/videos taken in the Gallery.
6. PHOTO EFFECTS
Choose this icon to add fun photo frames, fun stickers and special effects.Photo Frames![]() To select a photo frame for your picture, press left or right cursor button and hit the OKbutton to confirm.
To select a photo frame for your picture, press left or right cursor button and hit the OKbutton to confirm.

Fun Stickers ![]() To select a fun sticker for your picture, press left or right cursor button and hit the OK button to confirm.
To select a fun sticker for your picture, press left or right cursor button and hit the OK button to confirm.
Special Effects ![]() To apply a special effect for your picture, press the left or right cursor button and hit the OK button to confirm.
To apply a special effect for your picture, press the left or right cursor button and hit the OK button to confirm.
Once you have applied all of your photo effects, hit the save button. ![]()
7. SETTINGS
You can adjust different settings for your Snapcam Camera. Press the list cursor buttons ![]() to navigate between different pages.
to navigate between different pages.
SET A BACKGROUND
Here you can set your favorite wallpaper as the background picture in the main menu. Press the left or right cursor button to select your wallpaper. Press the Home button to confirm selection.
VOLUME/BRIGHTNESS
Here you can adjust the volume and brightness for your camera. Press the left or right cursor button to adjust the volume and press the OK Button to confirm. To adjust thebrightness, press the left or right cursor button to adjust the brightness and press the OK Button to confirm.
DATE & TIME
This menu allows you to set your current date and time. If you would like to change the date or time, press the left or right cursor button to begin setting the month. Press the OKbutton to confirm. Select your day and year respectively. To set the time, press the left or night cursor icon and press the OK button after each selection.
CAMERA SETTINGS
Here you can adjust the photo and video settings of your camera.For photos resolution, you can choose between 4M, 3.5M, 2M, 1M, 960 x 960, 720 x 720, 640 x 640, and 480 x 480.For video quality, you can choose between 720p, and VGA.
MEMORY
This menu allows you to review the status of the camera’s internal memory or memorycard (if inserted).
FILE MANAGER
This menu shows you how to connect the camera to your computer with a Micro-USB cable. Click the camera drive on your computer and pull your photos and videos into yourcomputer.

Read More About This User Manuals…
report this ad[xyz-ips snippet=”download-snippet”]