
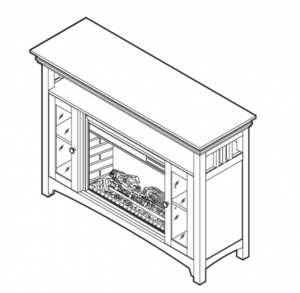
Pleasant Hearth 48” Mantel 23” Firebox Instructions
ATTACH YOUR RECEIPT HERE
Questions, problems, missing parts?Before returning to your retailer, call our customer service department at 1-877-447-4768, 8:30 a.m. –4:30 p.m. EST, Monday – Friday or email us at
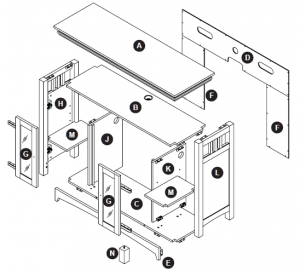
PACKAGE CONTENTS
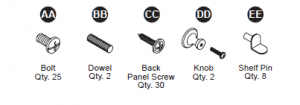
HARDWARE CONTENTS
PACKAGE CONTENTS
|
PART |
DESCRIPTION |
QTY. |
PART NO. BURNISHED OAK MANTEL
23-894-213 / 23-153-213 |
| A | Top Panel | 1 | 20-06-766 |
| B | Media Shelf | 1 | 20-06-767 |
| C | Base | 1 | 20-06-768 |
| D | Upper Back Panel | 1 | 20-06-769 |
| E | Trim Panel | 1 | 20-06-770 |
| F | Lower Back Panels | 2 | 20-06-771 |
| G | Cabinet Door | 2 | 20-06-772 |
| H | Left Side Panel | 1 | 20-06-773 |
| J | Left Inner Panel | 1 | 20-06-774 |
| K | Right Inner Panel | 1 | 20-06-775 |
| L | Right Side Panel | 1 | 20-06-776 |
| M | Adjustable Shelf | 2 | 20-06-777 |
| N | Support Leg | 1 | 20-06-778 |
| AA | Bolt | 25 |
20-09-578 |
| BB | Dowel | 2 | |
| CC | Back Panel Screw | 30 | |
| DD | Knob | 2 | |
| EE | Shelf Pin | 8 |
ASSEMBLY INSTRUCTIONS
Carefully remove all pieces from carton and make sure that you have all parts listed (refer to parts list on page 2-3).If you are missing parts, please call GHP customer service at 1-877-447-4768.
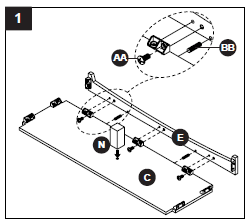
- Lay the Base (C) on a clean, flat surface. The side with the plastic connectors should be facing up. Attach the Support Leg onto base by turning clockwise. Attach the Trim Panel (E) using two dowels (BB) and securing the plactic connectors with 3 Bolts (AA).
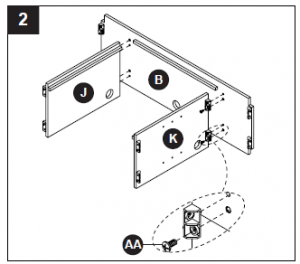
- Slip the Left Inner Panel (J) into the predrilled holes on Media Shelf (B) as shown and secure with 2 Bolts (AA). Repeat using the Right Inner Panel (K).
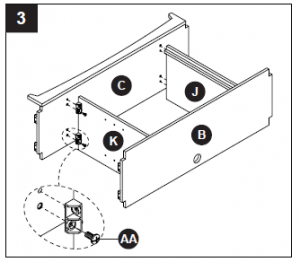
- Set Base (C) on floor with the front trim facing up. Attach the media shelf assembly to the Base (C) using attached plastic connectors and 4 Bolts (AA).
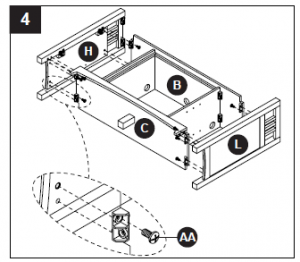
- Attach Left Side Panel (H) to mantel assembly using pre-installed plastic connectors and 4 Bolts (AA). Repeat with Right Side Panel (L).
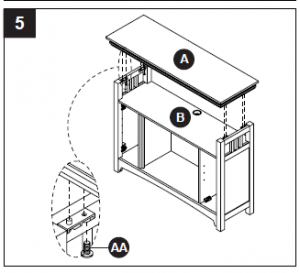
- Set top (A) over connectors until snug. Secure top (A) from underneath with bolts (AA).
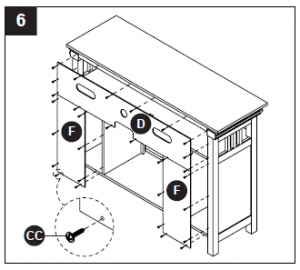
- Attach the upper back panel (D) with back panel screws (CC). Attach both lower back panels (F) on each side with back panel screws (CC).
ASSEMBLY INSTRUCTIONS
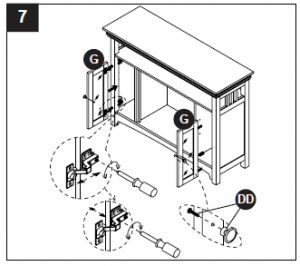
- Attach the left door (G) to the left cabinet using hinge screws as shown. Repeat using the right door (G). Level the cabinet doors using a Phillips screwdriver as shown in inset diagrams. Attach knobs (DD) to each door using screw included with knob (DD).
- Insert 4 shelf pins (EE) into predrilled holes in side walls of each cabinet at preferred height. Set adjustable shelves (M) in desired positions in each cabinet.
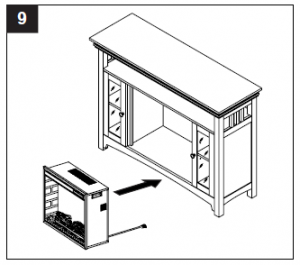
- Place the insert directly in front of the mantel opening. Carefully lift the insert through the center opening in the front of the fireplace. The bottom of the insert has two foam rubber strips to prevent scratching of the hearth base. Slide the insert back through the opening until the metal trim makes contact with the front of the mantel.
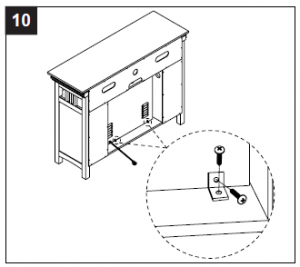
- Attach the mounting brackets provided with the insert in the predrilled holes on the bottom of the insert. Secure the mounting brackets with two bolts.
- Set completed mantel in desired position against wall.


ONE YEAR LIMITED WARRANTY
ONE YEAR LIMITED WARRANTYIf within one year from the date of original purchase, this item fails due to a defect in material or workmanship, we will replace or repair at our option, free of charge. To order parts or obtain warranty service, call 1-877-447-4768, 8:30 a.m. – 4:30 p.m. EST, Monday – Friday. This warranty does not cover defects resulting from improper or abnormal use, misuse, accident, or alteration. Failure to follow all instructions in the owner’s manual will also void this warranty. GHP Group, Inc. will not be liable for incidental or consequential damages. Some states do not allow the exclsion or limitation of incidental or consequential damages, so the above limitation or exclusion of incidental or consequential damages may not apply to you. This warranty gives you specific legal rights and you may also have other rights which vary from state to state.
Our quality furniture is built keeping tradition in mind. Variations in actual wood color and finishes which may result from natural characteristics of the wood, such as grain patterns, mineral streaks and the like, are not considered defects. As wood continues to move and age you may notice these slight differences in color, even on different parts of any individual unit. Sound knots and slight surface cracks are true personality of a quality piece of wood furniture.
There are several practices we recommend so that you may maintain your new furniture in top condition. First of all, to maintain the finish, you should clean with a soft, slightly damp cloth and buff with a dry cloth. Secondly, wood furniture should never be dragged across a floor. The added stress from dragging the unit may cause the dragged edge to splinter or it may cause some joints to loosen. Please contact us for any questions or concerns you may have regarding your new piece of furniture.
Read More About This Manual & Download PDF:
[xyz-ips snippet=”download-snippet”]