
![]() BeerDispenserInstruction manualModel:GE632/GE633
BeerDispenserInstruction manualModel:GE632/GE633
Safety Tips
- Position on a flat, stable surface.
- A service agent/qualified technician should carry out installation and any repairs if required. Do not remove any components or service panels on this product.
- Consult Local and National Standards to comply with the following:– Health and Safety at Work Legislation– BS EN Codes of Practice– Fire Precautions– IEE Wiring Regulations– Building Regulations
- DO NOT use jet/pressure washers to clean the appliance.
- DO NOT use the appliance outside.
- DO NOT store food in the appliance.
- DO NOT use this appliance to store medical supplies.
- DO NOT allow oil or fat to come into contact with the plastic components or door seal. Clean immediately if contact occurs.
- DO NOT store products on top of the appliance.
- Always carry, store and handle the appliance in a vertical position and move by holding the base of the appliance.
- Always switch off and disconnect the power supply to the unit before cleaning.
- Keep all packaging away from children. Dispose of the packaging in accordance with the regulations of local authorities.
- If the power cord is damaged, it must be replaced by a POLAR agent or a recommended qualified technician in order to avoid a hazard.
- This appliance can be used by children aged 8 years and above and persons with reduced physical, sensory or mental capabilities or lack of experience and knowledge if they have been given supervision or instruction concerning the use of the appliance in a safe way and understand the hazards involved.
- Children shall not play with the appliance.
- Cleaning and user maintenance shall not be made by children without supervision.
- Keep the appliance and its cord out of reach of children less than 8 years.
- The appliance is not intended to be operated by means of an external timer or separate remote-control system.
- Polar recommends that this appliance should be periodically tested (at least annually) by a Competent Person. Testing should include, but not be limited to: Visual Inspection, Polarity Test, Earth Continuity, Insulation Continuity and Functional Testing.
- POLAR recommends that this product is connected to a circuit protected by an appropriate RCD (Residual Current Device).
![]() Caution Risk of Fire
Caution Risk of Fire
- Do not store explosive substances such as aerosol cans with a flammable propellant in this appliance.
 Warning: Keep all ventilation openings clear of obstruction. The unit should not be boxed in without adequate ventilation.
 - Warning: Do not use mechanical devices or other means to accelerate the defrosting process, other than those recommended by the manufacturer.
- Warning: Do not damage the refrigerant circuit.
- Warning: Do not use electrical appliances inside the food storage compartments of the appliance, unless they are the type recommended by the manufacturer.
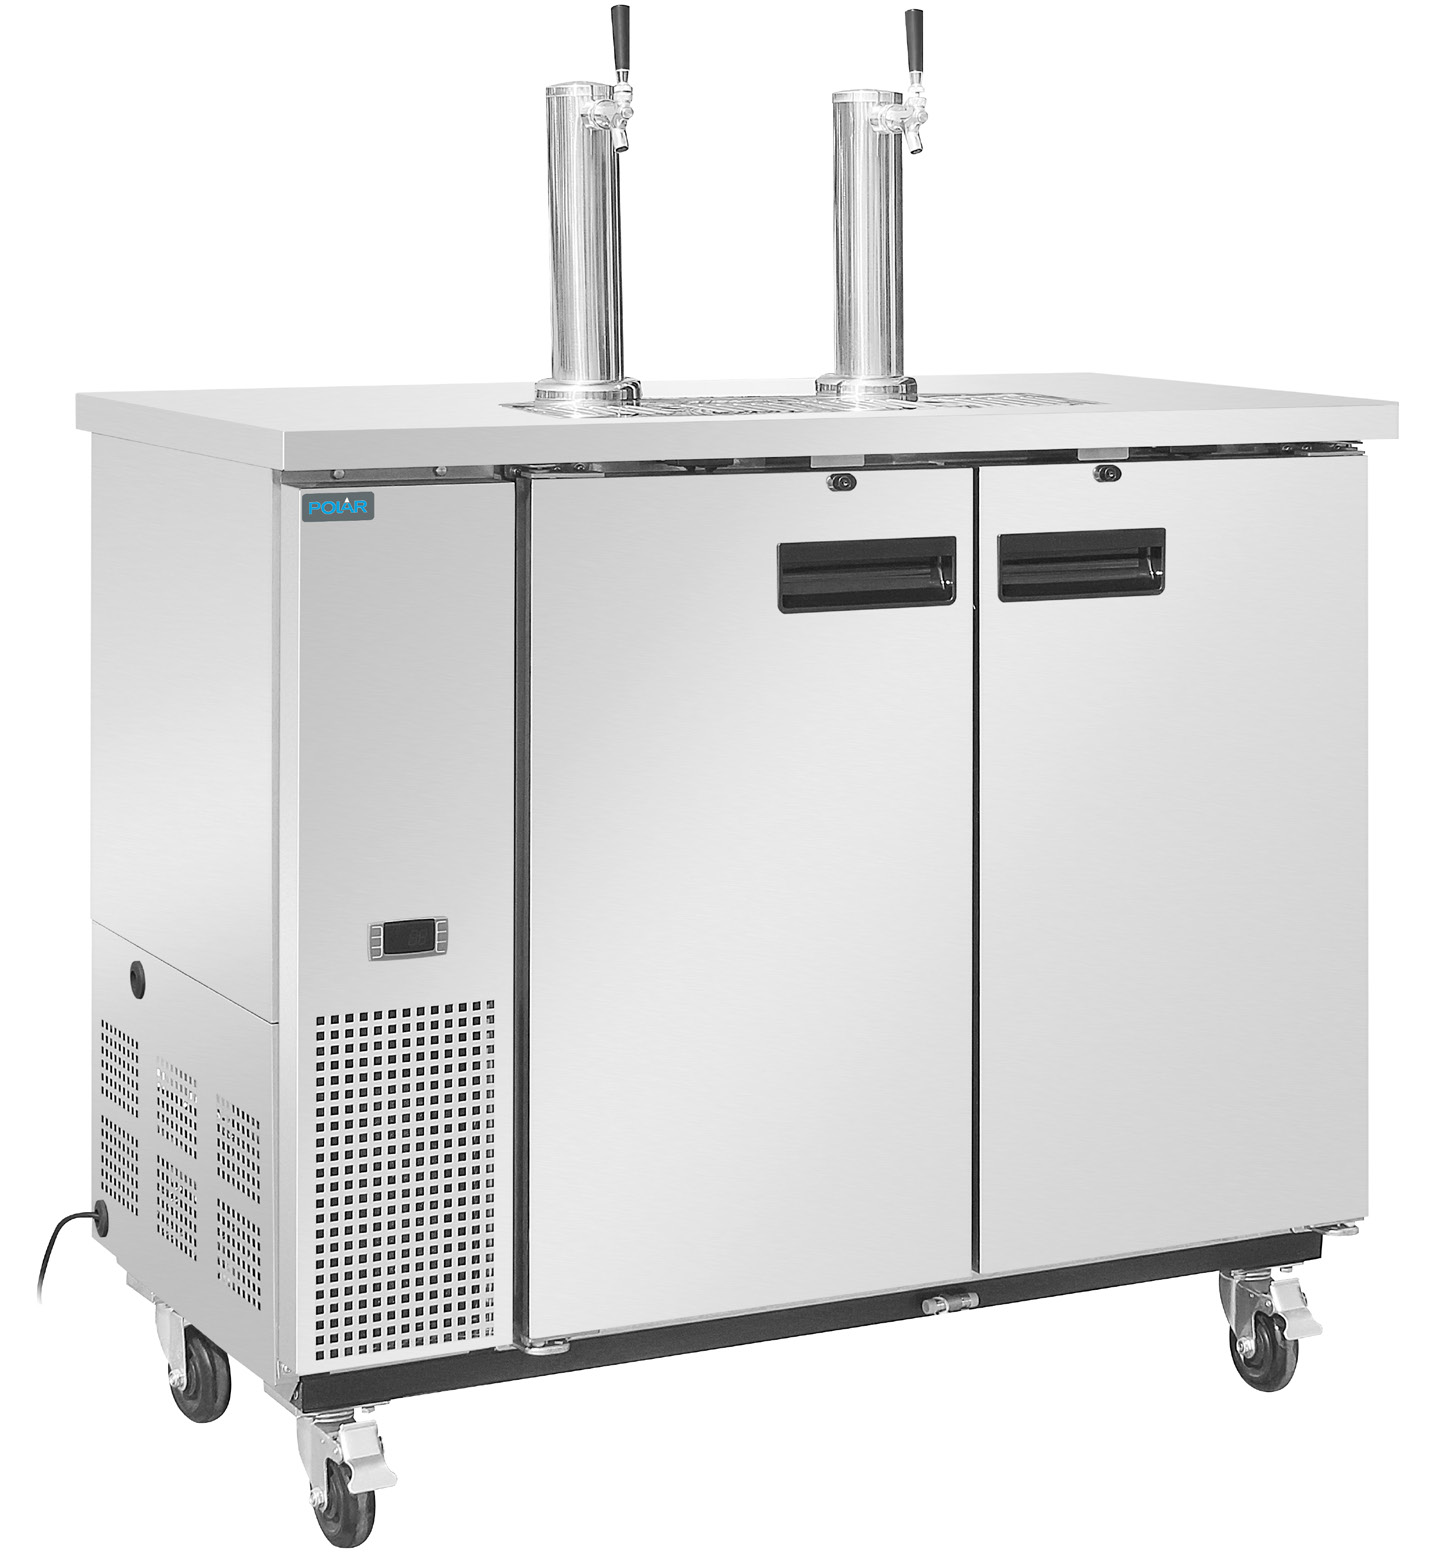
Product Description GE632 – Direct Draw Beer Dispenser (1 Keg 1 Tap)GE633 – Direct Draw Beer Dispenser (2 Keg 2 Tap)
Introduction
Please take a few moments to carefully read through this manual. Correct maintenance and operation of this machine will provide the best possible performance from your POLAR product.
Pack Contents
The following is included:
- Beer Dispenser
- Drip pan
- Beer tower assembly
- CO2 line
- Tee joint for CO2 lines
- Screws and washers
- Multi-function spanner
- Instruction manual
POLAR prides itself on quality and service, ensuring that at the time of packaging the contents are supplied fully functional and free of damage. Should you find any damage as a result of transit, please contact your POLAR dealer immediately.
Installation
 Note: If the unit has not been stored or moved in an upright position, let it stand upright for approximately 12 hours before the operation. If in doubt allow standing.
- Remove the appliance from the packaging. Make sure that all protective plastic film and coatings are thoroughly removed from all surfaces.
- To optimize performance and longevity, ensure a minimum clearance of 2.5cm is maintained between the unit and walls and other objects, with a minimum 5cm clearance on the top.
NEVER LOCATE NEXT TO A HEAT SOURCE.
Note: Before using the appliance for the first time, clean the interior with soapy water.
Location
- The appliance is intended for indoor use only.
- Be sure the location chosen has a floor strong enough to support the total weight of the cabinet and contents. A fully loaded unit can weigh as much as 450kg. Reinforce the floor as necessary to provide maximum loading.
- For the most efficient refrigeration, be sure to provide good air circulation inside and outside.Ventilation
- Be sure that the unit has access to ample air. Avoid hot corners and locations near stoves and ovens.
- Should it become necessary to lay the unit on its side or back for any reason, allow at least 12 hours before start-up so as to allow compressor oil to flow back to the sump? Failure to meet this requirement can cause compressor failure and unit damage.
Leveling
- A level cabinet will perform better because the doors will line up with the frames properly, the cabinet will not be subject to undue strain and the contents inside the cabinet will not move around.
- Use a level to make sure the unit is level from front to back and side to side.
- Units supplied with legs will have adjustable bullet feet to make the necessary adjustments. If the unit is supplied with castors, set the brakes on the castors to keep the appliance in position.
- Ensure the floor where the unit is to be located is level.
Caution:Failure to follow all the due installation instructions will invalidate your guarantee.
Connection
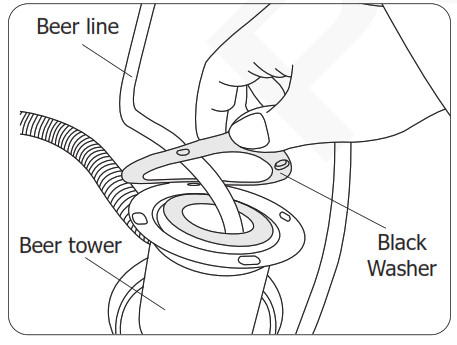
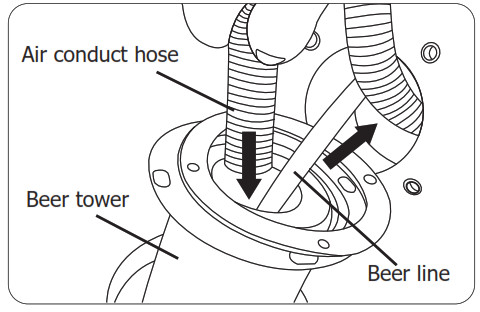
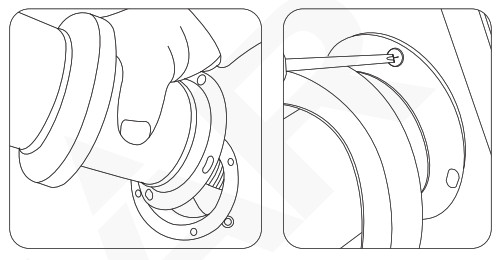
Connecting the beer tower
- Pull out the air conduct hose from the hole in the cabinet surface.
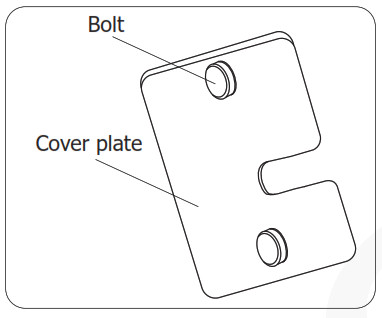
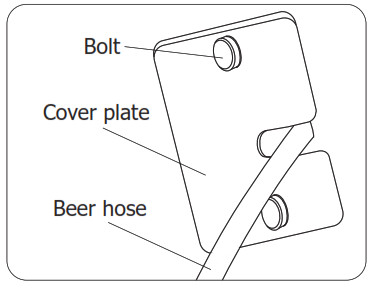
- Unscrew the 2 bolts to release the cover plate which is located on the cabinet’s inner surface.
- Thread the big black washer through the beer line that is coming from the beer tower.
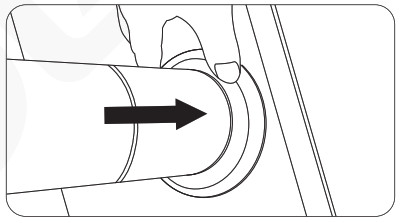
- Insert the beer line into the cabinet via the hole. Then insert the air conduct hose into the beer tower.
- Align all holes and install the 4 screws to fix the beer tower in place.
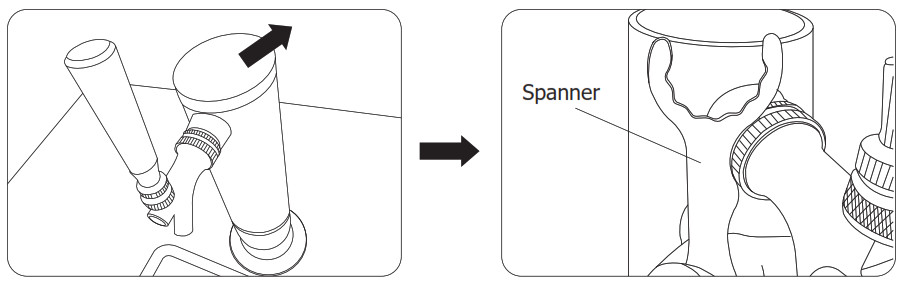
- Slide the beer tower’s shade downward fully.
- Re-attach and fix the cover plate to the cabinet’s inner surface with bolts.
- In case the beer tower is not stable, you can adjust the tap as needed. Open the top cap of the beer tower first. Then use the supplied spanner to adjust the tap.

Connecting the CO2 cylinder and beer kegNote: The diagram below is for reference only. For actual connections, please follow the manufacturer’s instructions supplied with the CO2 cylinder and beer keg. All connections should be done by professionals only.Be gentle when locating CO2 cylinder and beer keg into the cabinet to avoid any damage.
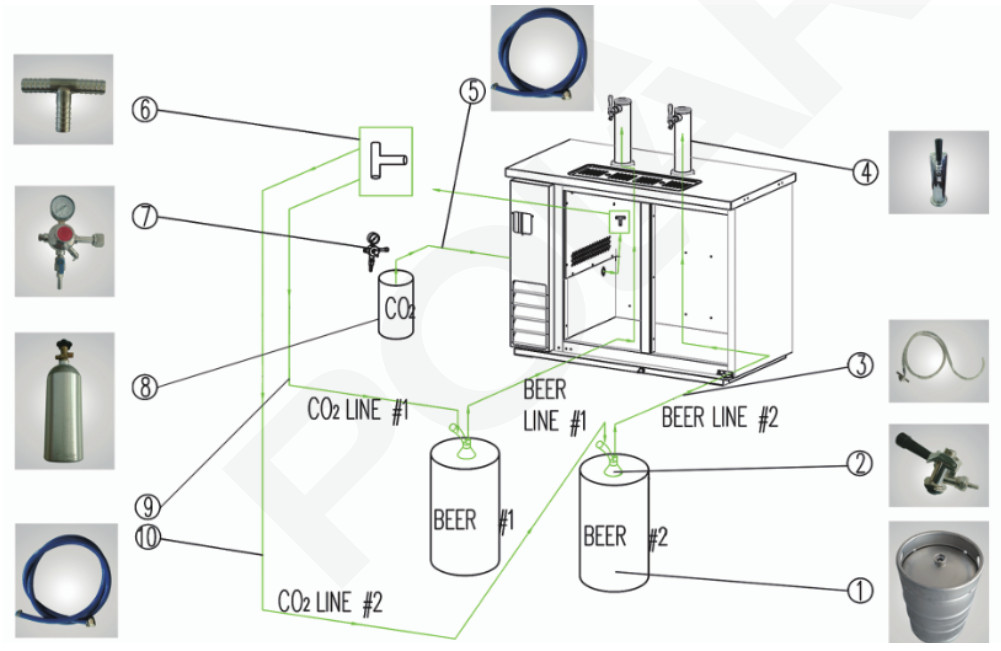
| 1. Beer keg2. Keg tap3. Beer line4. Beer tower5.CO2 line | 6. Tee Joint for CO2 lines7. CO2 regulator8.CO2 cylinder9. CO2 line (#1)10. CO2 line (#2) |
Warning:
- Make sure that all fittings in the system are tight. Always keep the CO2 cylinder in a vertical position. The recommended pressure for the CO2 system is 8-10 psi.
- Always handle the CO2 cylinder with care. Never lay flat or drop!
- Handle all pressure system components with care. Do not use excessive pressures. Be sure instructions are understood thoroughly. If in doubt, contact your dealer/distributor for an explanation.
- Filled CO2 cylinders are potentially dangerous because of the pressure they contain. If you are unfamiliar with their use or the use of the CO2 regulator, seek information from your local distributor, or your local beverage man before proceeding.
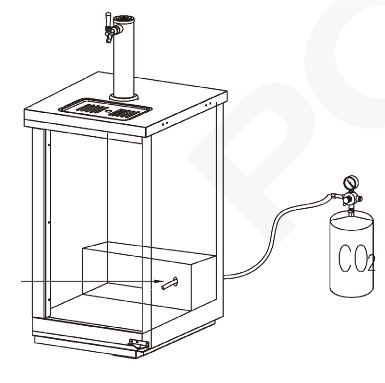
When necessary to connect a remote CO2 cylinder, use below diagram for reference. For actual connections, ensure to follow the manufacturer’s instructions supplied with the CO2 cylinder.
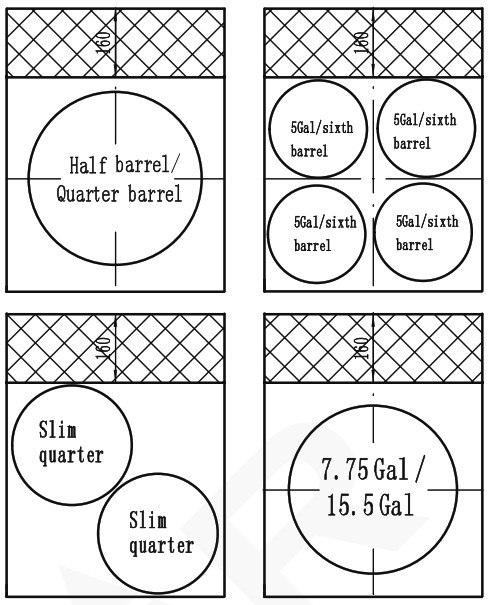
Beer keg layout: Model GE632
Beer keg layout: Model GE633
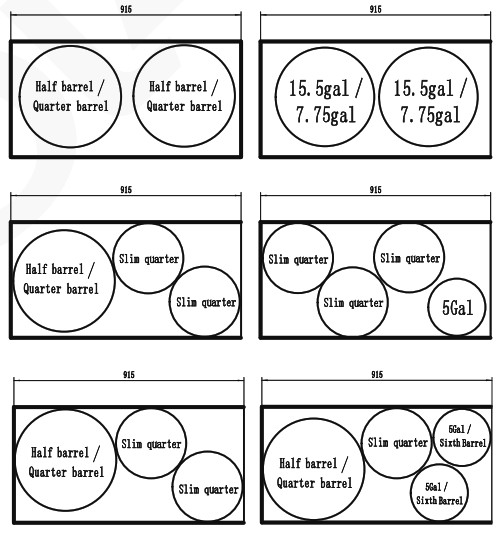
Beer keg layout: Model GE633

Operation
Control PanelFor GE632: The control panel is located on the rear wall inside the cabinet.For GE633: The control panel is located on the front of the appliance.

To lock/unlock the keyboard, press![]() and
and ![]() together for more than 3 seconds. Display will flash POF (locked) / PON (unlocked).Turn On
together for more than 3 seconds. Display will flash POF (locked) / PON (unlocked).Turn On
- Close the door(s) of the appliance.
- Connect the appliance to a mains power supply.
Set the Operating Temperature
- Hold the SET button for 3 seconds. The value of the current setpoint will be displayed.
- Press the or button to display the required temperature.
- Press the SET button to store the temperature.
Manual Defrost Press and hold the defrost button![]() for 2 seconds to begin a manual defrost. The defrost light illuminates.Lock/Unlock the Doors Use the keys provided to lock/unlock the door.
for 2 seconds to begin a manual defrost. The defrost light illuminates.Lock/Unlock the Doors Use the keys provided to lock/unlock the door.
Serving
- Before serving, ensure to locate the drip tray(s) in place.
- Pull the tap toward you to begin pouring.
- Raise the tap handle to close the tap.

Cleaning, Care & Maintenance
Switch off and disconnect from the power supply before cleaning and maintenance.• Warm, soapy water is recommended for cleaning. Cleaning agents may leave harmful residues. Wipe the exterior with a damp cloth.• Empty and clean the drip trays regularly.• A POLAR agent or qualified technician should carry out repairs if required.
Cleaning the cabinetThe interior and exterior can be cleaned using soap and warm water. If this is not sufficient, try ammonia and water or a non-abrasive liquid cleaner. When cleaning the exterior, always rub with the “grain” of the stainless steel to avoid marring the finish.Do not use an abrasive cleaner because it will scratch the stainless steel and plastic and can damage the breaker strips and gaskets.Cleaning the Condenser Coil The condenser coil requires regular cleaning, with the recommended frequency of every 90 days. In some instances, you may find there is a large amount of debris and dust or grease accumulated prior to the 90-day period. Thus the condenser coil should be cleaned more frequently.
If the buildup on the coil consists of only light dust and debris the condenser coil can be cleaned with a simple brush. Heavier dust buildup may require a vacuum or even compressed air to blow through the condenser coil.If heavy grease is present, there are de-greasing agents available for refrigeration use and specifically for the condenser coils. The condenser coil may require a spray with the degreasing agent and then blown through with compressed air.Failure to maintain a clean condenser coil can initially cause high temperatures and excessive run times, continuous operation with dirty or clogged condenser coils can result in compressor failures. Neglecting the condenser coil cleaning procedures will void any warranties associated with the compressor or the cost to replace the compressor.In order to maintain proper refrigeration performance, the condenser fins must be cleaned of dust, dirt, and grease regularly. It is recommended that this be done at least every 3 months. If conditions are such that the condenser is totally blocked, the frequency of cleaning should be increased. Clean the condenser with a vacuum cleaner or stiff brush. If extremely dirty, a commercially available condenser cleaner may be required.
Stainless Steel CareTo maintain the stainless steel exterior of your Polar item, please consider the following information:Never:
- Use abrasive Scourers or scrubbing pads, etc.
- Use Chlorinated or acidic detergents
- Allow anything e.g. food, dirt, cleaning chemicals to remain on the surface for longer than necessary, clean them off right away.
- Allow the surface to remain wet.
Do:
- Clean often.
- Use soft Cloths or plastic Scourers.
- Rub with the grain of the metal, rather than across it.
- Use detergents and polish designed for cleaning Stainless Steel.
- Ensure that the cleaning products are washed off fully and that the steel is left dry.
Gasket MaintenanceGaskets require regular cleaning to prevent mold and mildew buildup and also to keep the elasticity of the gasket.Gasket cleaning can be done with the use of warm soapy water. Avoid full-strength cleaning products on gaskets as this can cause them to become brittle and prevent proper seals. Also, never use sharp tools or knives to scrape or clean the gasket which could possibly tear the gasket and rip the bellows.Gaskets can easily be replaced and do not require the use of tools or authorized service persons. The gaskets are “Dart” style and can be pulled out of the grove in the door and new gaskets can be “pressed” back into place.Doors/HingesOver time and with heavy use, doors the hinges may become loose. If it is noticed that the door is beginning to sag, it may become necessary to tighten the screws that mount the hinge brackets to the frame of the unit. If the doors are loose or sagging this can cause the hinge to pull out of the frame which may damage both the doors and the door hinges. In some cases, this can require qualified service agents or maintenance personnel.Drain MaintenanceEach unit has a drain located inside the unit which removes the condensation from the evaporator coil and evaporates it at an external condensate evaporator pan. The drain may become loose or even disconnected resulting from moving or bumping the drain.If you notice excessive water accumulation on the inside of the unit, be sure the drain tube is connected from the evaporator housing to the condensate evaporator drain pan.If water is collected underneath the unit, you may need to check the condensate evaporator drain tube to make sure it is still located inside the drain pan.The leveling of the unit is important as the units are designed to drain properly when on a level surface. If your floor is not level this can also cause drain problems. Make sure all drain lines are free of obstructions, or blocked drain lines will cause water to back up and overflow the drain pans.
Troubleshooting
| Fault | Probable Cause | Solution |
| The appliance is not working | The unit is not switched on | Check the unit is plugged in correctly and switched on |
| Plug or lead Is damaged | Call POLAR agent or qualified Technician | |
| Fuse in the plug has blown | Replace the fuse | |
| Power supply | Check power supply | |
| Cabinet temperature is too warm | Doors are not shut properly | Check doors are shut and seals are not damaged |
| The appliance is located near a heat source or airflow to the condenser is being interrupted | Move the appliance to a more suitable location | |
| Ambient temperature is too high | Increase ventilation or move the appliance to a cooler position | |
| Insufficient airflow to the fans | Remove any blockages to the fans | |
| The set temperature is too high | Set a lower temperature | |
| Low refrigerant level | Call POLAR agent or qualified Technician | |
| Condensation on the Cabinet and/or floor | Gasket not sealing well | Clean, repair, or replace the gasket as necessary |
Technical Specifications
| Model | Voltage | Power | Current | TemperatureRange | Refrigerant | DimensionsHxWxDmm | Weight(kg) |
| GE632 | 230V— 50Hz | 150W | 1.1A | 2°C — 8°C | R600a (55g) | 1312 x 612 x 810 | 63 |
| GE633 | 230V— 50Hz | 250W | 1.6A | 2°C — 8°C | R290 (95g) | 1438 x 1247 x 620 | 97 |
Electrical Wiring
POLAR appliances are supplied with a 3 pin BS1363 plug and lead.The plug is to be connected to a suitable mains socket.POLAR appliances are wired as follows:
- Live wire (colored brown) to the terminal marked L
- Neutral wire (colored blue) to the terminal marked N
- Earth wire (colored green/yellow) to terminal marked E
This appliance must be earthed.![]() If in doubt consult a qualified electrician.Electrical isolation points must be kept clear of any obstructions. In the event of any emergency, disconnection is required they must be readily accessible.
If in doubt consult a qualified electrician.Electrical isolation points must be kept clear of any obstructions. In the event of any emergency, disconnection is required they must be readily accessible.
DisposalEU regulations require refrigeration products to be disposed of by specialist companies who remove or recycle all gasses, metal, and plastic components.Consult your local waste collection authority regarding the disposal of your appliance. Local authorities are not obliged to dispose of commercial refrigeration equipment but may be able to offer advice on how to dispose of the equipment locally.Alternatively, call the POLAR helpline for details of national disposal companies within the EU.
Compliance The WEEE logo on this product or its documentation indicates that the product must not be disposed of as household waste. To help prevent possible harm to human health and/or the environment, the product must be disposed of in an approved and environmentally safe recycling process. For further information on how to dispose of this product correctly, contact the product supplier, or the local authority responsible for waste disposal in your area.
 POLAR parts have undergone strict product testing in order to comply with regulatory standards and specifications set by international, independent,and federal authorities.POLAR products have been approved to carry the following symbol:
All rights reserved. No part of these instructions may be produced or transmitted in any form or by any means, electronic, mechanical, photocopying, recording, or otherwise, without the prior written permission of POLAR.Every effort is made to ensure all details are correct at the time of going to press, however, POLAR reserves the right to change specifications without notice.
DECLARATION OF CONFORMITY
| Equipment Type | Model | |
| Direct Draw Beer Dispenser (1 Keg, 1 Tap)Direct Draw Beer Dispenser (2 Keg, 2 Tap) | GE632 (-E & -A)GE633 (-E & -A) | |
| Application of Territory Legislation &Council Directives(s)Toepassing van Europese Richtlijn | Machinery Directive 2006/42/ECSupply of Machinery (Safety) Regulations 2008EN 60335-1:2012 +A11:2014 +A13:2017EN 60335-2-89:2010 +A1:2016 +A2:2017EN 62233:2008Electro-Magnetic Compatibility (EMC) Directive2014/30/EU – recast of 2004/108/ECElectromagnetic Compatibility Regulations 2016(S.I. 2016/1091)EN 55014-1: 2017EN55014-2:2015EN 61000-3-2: 2014EN 61000-3-3:2013Restriction of Hazardous Substances Directive(RoHS) 2015/863 amending Annex II to Directive 2011/65/EURestriction of the Use of Certain HazardousSubstances in Electrical and ElectronicEquipment Regulations 2012 (S.I. 2012/3032) | Electrical SafetyIEC 60335-1:2010IEC 60335-2-89:2010EN 62233:2008Electromagnetic CompatibilityEN 55014-1: 2017EN55014-2:2015EN 61000-3-2: 2014EN 61000-3-3:2013 |
| Producer Name | Polar |
I, the undersigned, hereby declare that the equipment specified above conforms to the above Territory Legislation, Directive(s), and Standard(s).
| Date | 4th March 2021 | ||
| Signature |  |
 |
 |
| Full Name | Ashley Hooper | Eoghan Donnellan | Josie Holt |
| Position | Technical & QualityManager | CommercialManager/ Importer | Commercial Manager/ ResponsibleSupplier |
| Producer Address | Fourth Way, Avonmouth,Bristol,BS11 8TBUnited Kingdom | 42 North PointBusiness ParkNew Mallow RoadCork Ireland | 15 Bagdally Road,CampbelltownNSW 2560 |

![]() UKEire +44 (0)845 146 2887
UKEire +44 (0)845 146 2887
![]()

![]() http://www.polar-refrigerator.com/GE632-GE633_UK_A5_v1_20210419
http://www.polar-refrigerator.com/GE632-GE633_UK_A5_v1_20210419
References
[xyz-ips snippet=”download-snippet”]