
Polar GoFit Web Service Physical Education Solution

Welcome to the Polar GoFit web service! Polar GoFit is a part of the Polar Physical Education solution. It supports both activity monitoring and heart rate monitoring. The web service enables teachers and students to track students’ daily activity and the time spent in different activity zones. It also enables teachers and students to track students’ heart rate data during PE lessons and the time spent in different heart rate zones. In addition, Polar GoFit web service provides a manual fitness testing system.
Teachers can use Polar GoFit for organizing courses and fitness testing. They can also follow and document each student’s effort and improvement in and out of the classroom. The web service makes it easy to create reports and track long-term progress. The data can also be shared with parents and administrators.
Students can use Polar GoFit to review their daily activity and heart rate data, and test results. Polar GoFit helps them learn a healthy lifestyle.
SIGN-IN
Sign in to the web service on the Polar GoFit home page (www.polargofit.com). The first teacher user account was created when the licenses were purchased. A link to select a password for the account was provided in the welcome email. More teacher user accounts can be created after signing in. Both teachers and students use the same sign-in page.
COMPUTER REQUIREMENTS
For general Polar GoFit use:
- Internet connection
- Compatible web browser (Microsoft Internet Explorer 9 or newer, Apple Safari 4 or newer, Mozilla Fire- fox 3 or newer, Google Chrome 0.1271.97m or newer)
- 1024 x 768 resolution display or higher
Additional requirement for Activarium:
For data transfer between Polar Active activity monitors and web service with FlowLink and WebSync:
- Operating system: Microsoft Windows XP/Vista/7 or Mac OS X 5 or newer (running on Intel plat- form)
- Internet connection
- Compatible web browser (Microsoft Internet Explorer 9 or newer, Apple Safari 4 or newer, Mozilla Fire- fox 3 or newer, Google Chrome 0.1271.97m or newer)
- Free USB port for the FlowLink
- 1024 x 768 resolution display or higher
PROXY SETTINGS
Make sure your browser’s proxy settings are set correctly. Contact your IT administrator if you need help with the browser settings.
ABOUT THE USER GUIDE
The user guide includes instructions for different parts of the web service. You can download the entire user guide in PDF format by clicking ‘Download in PDF format’ in the navigation panel on the left.
ABOUT THE POLAR GOFIT APP
Teachers use the Polar GoFit iPad app to monitor and share heart rate data during PE lessons. The data transfer between the Polar GoFit app and Polar GoFit web service is automatic.
ABOUT THE LESSONS FOR LIFE BOOK
Lessons for Life is a teacher’s guidebook to Polar Education Technology. It provides tips on how to use the new technology to motivate students towards an active lifestyle. The book is purchased separately.
LICENSE AGREEMENT
Each teacher must accept the license agreement when signing in to the web service for the first time. The licence agreement can be opened by clicking Legal Notice in the Polar GoFit footer.
ACTIVITY MONITORING
Follow the steps below when starting to use the Polar activity monitoring solution. See also Activity monitoring workflow for more information on the general workflow in activity monitoring.
Activity data cannot be transferred from the activity monitors to the web service before the monitors have been managed in the Polar GoFit web service.
- Set up the web service according to the instructions in chapter Setting up Polar GoFit.
- Create an activity course in the web
- Assign the activity monitors to students who participate in the The activity monitors are assigned individually for each student.
- Give the activity monitors to the The activity monitors are worn on the wrist.
- Transfer the activity data from the activity monitors to the web service regularly with the FlowLink data transfer unit and the WebSync
Polar Active has room for 21 days in the activity diary. When activity data is transferred to the web service, it is removed from the activity monitor. If activity data is not transferred to the web service during the course, the activity monitor stops recording daily activity after 21 days of use. The web service informs on the Dashboard how many days it has been since last data transfer. Students can also transfer activity data from Polar Active to the web service with their own user credential.
Daily activity can also be tracked without the web service using the activity progress poster. For more information on the activity monitors, see the Polar Active user manual.
HEART RATE MONITORING
Follow the steps below when starting to use the Polar heart rate monitoring solution. See also Heart rate monitoring workflow for more information on the general workflow in heart rate monitoring.
- Set up the web service according to the instructions in chapter Setting up Polar GoFit.
- Create a heart rate course in the web
- Assign the heart rate sensors to students who participate in the
- Students wear the sensors during PE
- Monitor heart rate data via the Polar GoFit app during the
Data transfer between Polar GoFit and the Polar GoFit app is automatic.
FITNESS TESTING
Follow the steps below when starting to use the Polar fitness testing solution. See also Fitness testing workflow for more information on the general workflow in fitness testing.
- Set up the web service according to the instructions in chapter Setting up Polar GoFit.
- Create a template by selecting the test items, or use an existing
- Create a test by choosing the
- Carry out the test and enter the results into the web
![]() You can use an iPad in the test situation and enter the results into the web service as testing proceeds. Or you can write the results by hand on printed result sheets, and enter them into the web service later.
You can use an iPad in the test situation and enter the results into the web service as testing proceeds. Or you can write the results by hand on printed result sheets, and enter them into the web service later.
We recommend that the following steps are completed when starting to use the Polar GoFit web service in the school. School settings can be modified later with any teacher’s user account. See also Activity monitoring workflow, Heart rate monitoring workflow and Fitness testing workflow for more information on using Polar GoFit.
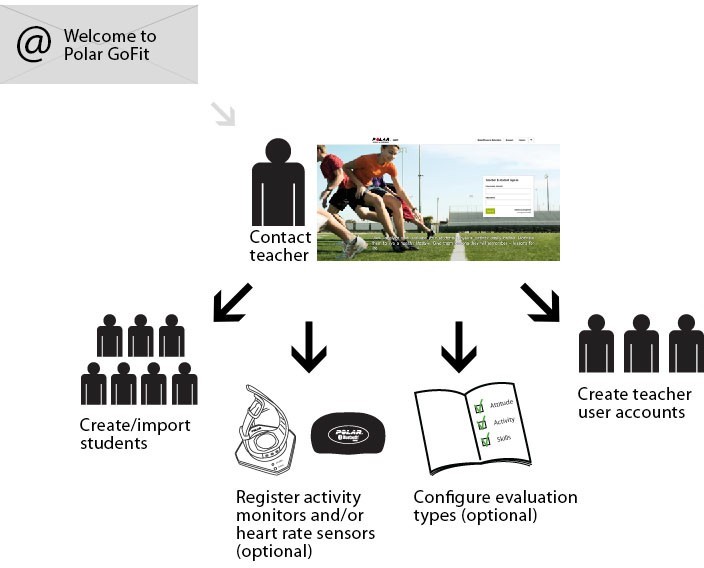
![]() The system must be configured only once. Changes (new teacher accounts, new students, new monitors, new sensors) can be done at any point.
The system must be configured only once. Changes (new teacher accounts, new students, new monitors, new sensors) can be done at any point.
You can return to this list by selecting Setting up Polar GoFit from the navigation panel on the left. For further instructions on each step, click on the links below.
- If you are going to use Polar GoFit for activity monitoring, make sure you have all the necessary com- ponents available for data transfer between an activity monitor and Polar GoFit.
- Import or create students in School > Students.
- If you are going to use Polar GoFit for activity and/or heart rate monitoring, Register the activity mon- itors into the web service in School > Monitors, and/or register the heart rate sensors into the web ser- vice in School > Sensors.
- If you are going to use Polar GoFit for activity and/or heart rate monitoring, Configure evaluation types in School > Evaluation.You can also use the default grades/evaluation types.
- Create user accounts for the other teachers in School > Teacher. Teacher user accounts are limited based on the number of purchased licenses.
After setting up the web service, you can continue by creating the first activity course or creating the first heart rate course in the Courses section, or creating the first test template in the Fitness tests section.
ACTIVITY MONITORING WORKFLOW
The general activity monitoring workflow in the Polar GoFit web service is described below. Set up the system first. Then proceed to create the first course and continue as shown in the picture below.
You can have several activity courses in the Polar GoFit web service simultaneously. A student can participate in one activity course at a time. An activity monitor can be assigned to one student at a time.
- Create an activity course. Enter course information, course type, activity course settings and monitor settings.
- Add students to the course.
- Assign activity monitors to the students.
- Give the activity monitors to the students who wear them on their Activity measurement starts automatically. For more information on how to use the Polar Active activity monitor, see the Polar Active user manual.
- Transfer daily activity data regularly (at least once a week) to the web Both teachers and students can transfer activity data from Polar Active to the web service.
![]() Polar Active has room for 21 days in the activity diary. When activity data is transferred to the web service, it is removed from the activity monitor. If activity data is not transferred to the web service dur- ing the course, the activity monitor stops recording daily activity after 21 days of use.
Polar Active has room for 21 days in the activity diary. When activity data is transferred to the web service, it is removed from the activity monitor. If activity data is not transferred to the web service dur- ing the course, the activity monitor stops recording daily activity after 21 days of use.
- Review the daily activity data during and after course.
- Collect the activity monitors back from the students after the course The web service evaluates students automatically based on the selected evaluation type. Print out course evaluation report and detailed student report.
See also Student user accounts.
HEART RATE MONITORING WORKFLOW
The general heart rate monitoring workflow in the Polar GoFit web service is described below. Set up the system first. Then proceed to create the first course and continue as shown in the picture below.

You can have several heart rate courses in the Polar GoFit web service simultaneously. Students can participate in several heart rate courses at a time, and they can have several heart rate sensors assigned to them. Moreover, one heart rate sensor can be assigned to several students at a time provided that the students sharing a heart rate sensor are not participating in the same course.
- Create a heart rate course. Enter course information, course type and heart rate course settings.
- Add students to the course.
- Assign heart rate sensors to the students.
- Students wear the heart rate sensors during PE Teacher monitors and shares heart rate data via the Polar GoFit app. The Polar GoFit app displays each student’s heart rate as a percentage of the individual maximum heart rate value. It also shows the reward badges students collect. For instructions on how to wear the heart rate sensor, see the heart rate sensor user manual.
 Students pick up their assigned sensors in the beginning of each PE lesson and return them after the lesson. Alternatively, if each sensor is assigned to only one student, students may keep their assigned sensors at home. It is also possible for individual students to purchase their own sensors and wear them instead of school sensors.
 - Data transfer between the Polar GoFit app and Polar GoFit is automatic.
- Review the heart rate data during and after course in both Polar GoFit and the Polar GoFit app.
- The course The web service evaluates students automatically based on the selected evaluation type. Print out course evaluation report and detailed student report.
See also Student user accounts.
See Using heart rate monitoring in school in the Lessons for Life book to learn more about the basic structure of a heart-rate-based lesson.
FITNESS TESTING WORKFLOW
The general fitness testing workflow in the Polar GoFit web service is described below. Set up the system first. Then proceed to create a template and continue as shown in the picture below.

- Create a template by choosing the test items, or use an existing template.
![]() In addition to the optional test items that you can choose, Height & Weight is included in each template by default. This is because students’ height and weight influence the evaluation of their performance.
In addition to the optional test items that you can choose, Height & Weight is included in each template by default. This is because students’ height and weight influence the evaluation of their performance.
- Create a test by choosing the students.
- Arrange testing and enter the results into Polar GoFit.
- View the test results and edit them if necessary.
- Print out the reports.
TEACHER USER ACCOUNTS
The number of teacher user accounts is limited based on the purchased licenses. The school receives the first user account to Polar GoFit service when the licenses are purchased. After the sign-in, more user accounts can be created. It is recommended that each teacher has their own user account because created courses are attached to teacher accounts. Separate accounts help to organize courses more efficiently.
The number of available licenses for teacher user accounts is shown at the top of teacher list. To view the teacher list go to School > Teachers.
Teachers sign in to the web service to:
- create and manage courses,
- organize and carry out fitness testing,
- review, analyze and follow up students’ activity data, heart rate data and test results,
- create reports,
- manage school
Teachers sign in to the web service on Polar GoFit home page (www.polargofit.com) with the email address and password. When a teacher account is created, a link to select a password is sent by email. The password can be reset after sign-in under School > Teachers. The same user credentials are also used with WebSync.
See also, Adding teachers, Editing teachers and Resetting teacher’s password.
STUDENT USER ACCOUNTS
The number of student user accounts is not limited in Polar GoFit. Students can sign in to the web service to review their activity and heart rate data, and test results. Students can see only their own data.
Students sign in to the web service on Polar GoFit home page (www.polargofit.com) with a username and password. The username consists of school alias and student ID (school-alias/student-ID), for example polar- school/johnadams. The same user credentials are also used to transfer activity data from the activity monitors to the web service with Polar WebSync software.
Passwords are generated automatically when students are added or imported to the web service.
A password list can be printed out on the course page. The list contains course information, student names, usernames, passwords, and the address of the sign-in page. For security reasons, the passwords can only be printed out once. If you print out the list again, the passwords will not show. A Password assigned previously text will appear instead. A password can be regenerated with any teacher account under School > Students.
See also, Creating students, Editing students, Getting password list and Generating new password for student.
MONITORS IN POLAR GOFIT
Polar GoFit is compatible with the Polar Active activity monitors. It is mandatory to register the activity monitors to Polar GoFit before starting to use them. Activity data cannot be transferred from the activity monitors to the web service before the monitors are registered to the Polar GoFit web service.
Monitors are registered to the web service only once. During each course, the activity monitors will be assigned for students so that the activity data can be transferred to the web service.
There can be up to 1248 Polar Active activity monitors in the web service. The monitor IDs are set to the activity monitors in Polar GoFit when the monitors are registered to the web service. A monitor ID consists of a letter (A-Z) and a number (1-48). The monitor ID tells which case the activity monitor belongs to.
For instructions on registering the products to the web service, see Registering activity monitors. See also Assigning activity monitors.

SENSORS IN POLAR GOFIT
Polar GoFit is compatible with the Polar heart rate sensors that use Bluetooth® Smart technology. It is mandatory to register the heart rate sensors to Polar GoFit before starting to use them. Heart rate data cannot be monitored in the Polar GoFit app or transferred to the Polar GoFit web service before the sensors have been registered.
The sensor IDs are inserted into Polar GoFit at registration, and the registered sensors are labeled with stickers. Sensors are registered to the web service only once.
After registration, the sensors can be assigned to students so that their heart rate data can be monitored in the Polar GoFit app and transferred to the web service. One sensor can be assigned to several students at the same time provided that the students are not participating in the same course. Moreover, students can participate in several heart rate courses at a time, which is why they can also have several sensors assigned to them.
For instructions on registering sensors to the web service, see Registering heart rate sensors. See also Assigning heart rate sensors.
![]() It is possible for individual students to purchase their own heart rate sensors and wear them instead of school sensors. Sensors purchased by students need to be registered to Polar GoFit, too. For more information, see Using a personal heart rate sensor.
It is possible for individual students to purchase their own heart rate sensors and wear them instead of school sensors. Sensors purchased by students need to be registered to Polar GoFit, too. For more information, see Using a personal heart rate sensor.

DATA TRANSFER IN ACTIVITY MONITORING
To transfer data between an activity monitor and Polar GoFit, make sure you have the following available:
- Polar GoFit user credentials,
- a Polar FlowLink data transfer unit, and
- the Polar WebSync software (version 4 or newer).
You can download WebSync at www.polar.com/support. To install WebSync, download the installer, run it and follow the instructions on the screen.
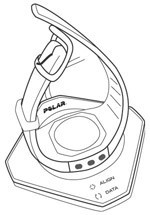
To start the data transfer, plug the FlowLink data transfer unit into a free USB port and place an activity monitor on the FlowLink with the display facing down. When the activity monitor is aligned correctly, the Align light is lit on the FlowLink.
![]()
When the activity monitor is detected and WebSync is running, WebSync prompts for Polar GoFit user credentials. The WebSync icon turns green in the task bar (Windows) / menu bar (OS X) simultaneously.
Use data transfer to:
- register activity monitors to the Polar GoFit web service,
- assign activity monitors to students when creating courses, and
- download activity data from an activity monitor to Polar GoFit.
Depending on what kind of data is transferred, the needed actions vary. See the table below for reference.
| I want to… | Location in Polar GoFit | WebSync | FlowLink |
| register activity monitors to the web service for my school. | School > Monitors | Start the software if it is not already running.
If there is a WebSync icon in the task bar (Windows) / menu bar (OS X), the software is ready to be used. |
Plug the data transfer unit into the USB port. |
| assign activity monitors to students for course duration. | Courses > Create course > Assign monitors / Courses > select and open course > Assign monitors | ||
| download activity data from an activity monitor to the web service. | – |
![]() Working with several activity monitors: When WebSync confirms with a green tick that the activity monitor is okay, leave the software running and place the next activity monitor on the FlowLink. If you accidentally closed WebSync, it prompts for the user credentials again when needed.
Working with several activity monitors: When WebSync confirms with a green tick that the activity monitor is okay, leave the software running and place the next activity monitor on the FlowLink. If you accidentally closed WebSync, it prompts for the user credentials again when needed.
For more information on the WebSync software, see the WebSync software help.
![]()
DATA TRANSFER IN HEART RATE MONITORING
Heart rate data is transferred from the heart rate sensors to the Polar GoFit app automatically via Bluetooth® Smart technology, provided that all the preparations (setting up the system, creating a heart rate course and assigning heart rate sensors) have been done as instructed. Teacher just needs to sign in to the Polar GoFit app in the beginning of a PE lesson, select the right course, and start a new lesson. Students wear their assigned heart rate sensors and start exercising as instructed by the teacher.
Also the data transfer between the Polar GoFit app and Polar GoFit is automatic. There is no need for additional data transfer software or equipment. All you need is an Internet connection.
Before PE lesson: Course and student data is synchronized from Polar GoFit to the Polar GoFit app.
Just before PE lesson: Teacher can edit exercise target in the Polar GoFit app. If a sensor is lost or broken, a teacher can assign a new sensor to a student in the Polar GoFit app. The changes are synchronized from the Polar GoFit app to Polar GoFit. Visitors are added to lessons in the Polar GoFit app.
During PE lesson: Heart rate data is transferred from the heart rate sensors to the Polar GoFit app via
Bluetooth® Smart technology.
Just after PE Lesson: Course and student data is synchronized from the Polar GoFit app to Polar GoFit.
After PE lesson: The Polar GoFit app shows the latest date when data was synchronized to Polar GoFit. The synchronized data is available in both Polar GoFit and the Polar GoFit app.

COURSE EVALUATION
The most common evaluation types are pre-defined in the web service. However, you can also edit, remove and add new evaluation types. For instructions on adding and editing the evaluation types, see Configuring evaluation types.
Default evaluation types:
| Letters fractionalized |
|
| Letters |
|
| Numbers (1-5) |
|
| Numbers (4-10) |
|
| Pass/Fail |
|
|
Basic |
|
| Advanced |
|
| Olympic medals |
|
Polar solutions for activity monitoring and heart rate monitoring provide teachers with objective evaluation tools. They allow evaluation based on effort, not just skills.
For more information on how to analyze activity and heart rate data, see Analyzing activity information and
Analyzing heart rate information in the Lessons for Life book.
TEST EVALUATION
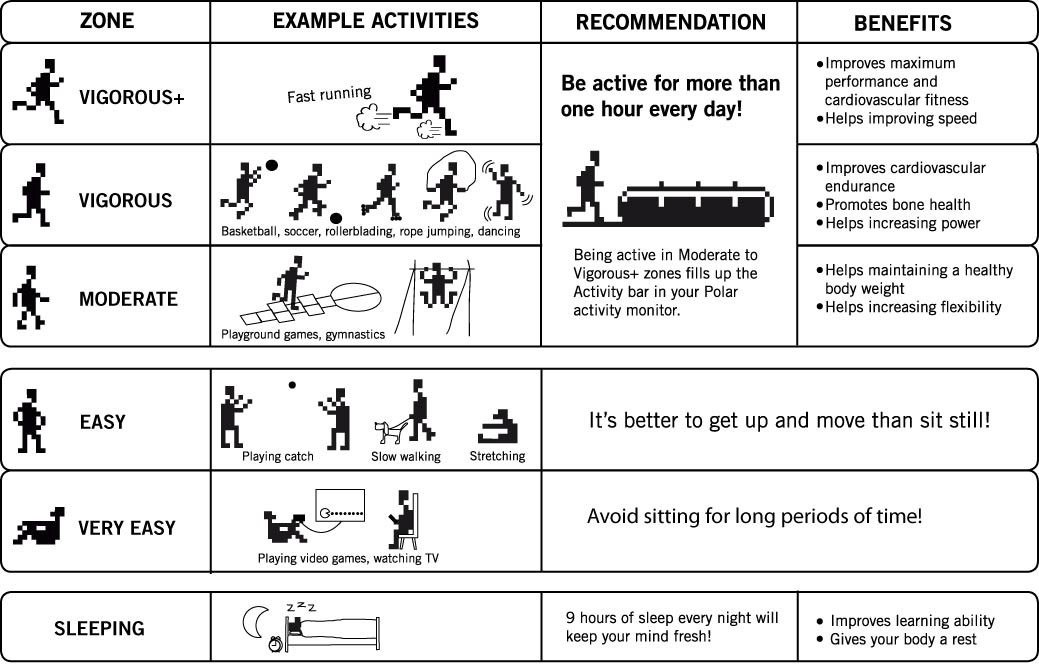
Teachers organize fitness testing by creating templates. Templates consist of test items, such as One-Mile Run or Shoulder Stretch. Each test item measures one of the following four fitness areas:
- Aerobic capacity:
- One-Mile Run,
- PACER (Progressive Aerobic Cardiovascular Endurance Run), and
- Walk Test.
- Flexibility:
- Back-Saver Sit and Reach and
- Shoulder Stretch.
- Body composition:
- BMI (Body Mass Index),
- Bioelectrical Impedance Analyzer, and
- Skinfold Measurement.
- Muscular strength and endurance:
- Curl-Up (abdominal strength and flexibility),
- Trunk Lift (trunk extensor strength and flexibility),
- Push-Up (upper body strength and endurance),
- Modified Pull-Up (upper body strength and endurance), and
- Flexed Arm Hang (upper body strength and endurance).
![]() In addition to the optional test items that you can choose, Height & Weight is included in each template by default. This is because students’ height and weight influence the evaluation of their performance.
In addition to the optional test items that you can choose, Height & Weight is included in each template by default. This is because students’ height and weight influence the evaluation of their performance.
Each test item is evaluated according to one of the following evaluation scales:
- Very Lean -Meets Expectations-Needs Improvement (Some Risk)-Needs Improvement (High Risk):
- BMI (Body Mass Index),
- Bioelectric Impedance Analyzer, and
- Skinfold Measurement.
- Meets Expectations-Needs Improvement (Some Risk)-Needs Improvement (High Risk):
- One-Mile Run,
- PACER (Progressive Aerobic Cardiovascular Endurance Run), and
- Walk Test.
- Meets expectations-Needs improvement:
- Curl-Up,
- Trunk Lift,
- Push-Up,
- Modified Pull-Up,
- Flexed Arm Hang,
- Back-Saver Sit and Reach, and
- Shoulder Stretch.

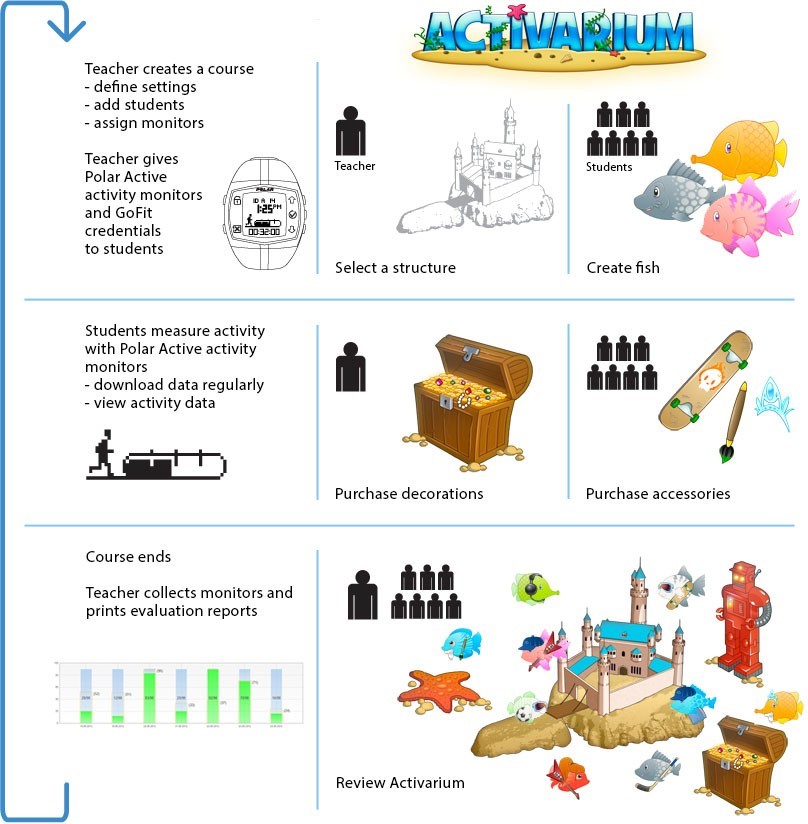
Activarium is a game that students play with the daily activity they gather on their activity monitors: the more daily activity on Polar Active, the more activity points in Activarium!
Each student has their own fish that represents them in the game, and together as a group the students build a structure, such as a castle or a shipwreck, by reaching their daily activity target. The students can see how the building project progresses, and with the collected activity points they can customize their fish. Teacher can also buy decorations for the Activarium with the course’s activity points.
Activarium can be activated for any course. There can be several Activariums in use at the same time. The school can showcase either all activated Activariums or a selected one, for example, on a big screen at school. Students can access a course’s Activarium after signing in to the web service if Activarium has been activated.
Activarium is not automatically included in the Polar GoFit licenses. It has to be purchased separately for the school.
See also, Activating Activarium for a course, Opening Activarium, Decorating the Activarium and Opening Activarium showcase.
ACTIVITY POINTS
The daily activity the students gather on their activity monitors is turned into activity points. The fish can be customized and the Activarium can be decorated with activity points.
There are three types of activity points:
- All daily activity a student gathers increases his/her individual activity point The students can customize their own fish with these activity points. Customization is buying accessories and changing colors and pattern.
- The daily activity the students gather together gradually builds up the selected structure automatically.
- The gathered daily activity that exceeds the daily activity target increases course’s activity point The teacher can decorate the Activarium with these activity points.
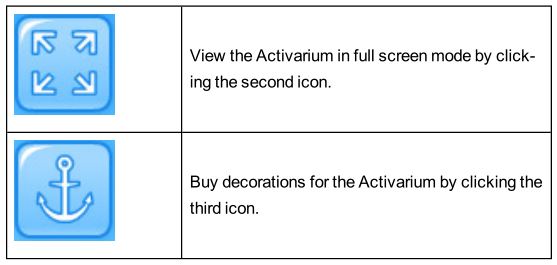
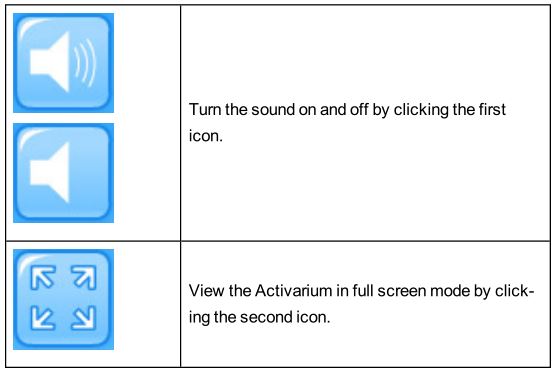
ACTIVARIUM CONTROLS
Point your mouse to the upper right corner of the Activarium. A menu appears.
In course’s Activarium:
In course’s or school’s Activarium showcase:
ACTIVITY COURSES
CREATING AN ACTIVITY COURSE
- Go to Courses.
- Click Create course.
- Enter Course information (course name, start date, end date, and evaluation type).
- Select Activity course as course
- Select Target active time.
- Select Monitor settings (monitor display selection, monitor language and settings lock).
- Click Add students. After adding students, the web service redirects you back to the course For more information, see Adding students to an activity course.
- Click Assign monitors. After assigning the activity monitors, the web service redirects you back to the course For more information, see Assigning activity monitors.
- After adding students and assigning activity monitors, click Save. The software redirects you back to the Courses page.
When you create a course, it is not mandatory to add students or assign monitors right away. You can add (more) students and assign (more) activity monitors at any time.
![]() You can edit an ongoing or future activity course in Polar GoFit at any time. However, you can only edit course name, evaluation type, students and monitors after you have saved the course. You can also change the teacher. For more information, see Editing an activity course.
You can edit an ongoing or future activity course in Polar GoFit at any time. However, you can only edit course name, evaluation type, students and monitors after you have saved the course. You can also change the teacher. For more information, see Editing an activity course.
EDITING AN ACTIVITY COURSE
You can edit an ongoing or future activity course at any time. Finished courses can only be viewed.
- Go to Courses.
- Find the course on the Ongoing courses list, or use the search.
- Click the row or the icon to open the course.
- Click Edit course.
- View the course information and edit the necessary You can edit the following information: course name, teacher, evaluation type, students and monitors.
- Click Save. The software redirects you back to the Courses
For more information on adding or removing students, see Adding students to an activity course and Removing students from an activity course.
For more information on assigning and reassigning Polar Active activity monitors, see Assigning activity monitors and Reassigning activity monitors.
ADDING STUDENTS TO AN ACTIVITY COURSE
Students can be added to the course when the course is created or afterwards. You can edit an ongoing or future activity course at any time.
- Go to Courses.
- Find the course on the Ongoing courses list, or use the search.
- Click the row or the icon to open the course.
- Click Edit course.
- Click Add students.
- Select the students you want to add to the course.
School’s students are listed on the page, grouped by classes. Expand classes to see the students available for the course. You can also select a whole class to be added. Selected students do not need to be from the same class.
![]() A student can participate in one activity course at a time. Students who have already been added to another activity course are not shown on the student list on this page. A student can, however, par- ticipate in an activity course while participating in one or more heart rate courses.
A student can participate in one activity course at a time. Students who have already been added to another activity course are not shown on the student list on this page. A student can, however, par- ticipate in an activity course while participating in one or more heart rate courses.
- Click Finish when you are The software redirects you back to the course information page.
REMOVING STUDENTS FROM AN ACTIVITY COURSE
Students can be removed from an activity course any time during the course.
- Go to Courses.
- Find the course on the Ongoing courses list, or use the search.
- Click the row or the icon to open the course.
- Click Edit course.
- Click Remove students.
- Students who have been marked to participate in the course are listed on the page, grouped by Expand classes to see the students. Select the students you want to remove from the course.
- Click Remove students.
- Polar GoFit asks for a Click Remove to confirm or Cancel to return to the previous view. After clicking Remove, the software redirects you back to the course information page.
ASSIGNING ACTIVITY MONITORS
Activity monitors can be assigned when the course is created or afterwards. An ongoing or future activity course can be edited at any time.
- Make sure you have Polar FlowLink data transfer unit plugged into a free USB port and Polar WebSync software installed on your computer. For more information, see Data transfer in activity monitoring.
- Go to Courses.
- Find the course on the Ongoing courses list, or use the search.
- Click the row or the icon to open the course.
- Click Edit course.
- Click Assign monitors.
- Place the first free activity monitor on the FlowLink with the display facing down. Make sure the Align light is lit on the FlowLink.
- WebSync prompts for Polar GoFit user credentials.
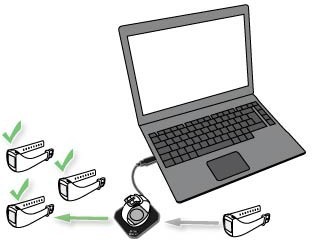
- As soon as a green tick appears for the activity monitor in WebSync and the monitor appears in Polar GoFit, place another activity monitor on the Follow the progress in WebSync.
- Continue until you have assigned activity monitors to all students.
- Click Finish when you are The software redirects you back to the course information page.
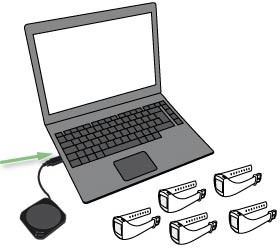
![]() Working with several activity monitors: When WebSync confirms with a green tick that the activity monitor is okay, leave the software running and place the next activity monitor on the FlowLink. If you accidentally closed WebSync, it prompts for the user credentials again when needed.
Working with several activity monitors: When WebSync confirms with a green tick that the activity monitor is okay, leave the software running and place the next activity monitor on the FlowLink. If you accidentally closed WebSync, it prompts for the user credentials again when needed.
REASSIGNING ACTIVITY MONITORS
Activity monitors can be reassigned to other students or courses after the course has ended. If a monitor is needed for another course before the original course has ended, the reservation can be removed by following the steps below. After that the activity monitor can be reassigned or, for example, removed from the school.
An ongoing or future activity course can be edited at any time. This includes reassigning activity monitors.
- Go to Courses.
- Find the course on the Ongoing courses list, or use the search.
- Click the row or the icon to open the course.
- Click Edit course.
- Click Assign monitors.
- Remove an activity monitor from a student by clicking Remove monitor at the end of the row.
- Polar GoFit asks for a Click Remove monitor to confirm or Cancel to return to the previous view.
- Repeat steps 6 to 7 to remove more activity monitors.
- Click Finish when you are The software redirects you back to the course information page.
Removed activity monitors can now be assigned to other students or courses. For more information, see Assigning activity monitors.
Removed activity monitors can also be removed from the school. For more information, see Removing activity monitors.
TRANSFERRING ACTIVITY DATA
Activity data can be transferred from the Polar Active activity monitors to the web service with teacher or student user credentials. For more information on user credentials, see Teacher user accounts and Student user accounts.
- Make sure you have Polar FlowLink data transfer unit plugged into a free USB port and Polar WebSync software installed on your computer running in the background. For more information see Data transfer in activity monitoring.
- Place the first activity monitor on the FlowLink with the display facing Make sure the Align light is lit on the FlowLink.
- WebSync window opens automatically and prompts for Polar GoFit user credentials.
- As soon as a green tick appears for the activity monitor in WebSync and the monitor appears in Polar GoFit, place another activity monitor on the Follow the progress in WebSync.
- Continue until you have transferred activity data from all activity
- Close WebSync when you are Sign in to the web service to review the activity data.
![]() Working with several activity monitors: When WebSync confirms with a green tick that the activity monitor is okay, leave the software running and place the next activity monitor on the FlowLink. If you accidentally closed WebSync, it prompts for the user credentials again when needed.
Working with several activity monitors: When WebSync confirms with a green tick that the activity monitor is okay, leave the software running and place the next activity monitor on the FlowLink. If you accidentally closed WebSync, it prompts for the user credentials again when needed.
VIEWING ACTIVITY COURSES
There are two ways to list and view activity courses, including your own courses. You can open your latest courses through the Dashboard and all the courses at your school through the Courses page.
![]() Your own courses have been created with your teacher account.
Your own courses have been created with your teacher account.
VIEWING “MY COURSES” ON DASHBOARD
Your five latest courses are listed on the Polar GoFit dashboard.
- Click the icon to go to Dashboard.
- Scroll down to My Courses. Activity courses are marked with the activity icon:
- View your latest activity The following course information is shown on the Dashboard:
-
- course name,
- average active time in minutes compared to target active time (for example, 65/90 min),
- number of students,
- number of assigned activity monitors,
- days since the last time activity data was transferred from the activity monitors,
- start date, and
- end
- Open a course by clicking View course.
- View the course For more information, see Viewing activity courses on courses page.
VIEWING ACTIVITY COURSES ON COURSES PAGE
- Go to Courses.
- Find the course on the course lists (Ongoing courses/Finished courses), or use the Activity courses are marked with the activity icon:
- Click the row or the icon to open the Ongoing and future activity courses can be edited, but finished activity courses can only be viewed.
- Click Edit course/View course.
- The following information is shown:
-
- course name,
- teacher,
- start date,
- end date,
- course duration,
- evaluation type,
- course type,
- target active time in minutes,
- activity monitor settings, and
- students added to the course (listed by the class).
Expand a class to see the students. The following information is shown for the students:
- first name,
- last name,
- activity monitor which is assigned to the student, and
- date when activity data was last transferred from the activity
Return to course list by clicking Back to Course list.
VIEWING ACTIVITY DATA
All the activity courses at your school are listed on the Courses page. Your latest activity courses are listed also on Dashboard. For more information, see Viewing activity courses.
- Go to Courses.
- Find the course on the course lists (Ongoing courses/Finished courses), or use the
- Click the row or the icon to open the
- The Weekly activity page shows the following Course information:
- number of students,
- average active time in minutes compared to target active time(for example, 65/90min),
- teacher,
- evaluation type,
- start date, and
- end date.
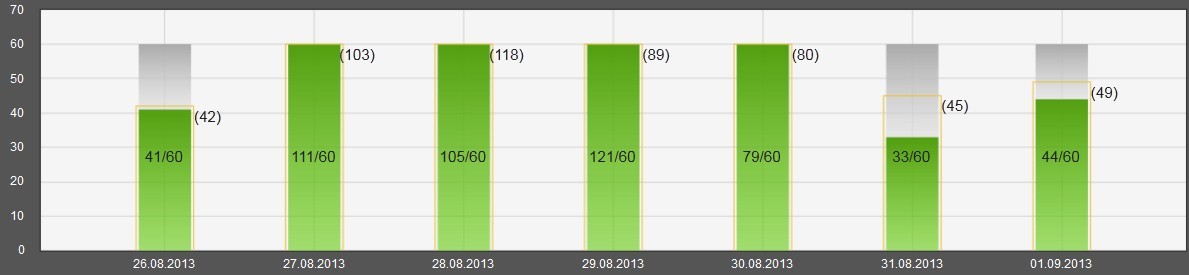
- Select All students on the Student information drop-down list to review the daily group averages for the whole course as bar graphs. Up to seven days’ activity bars are displayed simultaneously. Browse through the weeks with the arrows above the bar graph area. The bar graph area shows the following information:
- the bar is the daily activity target, and
- the colored part of the bar is the group average result for the day.This information is also shown as a tooltip text when you hover over any of the bars.
- Select one student on the Student information drop-down list to review the daily results for the selec- ted student as bar graphs. Up to seven days’ activity bars are displayed simultaneously. Browse through the weeks by using the arrows above the bar graph area. The bar graph area shows the following information:
- the bar is the daily activity target,
- the colored part of the bar is the student’s daily activity result, and
- the colored frame on the bar is the group average result for theThis information is also shown as a tooltip text when you hover over any of the bars.
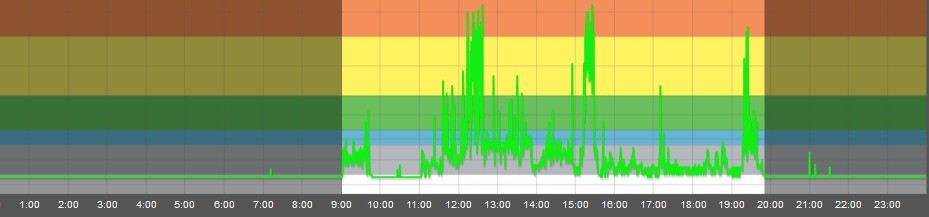
- Click View daily activity to review the selected student’s daily activity in Each day’s activity data is displayed as a curve graph. Alternatively, you can click any of the bars in the weekly bar graph to view the curve graph displaying the selected student’s activity data on that particular day. Move between the days with the arrows above the curve graph area. You can change the student from the Student information drop-down list. In addition to the daily activity curve, the Daily activity page shows the following information:
- active time in minutes compared to target active time (for example, 65/90 min),
- time spent in the different activity zones (the Vigorous+, Vigorous and Moderate zones fill up the daily activity bar),
- time spent in the sleeping zone,
- calories and steps,
- automatic evaluation based on the selected evaluation type and student’s total score of daily activity. You can print the activity curve by clicking Print activity curve above the curve. The curve is printed as a PDF file which can then be saved on the computer or printed on paper.
- Return to the bar graph page by clicking Back to weekly activity. You can use, for example, the following questions to discuss the activity data with your students:
- How did you get your activity bar filled?
- How did you get time for each activity zone?
- What could you do to gain more active time?
You can also make a plan for an active day/week, and then discuss the planned and actual hours/minutes.
For more information on how to analyze activity data, see Analyzing activity information in the Lessons for Life book.
ACTIVATING ACTIVARIUM FOR A COURSE
You can activate Activarium for an ongoing or future course at any time. Activarium cannot be activated for finished courses. The students cannot see Activariums that have not been activated.
- Go to Courses.
- Find the course on the Ongoing courses list, or use the search.
- Click the row or the icon to open the course.
- Click Edit course.
- Click Open Activarium. The Activarium opens into a new window.
- If Activarium has not been activated for the course, you are asked to select a main building for the course’s Activarium.
- Save the selection by clicking Save. The Activarium is now activated for the course.
OPENING ACTIVARIUM
A course’s Activarium can be opened on the Dashboard or on the Courses page.
ON THE DASHBOARD
- Click the icon to go to Dashboard.
- Scroll down to My Courses.
- View your latest courses.
- Open the course’s Activarium by clicking Open Activarium. The Activarium opens into a new window.
ON THE COURSES PAGE
- Go to Courses.
- Find the course on the Ongoing courses list, or use the search.
- Click the row or the icon to open the course.
- Click Edit course.
- Click Open Activarium. The Activarium opens into a new window.
The school can also showcase Activariums, for example, on a big screen at school.
DECORATING THE ACTIVARIUM
You can buy decorations for the Activarium’s main building with the course’s activity points.
- Open the Activarium.
- Point your mouse to the upper right corner of the A menu appears.
- Select the decoration icon.
- The available activity points are shown in the upper left Scroll through the decorations.Preview a decoration by selecting it and clicking Preview. Click the Activarium to return to the decoration store.
- Select a decoration and click Buy if you have enough activity points to buy the The dec- oration is added to the Activarium.
![]() Students can customize (accessorize and modify) their fish with their individual activity points.
Students can customize (accessorize and modify) their fish with their individual activity points.
Read more about the activity points in Activarium.
OPENING ACTIVARIUM SHOWCASE
The school can showcase activated Activariums, for example, on a big screen at school. You can select to showcase school’s all activated Activariums or a course’s Activarium.
SHOWCASING SCHOOL’S ALL ACTIVARIUMS
- Go to Activarium showcase on the Dashboard .
- Click Open showcase with all courses to launch the Activarium showcase in a new window.
- Copy the Activarium’s URL address to showcase the Activarium on another computer.
All of the school’s activated Activariums are shown randomly with anonymous fish.
SHOWCASING A COURSE’S ACTIVARIUM
- Go to Courses.
- Find the course on the Ongoing courses list, or use the search.
- Click the row or the icon to open the course.
- Click Edit course.
- Click Showcase Activarium to launch the Activarium showcase in a new window.
The course’s Activarium is shown with anonymous fish.
REMOVING AN ACTIVITY COURSE
Courses can be removed from the school. Only activity courses that do not have activity monitors assigned to students can be removed.
If the course you wish to remove is not available for removal, make sure there are no activity monitors assigned to the course’s students. To remove the monitors from the students, see Reassigning activity monitors.
- Go to Courses.
- Click Remove course. The courses that can be removed from the school are listed.
- Select the courses you wish to remove from the Click Remove course.
- Polar GoFit asks for a Click Remove to confirm or Cancel to return to the previous view.
- Repeat steps 2 to 4 to remove more courses.
HEART RATE COURSES
CREATING A HEART RATE COURSE
- Go to Courses.
- Click Create course.
- Enter Course information (course name, start date, end date, and evaluation type).
- Select Heart rate course as course type.
- Enter Heart rate course settings (target zone, time in target zone, showing/hiding calories, showing student names/student IDs in the Polar GoFit app). For more information on target zones, see Target zones and badges.
- Click Add students. After adding students, the web service redirects you back to the course For more information, see Adding students to a heart rate course.
- Click Assign sensors. After accepting the sensor reservations, the web service redirects you back to the course For more information, see Assigning heart rate sensors.
- After adding students and assigning heart rate sensors, click Save. The software redirects you back to the Courses page.
When you create a course, it is not mandatory to add students or assign sensors right away. You can add (more) students and assign (more) heart rate sensors at any time.
You can edit an ongoing or future heart rate course in Polar GoFit at any time. However, start date and course type cannot be changed after you have saved the course. For more information, see Editing a heart rate course.
It is possible to change the exercise target (target zone and time in target zone) in the Polar GoFit app as well. If you change the exercise target in the Polar GoFit app, the change will be synchronized to Polar GoFit.
TARGET ZONES AND BADGES
TARGET ZONES
When you create a heart rate course, you need to select a Target zone. The available target zones are:
- Performance (70-100% of maximum heart rate): develops maximum performance and speed,
- Healthy heart (70-90% of maximum heart rate): improves aerobic fitness and performance capacity,
- Active (60-80% of maximum heart rate): improves basic endurance and muscle tone, and
- Free (no zone target).
You also need to select Time in target zone, which indicates for how long the students should aim to stay within the target zone in every PE lesson. The system evaluates students automatically based on their achieved percentages of the target time in target zone.
If the target zone is Free, there will be no evaluation and no badges.
You can change both the target zone and time in target zone in either Polar GoFit or the Polar GoFit app after the course has been created. For more information, see Editing a heart rate course.
For more information on heart rate zones in general, see Using heart rate monitoring in school in the
Lessons for Life book.
BADGES
There are two kinds of badges: reward badges and personal best badges.
For every ten minutes spent in the target zone, a student receives a reward badge. The reward badges are named after cats:
![]()
![]()
Polar GoFit lesson summaries show the reward badges a student has received for each lesson. If a student stays in the target zone for less than ten minutes during a lesson, no reward badge is achieved for that lesson.
In each heart rate course, a student receives a personal best badge for the lesson with the best performance in terms of minutes spent in the target zone. The personal best badges are shown in Polar GoFit lesson summaries.
![]()
EDITING A HEART RATE COURSE
You can edit an ongoing or future heart rate course at any time. Finished courses can only be viewed.
- Go to Courses.
- Find the course on the Ongoing courses list, or use the search.
- Click the row or the icon to open the course.
- Click Edit course.
- View the course information and edit the necessary Start date and course type cannot be edited.
- Click Save. The software redirects you back to the Courses page.
For more information on adding or removing students, see Adding students to a heart rate course and Removing students from a heart rate course.
For more information on assigning and reassigning heart rate sensors, see Assigning heart rate sensors and Reassigning heart rate sensors.
![]() It is possible to change the exercise target (target zone and time in target zone) in the Polar GoFit app as well. If you change the exercise target in the Polar GoFit app, the change will be synchronized to Polar GoFit.
It is possible to change the exercise target (target zone and time in target zone) in the Polar GoFit app as well. If you change the exercise target in the Polar GoFit app, the change will be synchronized to Polar GoFit.
ADDING STUDENTS TO A HEART RATE COURSE
Students can be added to the course when the course is created or afterwards. You can edit an ongoing or future heart rate course at any time.
- Go to Courses.
- Find the course on the Ongoing courses list, or use the
- Click the row or the icon to open the
- Click Edit course.
- Click Add students.
- Select the students you want to add to the The maximum number of students for a heart rate course is 40.School’s students are listed on the page, grouped by classes. Expand classes to see the students available for the course. You can also select a whole class to be added. Selected students do not need to be from the same class. A student can participate in several heart rate courses at a time. It is also possible to participate in an activity course while participating in one or more heart rate courses.
- Click Finish when you are The software redirects you back to the course information page.
![]() It is possible for visiting students to participate in individual lessons provided that there are available sensors and the visiting student has been added to Polar GoFit. Visitors are added to lessons in the Polar GoFit app. Visiting students’ lesson summaries can be viewed via the students’ personal Polar GoFit accounts.
It is possible for visiting students to participate in individual lessons provided that there are available sensors and the visiting student has been added to Polar GoFit. Visitors are added to lessons in the Polar GoFit app. Visiting students’ lesson summaries can be viewed via the students’ personal Polar GoFit accounts.
REMOVING STUDENTS FROM A HEART RATE COURSE
Students can be removed from heart rate course any time during the course.
- Go to Courses.
- Find the course on the Ongoing courses list, or use the search.
- Click the row or the icon to open the course.
- Click Edit course.
- Click Remove students.
- Students who have been marked to participate in the course are listed on the page, grouped by Expand classes to see the students. Select the students you want to remove from the course.
- Click Remove students.
- Polar GoFit asks for a Click Remove to confirm or Cancel to return to the previous view. After clicking Remove, the software redirects you back to the course information page
ASSIGNING HEART RATE SENSORS
Heart rate sensors can be assigned when the course is created or afterwards. An ongoing or future heart rate course can be edited at any time.
- Go to Courses.
- Find the course on the Ongoing courses list, or use the
- Click the row or the icon to open the
- Click Edit course.
- Click Assign sensors.
- The system assigns a sensor for each student The number of the assigned sensor is shown for each student. You can use the drop-down list to reassign the heart rate sensors manually.
- Click Save to accept the reservations. The software redirects you back to the course information page
If a student has purchased their own heart rate sensor to use instead of a school sensor, you need to register the sensor ID to the system. If a student has a personal heart rate sensor in use, the system does not assign a school sensor for that particular student.
Within a course, one sensor can be assigned to one student at a time. Within a school, one sensor can be assigned to several students at a time provided that they are not participating in the same course. Individual students can take several heart rate courses simultaneously, and have several heart rate sensors assigned to them.
![]() If a sensor is lost or broken, a teacher can assign a new sensor to a student in the Polar GoFit app right before the PE lesson.
If a sensor is lost or broken, a teacher can assign a new sensor to a student in the Polar GoFit app right before the PE lesson.
REASSIGNING HEART RATE SENSORS
An ongoing or future heart rate course can be edited at any time. This includes reassigning heart rate sensors.
- Go to Courses.
- Find the course on the Ongoing courses list, or use the
- Click the row or the icon to open the
- Click Edit course.
- Click Assign sensors.
- The number of the assigned sensor is shown for each You can use the drop-down list to reas- sign heart rate sensors manually. Click Remove reservation to remove a heart rate sensor from a stu- dent.
- Click Save to accept the The software redirects you back to the course information page.
See also Assigning heart rate sensors.
Removed heart rate sensors can be removed from the school if they have no other reservations. For more information, see Removing heart rate sensors.
USING A PERSONAL HEART RATE SENSOR
It is possible for students to purchase their own heart rate sensors and use them instead of school sensors. Personal sensors need to be registered to the system.
- Go to School > Students tab.
- Find the student on the student Students are listed by the class. Use the search and filtering options above the student list. Expand a class to see the students.
- Click the icon to edit the student.
- Register the sensor by inserting the sensor ID into the Own sensor’s ID field.
- Click Save to save the The software redirects you back to the student list. To return without saving the changes, click Back to student list.
If there is a school sensor assigned to the student, you can remove the reservation. See also Assigning heart rate sensors.
TRANSFERRING HEART RATE DATA
Heart rate data is transferred from the heart rate sensors to the Polar GoFit app via Bluetooth® Smart technology. Also the data transfer between the Polar GoFit app and Polar GoFit is automatic. There is no need for additional data transfer software or equipment. All you need is an Internet connection. For more information, see Data transfer in heart rate monitoring.
VIEWING HEART RATE COURSES
There are two ways to list and view heart rate courses, including your own courses. You can open your latest courses through the Dashboard and all the courses at your school through the Courses page.
Your own courses have been created with your teacher account.
VIEWING “MY COURSES” ON DASHBOARD
Your five latest courses are listed on the Polar GoFit dashboard.
- Click the icon to go to Dashboard.
- Scroll down to My Courses. Heart rate courses are marked with the heart icon:
- View your latest heart rate courses. The following course information is shown on the Dashboard:
- course name,
- achieved percentage of target time in target zone(for example 91/100%),
- number of students,
- number of assigned sensors,
- number of completed lessons,
- start date, and
- end date.
- Open a course by clicking View course.
- View the course information. For more information, see Viewing heart rate courses on courses page.
VIEWING HEART RATE COURSES ON COURSES PAGE
- Go to Courses.
- Find the course on the course lists (Ongoing courses/Finished courses), or use the Heart rate courses are marked with the heart icon:
- Click the row or the icon to open the Ongoing and future heart rate courses can be edited, but finished heart rate courses can only be viewed.
- Click Edit course/View course.
- The following information is shown:
- course name,
- teacher,
- start date,
- end date,
- course duration,
- evaluation type,
- course type,
- target zone,
- time in target zone,
- visibility of calories (Yes/No)
- student identifier in the Polar GoFit app (name or student ID), and
- students added to the course (listed by the class).
Expand a class to see the students. The following information is shown for the students:
- first name,
- last name, and
- heart rate sensor(s) assigned to the
Return to course list by clicking Back to Course list.
VIEWING HEART RATE DATA
All the heart rate courses at your school are listed on the Courses page. Your latest heart rate courses are listed also on Dashboard. For more information, see Viewing heart rate courses.
- Go to Courses.
- Find the course on the course lists (Ongoing courses/Finished courses), or use the
- Click the row or the icon to open the
- The Course summary page shows the following Course information:
-
- number of students,
- number of lessons,
- teacher,
- evaluation type,
- start date, and
- end
- It also shows:
- achieved percentage of target time in target zone (group average),
- time spent in different heart rate zones (group average), and
- list of lessons.
- The list of lessons shows the following information for each lesson:
- date and time,
- target zone,
- time spent in different heart rate zones, and
- lesson
-
- Click / to open/close all the Click to open/close an individual lesson. When you open a lesson, the following information is shown:
- a horizontal bar shows the minutes each student has spent in the target zone,
- a green vertical line shows the target time in target zone in minutes,
- a red vertical line shows the group average minutes spent in target zone, and
- saved data percentage for each student (data can be missing, for example, if the student had to leave the class for a few minutes and the connection between the heart rate sensor and the Polar GoFit app was interrupted)
- To view the students’ lesson summaries with heart rate curves, click View lesson summaries. Alternatively, you can click the name of the student whose lesson summaries you wish to The Lesson summary page shows the following information:
- Student information drop-down list where you can select the student whose lesson sum- maries you wish to view,
- time spent in different heart rate zones (target zone indicated with a red frame),
- achieved time in target zone compared to target time (both as a percentage and as minutes),
- calories spent (optional),
- evaluation,
- saved data percentage,
- lesson number,
- possible badges,
- short description of the benefit of the lesson (if the student stayed in the target zone for at least ten minutes),
- a curve graph displaying the student’s heart rate during the lesson, and
- maximum and average heart rate during the lesson. Move between the lessons with the arrows above the curve graph area. You can print the heart rate curve by clicking Print HR curve above the curve. The curve is printed as a PDF file which can then be saved on the computer or printed on paper.
- Click View course summary to return to the course charts.
 Move between the lessons with the arrows above the curve graph area.
Heart rate data can be missing for two possible reasons:
- The connection between a heart rate sensor and the Polar GoFit app was This could hap- pen, for example, if a student had to leave the class for a few minutes. In this case, the saved data per- centage for that student is less than 100 %.
- A heart rate sensor did not detect heart This could happen, for example, if the heart rate sensor was not worn as instructed (the strap must be tight enough and the electrodes must be properly moistened). In this case, the connection between the heart rate sensor and the Polar GoFit app was uninterrupted, and the saved data percentage is 100 %, but the heart rate curve shows that no heart rate was detected.
It is possible for visiting students to participate in individual lessons provided that there are available sensors and the visiting student has been added to Polar GoFit. Visitors are added to lessons in the Polar GoFit app. Visiting students’ lesson summaries can be viewed via the students’ personal Polar GoFit accounts.
![]() You can use, for example, the following questions to discuss the heart rate data with your students:
You can use, for example, the following questions to discuss the heart rate data with your students:
- How did you feel in each heart rate zone?
- What are the benefits of exercise in each heart rate zone?
- Why is it important to have a warm-up and a cool-down phase?
- Compare and discuss your maximum/average heart rate in different Can you explain the differences between lessons?
You can also make a plan for a heart-rate-based PE lesson together with the students, and then discuss the actual heart rate data after the lesson. Did the class achieve the target?
For more information on how to analyze heart rate data, see Analyzing heart rate information in the
Lessons for Life book.
REMOVING A HEART RATE COURSE
Courses can be removed from the school. Only heart rate courses that do not have heart rate sensors assigned to students can be removed.
If the course you wish to remove is not available for removal, make sure there are no heart rate sensors assigned to the course’s students. To remove the sensors from the students, see Reassigning heart rate sensors.
- Go to Courses.
- Click Remove course. The courses that can be removed from the school are listed.
- Select the courses you wish to remove from the Click Remove course.
- Polar GoFit asks for a Click Remove to confirm or Cancel to return to the previous view.
- Repeat steps 2 to 4 to remove more courses.
GETTING STUDENT LIST
You can print out a student list for a course and place the printed student list, for example, into the pocket of the case.
- Go to Courses.
- Find the course on the Ongoing courses list, or use the search.
- Click the row or the icon to open the course.
- Click Edit course.
- Click Print student list to generate a list of the students added to the course.
- A PDF file is The PDF file can be saved on the computer and printed on paper.
GETTING PASSWORD LIST
You can print out a password list for a course and share the passwords with students. For security reasons, the passwords are shown on the password list only when they are printed for the first time. For more information on the password list, see Student user accounts.
- Go to Courses.
- Find the course on the Ongoing courses list, or use the
- Click the row or the icon to open the course.
- Click Edit course.
- Click Print password list to generate a password list for the students added to the
- A PDF file is The PDF file can be saved on the computer and printed on paper. The PDF file includes a student list with passwords. You can cut the student list into strips and give the passwords to students.
![]() The password list includes only automatically generated passwords. Passwords that have been generated on student information page are not shown in the PDF.
The password list includes only automatically generated passwords. Passwords that have been generated on student information page are not shown in the PDF.
GETTING COURSE EVALUATION REPORT
- Go to Reports > Course report.
- Click the row or the icon to select a The course list can be filtered with the search form above the list.
- Select Course evaluation.
- Select either PDF, XLS or Data XLS depending on which format you need.Data XLS report contains no formatting which makes the data easy to filter, sort and export further.
- If you wish to exclude days that contain no activity data/times when there is no heart rate data available, tick the box.
- Click Create report. The report is created and The file can be saved on the computer and printed on paper.
![]() Alternatively, you can proceed to report printing by clicking Print reports on the Course summary page. See also Reading course evaluation report.
Alternatively, you can proceed to report printing by clicking Print reports on the Course summary page. See also Reading course evaluation report.
READING COURSE EVALUATION REPORT
To create a course evaluation report, see Getting course evaluation report. The course evaluation report can be in either XLS, PDF or Data XLS format. All students are printed in the same report.
![]() Data XLS report contains no formatting which makes the data easy to filter, sort and export further.
Data XLS report contains no formatting which makes the data easy to filter, sort and export further.
The report heading shows the following information: teacher’s name, school, course name, course start and end dates, report type and course status (not started/ongoing/finished).
The report shows the following information:
- The first column shows the student’s name.
- The second column shows the achieved percentage of the maximum score.
- The third column shows the automatic evaluation for the student.
The course averages are shown on the last row.
For more information on how to analyze activity or heart rate data, see Analyzing activity information or Analyzing heart rate information in the Lessons for Life book.
GETTING DETAILED STUDENT REPORT
- Go to Reports > Course report.
- Click the row or the icon to select a The course list can be filtered with the search form above the list.
- Select Student details.
- Select either PDF, XLS or Data XLS depending on which format you need.
![]() Data XLS report contains no formatting which makes the data easy to filter, sort and export further.
Data XLS report contains no formatting which makes the data easy to filter, sort and export further.
- Select the students you want to include in the By default all the students who have been added to the course are selected.
- If you wish to exclude days that contain no activity data/time when there is no heart rate data available, tick the box.
- Click Create report. The report is created and The file can be saved on the computer and printed on paper.
![]() Alternatively, you can proceed to report printing by clicking Print reports on the Course summary page. See also Reading detailed student report.
Alternatively, you can proceed to report printing by clicking Print reports on the Course summary page. See also Reading detailed student report.
READING DETAILED STUDENT REPORT
To create a detailed student data report, see Getting detailed student report. The detailed student report can be either in XLS, PDF or Data XLS format. All selected students are printed in the same report and displayed separately.
![]() Data XLS report contains no formatting which makes the data easy to filter, sort and export further.
Data XLS report contains no formatting which makes the data easy to filter, sort and export further.
The report heading shows the following information: teacher’s name, school, course name, course start and end dates, and report type.
The report shows the following information in the table header: student’s name, course name and date range.
ACTIVITY COURSES
The report shows the following information:
- date,
- daily activity result (of the daily activity target),
- time spent in the different activity zones (5 zones and sleep time),
- steps,
- calories, and
- automatic
Student’s average results are shown on the last row.
For more information on how to analyze activity data, see Analyzing activity information in the Lessons for Life book.
HEART RATE COURSES
The report shows the following information:
- date of each lesson,
- saved data percentage (data can be missing, for example, if the student had to leave the class for a few minutes and the connection between the heart rate sensor and the Polar GoFit app was inter- rupted),
- time spent in target zone compared to the target time,
- time spent in each heart rate zone (5 zones, target zone highlighted),
- calories (optional), and
- automatic evaluation (if the target zone for a lesson is Free, there will be no evaluation for that lesson).
For more information on how to analyze heart rate data, see Analyzing heart rate information in the Lessons for Life book.
EXPORT MET VALUES
- Go to Reports > Course report.
- Click the row or the icon to select a The course list can be filtered with the search form above the list.
- Select MET export.
- Select the students you want to include to the By default all the students who have been added to the course are selected.
- If you wish to exclude days that contain no activity data, tick the box.
- Click Create report. The report is created and The file can be saved on the computer and printed on paper.
![]() Alternatively, you can proceed to report printing by clicking Print reports on the Course summary page. See also Reading MET value report.
Alternatively, you can proceed to report printing by clicking Print reports on the Course summary page. See also Reading MET value report.
READING MET VALUE REPORT
To create a MET value report report, see Exporting MET values. The MET values are printed in CSV (comma separated values) format which can be opened in Microsoft Excel or in similar application. All selected students are printed in the same report.
The first column of the CSV file displays a time stamp for every 30 seconds of the course. All selected students have a separate column after the time stamp column. MET values are shown for each time stamp for all students.
![]() MET stands for metabolic equivalent and it expresses the intensity and energy expenditure of physical activities.
MET stands for metabolic equivalent and it expresses the intensity and energy expenditure of physical activities.
For more information on MET values, see Using activity monitors in school in the Lessons for Life book.
GETTING SCHOOL REPORT
You can create different kinds of school-wide reports for different purposes. Define the students and courses that you want to include in the report by selecting specific values, such as age, gender, course type, date, and activity/exercise target. Define the minimum requirement for the grade Pass, and the report shows how many students passed/failed according to these standards.
ACTIVITY REPORTS
- Go to Reports > School report.
- Define Students:
-
- Select Gender.
- Enter Age range.
- Select whether you want the report to show individual students or not:
- Select No to not show students at
- Select Yes, with names to show students identified by their
- Select Yes, with student IDs to show students identified by their
- Define Courses:
-
- Select Time range.
- Select Activity as Course type.
- Select Target active time.
- Select whether you want the report to be based on Activity or Activity and steps.
- If you selected Activity and steps, enter Number of steps / day.
- Enter Minimum requirement as a number of days. This is the minimum number of successive days when Target active time needs to be reached for a student to pass.
- Click Create report. The report is created and The file can be saved on the computer and printed on paper.
HEART RATE REPORTS
- Go to Reports > School report.
- Define Students:
- Select Gender.
- Enter Age range.
- Select whether you want the report to show individual students or not:
- Select No to not show students at all.
- Select Yes, with names to show students identified by their names.
- Select Yes, with student IDs to show students identified by their IDs.
- Define Courses:
- Select Time range.
- Select Heart rate as Course type.
- Select Target zone.
- Select Time in target zone.
- Select Minimum requirement as a percentage of This is the minimum percentage of lessons when Time in target zone needs to be reached for a student to pass.
- Click Create report. The report is created and The file can be saved on the computer and printed on paper.
See also Reading school report.
READING SCHOOL REPORT
To create a school report, see Getting school report.
The report heading shows the report type and the selected values. The report shows the following information for each course included:
- course name,
- course duration,
- age range,
- number of students included in the report,
- number of girls and boys included in the report,
- number of students that passed, and
- number of students that
If you chose to show individual students in the report, the following information is shown under each course:
- student names or IDs,
- student ages, and
- pass/fail values for each This value shows the percentage of lessons/days when a student reached the target.
If you chose not to show individual students in the report, there is a summary row in the end of the report that shows the following information:
- total number of students included in the report,
- total number of girls and boys included in the report,
- total number of students that passed, and
- total number of students that failed.
STUDENTS
IMPORTING STUDENTS
Each student should have their own user account in Polar GoFit. Both activity and heart rate data is always connected to a student. The student information can be edited afterwards with any teacher user account.
Students can be imported to the web service with an Excel file. It is also possible to create students one by one. It is recommended to import students in larger batches and manually create only individual students.
Content of the Excel file:
- The first row of the file is for field names and it is not processed when the file is imported.
- There should be one line per student in the The information must be in the order shown below and each piece of information must be in a separate cell.
For example:
| StudentID | Last Name | FirstName | Gender(M or F) | Date of birth(mm.d- d.yyyy) | Class | Weight | Height | Maximumheart rate |
| 1234 | Smith | John | M | 05.05.1990 | 7A | 42 | 145 | |
| 1235 | Smith | Sandra | F | 12.01.1992 | 5B | 35 | 125 | |
| 1236 | Taylor | Marcus | M | 03.25.1989 | 8A | 65 | 165 |
Contact your IT administrator if you need help in creating the files. You can download sample files from the student import view.
- Go to School > Students tab.
- Click Import students.
- Download an import file or a sample Type in the student information and save the Excel file.
- Select the Excel file from your computer by using the Browse button.
- Click Import.
- Review the import preview. If the data is correct, click Import.
- Click Finish to finalize the student import. The students are imported to the web service.
If the data in the import preview is incorrect, click Cancel on the summary page, edit and save the Excel file and repeat steps 4 to 6.
![]() If you know the students’ maximum heart rate values, you can enter the values into the excel file when importing students. If you don’t know their maximum heart rate values, you can leave the field empty. If the field is empty, the imported students will have 200 as the maximum heart rate value. You can edit the value later.
If you know the students’ maximum heart rate values, you can enter the values into the excel file when importing students. If you don’t know their maximum heart rate values, you can leave the field empty. If the field is empty, the imported students will have 200 as the maximum heart rate value. You can edit the value later.
CREATING STUDENTS
Each student should have their own user account in Polar GoFit. Both activity and heart rate data is always connected to a student. The student information can be edited afterwards with any teacher user account.
It is also possible to import students with an Excel file. It is recommended to import students in larger batches and manually create only individual students.
- Go to School > Students
- Check that the student does not already have an account in the Use the search and filtering options above the student list.
- Click Create new student.
- Fill in the student’s The mandatory information is marked with an asterisk. The default maximum heart rate value is 200. If you know the exact value for a student, insert it here. If a student has purchased their own heart rate sensor, register the sensor by inserting the sensor ID here.For information on student accounts, see Student user accounts.
- Click Save to finalize the student The software redirects you back to the student list.
- Repeat steps 3 to 5 to create more student
Student ID must be unique within the school. The student ID is part of the student’s username.
VIEWING STUDENT INFORMATION
- Go to School > Students tab.
- Find the student on the student Students are listed by the class. Use the search and filtering options above the student list. Expand a class to see the students.
- The student list includes the following information:
-
- student’s first name,
- student’s last name, and
- activity monitor and/or heart rate sensor(s) assigned to the student
- Click the icon to view the detailed student information.
- The student information is shown and it can be edited.
- Click Back to student list to return to the student To save the changes, click Save instead.
- Repeat steps 2 to 6 to view more student accounts.
EDITING STUDENTS
- Go to School > Students
- Find the student on the student Students are listed by the class. Use the search and filtering options above the student list. Expand a class to see the students.
- Click the icon to edit the student.
- Edit the student’s The mandatory information is marked with an asterisk (*). The default maximum heart rate value is 200. If you know the exact value for a student, insert it here. If a student has purchased their own heart rate sensor, register the sensor by inserting the sensor ID here.For information on student accounts, see Student user accounts.
- Click Save to save the The software redirects you back to the student list. To return without saving the changes, click Back to student list.
- Repeat steps 2 to 5 to edit more student accounts.
MOVING STUDENTS TO ANOTHER CLASS
- Go to School > Students tab.
- Select either individual students or an entire Students are listed by the class. Use the search and filtering options above the student list. Expand a class to see the students.
- Click Move students.
- Insert the new class name (for example, 3B).
- Click Move.
- If there already are students in the class you wish to move the selected students to, the software asks for your If you still wish to move the students to the class, click Yes, move students.
For more information on editing students, see Editing students.
GENERATING NEW PASSWORD FOR STUDENT
- Go to School > Students tab.
- Find the student on the student Students are listed by the class. Use the search and filtering options above the student list. Expand a class to see the students.
- Click the icon .
- Click Generate new password. A new password is generated for the student and it is shown in a new window.
- Print the password page on paper and give it to the student.
- Click Back to student list to return to the student list.
- Repeat steps 2 to 6 to generate new passwords for other students.
For information on student accounts, see Student user accounts. See also Getting password list.
REMOVING STUDENTS
Students can be removed from the school. Only students that do not have activity monitors or heart rate sensors assigned can be removed.
- Go to School > Students tab.
- Click Remove students. The students that cannot be removed from school are marked the red symbol . You cannot select them.
- Select the students or whole classes you wish to remove from the Click Remove students.
- Polar GoFit asks for a Click Remove to confirm or Cancel to return to the previous view.
- Repeat steps 2 to 4 to remove more students.
If the students you wish to remove are not available for removal, make sure they do not have activity monitors or heart rate sensors assigned. To remove the monitors or sensors from the students, see Reassigning activity monitors or Reassigning heart rate sensors.
TEACHERS
CREATING TEACHERS
For more information on the teacher accounts in the Polar GoFit web service, see Teacher user accounts.
- Go to School > Teachers tab.
- Check that the teacher does not already have an account in the system.
- Click Create new teacher.
- Fill in the teacher’s All the fields are mandatory.
- Click Save to finalize the teacher A link to select a password is sent by email to the teacher.
- Repeat steps 3 to 5 to create more teacher accounts.
![]() The new teacher account is not valid until the teacher has generated a password, signed in to the web service, and accepted the terms of use. Until this has been done, the new teacher appears on the teacher list by email address only.
The new teacher account is not valid until the teacher has generated a password, signed in to the web service, and accepted the terms of use. Until this has been done, the new teacher appears on the teacher list by email address only.
If you are using the free trial, you cannot create new teachers.
VIEWING TEACHER INFORMATION
![]() Each teacher can only view their own information.
Each teacher can only view their own information.
- Go to School > Teachers tab.
- Find yourself on the teacher Teachers are listed alphabetically by the last name.
- Click the icon to view the account information.
- Click Cancel to return to the teacher list.
![]() The number of available licenses for teacher user accounts is shown at the top of teacher list.
The number of available licenses for teacher user accounts is shown at the top of teacher list.
EDITING TEACHERS
Each teacher can only edit their own information.
- Go to School > Teachers tab.
- Find yourself on the teacher Teachers are listed alphabetically by the last name.
- Click the icon to view the account information.
- Edit the All the fields are mandatory.
- Click Save to save the The software redirects you back to the teacher list.
RESETTING TEACHER’S PASSWORD
There are two ways to reset a teacher’s password. A teacher can order a new password without signing in to the web service, or reset password under School > Teachers.
ORDERING A NEW PASSWORD WITHOUT SIGNING IN
- Go to polargofit.com.
- Click Forgot your password?.
- Type your Polar GoFit username (your email address) into the field and click Send. A link to select a new password is sent by email.
Check your spam filter if the email cannot be found in your email inbox.
RESETTING THE PASSWORD
- Sign in to the web service.
- Go to School > Teachers tab.
- Find yourself on the teacher Teachers are listed alphabetically by the last name.
- Click the icon to view the account information.
- Click Reset password.
- A link to select a new password is sent to your email address.
Check your spam filter if the email cannot be found in the email inbox.
DELETING TEACHERS
If a teacher no longer works at your school, the teacher can be deleted from the web service.
- Go to School > Teachers tab.
- Find the teacher on the Teachers are listed alphabetically by the last name.
- Click the icon to delete the teacher.
- Polar GoFit asks for a Click Delete to confirm or Cancel to return to the previous view.
- Repeat steps 2 to 4 to delete more teacher accounts.
The courses created by a deleted teacher can be found in Courses. They can be accessed and edited by any teacher.
MONITORS
REGISTERING ACTIVITY MONITORS
It is recommended that the products are registered to the system before they are taken into use. Activity data cannot be transferred from the activity monitors to the web service before the monitors have been managed in the Polar GoFit web service. For information on activity monitors in the web service, see Monitors in Polar GoFit.
- Make sure you have Polar FlowLink data transfer unit plugged into a free USB port and Polar WebSync software installed on your For more information see Data transfer in activity monitoring.
- Go to School > Monitors
- Click Register monitors.
- Select a label/case (A-Z) for the activity monitor from the drop down The list tells how many activity monitors have already been registered for each label/case.
- Click Start.
- Place the first activity monitor on the FlowLink with the display facing Make sure the Align light is lit on the FlowLink.
- WebSync prompts for Polar GoFit user credentials.
- As soon as a green tick appears for the activity monitor in WebSync and the monitor appears in Polar GoFit, click Start in the web service and place another activity monitor on the Follow the progress in WebSync.
- Continue until you have registered all the monitors to the selected case.
- Click Finish when you are done. The software redirects you back to the monitor list.
![]() Working with several activity monitors: When WebSync confirms with a green tick that the activity monitor is okay, leave the software running and place the next activity monitor on the FlowLink. If you accidentally closed WebSync, it prompts for the user credentials again when needed.
Working with several activity monitors: When WebSync confirms with a green tick that the activity monitor is okay, leave the software running and place the next activity monitor on the FlowLink. If you accidentally closed WebSync, it prompts for the user credentials again when needed.
VIEWING ACTIVITY MONITORS
- Go to School > Monitors tab.
- The activity monitors that have been registered to the school are listed by the Expand a case by clicking to see the monitors in it.
- The monitor list includes the following information:
-
- which student the activity monitor is assigned to, and
- how long the activity monitor is assigned to the student.
See also, Registering activity monitors.
REMOVING ACTIVITY MONITORS
Activity monitors can be removed from the school. Only monitors that are not assigned to any student can be removed.
![]() Make sure you have transferred all the activity data from the activity monitor to the web service before removing the monitor from the school. See Transferring activity data.
Make sure you have transferred all the activity data from the activity monitor to the web service before removing the monitor from the school. See Transferring activity data.
- Go to School > Monitors tab.
- The activity monitors that have been registered to the school are listed by Expand a case to see the monitors in it.
- Click Remove monitors. The monitors that cannot be removed from school are marked with the red symbol . You cannot select them
- Select the activity monitors you wish to remove from the Click Remove selected monitors.
- Polar GoFit asks for a Click Remove to confirm or Cancel to return to the previous view.
- Repeat steps 3 to 5 to remove more activity monitors.
If a monitor is assigned to a student, it cannot be removed. The reservation must be removed first. See Viewing activity monitors and Reassigning activity monitors for more information.
SENSORS
REGISTERING HEART RATE SENSORS
Heart rate sensors need to be registered to the system before they are taken into use. If the sensors have not been registered, heart rate data cannot be transferred from the sensors to the Polar GoFit app and Polar GoFit. For information on heart rate sensors in the web service, see Sensors in Polar GoFit.
- Make sure you have the numbered stickers available for numbering the sensors.
- Go to School > Sensors tab.
- Click Register sensors.
- Type the sensor ID into the field and click Add sensor. A green tick appears next to the sensor ID to show that registration was successful.
- Label the sensor with the sticker that has the number appearing on the left side of the sensor The registered sensor appears on the sensor list identified by this number.
- Repeat steps 4-5 to register more sensors.
- Click Finish when you are done.

![]() If a student has purchased their own heart rate sensor to use instead of a school sensor, you need to register the sensor ID to the system in School > Students.
If a student has purchased their own heart rate sensor to use instead of a school sensor, you need to register the sensor ID to the system in School > Students.
VIEWING HEART RATE SENSORS
- Go to School > Sensors tab.
- View the sensor The heart rate sensors that have been registered to the school are listed by number. The sensor list also shows how many reservations each sensor has, and which courses and stu- dents the sensor is assigned to.
See also Registering heart rate sensors.
REMOVING HEART RATE SENSORS
Heart rate sensors can be removed from the school. Only sensors that are not assigned to any student can be removed.
- Go to School > Sensors tab.
- The heart rate sensors that have been registered to the school are listed by The sensor list also shows how many reservations each sensor has, and which courses and students the sensor is assigned to.
- Click Remove sensors. The sensors that cannot be removed from school are marked with the red symbol . You cannot select them.
- Select the heart rate sensors you wish to remove from the Click Remove sensor.
- Polar GoFit asks for a Click Yes, remove to confirm or No to return to the previous view.
- Repeat steps 3 to 5 to remove more heart rate sensors.
- Click View sensors to go back to the sensor list.
If a sensor is assigned to a student, it cannot be removed. The reservation must be removed first. See Reassigning heart rate sensors for instructions.
See also Viewing heart rate sensors.
EVALUATION
CONFIGURING EVALUATION TYPES
For more information on the evaluation types in the Polar GoFit web service, see Evaluation.
EDITING EVALUATION TYPES
- Go to School > Evaluation tab.
- Find the evaluation type on the list.
- Click the icon to edit the evaluation type.
- Make the necessary You can:
-
- edit the grade names,
- edit the grade limits (minimum and maximum limits), and
- add new
- Click Save to save the The software redirects you back to the evaluation type list.
- Repeat steps 2 to 5 to edit more evaluation types.
ADDING EVALUATION TYPES
- Go to School > Evaluation tab.
- Click Create new evaluation type.
- Give a name to the evaluation type.
- Fill in and edit the evaluation type You can:
- edit the grade names,
- edit the grade limits (minimum and maximum limits), and
- add new grades.
- Click Save to save the The software redirects you back to the evaluation type list.
- Repeat steps 2 to 5 to add more evaluation types.
DELETING EVALUATION TYPES
Only evaluation types that are not in use at the moment can be deleted from the web service.
- Go to School > Evaluation tab.
- Find the evaluation type on the list.
- Click the icon to delete the evaluation type.
- The software asks for a Click Delete to confirm or Cancel to return to the previous view.
- Repeat steps 2 to 4 to delete more evaluation
LICENSE STATUS
VIEWING LICENSE STATUS
- Go to School > License status
- View license The following information is shown:
- Polar GoFit license information: whether or not license is active, possible license expiration date, number of teacher licenses (total number/number of licenses currently in use)
- Activarium license information: whether or not license is active, possible license expiration date.
TEMPLATES
CREATING A TEMPLATE
To create a test, you need a template. Templates consist of test items, such as One-Mile Run or Shoulder Stretch. You can create a template yourself or use an existing template.
- To create a template, go to Fitness tests > Templates.
- Press Create template.
- Type a descriptive name in the Template name
- Select the test items that you want to include in your You can press the icon for more information on a test item. In addition to a written description, you will see a useful video tutorial. In addition to the optional test items that you can choose, Height & Weight is included in each template by default. This is because students’ height and weight influence the evaluation of their performance.
- You can change the order of test items by dragging and dropping.
- Press Save when you are done.
- The web service asks you if you want to create a test right Press Create test or Back to templates.
You can edit the template later.
CREATING A TEST
When you create a test, you add students to a template. You can select the students either From previous tests or From student list.
STUDENTS FROM PREVIOUS TESTS
- Go to Fitness tests > Templates.
- Find the template on the list and press Create test.
- Type a descriptive name for your test in the Test name field.
- Choose a Planned test date.
- Press Add students.
- Press From previous tests.
- Choose either My tests or All tests.
- Choose a test from the drop-down list.
- A list of students that took the test Tick the first box to choose all the students. You can also choose students one by one.
- Press Save.
- You can still Remove students or Add students.
- When your student configuration is ready, press Save.
- The web service asks you if you want to start entering the results right Press OK to start enter- ing the results, or press Back to templates if you want to enter the results later.
STUDENTS FROM STUDENT LIST
- Go to Fitness tests > Templates.
- Find the template on the list and press Create test.
- Type a descriptive name for your test in the Test name field.
- Choose a Planned test date.
- Press Add students.
- Press From student list.
- A list of all students Students are listed by class. Expand a class to see the students. Tick the box to choose a student or a class. The chosen students can be from different classes.
- Press Save.
- You can still Remove students or Add students.
- When your student configuration is ready, press Save.
- The web service asks you if you want to start entering the results right Press OK to start enter- ing the results, or press Back to templates if you want to enter the results later.
EDITING A TEMPLATE
You can add or remove test items, change the order of test items, or rename the template.
- Go to Fitness tests > Templates.
- Find the template on the list and press the icon .
- Press a test item to add it to the list of Selected test items.
- Press the icon to remove a test item from the list of Selected test items.
- You can change the order of test items by dragging and You can also change Template name.
- Press Save when you are done.
- The web service asks you if you want to create a test right Press Create test or Back to templates.
REMOVING A TEMPLATE
- Go to Fitness tests > Templates.
- Press Remove template.
- Find the template on the list and press the icon .
- The web service asks for your Press Remove or Cancel.
TESTS
ENTERING RESULTS
After you have created a test, you can start entering the results. You can use an iPad in the test situation and enter the results into the web service as testing proceeds. Or you can write the results by hand on printed result sheets, and enter them into the web service later.
You don’t have to enter all the results into the web service at one go. You can interrupt any time and continue later.
START ENTERING RESULTS
- Go to Fitness tests > Tests.
- Find your test on the list of Ready-to-start tests and press Enter results. You can also Print result sheets here, if you wish to use them instead of entering the results into the web service during testing.
- On the Preview page, you can see the following information:
-
- test name,
- teacher,
- creation date,
- chosen test items, and
- chosen students.
- On the Preview page, you can:
-
- change the order of test items by dragging and dropping,
- prepare for testing by watching the video tutorials that we’ve created for each test item (just press the icon to see a written description and the video tutorial),
- Print result sheets.
- If you need to make changes to the test, just press Edit test and you’ll be able to change Test name and Planned test date. You can also Remove students or Add students.
- When you are ready to start, press Enter results.
- You can choose to enter results either by test item or by You can browse between the test items/students with the Next and Previous buttons. The results are saved automatically as soon as you enter them. You can watch the video tutorial for a test item at any time. Just press the video thumbnail under the name of the test item.
- To stop entering the results, press Done.
- If there are empty result fields, the web service asks you if you are done with entering the results or if you want to continue Press Continue later, Test completed or Cancel.
CONTINUE ENTERING RESULTS
You can continue entering the results any time.
- Go to Fitness tests > Tests.
- Find your test on the list of Unfinished tests and press Enter results. You can also Print result sheets here, if you wish to use them instead of entering the results into the web service during testing.
- You can choose to enter results either by test item or by You can browse between the test items/students with the Next and Previous buttons. The results are saved automatically as soon as you enter them. You can watch the video tutorial for a test item at any time. Just press the video thumbnail under the name of the test item.
- To stop entering the results, press Done.
- If there are empty result fields, the web service asks you if you are done with entering the results or if you want to continue Press Continue later or Test completed or Cancel.
![]() After you have completed the test and entered all the results into the web service, you can view the results. It is also possible to edit the results if you notice a mistake.
After you have completed the test and entered all the results into the web service, you can view the results. It is also possible to edit the results if you notice a mistake.
EDITING A TEST
You can only edit Ready-to-start tests. If you have already started entering the results, it’s no longer possible to edit the test.
- Go to Fitness tests > Tests.
- Find your test on the list of Ready-to-start tests and press Enter results.
- On the Preview page, you can see the following information:
-
- test name,
- teacher,
- creation date,
- chosen test items, and
- chosen students.
- On the Preview page, you can:
-
- change the order of test items by dragging and dropping,
- prepare for testing by watching the video tutorials that we’ve created for each test item (just press the icon for a written description and the video tutorial),
- Print result sheets.
- If you need to make changes to the test, just press Edit test and you’ll be able to change Test name and Planned test date. You can also Remove students and Add students.
- Make your changes and press Save.
- The web service asks you if you want to start entering the results right Press OK to start entering the results, or press Back to templates if you want to enter the results later.
REMOVING A TEST
You can only remove Ready-to-start tests. If you have already started entering the results, it’s no longer possible to remove the test from the web service.
- Go to Fitness tests > Tests.
- Press Remove tests.
- Find your test on the list of Ready-to-start tests and press the icon .
- The web service asks for your Press Remove or Cancel.
RESULTS
VIEWING RESULTS
- Go to the Fitness tests > Results.
- Find your test on the list of Completed tests and press the icon .
- You can browse between students with the Next and Previous
Alternatively, you can access the results of your own tests via Dashboard ![]() .
.
![]() After a test has been completed and you have entered all the results into the web service, it is still possible to edit the results if you notice a mistake.
After a test has been completed and you have entered all the results into the web service, it is still possible to edit the results if you notice a mistake.
EDITING RESULTS
After a test has been completed and you have entered all the results into the web service, it is still possible to edit the results if you notice a mistake.
- Go to the Fitness tests > Results.
- Find your test on the list of Completed tests and press the icon .
- You can browse between students with the Next and Previous buttons.
- Press Edit results.
- Make the The changes are saved automatically as soon as you enter them.
- Press Done.
Alternatively, you can access the results of your own tests via Dashboard ![]() .
.
GETTING STUDENT RESULTS REPORT
- Go to Fitness tests > Results.
- Find your test on the list of Completed tests. Unfinished tests can’t be included in
- Press the icon .
- You can browse between students with the Next and Previous buttons.
- Select the student whose results you want to include in the report and press Print report.
REPORTS
GETTING TEST RESULTS REPORT
- Go to Fitness tests > Reports.
- Select Test results.
- Use the search and filtering options to find the tests and students that you want to include in the report.
- Select the tests and students that you want to include in the At least one student must be selected. Unfinished tests can’t be included in reports.
- Press Create report.
GETTING SCHOOL RESULTS REPORT
You can use the School results report to create different kinds of reports for different purposes. You can decide the content of your report by choosing specific values, such as date range, age range, sex, and test items.
- Go to Fitness tests > Reports.
- Select School results.
- You can narrow down your report by choosing:
-
- start date,
- end date,
- sex, and
- age
- Choose the test items that you want to include in the At least one test item must be selected.
- Press Create report.
The following troubleshooting applies for both Windows and Mac OS users.
Always make sure:
- you have installed all the available updates for your operating system,
- you have installed all the available updates for your browser,
- you have installed all the available driver updates for the
POLAR GOFIT SIGN-IN PAGE DOES NOT LOAD
Make sure:
- you are using the Polar GoFit home page for signing in (www.polargofit.com),
- you are connected to the internet (contact the school’s IT administrator for help),
- you are using a compatible internet browser (Microsoft Internet Explorer 9 or newer, Apple Safari 4 or newer, Mozilla Firefox 3 or newer, Google Chrome 0.1271.97m or newer), and
- your browser’s proxy settings are set correctly (contact the school’s IT administrator for help).
I AM UNABLE TO SIGN IN TO POLAR GOFIT
Make sure:
- you are using the Polar GoFit home page for signing in (www.polargofit.com),
- you are using the correct user credentials,
- you are connected to the internet (contact the school’s IT administrator for help),
- you are using a compatible internet browser (Microsoft Internet Explorer 9 or newer, Apple Safari 4 or newer, Mozilla Firefox 3 or newer, Google Chrome 0.1271.97m or newer), and
- your browser’s proxy settings are set correctly (contact the school’s IT administrator for help).
MEDICAL DEVICES IN PROFESSIONAL USE
Professional use sets high standards for the manufacturer, distributor and user of a medical device. Polar offers user instructions and training for professional users in order to ensure the safe use of Polar devices.
PRECAUTIONS
Polar GoFit web service is designed to enable:
- tracking and documenting students’ daily activity and time spent in different activity zones,
- tracking and documenting students’ heart rate during PE lessons and the time spent in different heart rate zones,
- fitness testing and documenting test
No other use is intended or implied.
MINIMIZING POSSIBLE RISKS
Physical activity and exercising may include some risks. Before beginning a regular exercise program, answer the following questions concerning your health status. If you answer yes to any of these questions, consult a physician before starting any exercise program.
The following questions are for children:
- Have you been physically inactive?
- Do you have symptoms of any disease?
- Are you taking heart or any other medication?
- Do you have a history of breathing problems?
- Are you recovering from a serious illness or medical treatment?
- Do you use a pacemaker or other implanted electronic device?
If you feel unexpected pain or excessive fatigue when exercising, stop the exercise or continue at a lighter intensity.
If you are allergic to any substance that comes into contact with your skin or if you suspect an allergic reaction due to using the product, check the listed materials in the Technical Specifications of the Polar Active activity monitor or the Polar heart rate sensor.
COPYRIGHT
Copyright © 2015 Polar Electro Oy, FIN-90440 KEMPELE. All rights reserved. No part of this manual may be used or reproduced in any form or by any means without prior written permission of Polar Electro Oy.
DISCLAIMER
The material in this manual is for informational purposes only. The products it describes are subject to change without prior notice, due to the manufacturer’s continuous development program.
Polar Electro Inc./Polar Electro Oy makes no representations or warranties with respect to this manual or with respect to the products described herein.
Polar Electro Inc./Polar Electro Oy shall not be liable for any damages, losses, costs or expenses, direct, indirect or incidental, consequential or special, arising out of, or related to the use of this material or the products described herein.
The Bluetooth® word mark and logos are registered trademarks owned by Bluetooth SIG, Inc. and any use of such marks by Polar Electro Oy is under license.
Polar GoFit Web Service Physical Education Solution – Polar GoFit Web Service Physical Education Solution –
[xyz-ips snippet=”download-snippet”]