![]()
POLAR Slush Machine Instruction Manual

Model: DB331 / DB332 / DB843
Safety instructions
 THE APPLIANCE MUST ONLY BE USED BY TRAINED PERSONNEL IN ACCORDANCE WITH THESE INSTRUCTIONS.
- Position on a flat, stable surface.
- Install the appliance where it can be overseen by trained personnel.
- Always carry, store and handle the appliance in a vertical position.
- A service agent/qualified technician should carry out installation and any repairs if required. Do not remove any components or service panels on this product.
- Consult Local and National Standards to comply with the following:– Health and Safety at Work Legislation– BS EN Codes of Practice– Fire Precautions– IEE Wiring Regulations– Building Regulations
- DO NOT immerse in water, or use jet/pressure washers to clean the appliance.
- Not suitable for outdoor use.
- Always switch off and disconnect the power supply to the appliance before cleaning.
- This appliance is not intended for use by persons (including children) with reduced physical, sensory or mental capabilities, or lack of experience and knowledge, unless they have been given supervision or instruction concerning the use of the appliance by a person responsible for their safety.
- Children should be supervised to ensure that they do not play with the appliance.
- Keep all packaging away from children. Dispose of the packaging in accordance to the regulations of local authorities.
- If the power cord is damaged, it must be replaced by a POLAR agent or a recommended qualified technician in order to avoid a hazard.
- DO NOT attempt to modify the appliance in any way.
- NEVER leave the appliance unattended when in use.
- Never use accessories which are not recommended by the manufacturer. They could pose a safety risk to the user andmight damage the appliance. Only use original parts and accessories.
- POLAR recommend that this appliance should be periodically tested (at least annually) by a Competent Person. Testing should include, but not be limited to: Visual Inspection, Polarity Test, Earth Continuity, Insulation Continuity and Functional Testing.
- POLAR recommend that this product is connected to a circuit protected by an appropriate RCD (Residual Current Device).
Caution Risk of Fire ![]()
- Do not store explosive substances such as aerosol cans with a flammable propellant in this appliance.
Warning: Keep all ventilation openings clear of obstruction. Unit should not be boxed in without adequate ventilation.
- Warning: Do not use mechanical devices or other means to accelerate the defrosting process, other than those recommended by the manufacturer.
- Warning: Do not damage the refrigerant circuit.
- Warning: Do not use electrical appliances inside the food storage compartments of the appliance, unless they are the type recommended by the manufacturer.
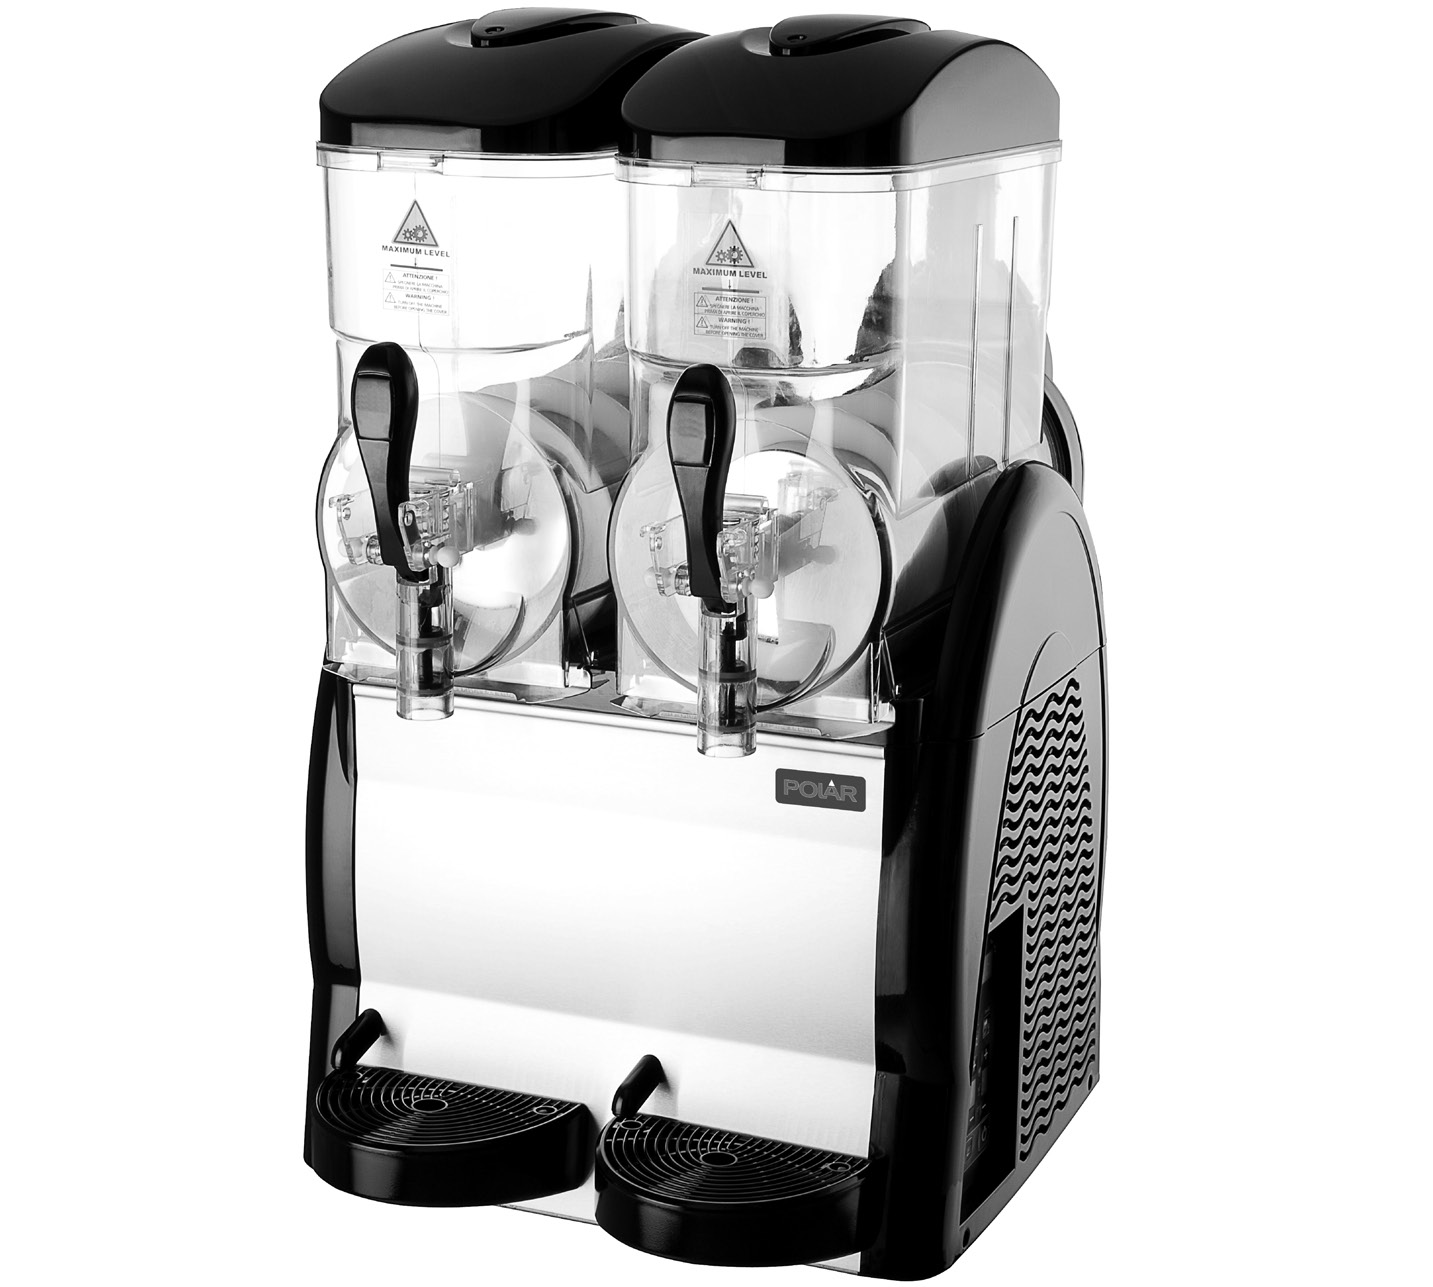
Product Description
- DB331 – Polar slush machine – 1 x 12Ltr Bowl
- DB332 – Polar slush machine – 2 x 12Ltr Bowl
- DB843 – Polar slush machine – 3 x 12Ltr Bowl
Introduction
Please take a few moments to carefully read through this manual. Correct maintenance and operation of this machine will provide the best possible performance from your POLAR product.
This appliance is intended for making drinks and cold beverages. If used with dairy-based products and/or when envisaged by law in accordance to the type of product used, it must be equipped with the optional extra of a temperature gauge for the product in the bowl. It is also obligatory to comply with the current regulations and standards concerning the products used.
Note: Only two types of persons can access the appliance:
- User: A person who has adequate technical training on how to use the appliance correctly, and full knowledge of routine work on how to maintain, clean and sanitize the appliance.
- Specialized technician: A person who has the full knowledge of the appliance concerning the installation, use and servicing of the appliance.
Pack Contents
The following is included:
- Polar slush machine
- Drip Tray:DB331 x 1 / DB332 x 2 / DB843 x 3
- Coupler x 2
- Connector of axis x 2
- Seal of auger x 1
- Seal of evaporator x 2
- Seal of Tap x 10
- Seal of axis x 2
- Vaseline (for lubrication of the appliance)
- Instruction Manual
POLAR prides itself on quality and service, ensuring that at the time of packaging the contents are supplied fully functional and free of damage.
Should you find any damage as a result of transit, please contact your POLAR dealer immediately.
Installation
Note: If the unit has not been stored or moved in an upright position, let it stand upright for approximately 12 hours before operation. If in doubt allow to stand.
- Remove the appliance from the packaging. Make sure that all protective plastic film and coatings are thoroughly removed from all surfaces.
- To optimize performance and longevity, ensure a minimum clearance of 2.5cm is maintained between the unit and walls and other objects, with a minimum 5cm clearance on the top. NEVER LOCATE NEXT TO A HEAT SOURCE.
Before installation,ensure to check that:
- The appliance is installed indoors.
- The room is adequately lit, well ventilated and hygienic.
- The location of the appliance is flat and solid, and can support its weight.
- The appliance may only operate in places with an ambient temperature ranging between 16°C and 32°C.
- Adequate clearance is kept around the appliance to enable personnel to operate without constraints.
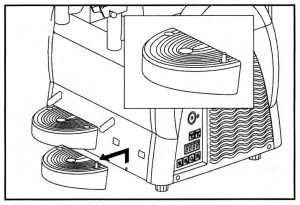
AssemblyHang the drip tray onto the slot on the front.
Control panel (Model featured: DB843)
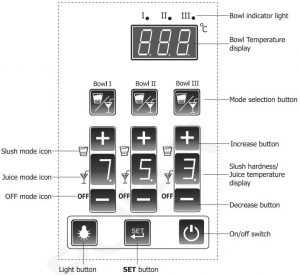
Note: The SET button is designed for adjusting parameters by professional technicians only, which is password protected. Ordinary uses/operators should not access it for any purpose.
Note: Before the first time use, ensure to let specialized technician check the appliance functions properly.
Appliances have varied quantity of bowls (Model DB332 has 2 and Model DB843has 3), so Bowl I means the one on the left hand side of the unit when looking from the front. Bowl II means the middle one…
Operation
Filling
- Ensure to switch Off and unplug the appliance.
- Preparing your product: Polar recommends that you use syrup mix designed for use in Slush Machines. Dilute and mix the concentrate with water in a container, following the manufacturer’s instructions. NOTE – Any mixture used must have a minimum sugar content of 13% – lower sugar content mixture will freeze solid and can damage the augers and gear motors. Damage caused by using incorrect mix will invalidate the warranty.
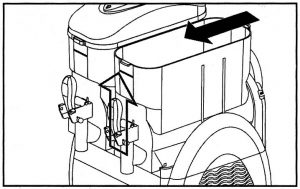
- Removing the lid: Lift the rear part to release. Then remove directly.

4. Pour the mixture into the bowl.
WARNING: Do not fill the tank with hot liquid. Do not let the level exceed the ‘MAX’ level line marked on the front of the bowl.
5. Re-locate the lid.
WARNING: There are moving parts inside the bowl, which may cause injuries. Therefore, ensure to turn off and unplug the appliance before carrying out any operations inside the bowl.
Getting started
- Connect the appliance to a mains power supply.
- Press the on/off switch

Selecting the working mode
- Press the mode button to select the working mode.
- There are 3 modes in total:

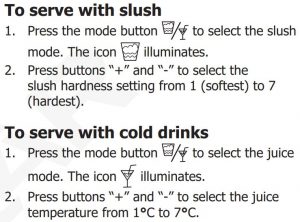
Note: When the shop is out of service and there is still remaining product in the bowl, we highly recommend setting all bowls to Juice mode, as in this mode bowl stirring and refrigerating are still ON so as to keep the product fresh (Temperature from 1°C to 7°C).
To simply clean the desired bowl
- Press the mode button for six seconds.
- “C” will be shown on the display.
Notes:
- In this mode no refrigerant gas will flow into, but the auger is still rotating to assist the cleaning process. Please fill warm and clean water into the corresponding bowl (not exceeding the maximum level marked on the bowl).
- If desired to perform a thorough cleaning or sanitization to the machine, please ensure the machine is powered off. For details, please see Section “Cleaning, Care & Maintenance”.
To use the dispenserOnce the liquid is sufficiently cooled, use the tap lever for dispensing.
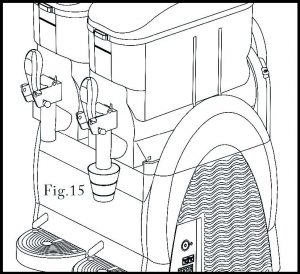
Notes:
- Regularly check the temperature of the product in the bowl, using a standard thermometer, to make sure the product is always kept below the storage temperature.
- NEVER disconnect the machine from the power supply or switch it off using the on/off switch when there is still product for consuming inside the bowl.
- If the appliance is not used continuously, when used with milk-based products, make sure to:– spray sanitizer solution around the spigot area and on the spigot itself (alternatively, wipe with a clean cloth and sanitizer);Or– Dispense a small amount of the product from the spigot and discard before dispensing the serving for the customer.
To turn off a certain bowl (for Model DB332/DB843)
Note: The bowls work independently. To stop a certain bowl, you just need to turn it off.
- Press the mode button to select the OFF mode for the desired. The icon illuminates.
- Under OFF mode, the bowl will stop stirring and refrigerating.
To empty the bowlNote: The bowl must be cleaned and sanitized at least once a day and more frequently depending on the products used, and in any case, in compliance with the applicable hygiene regulations.
- Before a bowl is cleaned, it must be emptied.
- Set the bowl to juice mode. Then release all the liquid from the bowl into a suitable container.
- Switch off and unplug the appliance.
To turn off the appliance
- After use: press the on/off switch for 3 seconds to turn off the appliance.
- In case of freezing, switch off and unplug the appliance. Then call POLAR agent or qualified technician.
- Should a fire break out, clear the area immediately to make way for the trained personnel for proper handling.
Cleaning, Care & Maintenance
Warning: Switch off and disconnect from the power supply before any cleaning and maintenance.
- Before cleaning or maintenance, ensure to wear proper personal protections (gloves, glasses, etc. .
- Do not use abrasive cleaning agents as they may leave harmful residues.
- DO NOT rinse the base unit. Instead just wipe the outer surface with a damp cloth.
- Empty and clean the drip trays regularly.
- DO NOT wash any parts in a dishwasher.
- DO NOT dry any parts in a conventional or microwave oven.
- Ensure to carry out any cleaning and sanitization with utmost care and on a regular basis to guarantee the quality of the product dispensed and compliance with mandatory hygiene standards.
- A POLAR agent or qualified technician should carry out repairs if required.
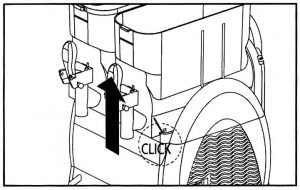
- To carry out easy cleaning and maintenance, the upper parts of the side protectors can be removed. When necessary, lift the upper part to remove. Once done with cleaning, re-locate the part in place.

Disassembling the tap assembly
- Disassemble the tap and remove the pin (F) from its seat to release all the other parts.
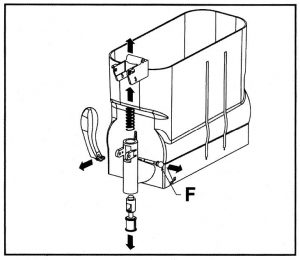
2. Wash the parts thoroughly and let them dry.
Removing the bowl
- Remove the bowl lid.
- Raise the front part of the bowl to release it.
3. Remove the bowl from its seat by pushing and tapping lightly on the rear part.
4. Take out the auger. Then remove the seals (A and B).

5. Clean and sanitize all the dismantled parts (excluding the lid), following below instructions:
- Wipe the parts with a sponge soaked with a sanitizer solution.
- Rinse the parts thoroughly with clean water.
- Soak the parts into the sanitizer solution for about 30 minutes.
- Wash the parts again with clean water.
- Let dry thoroughly.
Cleaning the lid
Caution:
- As the lid is equipped with LED lights, NEVER soak it in any type of liquid for cleaning.
- During cleaning, Never let water or any liquid come into contact with the electrical parts of the light.
- Use a clean damp cloth to wipe clean the bottom part of the lid.
- Wipe clean the whole outer part.
- Sanitize the bottom part with a sponge previously damped with sanitizer solution.
- Allow to act for 30 minutes.
- Wipe the bottom part twice or more with a clean sponge soaked with clean water.
- Let the lid dry well.
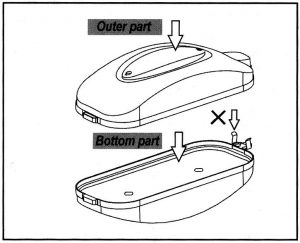
Caution: NEVER attempt to clean/sanitizer the lid while it is installed in the appliance.
Re-assembly1. Apply the seal (A) onto the auger as shown.

Always ensure to check the seal integrity. Should it be worn, replace with a new one immediately. Replace the seal (A) at least once a year.
2. Using the Vaseline provided, lubricate the seal (A) in the area as shown.
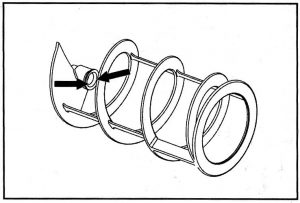
3. Apply the seal (B), lubricating the entire surface as indicated by the arrows.
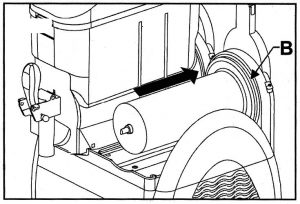
4. Introduce the auger, engaging head (C) with shaft (D). If necessary, rotate the auger to engage it.

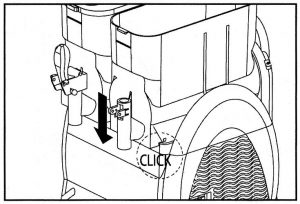
5. Setting the bowl back in place: Slightly raise head (C) of the auger so that it meets the seat (E) provided in the bowl.

6. Press the bowl downward until it get engaged as shown.
7. To refit the tap assembly, follow below instructions:
- Using the vaseline provided, adequately lubricate the cap (Y), and refit the components.
- Introduce the pin (F) while keeping the tap lever steady.
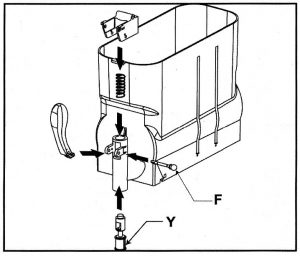
Always ensure to lubricate the cap. Otherwise, product leakage from the tap may occur.
Rinsing cycle
Caution: After re-assembly and before re-starting the appliance for serving, make sure to carry out the rinsing cycle.
- Fill the bowl with clean water.
- Run the cleaning mode. For details, please see Section “To simply clean the desired bowl”.
- Turn off the appliance. Then empty the bowl.
Replacing the light bulbLight bulb replacement should be carried out only by professional technician. For details, please refer to our service manual available online.
Cleaning the condenserPeriodically cleaning the condenser can extend the life of the appliance.POLAR recommend that a POLAR agent or qualified technician should clean the condenser.
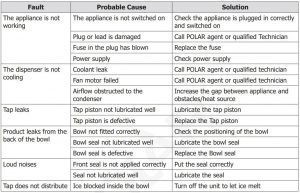
Troubleshooting
If your Drinks Dispenser develops a fault, please check the following points before making a call to the Helpline.
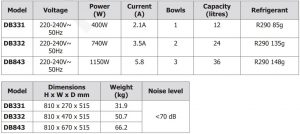
Technical Specifications
Electrical Wiring
POLAR appliances are supplied with a 3 pin BS1363 plug and lead.The plug is to be connected to a suitable mains socket.POLAR appliances are wired as follows:
- Live wire (coloured brown) to terminal marked L
- Neutral wire (coloured blue) to terminal marked N
- Earth wire (coloured green/yellow) to terminal marked E
This appliances must be earthed.
 If in doubt consult a qualified electrician.Electrical isolation points must be kept clear of any obstructions. In the event of any emergencydisconnection being required they must be readily accessible.
Disposal
EU regulations require refrigeration product to be disposed of by specialist companies who remove or recycle all gasses, metal and plastic components.
Consult your local waste collection authority regarding disposal of your appliance. Local authorities are not obliged to dispose of commercial refrigeration equipment but may be able to offer advice on how to dispose of the equipment locally.
Alternatively call the POLAR helpline for details of national disposal companies within the EU.
Compliance
![]() The WEEE logo on this product or its documentation indicates that the product must not be disposed of as household waste. To help prevent possible harm to human health and/or the environment, the product must be disposed of in an approved and environmentally safe recycling process. For further information on how to dispose of this product correctly, contact the product supplier, or the local authority responsible for waste disposal in your area.
The WEEE logo on this product or its documentation indicates that the product must not be disposed of as household waste. To help prevent possible harm to human health and/or the environment, the product must be disposed of in an approved and environmentally safe recycling process. For further information on how to dispose of this product correctly, contact the product supplier, or the local authority responsible for waste disposal in your area.
POLAR parts have undergone strict product testing in order to comply with regulatory standards and specifications set by international, independent, and federal authorities.
POLAR products have been approved to carry the following symbol:

All rights reserved. No part of these instructions may be produced or transmitted in any form or by any means, electronic, mechanical, photocopying, recording or otherwise, without the prior written permission of POLAR.
Every effort is made to ensure all details are correct at the time of going to press, however, POLAR reserve the right to change specifications without notice.
DECLARATION OF CONFORMITY


![]()

References
[xyz-ips snippet=”download-snippet”]