![]()
![]()
Streaming Action CameraUser Manual![]()
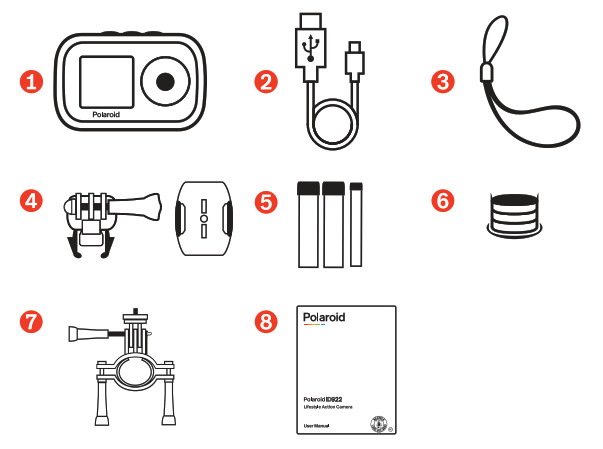
What’s Included
 Polaroid iD922 streaming camera
- USB charging cable
- Wrist strap
- Helmet mount
- Helmet mount straps
- Magnet mount
- Bicycle mount
- User manual
 Polaroid iD922 streaming camera
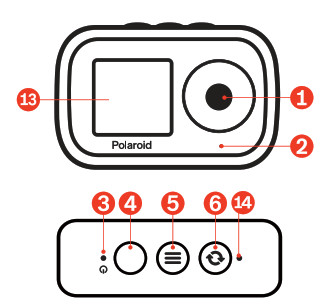
A Quick Look at Your Camera
- Lens
- Microphone
- Wi-Fi Indicator light
- Power/Shutter buttom
- Menu button
- Mode button
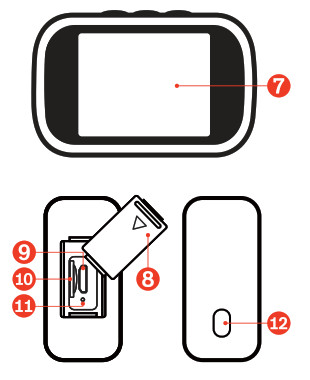
- 2.0″ LCD preview screen
- Port cover
- Micro USB port
- Micro SD memory card slot
- Reset button
- Wrist strap connector
- 1.4″ selfle screen
- Busy/Charging indicator light
 Lens
LensInserting a Memory Card
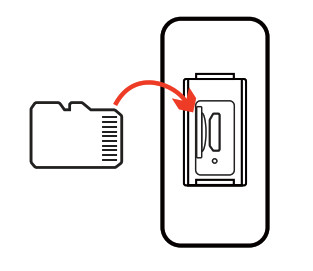
Before turning on your camera, insert a Micro SD memory ard(NOT included) into the memory card slot![]() . The memory card is needed in order to store photos or videos.Note: Class 4 or higher Micro SD memory cards are supported (up to 64GB).
. The memory card is needed in order to store photos or videos.Note: Class 4 or higher Micro SD memory cards are supported (up to 64GB).
Charging Your Camera
Your camera has a built-in lithium-ion battery. To charge the battery, follow the below steps.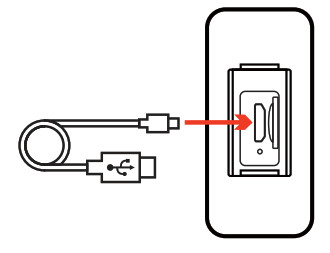
- Insert the Micro USB end of the included USB cable into the Micro USB port on your camera.
- Insert the other end of the USB cable into the USB port of a computer or a suitable 5V /1A USB charging adapter(NOT included).Note: A charging indicator light will illuminate while charging and then turn off once charging is complete.

 Note: A charging indicator light
 Turning On Your Camera
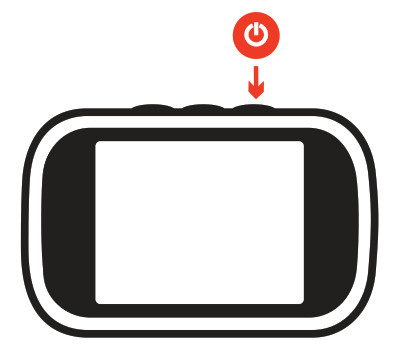 Press and hold the Power/Shutter button
 ![]() for approximately 3-4 seconds to power on or power off your camera.Note: Press and hold the Power/ Shutter button for approximately 6- 7 seconds to restart the camera if the camera freeze.
for approximately 3-4 seconds to power on or power off your camera.Note: Press and hold the Power/ Shutter button for approximately 6- 7 seconds to restart the camera if the camera freeze.
Changing Modes

Once the camera is powered on, press the Mode button ![]() repeatedly to switch between the camera’s different modes.
repeatedly to switch between the camera’s different modes.
The camera has three modes:
- Video Capture Mode : recording video
- Photo Capture Mode : capturing photos
- Playback Mode : reviewing photos & videos
Video Capture Mode
By default, when you first turn on your camera, it will be in Video Capture Mode. Use this mode when you want to record videos.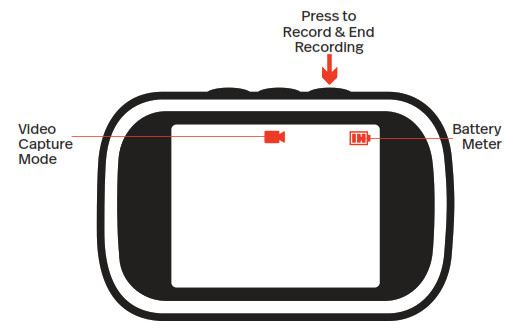 Press the Power / Shutter button
 ![]() to begin recording video. Press it again to end your recording.Videos will automatically be recorded to the Micro SD memory card.
to begin recording video. Press it again to end your recording.Videos will automatically be recorded to the Micro SD memory card.
Video Capture Mode Settings
While in Video Capture Mode ![]() , press the Menu button
, press the Menu button ![]() to access the Video Capture Mode Settings Menu.
to access the Video Capture Mode Settings Menu.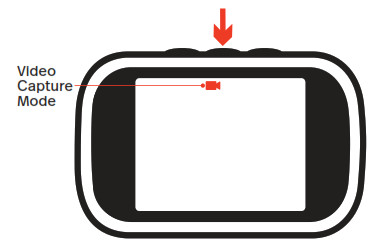
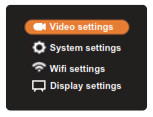 Make sure the Video settings is selected on the on-screen menu, and press the Power /Shutter button
 ![]() .
.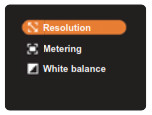 There are three video settings that can be adjusted:
- Resolution settings determines the size and quality of the video.
- Metering allows you to pick a pre-set that automatically adjusts light sensitivity.
- White balance settings attempt to balance out any color casts so that objects appear which appear white in person are rendered white in your videos.
Photo Capture Mode
To take photos, press the Mode button ![]() to access the Photo Capture Mode
to access the Photo Capture Mode![]() .Press the Power / Shutter button
.Press the Power / Shutter button ![]() to take a picture.Photos will automatically be recorded to the Micro SD memory card.
to take a picture.Photos will automatically be recorded to the Micro SD memory card.
Photo Capture Mode Settings
While in Photo Capture Mode ![]() , press the Menu button
, press the Menu button ![]() to access the Photo Capture Mode Settings Menu.
to access the Photo Capture Mode Settings Menu.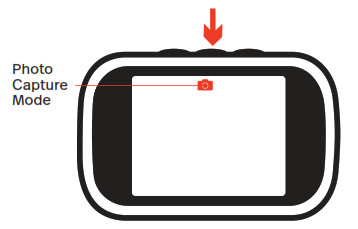
 Make sure the Camera settings is selected on the on-screen menu, and press the Power / Shutter button
![]() .Display settings allows you to switch the camera rear screen
.Display settings allows you to switch the camera rear screen ![]() to the selfie screen
to the selfie screen![]() .While in seilfie screen, press Menu button
.While in seilfie screen, press Menu button ![]() turn back to the rear screen.
turn back to the rear screen.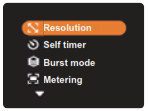
 There are six photo settings that can be adjusted:
- Resolution settings determines the size and quality of the photo.
- Self timer allows you to take a photo after a selected amount of time.
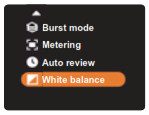
- Burst mode allows you to take several photos instantaneously after the is pressed. Shutter button
- Metering allows you to pick a pre-set that automatically adjusts light sensitivity.
- Auto review lets you choose if you want to view your photo immediately after shooting it.
- White balance settings attempt to balance out any color casts so that objects which appear white in person are rendered white in your photos.
Playback Mode
When you want to view the photos and videos you’ve taken, press the Mode button ![]() repeatedly after turning on your camera to enter Playback Mode.
repeatedly after turning on your camera to enter Playback Mode.
Playback Mode Settings
While in Playback Mode ![]() , press the Menu button
, press the Menu button ![]() to access the Playback Mode Settings Menu.
to access the Playback Mode Settings Menu.

- Delete allows you to delete a photo or video.
- Gallery allows you to review thumbnails of images andquickly select desired photos by using the Shutter button.
- Slide show allows you to view your photos in succession.
- Lock can be selected to lock a photo or video in place so it cant’t be deleted without unlocking it.
General System Settings
When in Photo Capture or Video Capture Modes, you can press Menu button to access the General System Settings.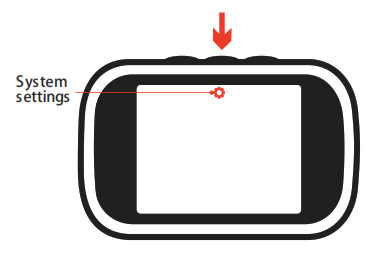
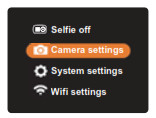 Make sure the System settings is selected on the on-screenmenu, and press the Shutter button.
 There are four general settings:
![]() Sele ct Date and time to set the camera to the current date.
Sele ct Date and time to set the camera to the current date.![]() Language setting allows you to choose which language is used on the camera’s display screen.
Language setting allows you to choose which language is used on the camera’s display screen.![]() Memory setting allows you to see how much remaining memory you have on your memory card.
Memory setting allows you to see how much remaining memory you have on your memory card.![]() If you are having issues with your camera’s performance, select Reset and format to reset the camera to the original default settings and to format the memory card.NOTE: Formatting the memory card will cause all contents to be deleted.
If you are having issues with your camera’s performance, select Reset and format to reset the camera to the original default settings and to format the memory card.NOTE: Formatting the memory card will cause all contents to be deleted.
Wifi Settings
When in Photo Capture ![]() or Video Capture
or Video Capture ![]() Modes, you can press Menu button
Modes, you can press Menu button ![]() to access the Wifi Settings Menu.
to access the Wifi Settings Menu.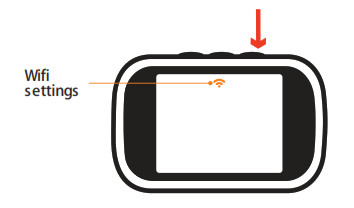
 Make sure the Wifi settings is selected on the on-screen menu, and press the Power /Shutter button
 ![]() to turn the camera’s Wifi ON.
to turn the camera’s Wifi ON. Follow the camera’s on-screen instructions to connect your device to the camera’s Wifi. On your device, select the camera’s Wifi and enter the provided password.NOTE: While your device is connected to the camera’s Wifi, you will not have access to the internet.
Connect to the Polaroid Wave App
The Polaroid Wave app allows you to see the camera’s live view and stored recordings directly from your device.

- Download the Polaroid Wave app on the App Store® (for iOS devices) or the Google Play™ store (for Android™ devices).
- With your device connected to the camera’s Wifi, open the Polaroid Wave app on your device.

App Store and iPhone are registered trademarks of Apple Inc.Google Play and the Google Play logo are trademarks of Google LLC.
Using the Polaroid Wave App
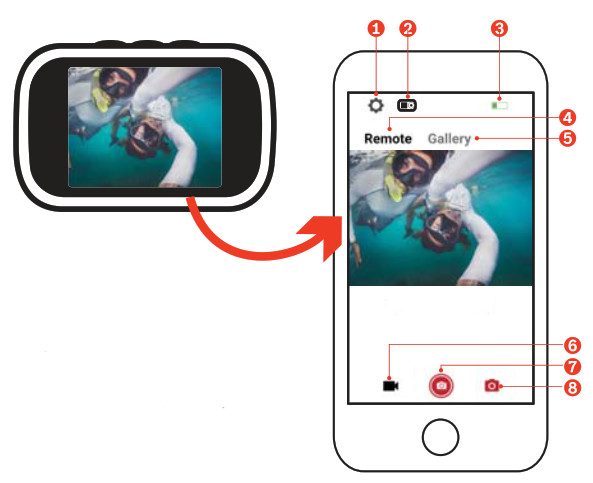
- Camera setting
- Camera connection status
- Camera battery meter
- Camera live view
- Camera memory card gallery
- Video capture mode
- Shutter release (for photo & video)
- Photo capture mode
Using the Polaroid Wave App
When viewing the Camera memory card gallery, you can download photos onto your phone, delete images or share downloaded images.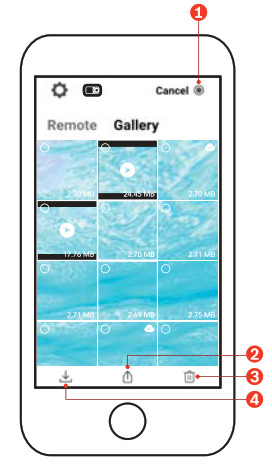
- Select/Cancel multiple images
- Share images*
- Delete images
- Download images
*Note: Only downloaded images can be shared using the app.
Using the Bicycle Mount
The bicycle mount can be used on bicycle handlebars or other similarly sized poles.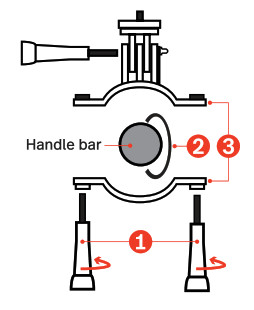
- Unscrew the two knobs on the mount and remove the bottom piece.
- Wrap the rubber grip around the handlebar.
- Place the top piece on the top of the handlebar, then place the bottom piece on the underside.
- Screw the two knobs back into place so that the mount is secure and does not shift.
- Once securely placed on the handlebar, the camera can be mounted to the top of the bicycle mount.

Using the Helmet Mount
The helmet mount can be used on a standard bicycle helmet by securing with the included helmet mount straps and adhesive pads on the underside of the mount.Optional: Remove the protective seal on the adhesive strip and place on your bike helmet so that it sticks in place.
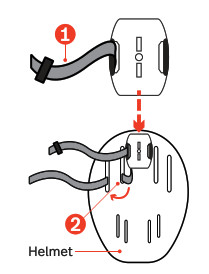
- Take one of the large straps and thread it down through the slot on the helmet mount base.
- Take the end of that strap and thread it through one of the ports on a bicycle helmet and then out through another port.
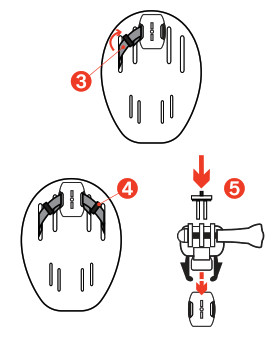
- Slide the end of the strap through the strap’s clip and adjust until the strap feels properly secure and in place, then press the clip until it clicks into place. Using the adhesive strips, fasten the loose ends of the large strap to other ports on the bicycle helmet.
- Repeat steps 1-3 with the other strap.
- Slide the fastener into the base and attached the camera to the top of the helmet mount.
FCC Statement
Changes or modifications not expressly approved by the party responsible for compliance could void the user’s authority to operate the equipment.
This device complies with Part 15 of the FCC Rules. Operation is subject to the following two conditions: (1) this device may not cause harmful interference, and (2) this device must accept any interference received, including interference that may cause undesired operation.
This equipment has been tested and found to comply with the limits for a Class B digital device, pursuant to Part 15 of the FCC Rules. These limits are designed to provide reasonable protection against harmful interference in a residential installation. This equipment generates, uses and can radiate radio frequency energy and, if not installed and used in accordance with the instructions, may cause harmful interference to radio communications. However, there is no guarantee that interference will not occur in a particular installation.
If this equipment does cause harmful interference to radio or television reception, which can be determined by turning the equipment off and on, the user is encouraged to try to correct the interference by one or more of the following measures:
- Reorient or relocate the receiving antenna.
- Increase the separation between the equipment and receiver.
- Connect the equipment into an outlet on a circuit different from that to which the receiver is connected.
- Consult the dealer or an experienced radio/TV technician for help.FCC Radiation Exposure StatementThe device has been evaluated to meet general RF exposure requirement.The device can be used in portable exposure condition without restriction.
Support
For warranty information and technical support, please call 877-408-0033 or visit polaroid.com/help. For e-mail support, please contact us at [email protected].
One Year Warranty
This warranty covers the original consumer purchaser only and is not transferable. This warranty covers products that fail to function properly UNDER NORMAL USAGE, due to defects in material or workmanship. Your product will be repaired or replaced at no charge for parts or labor for a period of one year.
What is not covered by warrantyDamage or malfunctions not resulting from defects in material or workmanship and damages or malfunctions from other than normal use, including but limited to, repair by unauthorized parties, tampering, modification or accident.
To obtain warranty service and troubleshooting information:Call 877-408-0033 or visit our website at www.polaroid.com.
To receive warrant service along with the name and address of an authorized product service center, the original consumer purchaser must contact us for problem determination and service procedures. Proof of purchase in the form of a bill of sale or receipted invoice, evidencing that the product is within the applicable warranty period(s). MUST be presented in order to obtain the requested service. It is your responsibility to properly package and send any defective products along with a dated copy of proof of purchase, a written explanation of the problem, and a valid return address to the authorized service center at your expense. Do not include any other items or accessories with the defective product. Any product received by the authorized service center that are notcovered by warranty will be returned unrepaired.
E-Waste Notification
PLR IP Holdings, LLC, its licensees, affiliates, and Sakar International, Inc. fully support all electronic waste initiatives. As responsible stewards of the environment, and to avoid violating established laws, you should properly dispose of this product in compliance with all applicable regulations, directives or other governances in the area where you reside. Please check with local authorities or the retailer where you purchased this product to determine a location where you can appropriately dispose of the product.
You may also go to www.polaroid.com and reference Social Responsibility https://polaroid.com/pages/social- responsibility to learn more about the specific laws in your area and to locate a collection facility near your home.
If your electronic device has internal memory on which personal or other confidential data may be stored, you may want to perform a data sanitization process before you dispose of your device to assure another party cannot access your personal data. Data sanitization varies by the type of product and its software, and you may want to research the best sanitization process for your device before disposal. You may also check with your local recycling facility to determine their data sanitization procedures during the recycling process.
Copyright © 2020 All rights reserved.Product features, specifications and appearance are subject to change without notice.
![]()
![]() Have questions? We’ve got answers.Visit us at polaroid.com/support or give us a call at 1-877-408-0033
Have questions? We’ve got answers.Visit us at polaroid.com/support or give us a call at 1-877-408-0033
References
[xyz-ips snippet=”download-snippet”]