
OWNER′S MANUALILLUMINATIONS™LED LIGHTWIZARD™
LED LIGHTWIZARD READ, AND KEEP THESE INSTRUCTIONS FOR FUTURE REFERENCE FAILURE TO FOLLOW THESE WARNINGS AND INSTRUCTIONS CAN RESULT IN SERIOUS INJURY OR DEATH TO USERS, ESPECIALLY CHILDREN.
![]() WARNING
WARNING
IMPORTANT SAFETY INSTRUCTIONS
When using electrical products, basic precautions should always be followed including the following:
READ AND FOLLOW ALL SAFETY INSTRUCTIONS.
- Do not use seasonal products outdoors unless marked suitable for indoor and outdoor use. When used outdoors, this product must be connected to a Ground Fault Circuit Interrupting (GFCI) outlet. If one is not provided, contact a qualified electrician for proper installation.
- This seasonal use product is not intended for permanent installation or use.
- Do not mount or place near gas or electric heaters, fireplace, candles, or another similar source of heat.
- Do not secure the wiring of the product with staples or nails, or place it on sharp hooks or nails.
- Do not let lamps rest on the supply cord or on any wire.
- Disconnect the product from the power source when leaving the house, when retiring for the night, or if left unattended.
- This is an electric product – not a toy! To avoid the risk of fire, burns, personal injury, and electric shock, it should not be played or placed where small children can reach it.
- Do not use this product for anything other than its intended use.
- Do not hang ornaments or other objects from the cord, wire, or light string.
- Do not close doors or windows on the product or extension cords as this may damage the wire insulation.
- Do not cover the product with cloth, paper, or any materials not part of the product when in use.
- This product can be used by children aged 8 years and above and persons with reduced physical, sensory or mental capabilities or lack of experience and knowledge if they have been given supervision or instruction concerning the use of the product in a safe way and understand the hazards involved. Children shall not play with the product. Cleaning and user maintenance shall not be made by children without supervision.
- Risk of fire: the supply cord, adapter, plugs, and/or connectors cannot be replaced or modified. If either is damaged, the product should be scrapped.
- Strobe lights have been known to trigger seizures in people with photosensitive epilepsy.
- Read, and follow all instructions that are on the product or provided with the product.SAVE THESE INSTRUCTIONS.
WARRANTY
Thank you for your purchase of Polygroup® products! We do hope that you are happy with what you received, but we know sometimes it’s necessary to exchange or return an item. Therefore, Polygroup® offers a 30-day limited warranty on this product*.We are happy to repair your defective item or replace it with an item that is equal to the purchase price of the item, given that:
- You are the original purchaser for products purchased directly from an authorized retailer or wholesaler of Polygroup® products;
- The item was purchased within the last 30 days;
- The item was purchased during its intended season;
- Proof of purchase can be provided, and
- The item is in its original packaging.If you meet these requirements, please contact us at (email) or (phone) 1.888.919.0070 so that we may forward you a quality assurance form.* Note: warranty is not extended to items that are purchased from seasonal stores as they generally sell items with an “all sales final” policy.Warranty is also not extended to close-out, second quality, or resold products (i.e. garage sales, online auctions, or online retailers not purchasing directly from Polygroup® ). Any issues with items purchased from these types of vendors/sellers will need to be addressed with them.
DISTRIBUTED BY: Polygroup® Trading Limited Unit 606, 6/F, Fairmont House, 8 Cotton Tree Drive, Central, Hong Kong
OWNER′S MANUAL
CAUTION:
To reduce the risk of fire or electric shock:
- Do not mount or support cords or cables in a manner that can cut or damage wire insulation;
- Use only the adapter provided with this product, and
- Make sure connectors are fully inserted and secured by fully fastening the connector rings.
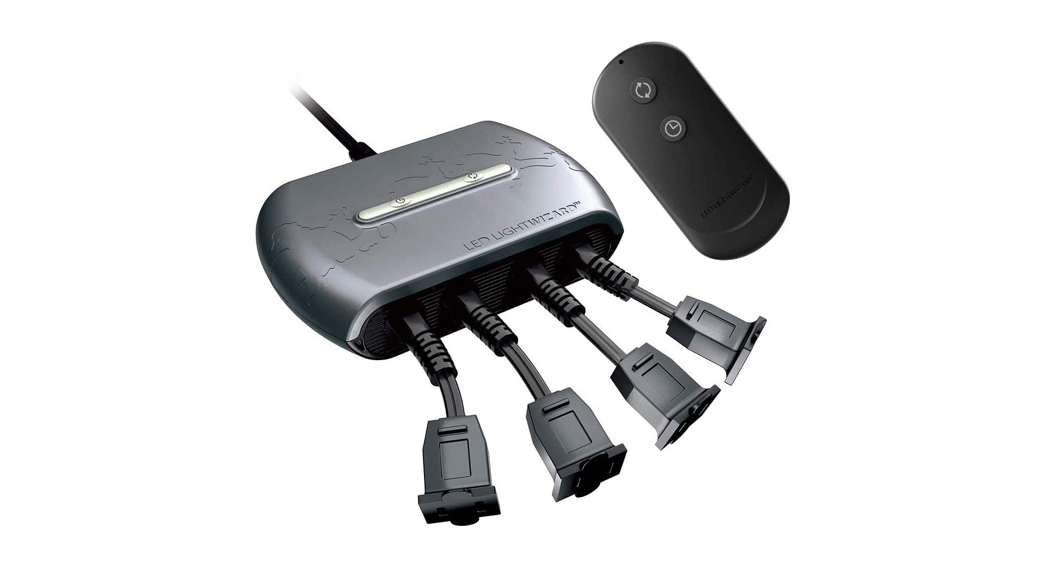
SpecificationsInput: AC 120V/60Hz, 2A (Max)Output: AC 120V/60Hz, 4×0.5A (Max)Model: PDR-026-120V
USE & CARE
Before using or reusing, inspect the product carefully. Discard any products that have cut, damaged or frayed wire insulation or cords, loose connections,or exposed copper wire.
IMPORTANT:
- Connect only standard LED lights without any functions.
- This product is equipped with an internal protection device (circuit breaker) that shuts off the power to an outlet when the outlet is overloaded. If lights with amperage over 0.5A are plugged into the outlet, the device will automatically switch off the outlet. Remove the lights and the outlet will work normally again. See TROUBLESHOOTING.
- Connect your LED lights (not included) to one of the four outlets of the product. The actual number of lights to be connected to each outlet varies with the actual Rated Amperage of your lights. Please refer to the specifications and user manual of your lights. Do not exceed the maximum rated amperage or it may cause damage to the product and/or the user.IMPORTANT: Connect only standard LED lights without any functions.

- Plug the product to a wall or electrical outlet
- When not in use, unplug the product from power and store it in a cool, dry place away from sunlight.
- When storing the product, carefully remove the product from wherever it is placed, including trees, branches, or bushes, to avoid any undue strain or stress on the product conductors, connections, and wires.


TROUBLESHOOTING
TROUBLESHOOTINGLights of one (or more) of the outlets go off
- The outlet is overloaded. Unplug the power and wait for 30 minutes. Meanwhile check that the power output of your lights does not exceed 0.5Amp, the maximum capacity of each outlet. Replace with lights of less lighting load.
- Connect with only static, constant standard LED lights without any functions.Lights flash abnormally
- Remove your lights and replace them with only static/constant LED lights without any functions or controller; the product should then work normally.
FUNCTIONS
- Press to select from the 10 preset Shows in the following sequence:Show#1: Steady GlowShow#2: Multi-speed FadingShow#3: Multi-speed BlinkingShow#4: ChasingShow#5: Shooting StarShow#6: StackingShow#7: SparkleShow#8: Cross WaveShow#9: AlternatingShow#10: ComboPress once after Show#10 to turn off the product.* If you unplug and reconnect the product to power, the product will replay the last Show you’ve chosen.
- Press to select from the 4 preset timer settings:a. Setting 1: 4 hours ON and then 20 hours OFF (LED in Green)b. Setting 2: 6 hours ON and then 18 hours OFF (LED in Blue)c. Setting 3: 8 hours ON and then 16 hours OFF (LED in Red)d. Setting 4: OFF (LED in Yellow)* The LED Timer Indicator of the product will constantly be on.* The LED light on the remote control will blink 5 times in red before turning off.
- The timer will reset after each Show/Timer selection, and after you unplug and reconnect the product to power.

MAINTENANCE
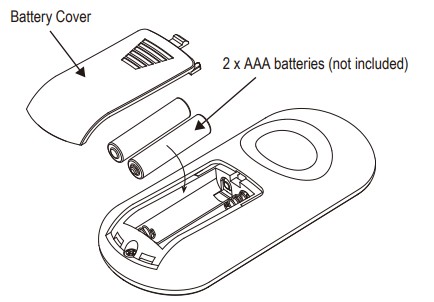
Battery Replacement
- To place/replace batteries, open the cover.
- Insert two AAA-size batteries (not included) into the compartment.
- Close the cover.
WARNING:
- Insert batteries with correct polarity (+/-).
- Use ONLY AAA size (LR03) batteries.
- For longer battery life, use alkaline batteries.
- WARNING: CHOKING HAZARD – AAA BATTERIES ARE SMALL PARTS, KEEP AWAY FROM CHILDREN.
- Do not expose the light set to moisture.
- Do not mix old and new batteries.
- Do not mix alkaline, standard (Carbon – Zinc), lithium, or rechargeable (NiCd, NiMH, or another type) batteries.
- Remove batteries when not used for an extended period of time, or when depleted.
- Dispose of used batteries properly.
- Dry-wipe with a cloth to clean the battery contacts prior to battery installation.
- DO NOT DISPOSE OF BATTERIES IN FIRE. BATTERIES MAY EXPLODE OR LEAK.
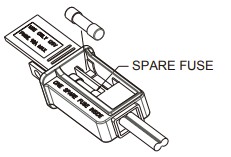
Fuse Replacement:
- Grasp the plug and unplug the product from power. Do not unplug by pulling on the cord.
- Slide open the fuse cover and remove the blown fuse carefully.
- Insert the included spare fuse.Risk of fire: replace only with 10 Amp 125 Volt fuse provided with the product.
- Slide closed the fuse cover.
[xyz-ips snippet=”download-snippet”]