
Full Touch Key MP3Owner’s Manual
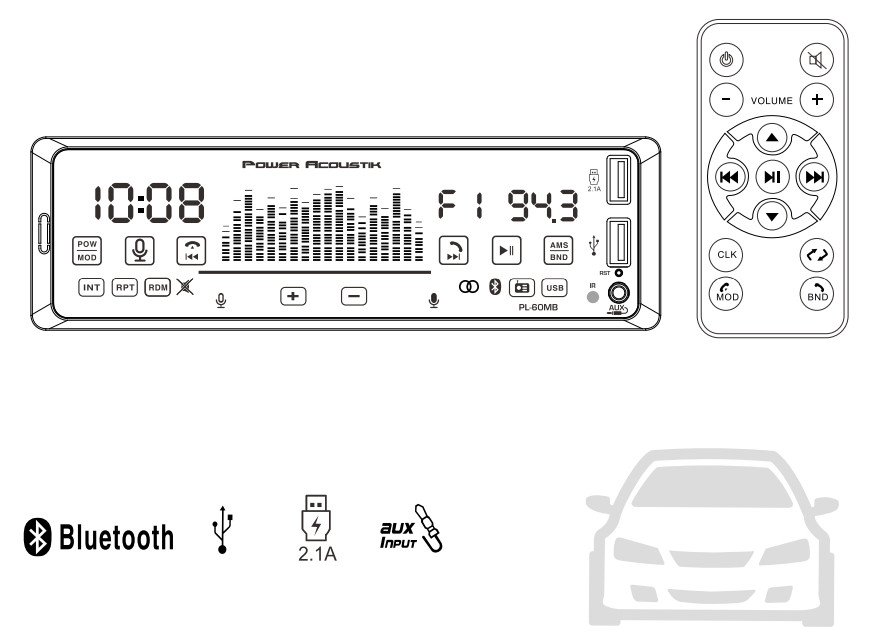
1 DIN MP3 with full touch keyMP3 PlayerVoice AssistantGesture ControlAM/FM RadioSupport Bluetooth
WARNING!
To promote safety, certain functions are disabled unless the parking brake is on. The Unit is designed to detect parked status and must be connected to the power supply side of the parking brake switch. Improper connection or use of his connection may violate applicable law and may result in serious injury or damage. To avoid the risk of damage and injury and the potential violation of applicable laws, this unit is not for use with a video screen that is visible to the driver.
- To avoid the risk of accident and the potential violation of applicable laws, the front Video image feature should never be used while the vehicle is being driven. Also, other video displays should not be in a location where it is a visible distraction to the driver. In some countries or states the viewing of images on a display inside a vehicle even by persons other than the driver may be illegal. Where such regulations apply, they must be obeyed and this unit’s DVD features should not be used.
- Please remember to wear your seat belt at all times while operating your vehicle. If you are ever in an accident, your injuries can be considerably more severe if your seat belt is not properly buckled.
- The supplier waives any and all liability when these warnings are not followed.
(OPERATION PRECAUTIONS
- Only connect to a 12V DC battery and negative grounding.
- Avoid placing the product in direct sunlight, in areas with high levels of dust, high temperatures (over 40°C) or high humidity (over 90%). In case of high temperatures, cool down the car interior by means of ventilation or air-conditioning.
- Operate in well-ventilated areas.
- Do not turn on or off the product in short When turning the unit off, wait for at least 10 seconds prior to turning the unit on again. Do not operate the player with scratched, bent or broken discs and when a disc is not loaded properly, do not force it into the player.
- Do not watch video playback while driving which will cause serious danger and risks of traffic accidents. It may violate the laws and (There may be an exceptional case, i.e., using rearview camera and navigation system)
- Do not install the unit where the operation for safe driving is restrained.
- Do not disassembly the unit by yourself, if need repairing, please take the unit to the after-service center.
- Do not open and close the monitor manually, it may damage the monitor tilt system.
- Do not touch the LCD screen by hard objects, it may damage or give scratch to the LCD
- If the back of the monitor touches the dashboard or air-conditioner inlet etc after opening the monitor, then setup TILT level in the monitor TILT menu to prevent damage from repeat
- Car parking under direct sunlight may increase the temperature inside the car and the unit may not be in proper operation, please try it again after the temperature returns to normal.
- Do not replace the fuse on the power cable without professional guidance, using an improper fuse may cause damage to the unit or even cause burn the unit.
- Do not use irregular-shaped Disks.
- IR remote control operation may be hindered by the monitor when the monitor is opened, thus please use the remote control at a similar level of remote control receiver.
- Do not install the unit where the cooling fan is blocked.
INSTALLATION / UN-INSTALLATION
Precautions:
- When the protective tube needs to be replaced, the protective tube of the same specification should be used and the random substitution is not
- The wires must be correctly connected according to the wiring diagram to ensure the normal operation of the head unit.
INSTALLATION Drawing
- The head unit should be placed as per the installation position before installation, and then should be connected to the corresponding loudspeaker wire and power wire for an audition.
- The head unit can be fixed after the head unit running effect is satisfactory.
INSTALLATION
- Install the mounting sleeve on the instrument board of the car, and bend the part of the bracket for positioning.
- Connect the power wire and loudspeaker wire, and fix the stator on the car.
- Insert the antenna plug, push the head unit into the sleeve, and tighten the fixing, not of the stator.
UN-INSTALLATION
- After inserting the two pieces of the disassembly keys into the holes on the left and right side, making the disassembly key hook the head unit and pulling it out gently.
- The head unit can be disengaged from the bracket, then the connecting cable can be removed and the antenna plug can be unplugged.

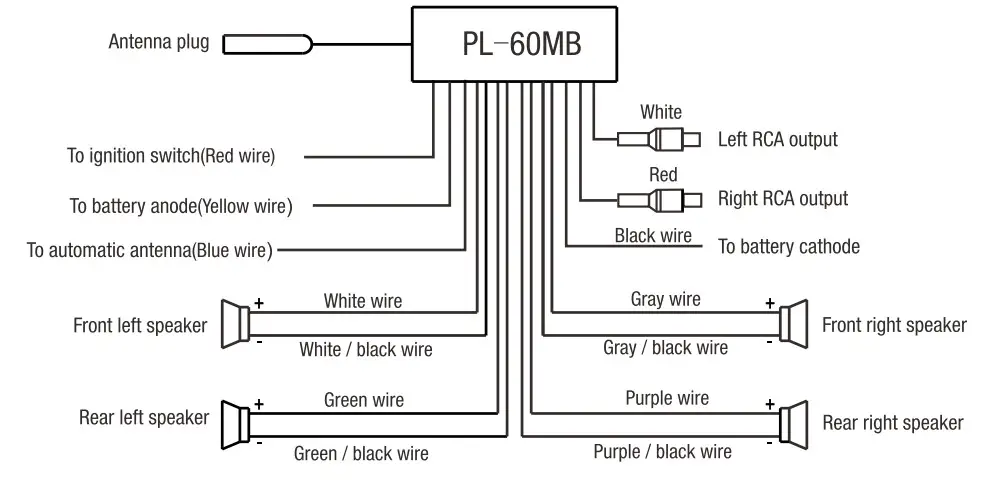
WIRING CONNECTIONS
Make sure you have good chassis ground. A good ground connection will eliminate most electrical noise problems. A good chassis ground requires a tight connection to the vehicle’s metal chassis. The area around the ground connection should be clean, bare metal without rust, paint, plastic, dust, or dirt for a good electrical connection.
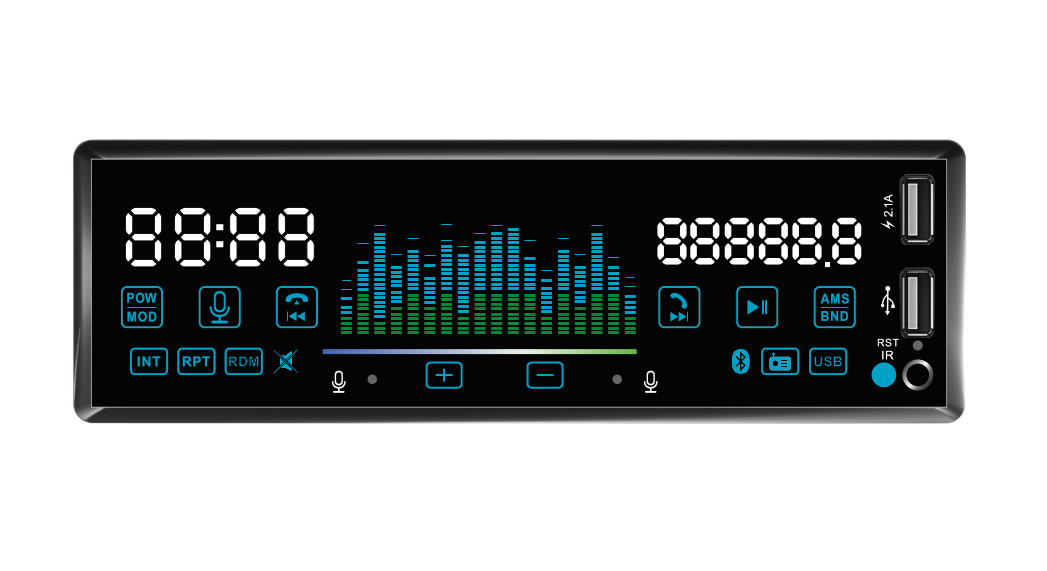
Description of features for panel
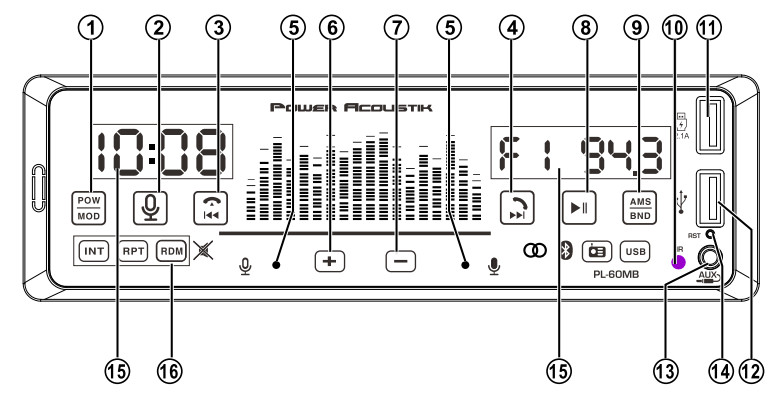
1. ![]() ON/OFF/Mode switch key
ON/OFF/Mode switch key
- In the OFF state, short press this key for ON.
- In the ON state, short press this key for the switch between Radio, USB, BT, and AUX.
- In the ON state, press and hold this key for OFF. (Note: In the absence of USB, the headunit will automatically skip to the next mode.)
2.![]() One-key wake-up of voice assistant key
One-key wake-up of voice assistant key
When the Bluetooth is connected, short press this key for one-key wake-up of voice assistant, and realize the following functions of the mobile phone through the voice command: Navigation, ringing up, send messages through WeChat, playing music. (Note: This function can be used when the mobile phone supports the voice assistant function and is equipped with the voice assistant APP)3. ![]() Selection of the previous songs/previous frequency search/on-hook key
Selection of the previous songs/previous frequency search/on-hook key
- In the reception state, short press this key for previous frequency selection of radio station ID, and press and hold this key for previous frequency manual search of radio stations
- In the Mp3 playback state, short press this key for selection of the previous song, Press and hold this key to play the previous 10 songs.
- After the Bluetooth is connected, when the phone rings, short press this key for hanging up. (Note: This function can be used when the mobile phone supports the voice assistant function and is equipped with the voice assistant APP)
4. ![]() Selection of the next songs/next frequency search/talking key
Selection of the next songs/next frequency search/talking key
- In the reception state, short press this key for the next frequency selection of radio station ID, and press and hold this key for next frequency manual search of radio stations.
- In Mp3 playback state, short press this key for selection of the next song, press and hold this key to play the next 10 songs.
- After the Bluetooth is connected, when the phone rings, short press this key for getting on the phone. In the call state, short press this key for switch between the mobile phone can and the headunit call. After hanging up, press and hold this key in Bluetooth mode for redialing.
5. ![]() MicrophoneIt is used to collect the call sound when the Bluetooth call or wake-up of voice assistant is ongoing in the mobile phone.
MicrophoneIt is used to collect the call sound when the Bluetooth call or wake-up of voice assistant is ongoing in the mobile phone.6. +Volume Up keyIn the ON state, press the key to increase the volume by 1 and press and hold this key to increase the volume in rapid succession.7. – Volume Down keyIn the ON state, press the key to decrease the volume by 1 and press and hold this key to decrease the volume in rapid succession.8. ![]() Pause/Playback/Mute key
Pause/Playback/Mute key
- In MP3/Bluetooth playback state, short press this key for pause and short press this key again to remove the paused playback.
- In the Radio receiver / AUX state, short press this key for mute and short press it again to unmute. c) (Note: In mute, unmute can be realized by touch or gesture control function)
- In the startup state, press and hold this key repeatedly to enter the following options: (DX/LOC, BASS, TRE, BAL, FAD, LOUD, E0, ALL, CLOCK, namely bass, treble, left and right balance, front and rear fader, equal loudness, sound effect, playback mode, clock) functions. Press and hold this key repeatedly to switch different functions, select the functions to be set, and set the corresponding value by short press +, – key.
9. ![]() Band switch /Automatic radio station memorizing keyIn Radio receiver mode, short press this key to switch the frequency band between pp FM1, FM2, FM3, AM1, AM2. Press and hold this key for automatic search and radio station memorizing. When the station is searched, 30 stations at most can be automatically memorized in FM1, FM2, FM2, AM1, AM2 bands. During the memorizing, the LED display shows the memorized bands and the memorized radio station ID number.
Band switch /Automatic radio station memorizing keyIn Radio receiver mode, short press this key to switch the frequency band between pp FM1, FM2, FM3, AM1, AM2. Press and hold this key for automatic search and radio station memorizing. When the station is searched, 30 stations at most can be automatically memorized in FM1, FM2, FM2, AM1, AM2 bands. During the memorizing, the LED display shows the memorized bands and the memorized radio station ID number.
10. IR Infrared receiving windowIt is used to receive instructions issued from the remote controller.11. ![]() USB charging portInsert the USB interface of the mobile phone charging cable in a direction to charge the mobile phone. The charging port can support a maximum charging current of 2A.
USB charging portInsert the USB interface of the mobile phone charging cable in a direction to charge the mobile phone. The charging port can support a maximum charging current of 2A.12. ![]() USB Playback portInsert the USB with music in a direction and then play the song of the corresponding format immediately.
USB Playback portInsert the USB with music in a direction and then play the song of the corresponding format immediately.13. ![]() AUX-IN jackUsed to connect external audio signals.
AUX-IN jackUsed to connect external audio signals.14. RST RESET keyWhen the headunit system function is in confusion, short press the “RESET” key to reset the headunit software system to the factory state.
![]()
15. It is used to display time and playback relater information. In FM, Bluetooth, AUX mode, the current clock time is displayed on the left side of the LED display screen. When USB music is played, the current song playback time schedule is displayed on the left side of the LED display screen, instead of the current clock time.16. Work instruction icon![]()
Time setting
In FM, AUX, BT mode, press and hold ![]() repeatedly until the CLOCK menu is displayed, release the touch for 1 second, and then short press
repeatedly until the CLOCK menu is displayed, release the touch for 1 second, and then short press ![]() to enter the time setting and two digits representing the hour flash. After short pressing +,- repeatedly to adjust the hour to reach the set value, short press
to enter the time setting and two digits representing the hour flash. After short pressing +,- repeatedly to adjust the hour to reach the set value, short press ![]() again and the two digits representing the minute flashed to enter the minute setting. After short pressings, 181 repeatedly to adjust the minute to reach the set value, release the touch, and the software will automatically exit the time setting after 3 seconds.
again and the two digits representing the minute flashed to enter the minute setting. After short pressings, 181 repeatedly to adjust the minute to reach the set value, release the touch, and the software will automatically exit the time setting after 3 seconds.
Gesture control
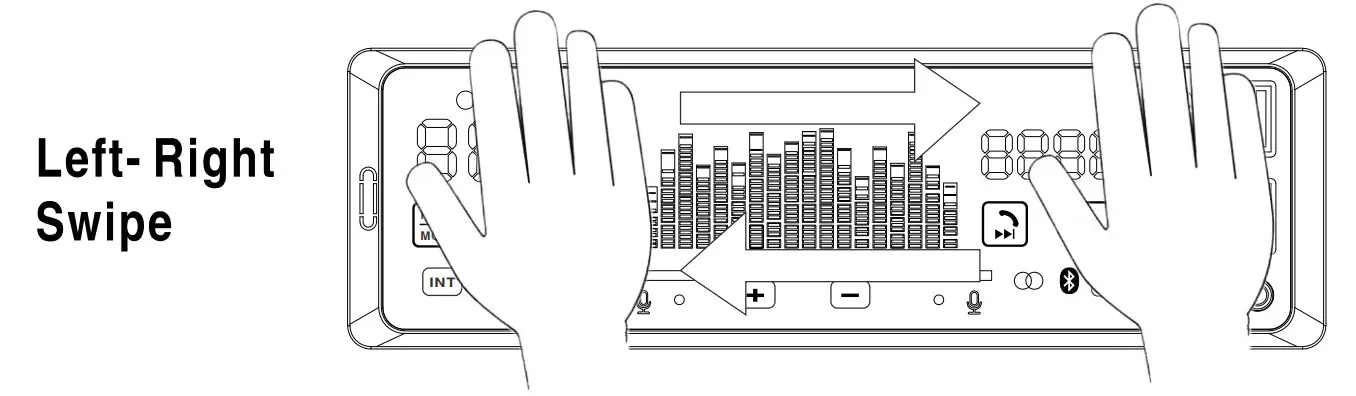
The machine supports the following two gesture control functions.
- Swiping your hand from left to right In the reception state, swipe your hand from left to right, with the function of next frequency selection of radio station ID. In Mp3, Bluetooth playback state, swipe your hand from left to right, with the function of select of next songs. After the Bluetooth is connected, when the phone rings, you can get on the phone by swiping your hand from left to right. During a phone call, the switch between the mobile phone call and headunit call can be realized through swiping your hands from left to right again. After the phone is connected, the switch between the mobile phone call and the headunit call can be realized through the same operation.
- Swiping your hand from left to right
In the reception state, swipe your hand from left to right, with the function of the previous frequency selection of radio station ID. In Mp3, Bluetooth playback state, swipe your hand from right to left, with the function of selection of previous songs. After the Bluetooth is connected, when the phone rings or the phone is connected, you can hang up and the headunit should not exceed 20CM during gesture control, and the hand should be swiped from one side of the headunit to the other side at a constant speed.
Bluetooth pairing
- The pairing of the mobile phone and the headunit First, turn on the headunit and press the El mode switch key to switch to BT mode. Move the mobile phone close to the headunit, turn on the Bluetooth function of the mobile phone, and then search for the Bluetooth name of the headunit (POWER ACOUSTIK) through the mobile phone and connect it. When the connection fails, the CI icon displayed on the headunit flashes; When the connection is successful, the display screen shows “BEON” and the BT icon is constant on, and a “ding-dong” sound will be made, indicating that Bluetooth is connected.
- If some phones have password prompts when pairing, the initial password defaults to “0000” or”1234″.
Operation of the remote controller
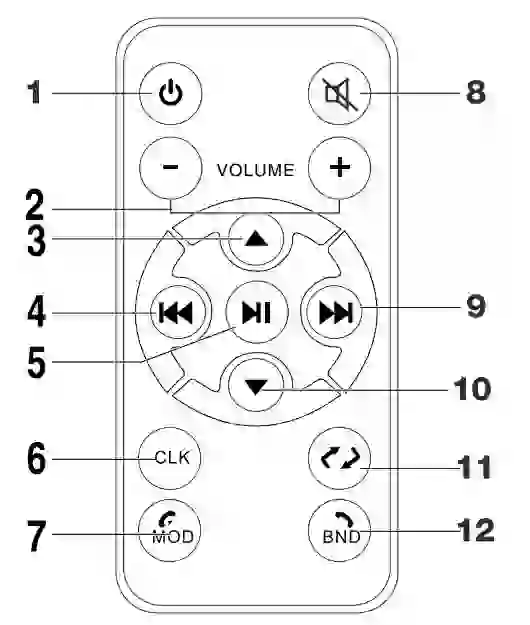
- Power key
- Volume +/- key
- Selection of pre-stored radio station /previous 10 songs key
- Up key for selection for music and frequency search for radio stations
- Pause /Play key
- Clock key
- Mode switch/On-hook key
- Mute key
- Selection of the next songs /next frequency search of radio stations
- Selection of pre-stored radio stations/ next 10 songs key
- Browse/Repeat/Random play key 1
- Band switch/Answer key
TECHNICAL SPECIFICATIONS
GeneralPower supply: 11-16V DCMaximum power output: 4 x 25W channels (max)Dimensions (W x D x H) : 178’50’80 mm 4-8 QLoudspeaker impedance: 4 -8ΩFM Stereo RadioFrequency range: 87.5 — 107.9MHzIntermediate frequency: 1.7MHzNoise limited sensitivity (S/N=30dB): ≤37dBSNR: ≥40dBFrequency Stepping: 0.2MHzPreset memory stations: 18AM Stereo RadioFrequency range: 530 — 1710KHzNoise limited sensitivity (S/N=30dB): ≤ 40dBSNR: ≥ 34 dBFrequency Stepping: 10kHzPreset memory stations: 12Mp3 playback Frequency response: 100Hz-20000Hz(±5dB)SNR: ≥ 45 dBChannel separation: ≥ 30dBVoltage harmonic distortion (1KHz): ≤ 1%Balance of playback stereo channel: ≤ 3dB
 report this ad
Specifications are subject to change without notice. Mass and dimension are approximate.http://www.poweracoustik.com©2021 Power Acoustik Corporation Printed in the USA
[xyz-ips snippet=”download-snippet”]