![]() DC Battery Meterwith External Shunt
DC Battery Meterwith External Shunt
 Instruction Manual
Overview
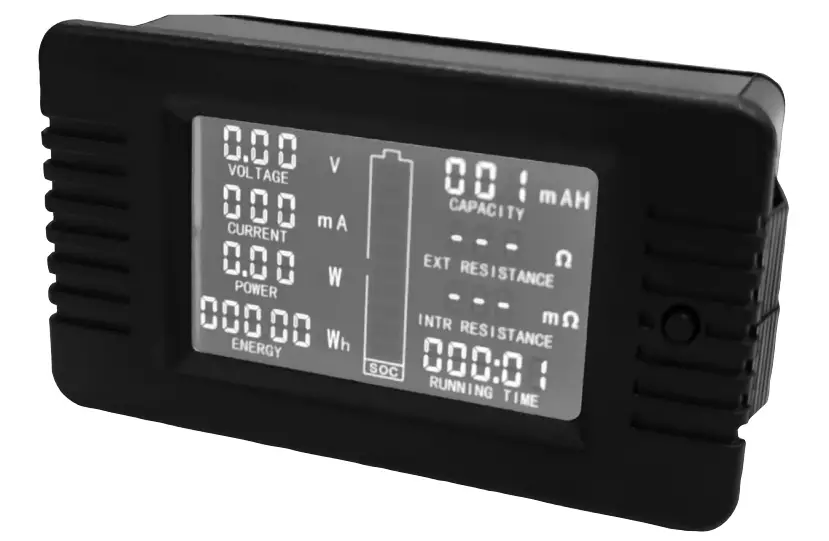
DC multifunction battery tester, this meter is mainly used to test all kinds of battery’s voltage, discharge current, discharge power, discharge impedance, internal resistance, capacity, dump energy, energy consumption, and running time, and display the measurement data through the LCD screen.
Function description
Voltage
- Measuring range: 0-200V. (when the test voltage is <8V, please use the independent power supply mode)
- Display format: <10V display as: 9.99V<100V display as: 99.9W≥100V display as: 199V
- Minimum resolubon:0.01V
- The starting test voltage: 0.05V 1.1.5 Measurement accuracy:1%
Current
- Measuring range: 0-200A
- Display format: <1A display as:999mA<10A display as: 9.99A<100A display as: 99.9A≥100A display as: 199A
- Minimum resolution:1mA
- The starting test current: 20mA
- Measurement accuracy:1%
Power
- Measuring range: 0-40000W
- Display format: <10W display as:9.99W<100W display as: 99.9W<1000W display as: 999W<10000W display as: 9.99kW≥10000W display as: 19.9kw
- Minimum resolution: 0.01W
- The starting test power: 0.2W
- Measurement accuracy:1%
Impedance
Impedance=Voltage/ Current
- Measuring range: 0-1000o
- Display format: <1000 display as: 99.90≥1000 display as: 9990When over the test range or the current is zero, it display “- – -“
- Minimum resolution: 0.10
- Measurement accuracy:1%
Internal Resistance
Internal resistance= (Full voltage — Bring load voltage) / Bring load current, when the bring load voltage is larger than the maximum voltage, the internal resistance is zero.
- Measuring range: 0-999mo
- Display format: 999mo, when over the test range or the current is zero, it displays “–
- Minimum resolution: lrnc2
- Measurement accuracy:1%
Note: Before you test the internal resistance, you should preset the full voltage depending on the battery type, after it is fully charged you can use it to test; if you do not fully charge it, you can set the battery without load voltage is the full voltage, then test; the internal resistance is not a fixed value, the more the battery discharged, the bigger the resistance.
Capacity
- Measuring range: 0-1000AH
- Display format: <1AH display as: 999mAH<10AH display as: 9.99AH<100AH display as: 99.9M-I≥1000AH display as: 999AH 1.6.3 Minimum resolution: lm
- Measurement accuracy:1%
Note: Battery capacity testing is a cumulative process of discharge current versus time, it needs some time, the time depends on the discharge current; before you test the capacity, you should preset the full voltage and the cut-off voltage depend on the battery type after it is fully charged you can use it to the discharge test; When the dump energy display blank, it means the discharge is over, this capacity display value is the battery’s capacity.
Dump energy
Dump energy is displayed via the battery symbol, a total of 10 grids, every grid presents 10%energy.Dump energy is calculated via the current battery voltage value, before the test you should preset the full voltage and the cut-off voltage depending on the battery type; every grid voltage = (the highest voltage — the lowest voltage) /10.
Accumulate energy consumption
- Measuring range: 0 —9999kWh
- Display format: <1kWh display as: 999Wh<10kWh display as: 9.99kWh<100kWh display as: 99.99kWh<1000kWh display as: 999.99kWh>1000kWh display as:9999kWh Over the test range will become zero.
- Minimum resolution: lWh
- Measurement accuracy:1%Note: 1Wh=0.001kWh=0.001 Kilowatt
Running time
- Measuring range: 0 – 999 hours (without load the time will not accumulate)
- Display format: 0:00:00 -999:59:59Over the test range will become zero.
OPERATING INSTRUCTIONS:
- Setting the full and cur-off voltage

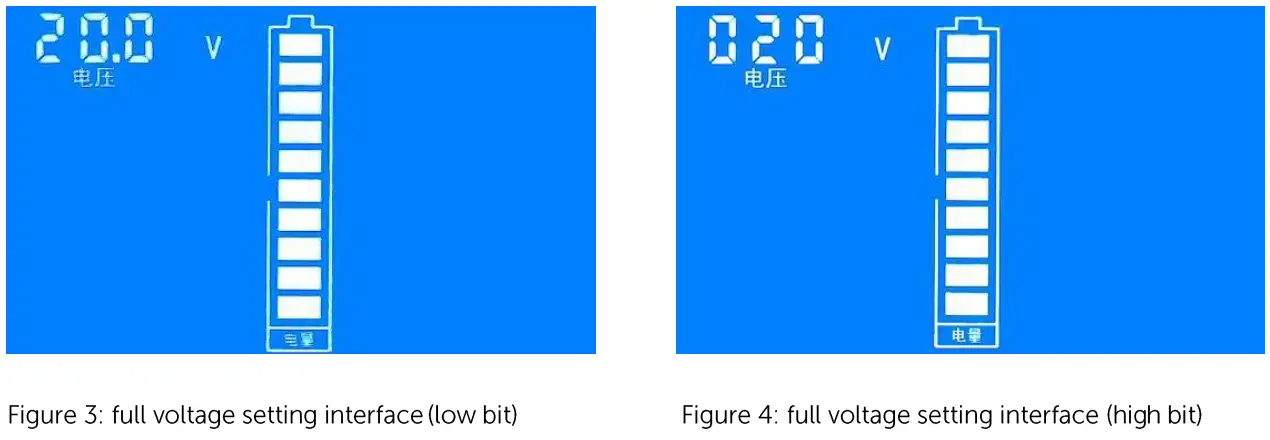
- Set the full voltage:Step 1: In the normal display interface (like fig. 1), long-press the button until the LCD screen display the interface Ike fig. 2, then release the button
Step 2: SET character blink present it is the setting status of full/cut-off voltage, long press the button until the LCD screen displays the interface like fig. 3, then release the button.Step 3: At this time, the battery symbol display full grids energy means the full voltage setting status, factory default the full voltage is 020.0V, the numerical code circulation flashing from the low bit to the high bit show that the current setting digit, short press to set the digit; please pay attention that, as the full voltage setting value has 4 digits, but the numerical code has only 3 digits, So the setting is divided into two parts: low bit (fig. 3) +high bit (fig. 4). For example.e, the default full voltage is 020.0V, then the display state is 20.0V to 020V low and high cyclic switching display. If you need to set the full voltage is 199.0V, then please set the low bit to 99.0V, when the cycle reaches the high bit, it will display 099V, and only the highest zero bit flicker to prompt it can be set. Setting the high bit to 19W represents the full voltage is 199.0V.
-
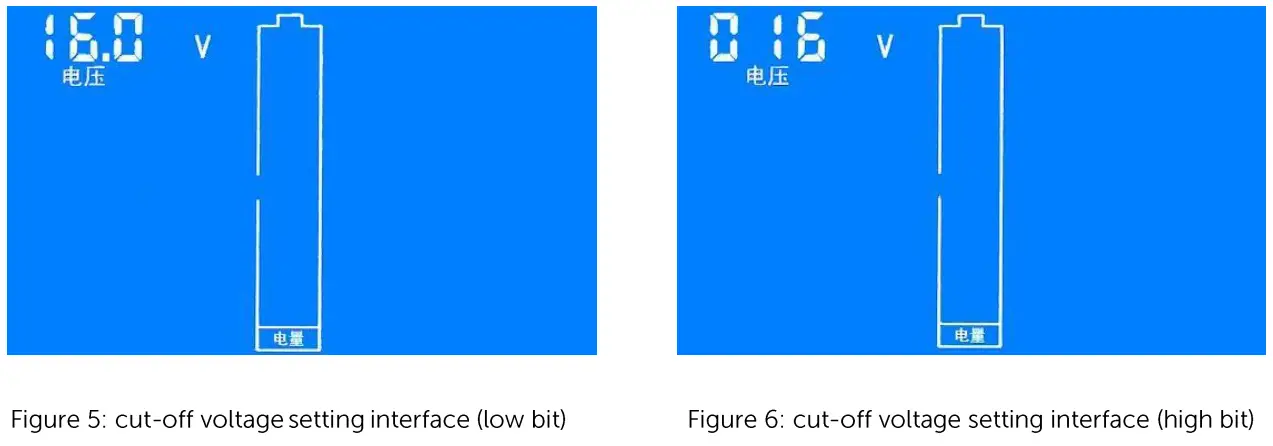
Set the Cut-off voltage:Step 1: After you set the full voltage, loner press the button until LCD shows the interface of Fig. 5, then release the button;Step 2: At this time, the battery symbol shows the zero-grid to indicate the cut-off voltage setting state, the default cut-off voltage is 016.0V, the setting method is the same as above; the cut-off voltage is 0.8 times of the full voltage by default, after setting the full voltage, the cut-off voltage is automatically generated in the relationship of 0.8 times; otherwise, you can reset it;After all the above settings are completed, long press the button until the settings are saved and exit the setting status, restoring the normal display interface.
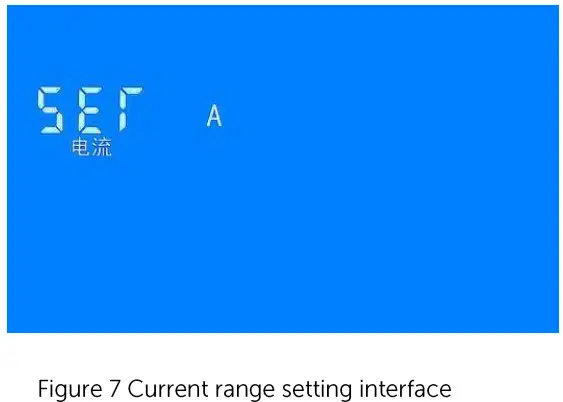
- Current range setting
Step 1: In the normal display interface, long press the button until the LCD shows the interface of Figure 2, then release the button, short press the button again switches to the interface to Figure 7, it indicates that this state is the current range setting state.
Step 2: Longer press the button until the LCD shows the interface of Figure 8, then release the button, short press the button again to switch the current range. This meter provides four current ranges, the factory default is 100A, choose the corresponding range according to the shunt.Step 3: After the current range setting is completed, long press the button until the settings are saved and exit the setting status, restoring the normal display interface.
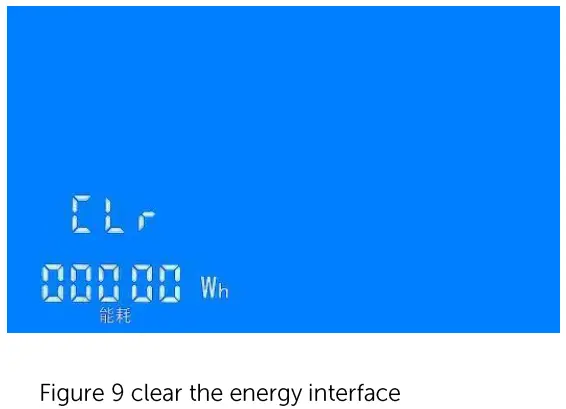
- Clear the Energy
Step 1: In the normal display interface, long press the button until the LCD shows the interface of Figure 2, then release the button, short press the button again switches to the interface to Figure 9, it indicates that this state is the clearing energy setting state.Step 2: Longer press the button until the data has been cleared and exit the setting status, restore the normal display interface
- Clear the capacity
Step 1: In the normal display interface, long press the button until the LCD shows the interface of Figure 2, then release the button, short press the button again switches to the interface to Figure 10, it indicates that this state is the clearing capacity setting state.Step 2: Longer press the button until the data has been cleared and exit the setting status, restore the normal display interface.
- Clear the running time
Step 1: In the normal display interface, long press the button until the LCD shows the interface of Figure 2, then release the button, short press the button again switches to the interface to Figure 11, it indicates that this state is the clearing running time setting state.Step 2: Longer press the button until the data has been cleared and exit the setting status, restore the normal display interface.
-
Working modeThis meter has two modes: normal display mode and dormant mode. In normal display mode, short press the button to enter the dormant mode, in order to reduce the whole machine power consumption, the backlight and LCD display will be turned off in dormant mode. In dormant mode, a short press of the button will switch to the normal display mode.Note: The meter will stop all measurement functions in dormant mode, so please do not switch to dormant mode if normal measurement is performed.

Wiring Diagram
Dimension Figure (mm)
Matters needing attention
- This module is suitable for indoor, please do not use outdoor.
- Applied load should not exceed the rated voltage, current.
- Wiring order can’t be wrong.
report this adOther specification
- LCD fun display figure
- Power consumptionNormal working state: 0.03-1.2 WSleeping state: 0.5mW-0.5WThe power consumption is related to the test voltage value, the higher the voltage, the greater the power consumption.
- Working temperature-20’C – +60’C.
Distributed by:Electus Distribution Pty. Ltd.320 Victoria Rd, Rydalmere NSW 2116 Australiawww.electusdistribution.com.auMade in China
[xyz-ips snippet=”download-snippet”]