POWERTECH MB3880 12V 140A Dual Battery Isolator Kit with Wiring Cables User Manual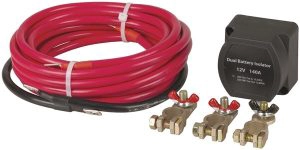
Installation of the Smart Battery Kit is a relatively simple task and requires no special knowledge of vehicle electrics and uses tools available in most home workshops.
Tools required are:
- A. Cutting pliers,side cutters or cable stripper to cut and strip the cable
- B. Crimping or electricians pliers for terminal crimping
- C. Spanner set or socket set
- D. Philips screwdriver
- E. Hairdryer or flame for heat shrink
- F. Power drill and 4.5mm drill bit
- G. Voltmeter
These instructions assume you have purchased and mounted you auxiliary battery (preferably a deep cycle)in your vehicle.
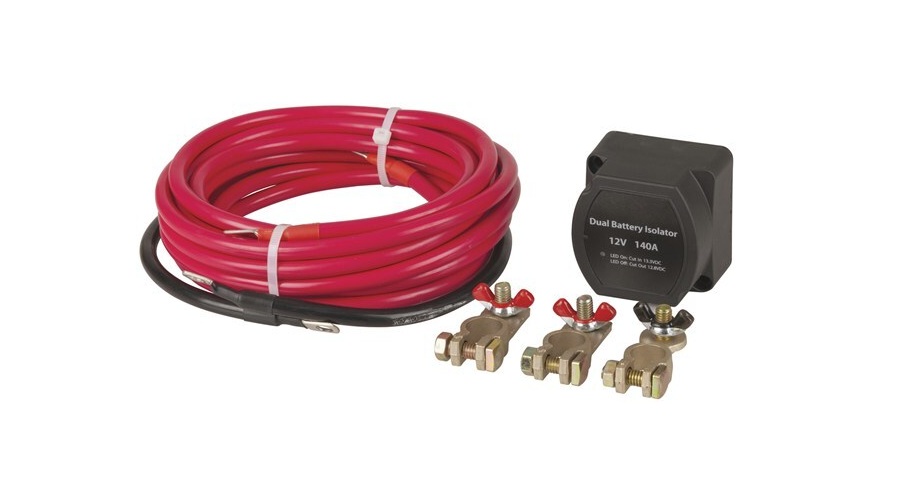
- Lay out your Smart Battery Kit and check that all the components are in the kit You should have:
- lx Smart Battery Isolator
- 1 x6000mm length of 10mm sq red cable terminated at both ends
- 1 x600mm length of 10mm sq black earth cable terminated at both ends
- 2xPositive Marine battery terminals
- lx Negative Marine battery terminals
- 3x SC16-8 Copper crimp lugs
- 2x Red heat shrink lx Black heat shrink
- lx Insulated blue ring terminal
- 6x300mm cable ties
- 4x Self tapping screw
- 2x M6 nut
- 2x M6 spring washer
- Isolate the starting battery by removing the negative terminal.
- Select a location for the SMART BATTERY ISOLATOR that is easily accessible and will not have the cables running near exhausts and is as close as possible to the starting battery.
- Remove the lower mounting plate from the SMART BATTERY ISOLATOR to use as a template and mark the position of the two (2) holes to be drilled. Drill the holes using a 4.5mm drill bit.
- Secure the two (2) blind holes of the base with the short 4mm screws.
- Take the 6000mm length of red cable, which has been terminated at both ends. Begin from the centre of the mounting plate and run the cable along the inner guard and firewall to the positive terminal of the starting battery (be careful to keep the wiring away from any moving parts). Cut the cable to length.
- Repeat the above process to the positive terminal of the auxiliary battery.
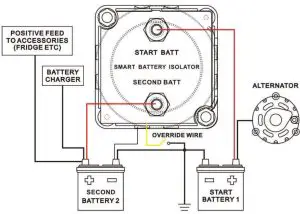
WIRIMG DIAGRAM

- 8.Strip the un-terminated ends of both cables back 15mm, fit the copper lugs and crimp in place, making sure the connection is secure Alternatively you can solder the cable to the lug if you wish.
- Slide the heat shrink over the lug and cable then heat with a flame or hairdryer until secure.
- Attach the insulated ring terminal to the black wire on the SMART BATTERY ISOLATOR. This is an earth wire and it is important that it has a secure and clean (Bare Metal) contact. If possible select a nearby bolt or screw that is earth to the body.
- Attach both red cables to the SMART BATTERY ISOLATOR and tighten the retaining nuts. The cable from the start battery goes to the stud on the SMART BATTERY ISOLATOR with the painted RED dot. The cable from the auxiliary battery goes to the unpainted stud.Note-You will have to cut the notched sections in the SMART BATTERY ISOLATOR housing where you require the cable to exit.
- Mount the SMART BATTERY ISOLATOR to the bottom plate and fix with the two (2) longer 4mm screws.
- Secure the black earth lead on the SMART BATTERY ISOLATOR to the selected earth point.
- Fit the Positive (Red+) battery terminal and the Negative (Black-) battery terminal to the auxiliary battery and tighten.
- Auxiliary battery BLACK earth cable – Select a nearby body bolt or drill an 8mm hole in the inner guard and secure one end of the 600mm black earth cable, make sure to have a secure and clean (bare metal) connection.
- Attach the RED lead from the SMART BATTERY ISOLATOR to the positive (+) terminal of the auxiliary battery and then secure the cable using the cable ties.
- Attach the other end of the BLACK earth lead to the negative (-) terminal of the auxiliary battery.
- Before fitting the battery terminal to the positive side if the start battery, check the type of the existing battery terminal and if it has a stud and nut on the terminal to secure the existing wiring connect to the existing terminal.
- Attach the RED cable from the SMART BATTERY ISOLATOR to the positive (+) terminal of the start battery and secure the cable using the cable ties.
- Reconnect the start battery earth cable.
Please carry out the following tests before driving the vehicle.
- Test for a proper earth on the auxiliary battery by placing a voltmeter across the positive (+) and negative (-) terminals and take a reading. Remove the negative (-) probe and place on an earth point on the body or engine (not the point the earth cable is mounted), both readings should be the same. If the readings are not the same check the earth cable has a clean and secure mounting.
- Start the vehicle’s engine.
- When the starting battery’s voltage reaches cut-in 13.3V the relay will close automatically and allow the auxiliary battery to be charged. This is indicated by the red light on the front panel of the SMART BATTERY ISOLATOR being illuminated.
- Ensure that the auxiliary battery is charging by checking that the voltage is above 13.0V.
- Turn off the engine.
- Check that the SMART BATTERY ISOLATOR disengages when the start battery’s voltage falls below cut-out 12.8V.This can take some time so to speed up the process turn on the headlights or leave the door open and interior lights on.
Use of the Emergency Override (Yellow Wire)
Connecting the wire to battery negative (or chassis) will force the relay to close, regardless of the voltage of the starting battery. The main purpose of this is to allow the vehicle to be started from auxiliary battery if the starter battery is flat. It is recommended that a push button (momentary) switch be used for this.
Distributed by : TechBrands by Electus Distribution Pty. Ltd.
320 Victoria Rd, Rydalmere, NSW 2116 AustraliaPh : 1300738555Website : www.techbrands.com
 report this ad
Made in China
References
[xyz-ips snippet=”download-snippet”]