POWERTECH ZM9124 200W Canvas Blanket Solar Panel User Manual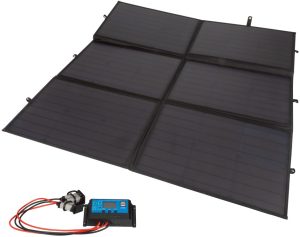
INTRODUCTION
Please ensure that you have read the product manual and instractions in full before using this product. Failure to do so many result in incorrect operation and potentially impact the performance of the product.
This product converts natural sunlight into DC electricity. It is designed to charge a 12V battery.
BOX CONTENTS
- 1 x 200W Canvas Blanket Solar Panel
- 1 x Solar Charge Controller
- 2 x Leads
CAUTION / WARNING
- For optimum performance, protect the solar cell from dust, dirt, and other debris.
- Use and store the product in a dry and vetilated location.
- Do not use in flammable or explosive areas.
- Stop use immediately if any wires become loose or electronic components are exposed.
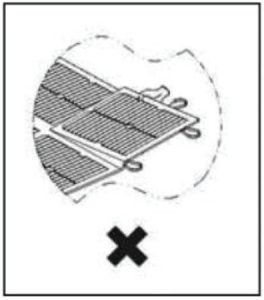
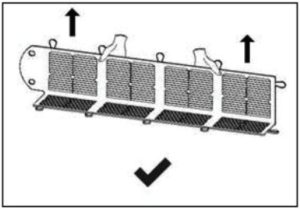
- Do not pick panel up directly by the solar cells.

- Use the gap between solar cells to pick up the panel.
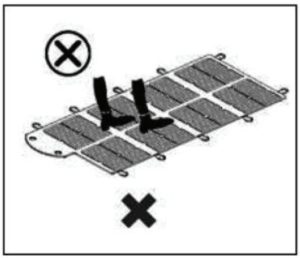
- Do not stan or walk on the solar panel.
SPECIFICATIONS
Solar Panel:
- Solar Cell Type: Monocrystalline 156 x 156mm
- Power Output: 200W
- Open Circuit Voltage: 23.7V
- Short Circuit Current: 9.8A
- Working Voltage: 18V
- Working Current: 9.5A
- Weight: 6.2KG
- Dimensons:
- Folded: 512(W) x 360(H)mm
- Unfolded: 1070(W) x 1032(H)mm
Solar Charge Controller
- System Voltage: 12/24V Auto
- Charge Current: 20A
- Discharge CUrrent: 20A
- Max. Solar Inout: <50V
- Battery Equalisation:
- Sealed: 14.4V
- GEL: 14.2V
- Flood: 14.6V
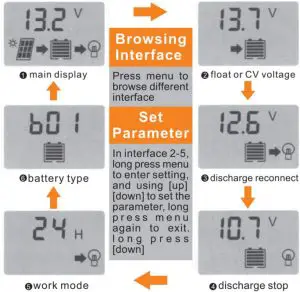
- Float Charge: 13.7V (Default, Adjustable)
- Discharge Stop: 10.7V (Default, Adjustable)
- Discharge Reconnect: 12.6V (Default, Adjustable)
- USB Output: 5V, 2A
- Self-Consumption: <10mA
- Operating Temperature: ∼35 — 60°C
- Weight: 154g
HOW TO USE
- Unfold the solar panel.
- Place the unfolded solar panel in a postion that receives direct sunlight, facing to the sun. Ensure that no shadows are covering the solar cells.
- Tilt the solar panel at a suitable angle. This can be the same as your loca latttude (additional support may be necessary, not supplied).
- Connect the solar panel to the solar charge controller before connecting battery clamp lead to the solar controller.
SAFETY INSTRUCTIONS
- Ensure battery has enough voltage for the solar charge controller to recognise the battery type before first installation.
- Battery cable should be as short as possible to minimise loss.
- The regulator is suitable for lead acid batteries (Flood, AGM, GEL), and lithium ion. Not suitable for nickel metal hydride, or other battery types. • Charge regulator is only suitable for regulating solar modules. Never connect another charging source to the charge regulator.
- The solar charge controller will be hot when working. Please install in a flat, well ventilated area.
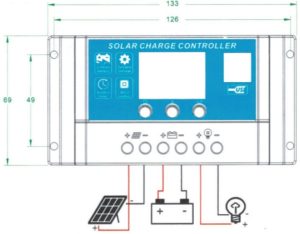
HOW TO CHARGE A 12V BATTERY
- Connect the battery to the solar charge controller.
- Connect load to solar charge controller.
- Connect solar panel to solar charge controller.
- Reverse this order when disconnecting.
NOTE: Heavy loads should not be connected to the battery.
LCD DISPLAY/KEY

- Menu: Switch between different displays, or enter/exit settings by long
- press. Up: Press to increase value
- Down: Press to decrease value
DISPLAY/SETTING
 report this ad
Attn:
- Press the [down] button to on/off load manully at main display.
- The work mode is working as below: [24H]Load output 24 hours [1-23H]Load on after sunset and closed after,setting hours [OH]Dusk to dawn
TROUBLESHOOTING
|
Issue |
Probably Cause | Solution |
| Charge icon not on when sunny | Solar panel closed or reversed |
Reconnect |
|
Load icon off |
Mode setting wrong | Set again |
|
Battery low |
Recharge |
|
| Load ion slow flashing | Over load |
Reduce load watts |
|
Load icon fast flashing |
Short circuit protection | Auto reconnect |
| Power off | Battery too low / reverse connected |
Check battery / connection |
FULL TECHNICAL PARAMETERS
| Model | 1210 | 1215 | 1220 | 4820 | 4830 |
| System Voltage | 12V/24V AUTO | 48V | |||
| Charge Current | 10A | 15A | 20A | 20A | 30A |
| Discharge Current | 10A | 15A | 20A | 20A | 30A |
| Max Solar Input | < 50V | < 80V | |||
| Battery Type | b01 Sealed | b02 GEL | b03 Flood | ||
| Equalization | 14.4V | 14.2V | 14.6V | ||
| Float Charge | 13.7V (default, adjustable) | ||||
| Discharge Stop | 10.7V (default, adjustable) | ||||
| Discharge Reconnect | 12.6V (default, adjustable | ||||
| Battery Type | b04Iron lithium4 Strands | b05Iron lithium5 Strands | b06Lithium ion3 Strands | b07Lithium ion4 Strands | |
| Constant ChargingVoltage | 3.6V*4/*5 | 4.2V”3/*4 | |||
| Recovery ChargeVoltage | 3.4V*4/”5 | 4.0V*3/*4 | |||
| Low VoltageProtection | 2.6V*4/*5 | 3.1V*31/*4 | |||
| Low VoltageRecovery | 2.9V*4/*5 | 3.7V*3/*4 | |||
|
b04—b07 Parameters can not be set |
|||||
| USB Output | 5V/2A | ||||
| Self-consume | < 10mA | ||||
| OperatingTemperature | -35 +60°C | ||||
| Size/Weight | 133*70*34mm/154g |
- All red colour voltage *2, *4 while using 28V/48 system.
- Product specifications are subject to change wihtout prior notice.
Distributed by:Electus Distribution Pty. Ltd.320 Victoria Rd, RydalmereNSW 2116 Australiawww.electusdistribution.com.au
[xyz-ips snippet=”download-snippet”]