OPERATOR’S MANUAL1600 RPM C1600-3 High Speed Burnisher
WARNING: OPERATOR MUST READ AND UNDERSTAND THIS MANUAL COMPLETELY BEFORE OPERATING THIS EQUIPMENT.©Tacony Corporation, All rights reservedX9330 05/2021Save These InstructionsYour new Powr-Flite High-Speed Burnisher will afford you many years of trouble-free operating satisfaction provided it is given proper care. Prior to packaging, your Powr-Flite High-Speed Burnisher was inspected by a Quality Control Technician.UNCRATINGYour Powr-Flite High-Speed Burnisher was protectively packed to prevent damage in shipment. We suggest that upon removing the unit from its carton, you carefully inspect it for any possible damage in transit. If damage is discovered, immediately notify the transportation company who delivered your machine. As a manufacturer, we are unable to act upon any claim for concealed damage; you must originate the claim.
IMPORTANT SAFEGUARDS
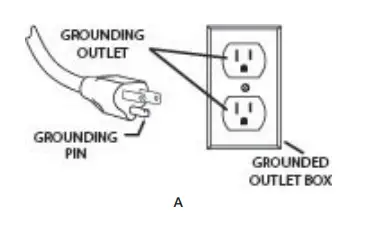
This machine is designed to be safe when used to perform the functions specified in this Operator’s Manual. Should damage occur to electrical or mechanical parts, Prior to further use, the machine should be repaired by the manufacturer or competent service center to avoid further damage to the machine or physical injury to the user. Your floor machine is equipped with a safety switch lockout device designed for your safety. Do not attempt to bypass or defeat the safety lockout device. Never use any device to lock the power switch triggers in the ON position.WARNINGSWARNING: The operator must have training in the operation of this machine before using it.WARNING: Machines can burn flammable materials and vapors. Do not use this machine with or near fuels, grain dust, solvents, thinners, or other flammable materials.WARNING: Do not operate this machine unless it is completely assembled.WARNING: Do not use this machine as a step or to move furniture.WARNING: When disconnecting the power cord from the electrical outlet, grasp the plug. Pulling it out by the cord itself can damage cord insulation and internal connection to the plug.To prevent electric shock, always remove the electrical plug from the electrical outlet before doing any repairs or maintenance to this machine.WARNING: To prevent injury, always remove the electrical plug from the electrical outlet before changing the polishing pad and before leaving the machine.WARNING: To prevent injury, keep hands, feet, and loose clothing away from the rotating pad.WARNING: Maintenance and repairs must be done by authorized personnel only.WARNING: Keep all fasteners tight. Keep adjustments according to specifications.WARNING: Keep the electrical parts of the machine dry. For storage, keep the machine in a building.WARNING: Always use a three-wire electrical system connected to the electrical ground. For maximum protection against electric shock, use a circuit that is protected by a ground fault circuit interrupter. Consult with your electrical contractor.WARNING: To prevent damage to the power cord, do not let the pad, pad driver, or wheels touch the power cord when the machine is running. Always lift the power cord over the machine.WARNING: Make sure all labels, decals, warnings, cautions, and instructions are fastened to the machine.WARNING: Do not leave the machine running unattended.This appliance must be grounded. If it should malfunction or break down, grounding provides a path of least resistance for electric current to reduce the risk of electric shock. This machine is equipped with a cord having an equipment-grounding conductor and grounding plug. The plug must be inserted into an appropriate outlet that is properly installed and grounded in accordance with all local codes and ordinances.WARNING: Improper connection of the equipment-grounding conductor can result in a risk of electric shock. Check with a qualified electrician or service person if you are in doubt as to whether the outlet is properly grounded. Do not modify the plug provided with the appliance – if it will not fit the outlet, have a proper outlet installed by a qualified electrician. This appliance is for use on a nominal 120-volt circuit and has a grounding plug that looks like the plug illustrated in sketch A
APPLICATION
The C1600-3 High-Speed Burnisher is used to achieve and/or maintain a high gloss appearance on an established floor finish. The high pad revolution of the floor burnisher combined with a good polishing pad will turn properly established cleaned floor finish into a high gloss hardened finish known as the “wet shine look”. The pads recommended are the image beige or white synthetic pads or the natural hogs hair blended pads.
PREPARATION OF THE SURFACE
Before each use of this machine, the floor must be dust mopped with a treated mop and if necessary, clean the floor with a damp mop, using a solution of water and neutral cleaner.PREPARE THE MACHINE FOR OPERATION WARNING:To prevent injury, always remove the electrical plug from the electrical outlet before changing the polishing pad and before leaving the machine.
|
 |
- With the handle locked, tip the machine back until the handle is lying flat on the floor.
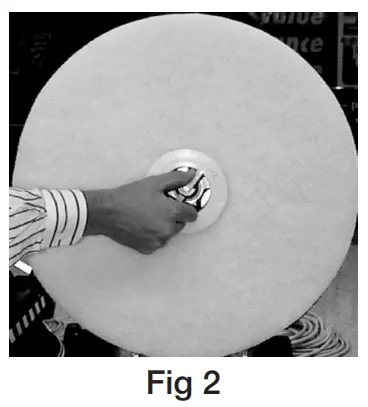
- To remove the pad-lock pad holder from the flexible pad driver, grasp the center support with your thumb and forefinger and turn the collar counter-clockwise. (Fig 1).
- Place a clean or new 20″ buffing pad over the alignment ring on the pad holder.
- Replace the collar by turning clockwise until snug.
- Step back and lift the burnisher to the upright position.
- Connect the power cord into a grounded 3-wire outlet.
- The C1600-3 Burnisher should be operated with the handle in the unlocked “floating” position to provide excellent maneuverability and automatic pad contact.
Note: the hardened steel cam release lever does not require extreme tightening to effectively hold the handle in position. Over-tightening will shorten the functional life of the lever. (Fig3).
HOW TO OPERATE THE MACHINE
- Plug the machine in as directed and lower the handle to the desired operating height. Push the safety switch forward (Fig 4) and squeeze the switch triggers beneath the handle grips. This activates the motor and starts the pad driver operation. Each time you release the triggers the safety switch will reset. You will need to follow the direction above to restart the machine.CAUTION: When leaving the machine unattended, disconnect the wall plug and return the handle to the “locked” upright position to prevent accidental starting.
- Push the machine forward in a straight line, at a slow walking speed. Overlap each pass by about 1″ (25 mm).
TRANSPORTING THE MACHINE
Use the rear wheels for transporting the C1600-3. This will ensure that the operating wheels remain clean and smooth for use on clean floor surfaces. (Fig 3).
AFTER USING THE MACHINE
- Upon completion, dust mop with a treated mop to pick up all burnishing residue.
- The condition of the floor pad has a direct effect on the performance of your burnisher. When the pad becomes dirty, turn it over and use the other side. When finished, wash the pad out and allow it to dry completely before using it again.
- Unplug the power cord and wrap it under the cord hook and over the right handle grip.
- Tip the machine back and remove the floor pad.
- Wipe off the machine housing and the cord. This will prevent the build-up of unnecessary residue.
MAINTENANCE
Once a month remove the motor cover of the unplugged C1600-3 by removing the motor screws. Vacuum out any dust or debris which has accumulated on the motor. (Fig 5).Replace the motor cover by setting it over the holes in the housing and replacing all of the screws. Check and maintain the tightness of all the fasteners.
WARNING: Do not over-tighten the switch housing screws.Keep the machine clean especially at the handle tube and collar so the handle tube will move freely through the collar.Inspect the cord for cuts, gashes, or loose prongs; replace as needed.The length of the carbon brushes should be inspected annually. If they no longer extend past the holder window, Fig 5 they should be replaced.Replacement of the carbon brushes should be done only by a qualified service technician.Disassembly of this motor voids the warranty.Improper disassembly and assembly of this motor can permanently damage the field or rotor.
DRIVE BELT ADJUSTMENT
(Fig 6)
- Remove four (4) large screws holding the drive pad.
- Remove four (4) screws holding pad cover.
- Loosen three (3) motor mount bolts.DO NOT remove the bolts.
- Using a wrench, turn the adjustment nut until it touches the adjustment bolt head. Turn the adjustment bolt to tighten or loosen the belt tension.
- Correct belt tension allows no more than 1/4″ of side movement.
- Tighten the three (3) motor mount bolts with the wrench.
- Loosen the adjusting bolt until it is snug against stop molded in housing and turn adjustment nut against pulley mount bracket.
- Replace pad cover, pad driver, and pad center grip.
TROUBLESHOOTING
Burnisher tends to move to the right.
- Do not lift up on the handle while operating the burnisher
- Do not operate with the handle set too high.Recommended handle height is from your waist with your arms extended forward.
The machine will not start.
- The plug is broken or has loose contact. Replace.
- The switch is defective. Replace.
- The rectifier is defective. Replace rectifier.
Prevent circuit overload.
- Do not spray buff with the C1600-3. Apply a restorer such as Powr-Flite’s Escalate, allow to dry, then burnish
- Check the pad and change it if it is rough or dirty.
- Check area being burnished for cleanliness, area should be damp mopped, scrubbed, or swept with a treated broom.
- The operator should not continually force the machine with handle pressure.
- The operator should not try to operate the burnisher in a side-to-side motion.
- Eliminate any extension cord that is smaller than 12/3 wire or greater than 25 feet in length.
 report this ad
Unplug anything other than the machine from the circuit or locate another circuit.For warranty information go to www.Powr-Flite.com
A Tacony Company 3101 Wichita CourtFort Worth, TX 76140-17551-800-880-2913Fax: 1-817-551-0719X9330 05/2021
References
[xyz-ips snippet=”download-snippet”]