Powr-Flite PDH2 Hybrid Carpet Dryer User Manual
Introduction
Check the carton for shipping damage. Carefully unpack and inspect your new Powr-Flite dryer for shipping damage. Each unit is tested and thoroughly inspectedprior to shipping. If damage is discovered, immediately notify the transportation company that delivered your machine and request an inspection. As a manufacturer, we are unable to act upon any claim for concealed damage; you must originate the claim. Be sure to keep the carton, packing inserts, packing lists, and carrier’s receipt until the inspector has verified your claim.
PROTECT THE ENVIRONMENT
Please dispose of packaging materials in an environmentally safe way according to local waste disposal regulations.
Always remember to recycle
Introduction ……………………………………………2Safety Instructions ………………………………….3Grounding Instructions ……………………………4Operating Instructions …………………………….5Maintenance …………………………………………..6Troubleshooting………………………………………6Storage…………………………………………………..6Machine Specifications……………………………7Schematic and Parts List…………………………8
MANUALThis manual has important information for the use and safe operation of the dryer. Read this manual carefully before starting the machine. Keep the manual available at all times and instruct all operators to read this manual.
Reference Information
Reference InformationModel Number _____________________________Serial Number _____________________________Date Purchased _____________________________
Retain this manual as a permanent record of your purchase.
Safety Warnings and Precautions
WARNING!Read all instructions before using. Save These Instructions. Following the cleaning instructions will prolong the life of your Powr-Flite Dryer.When using an electrical appliance, basic precautions should always be followed.
- Use only as instructed in this manual. Use only the recommended attachments and replacement parts.
- Do not leave machine when plugged in.
- Do not leave machine connected to the electricity supply when not in use.
- Do not leave the machine unattended while running.
- Only use accessories or spares specifically designed for use with this appliance.
- The fitting of other accessories or spare parts may affect the machines performance and safety.
- Use only indoors. Do not use outdoors or expose to rain.
- If the unit is not working as it should, has been dropped, damaged, left outdoors, or exposed to water, return it to a service center before using.
- Do not use with damaged cord or plug.
- Do not kink or twist the power cord.
- Do not pull or carry by the cord, use the cord as a handle, close a door on cord, or pull cord around sharp edges or corner. Keep cord away from heated surfaces.
- Do not pull on the cord to unplug. Grasp and pull the plug, not the cord. Turn off the dryer before unplugging.
- Do not handle the cord, plug, switch or dryer with wet hands.
- Do not use outlets with inadequate current capacity.
- Do not put any objects into openings. Do not use with any opening blocked. Keep free of dust, lint, hair and anything that might reduce airflow.
- Keep hair, loose clothing, fingers, and all parts of body away from openings and moving parts.
- Do not use near combustible liquids, gases, or dusts, such as gasoline or other fuels, lighter fluid, cleaners, oilbased paints, or natural gas, or anything that is burning or smoking, such as cigarettes, matches, or hot ashes.
- Do not operate near draperies or another material that could block the air intakes.
- Keep air intakes clear. Reduced airflow can cause motor to overheat.
- Keep children and unauthorized persons away from the dryer when in use.
- This machine is not intended for use by persons with reduced physical, sensory or mental capabilities, or lack of experience and knowledge.
- Do not attempt to service the dryer yourself. Repair by anyone other than an authorized repair service center may void the warranty.
- Store in dry area.
- Do not use an extension cord with this dryer.
WARNING!To reduce the risk of fire or electric shock, do not use this fan with any solid state speed control device.
Grounding Instructions
This appliance must be grounded. If it should malfunction or breakdown, grounding provides a path of least resistance for electric current to reduce the risk electric shock. This machine is equipped with a cord having an equipment – rounding conductor and grounding plug. The plug must be inserted into an appropriate outlet that is properly installed and grounded in accordance with all local codes and ordinances.WARNING: Improper connection of the equipment-grounding conductor can result in a risk of electric shock. Check with a qualified electrician or service person if you are in doubt as to whether the outlet is properly grounded. Do not modify the plug provided with the appliance – if it will not fit the outlet, have a proper outlet installed by a qualified electrician. This appliance is for use on a nominal 115-volt circuit, and has a grounding plug that looks like the plug illustrated in sketch A.

WARNING!Improper connection of the equipment-grounding conductor can result in a risk of electric shock. Check with a qualified electrician or service person if you are in doubt as to whether the outlet is properly grounded. Do not modify the plug provided with the appliance. If it will not fit the outlet, have a proper outlet installed by a qualified electrician.
WARNING!The replacement or repair of damaged wiring should only be performed by a qualified electrician or service engineer from the manufacturer or authorized service center.
Operating instructions
- Plug in to a standard outlet with the correct voltage and amperage for the unit.
- Use only on GFCI protected recepticles
- Place the dryer in the desired operating position.
Daisy ChainedThe unit can be daisy chained with up to 4 units on a dedicated 15 amp circuit with the built in power outlet.
BUILT-IN POWER OUTLET CAN DAISY CHAIN 4 PDH2 UNITS TOGETHER
WARNING!When daisy chaining units, each unit is controlled separately. The daisy chained units are not controlled by the master unit that is plugged into the wall outlet. Even with the master unit switch in the OFF position, any daisy chained unit(s) will still have power and may be turned ON.
The circuit breaker controls both the fan and the outlet. If the circuit breaker trips while units are daisy chained, remove some of the down stream units, then push in Reset button on circuit breaker. A maximum of 3 units may be daisy chained off of 1 unit for a total of 4 units per circuit.
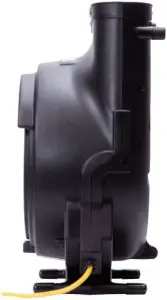
Operating PositionsThe Hybrid dryer can be used in multiple positions. The PDH2 model can be used in the vertical position (Figure 1), the horizontal position (Figure 2), with the kickstand (Figure 3), and using the side bumpers (Figure 4).
WARNING!To ensure objects are not sucked against the intake guard during operation and decrease airflow, do not place items in front of the intake guard.
3. Set the switch at the desired speed: LOW – I, MEDIUM – I I, or HIGH – I I I.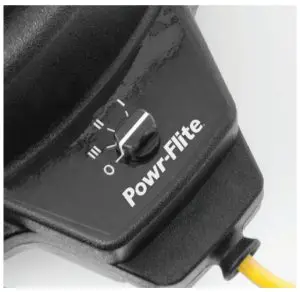
4. Check for proper operation before leaving the unit unattended.
WARNING!Do not move or carry the dryer when it is running.
Maintenance
Routine maintenance can significantly increase the life of your Hybrid Dryer. The applications and amount of use varies, so the recommendations listed below are for average-to-high volume use. Constant operation may require additional maintenance.
WARNING!Always unplug machine before cleaning, or making any adjustments or repairs.
Before Each Use
- Inspect power cord for fraying, cuts or damage; do not use if damaged.
- Remove lint or obstructions from the Intake Guard and Exhaust Port Guard using a vacuum or compressed air.
- Inspect exterior components (switch, knob, etc.) for damage.
After Each Use
- Remove any lint or debris from the intake screen.
- Clean dust and dirt from motor using a vacuum or compressed air.
- Snugly wrap the power cord around the cord wrap/feet and secure the end of the power cord to itself using the latch on the plug of the power cord.
- Clean the exterior with a household all-purpose spray cleaner. Spray the rag, then apply to the surface.
Periodic Maintenance
- Inspect all electrical connections.
- Check the power cord for any breaks, fraying, separations, or cuts.
- Make sure the ground pin or grounding prong is intact.
- Inspect the motor and fan for build-up of debris, removing the intake screen and fan, cleaning as required.
Trouble Shooting
If the dryer will not turn on:
- Make sure the power cord is firmly connected to the unit and is in good condition.
- Make sure the power cord is firmly seated in the wall outlet.
- If using an extension cord, make sure it is in good condition, proper gauge and firmly connected.
- Check to see if the building circuit breaker is tripped. If circuit is overloaded, move the unit to another circuit. On PDH2 – check circuit breaker on unit.
Storage
Always store the dryer in a dry place. The dryers can be stacked during storage or transport to minimize the required space. The stacking guide is located on the top and bottom of each unit.
Specifications
Specifications and parts are subject to change without notice.Please refer to www.Powr-Flite.com for the latest schematic drawing and parts list.
|
Model |
PDH2 |
| Running Amps |
2.8 |
| Power |
115V |
| Motor |
.4 hp |
| Air Velocity |
3,400 FPM |
| Drying Positions |
4 (0°, 5°, 90°, Side) |
| Housing |
co-polymer polypropylene |
| Daisy Chain Capable |
Yes |
| Kickstand |
Yes |
| Stackable |
Yes |
| Power Cord |
20 ft. / 6 m |
| Net Weight |
18 lbs. / 8.2 kg |
| Dimensions |
22″ x 16.5″ x 11.5″/ 56 cm x 42 cm x 29 cm |
|
SCHEMATIC AND PARTS LIST |
|||
| No. | Part No. | Qty | Description |
| 1 | X9051 | 1 | Caution Label |
| 2 | X8278 | 2 | Screw 8-32 x 1/2” |
| 3 | X8976 | 1 | Warning Label |
| 4 | X9726-SAN | 1 | Front Label |
| 5 | X8260 | 2 | Nyloc Nut |
| 6 | X8897 | 1 | Switch |
| 7 | X1023 | 1 | Fan Blade |
| 8 | X8871 | 1 | Dryer Discharge Grill |
| 9 | X9705 | 1 | Grommet |
| 10 | X9700 | 1 | Bottom Housing |
| 11 | X8946 | 2 | Rivet |
| 12 | PD3B | 4 | Dryer Foot Tall |
| 13 | X9704 | 2 | Screw, Hi-Lo 8-18 x 3.5” |
| 14 | X8874 | 1 | Dryer Kickstand |
| 15 | X8928 | 1 | Right Foot Kickstand |
| 16 | X8261 | 4 | Screw #6 x 1/2” |
| 17 | X8929 | 1 | Left Foot Kickstand |
| 18 | X9690 | 3 | Screw 8-18 x 1/2” |
| 19 | X9676 | 10 | Screw 8-18 x 3/4” |
| 20 | X9731 | 4 | Cap |
| 21 | X9702 | 5 | Bolt 1/4-20 x 2.75” |
| 22 | X8256 | 2 | Nut |
| 23 | PX73 | 2 | Screw 8-32 x 1” |
| 24 | X8459 | 1 | Serial Number Label |
| 25 | X1002 | 1 | Power Cord 14AWG 20’ |
| 26 | 04-0286-0000 | 1 | Cable Clamp |
| 27 | X9674-120 | 1 | Motor 115VAC,.43Hp,14Uf
Capacitor |
| 28 | X8235 | 5 | Washer |
| 29 | X8237 | 5 | Nyloc Nut |
| 30 | X9757 | 1 | Wiring Harness w/Plug |
| 31 | X1022 | 1 | Circuit Breaker 9Amp |
| 32 | X9701 | 1 | Top Housing |
| 33 | X9727 | 1 | Warning Label |
| 34 | X9831 | 1 | Knob |
| 35 | X8903 | 2 | Screw M4 x 6 |
| 36 | X9728-TOR | 1 | Switch Label |
For warranty information go to www.Powr-Flite.com
report this adA Tacony Company3101 Wichita CourtFort Worth, TX 76140-17551-800-880-2913Fax: 1-817-551-0719
References
[xyz-ips snippet=”download-snippet”]