Powr-Flite PF716DC Bagless Commercial Upright Vacuum Cleaner User Manual
Introduction
Check the carton for shipping damage. Carefully unpack and inspect your new Powr-Flite unit for shipping damage. Each unit is tested and thoroughly inspected prior to shipping. If damage is discovered, immediately notify the transportation company that delivered your machine and request an inspection. As a manufacturer, we are unable to act upon any claim for concealed damage; you must originate the claim. Be sure to keep the carton, packing inserts, packing lists, and carrier’s receipt until the inspector has verified your claim.
PROJECT THE ENVIRONMENT
Please dispose of packaging materials in an enviromentally safe way according to local waste disposal regulations.
Always remember to recycle.
Grounding InstructionsThis appliance must be grounded. If it should malfunction or break down, grounding provides a path of least resistance for electric current to reduce the risk of electric shock. This appliance is equipped with a cord that has an equipment-grounding conductor and grounding plug. The plug must be plugged into an appropriate outlet that is properly installed and grounded in accordance with all local codes and ordinances.DANGERImproper connection of an equipment- grounding conductor can result in risk of electric shock. Check with a qualified electrician or service person if you are in doubt as to whether the outlet is properly grounded. Do not modify the plug provided with the appliance. If it will not fit the outlet, have a proper outlet installed by a qualified technician.This appliance is for use on a nominal 115-volt circuit and has a grounding plug that looks like the plug illustrated in Fig. A
IMPORTANT SAFEGUARDS
When using an electrical appliance, basic precautions should always be followed, including the following:WARNINGTo reduce the risk of fire, electric shock, or injury:
- Do not use outdoors or on wet surfaces.
- Connect to a properly grounded outlet only. See grounding instructions.
- Do not leave vacuum cleaner when plugged in. Turn off the switch and unplug the electrical cord when not in use and before servicing.
- Always turn off this vacuum cleaner before connecting or disconnecting motorized nozzle.
- Do not allow to be used as a toy. Close attention is necessary when used by or near children.
- Use only as described in this manual. Use only manufacturer’s recommended attachments.
- Do not use with damaged cord or plug. If vacuum cleaner is not working as it should, has been dropped, damaged, left outdoors, or dropped into water, return it to a service center before using.
- Do not pull or carry by cord. Do not use cord as a handle. Do not close a door on cord or pull cord around sharp edges or corners. Do not run vacuum cleaner over cord. Keep cord away from heated surfaces.
- Do not use extension cords or outlets with inadequate current carrying capacity.
- Turn off all controls before unplugging.
- Do not unplug by pulling on cord. To unplug, grasp the plug, not the cord.
- Do not handle plug or vacuum cleaner with wet hands.
- Do not put any object into openings. Do not use with any opening blocked; keep free of dust, lint, hair, and anything that may reduce airflow.
- This vacuum cleaner creates suction and contains a revolving brush roll. Keep hair, loose clothing, fingers, and all parts of body away from openings and moving parts.
- Do not place vacuum cleaner on furniture or stairs as the brush roll may cause damage. Use extra care when cleaning stairs. Place vacuum cleaner on floor with the handle in storage position while using attachments.
- Do not pick up anything that is burning or smoking, such as cigarettes, matches, or hot ashes.
- Do not use without disposable dust bag and motor filter in place.
- Belt pulleys can become hot during normal use. To prevent burns, avoid touching the belt pulley when servicing the drive belt.
- Do not use to pick up flammable or combustible liquids such as gasoline, or use in areas where they may be present.
- Store your vacuum cleaner indoors in a cool, dry area.
- Keep your work area well lighted.
- Unplug electrical appliances before vacuuming them.
- Use extra care when cleaning on stairs.
- WARNING: This product contains chemicals known to the State of California to cause cancer, birth defects or reproductive harm.WASH HANDS AFTER HANDLING.
How to identify parts
How to Assemble the Unit
ASSEMBLY PACKET
- Looped handle – the assembly pack is with the owner’s guide. The packet contains two 2-part bolts, two screws, a cord clamp, screw, and lower cord hook.ASSEMBLYCaution: Fully assemble the cleaner before using.
- Align the screw holes in the bellows adapter with the back of the base and fasten with two screws.
- Raise the dirt cup support. Push the lower handle (largest end down) through the tube of the dirt cup support and into the handle socket at the back of the cleaner. Align the holes, insert a 2-part bolt and tighten. Hold the upper handle so it curves away from the cleaner. Push it down over the lower handle and secure with the other 2-part bolt.
- Secure the electrical cord to the dirt cup support with the cord clamp and screw. Place the clamp over the electrical cord and screw to the tab below the left latch for standard handle models and below the right latch on looped handle models.ATTACH CORD HOOKThe upper cord hook is part of the looped handle assembly on models having that feature.
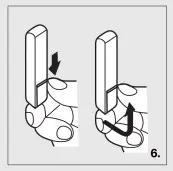
- Insert the power cord into the lower cord hook. Snap into lower handle per figure (5). Pull on the cord to tighten but leave enough slack near the base so the cord is not strained when the handle is lowered. Wrap the cord around the two cord hooks and fasten the plug to prevent unwinding. The looped handle version features a quick release cord hook on the upper handle. A downward twist of the cord hook frees the cord for quick removal.
How to Use


HANDLE ADJUSTMENT
- With the tip of the foot press down to the handle release located at the left rear side of the cleaner. Move the handle and adjust it to the desired position. Step on the handle release a second time to allow the hadle to lay flat for cleaning under low furniture.POWER SWITCH
- The power switch on the looped handle models is located on the left side of the handle assembly. Press down on the front of the switch to turn on, press down on the back of the switch to turn off. This model is equipped with a two-speed switch. Press down on the front once for low speed (Quiet Mode) and twice for high speed.EXTENSION CORDS
- On looped handle models only, the extension cord must be plugged into the pig-tail cord and fastened with the cord lock part. Use 16 AWG, SJT type extension cord as minimum requirement.CLEANER HEIGHT SETTINGS
- The front of the cleaner has an adjustment that raises or lowers the cleaner base to match the type of carpet. With the power cord unplugged, set the adjustment to the lowest setting for maximum cleaning. If the cleaner is difficult to push, move the adjustment to the next height setting until cleaner is comfortable to push. The brushroll must reach the carpet for effective cleaning.CHANGING DIRT CUP
- Release the two latches by pushing down on the latch and lifting up. Lift the lid and swing outward.
- Pull the dirt cup out of the holder and empty. Reverse the last three steps to reinstall the dirt cup system.
How to Maintain
CAUTIONTurn off the switch and unplug the electrical cord before maintenance.Important: Improper installation of the brushroll or brushroll belt could cause carpet or cleaner damage.
How to replace a worn belt
Warning: Belt pulleys can become hot during normal use. To prevent burns, avoid touching the belt pulley when servicing the drive belt.
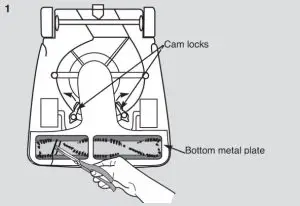
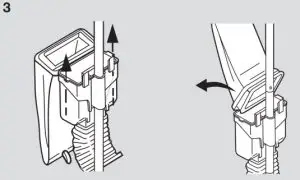
- Release cam locks and remove bottom plate. Pull up on belt to rotate it off of the motor pulley. Lift up on brushroll and remove worn belt. Place new belt around the brushroll. Align brushroll pulley with belt guide (Fig. 3).

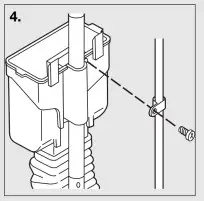
- Ensure rubber end cap cover is installed correctly (Fig. 4A). Align end caps with slots in cleaner base. Push brushroll into base.
- Place lower side of belt into belt guide and pull to stretch the belt around the left side of the motor pulley. Rotate pulley to secure the belt into the groove. Replace bottom plate and secure with the cam locks.How to replace bristle strips
- Remove rubber end cap (A) from one end. Unscrew locknut (B). Remove end cap (C) – sleeve bearing brushroll includes a shaft washer not shown. Remove bearing retainer (D). Push shaft (E) through opposite end. Pull out worn bristle strip (F) with pliers. Slide in new bristle strip of same length (rounded end first.) Fit track on either side of the bristle strip into the brushroll slot. Replace the second strip from opposite end of brushroll.
- Replace shaft. Align indentation on bearing retainer with bristle strip on both ends of brushroll. Reassemble the remainder of brushroll and secure into the base (Fig. 2).How to clear clog from fan chamber
- The clear cover provides easy inspection, cleaning and maintenance of the fan. Release two cam locks and remove bottom plate. Remove the two screws to release the clear fan cover.
How to clear a blockage
CAUTIONMake sure vacuum cleaner is turned off and unplugged.Shake-out bag or dirt cup may be fullCheck and empty if full.Check brushroll for debris
- If the bag or cup is not full, check the bottom of the cleaner and the brushroll.
- Turn cleaner upside down. Clip strings with scissors.
- If necessary, release the cam locks and remove the bottom metal plate. Clear debris around the brushroll.How to clear clog in fan chamber
- If there is not a clog around the brushroll, there may be a clog in the clear fan chamber. If you see a clog, release two cam locks and remove bottom plate. Remove the two screws to release the clear fan cover.
- Use a hanger to help release the clog around the fan, but do not remove the fan.How to clear clog in bellows
- Use a hanger to help release the clog around the fan, but do not remove the fan.
- Using a screwdriver, remove the bellows from the base of the cleaner. Use a tool or hanger to push any debris completely through the bellows to clear clog. Reattach the bellows to the base of the cleaner.
 How to clear clog in fan chamber
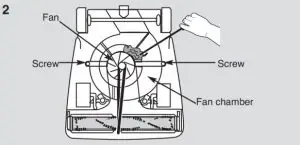 How to clear clog in bellows
Problem Solving
CAUTION: Always unplug vacuum cleaner before servicing.
 report this ad
Motor will not start
- Turn power switch to on.
- Push plug securely into outlet.
- Try another outlet.Vacuum cleaner does not clean
- Adjust carpet height setting to lower position.
- Check for clogs that restrict the air flow.
- Check for worn or broken belt and replace if necessary.Vacuum cleaner is hard to push
- Adjust carpet height setting to higher position.There is a clog
- All models: Remove bottom metal plate. Check for clog in base and / or brushroll.There is a burning smell
- The belt may be damaged or something may be caught in the brushroll.
- Check brushroll and remove any obstruction.
- Replace belt.There is dust leaking out of vacuum cleaner Make sure clamp on bag is secure.
References
[xyz-ips snippet=”download-snippet”]