

EH13552 x 15W Insect Killer
User ManualPlease retain for future reference
IMPORTANTInstaller and users please note:
Please read the entire instruction manual before using the product and then save it for future reference. We reserve the right for any errors in text or images and any necessary changes made to technical data. If you have any questions concerning technical problems, please contact our Customer Services on 01928 581 284
PRODUCT SAFETY
 DANGER: High voltage – this symbol means the appliance contains high voltage components.
- The appliance is to be kept out of reach of children
- Children shall not play with the appliance.
- Cleaning and user maintenance shall not be made by children without supervision.
- For Indoor Use Only
- Do not use in close proximity to gas appliances.
- Do not use the appliance in locations where paint, petrol, flammable liquids/vapor, or explosive dust are used or stored.
- Do not move the appliance whilst it is operating.
- Do not use in bathrooms, or in wet or damp locations.
- Do not use in barns, stables, or similar locations.
- Do not use this appliance in the immediate surroundings of a bath, a shower, or a swimming pool.
- Do not place the mains lead beneath a carpet or rug.
- Do not insert any object into the appliance through the grilles. This may damage the appliance or result in electric shock.
- Always switch off and disconnect the power supply before cleaning and whennot in use and before cleaning
- Install the fly killer at least 1m away from food preparation areas.
- Do not use the appliance for anything other than its intended use.
OPERATING INSTRUCTIONS
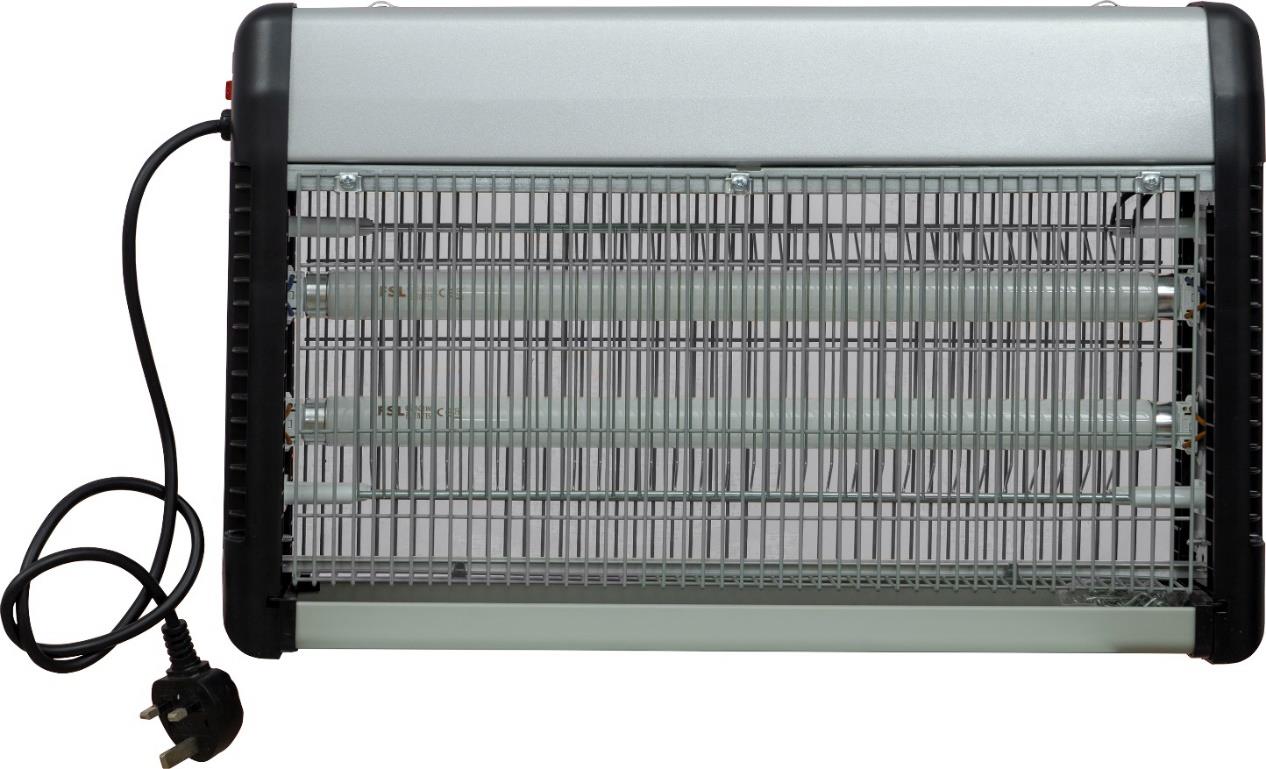
- Place the unit on a clean, level surface out of the reach of children.
- Ensure the power switch on the unit’s side is in the OFF position.
- Connect the mains plug to an appropriate socket outlet.
- Switch the unit on by moving the switch to the ON position.
- To switch the unit off, move the switch to the OFF position and disconnect from the mains supply.
HANGING INSTALLATION
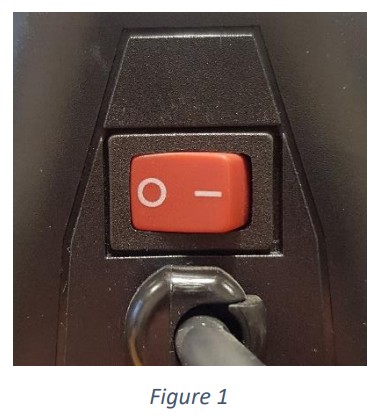
- Ensure the unit is powered off before hanging.
- Locate the 2x hanging points on the top of the unit (Figure 2).
- Clip each end of the chain to the hanging points (Figure 3) and check the chain is not twisted.
- Hang the unit at the center of the chain on an appropriate fixing point.Note: you must conduct a full site survey prior to installation of any fixings to ensure the fixing point will be safe and secure enough to bear the weight of the unit. Fitting should only be carried out by a competent person.
CLEANING AND MAINTENANCE.
- Ensure the unit is powered off and disconnected from the mains supply before cleaning.
- The unit should be cleaned gently with a clean dry brush or cloth. Do not use water to clean the unit.
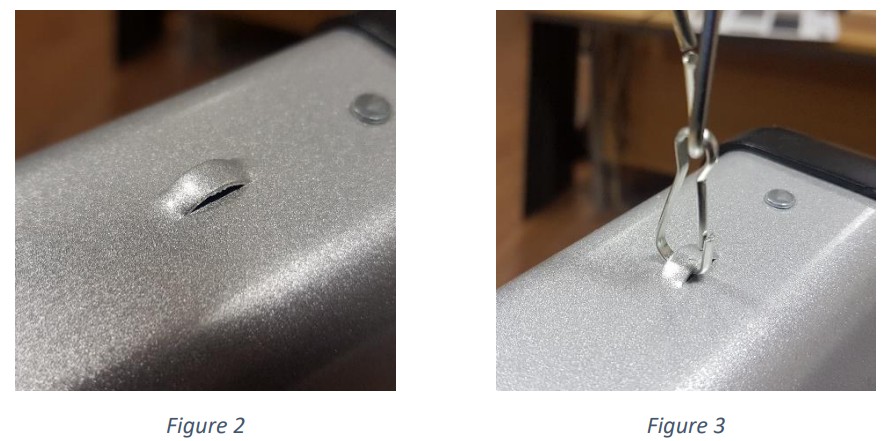
- The collection tray should be removed and emptied periodically. Remove the tray by lifting it upwards slightly and pulling it forward (figures 4-6).
REPLACING THE TUBES
- Ensure the unit is disconnected from the mains power supply and the power switch is in the off position.
- Remove the collection tray.
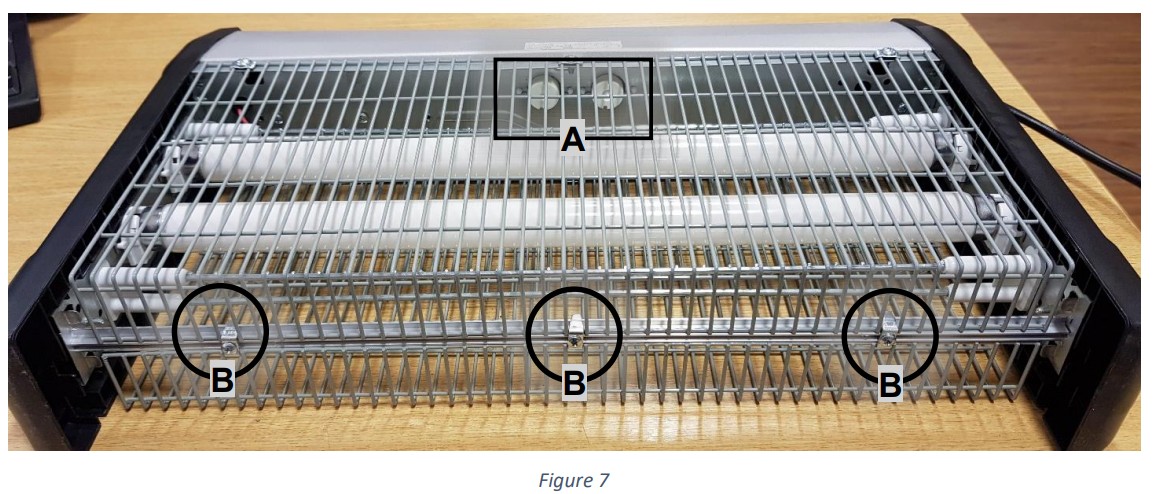
- Lie the unit on its side, so that the electrical discharge grid is facing downwards and the starters are located on the upper face (Figure 7, A).
- Remove 3 screws and brackets from the base of the unit (Figure 7, B)
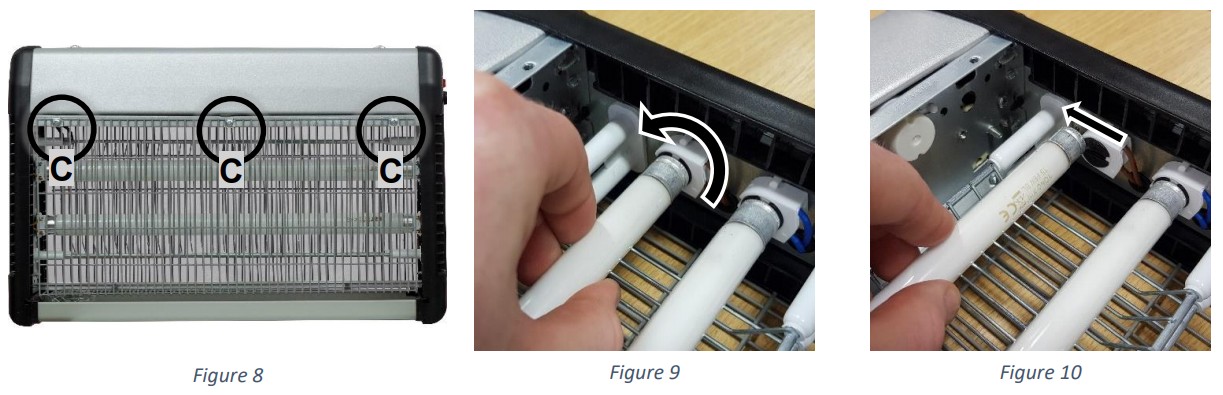
- Remove 3 screws and brackets from the face of the unit (Figure 8, C)
- Remove the grille.Note: once the grille is removed, you should be able to directly access the tubes. If the electrical grid is in the way, you have removed the wrong side grille. Replace the grille, turn the unit over and repeat steps 3-6.
- To remove the tubes, rotate them 90° (quarter-turn) and slide them up and out the holders.
- To insert new tubes, slide the tube pins into the grooves in the holders and rotate 90° to lock them in place.
- Replace the grille and secure using the brackets and screws removed in steps 4-5.
REPLACING THE STARTERS
- Ensure the unit is disconnected from the mains power supply and the power switch is in the off position.
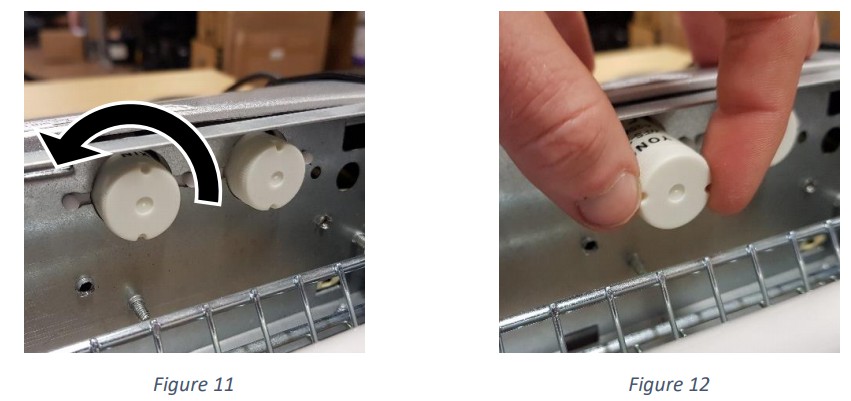
- Follow steps 2-6 from the previous section to remove the grille.
- Rotate the starter anti-clockwise 90° (quarter-turn) and pull it out (Figures 11-12)
- To insert the new starter: Align the pins of the starter to the socket, push it in and turn clockwise 90° to lock it in place.
- Replace the grille and secure using the screws and brackets removed in step 2.
POWER LEAD AND PLUG
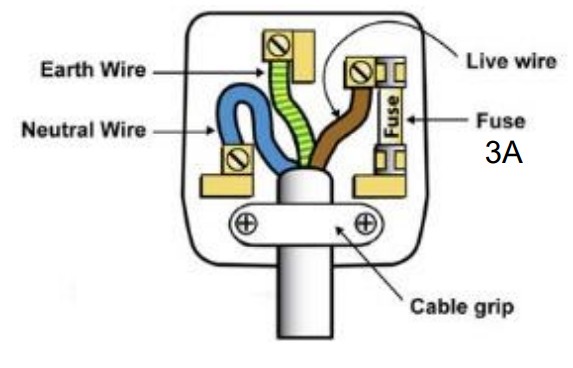
If the mains lead is damaged, it must be replaced by the manufacturer or an authorized service center. If the mains plug needs to be replaced, proceed as follows:
Connect the brown (live) wire to the terminal “L”Connect the blue (neutral) wire to the terminal “N”Connect the yellow and green (earth) wire to the terminal “E”
Ensure the cord grip is positioned correctly (over the outer sheath of the cable) and is fully tightened.
DISPOSAL AND RECYCLING
You must not dispose of this appliance with domestic household waste. Most local authorities have specific collection systems for appliances and disposal is free of charge to the end-user. When replacing an existing appliance with a similar new appliance, your retailer may take the old appliance for disposal.
TECHNICAL SPECIFICATION
| Dimensions: | 520 x 330 x 85 mm |
| Weight: | 2.70kg |
| Power supply: | 230V ~ |
| Power consumption: | 30W |
| Bulb Type | 2 x 15W UV-A Tube |
| Starter Type | 4 – 40W / 100 – 130V |
SERVICE WARRANTY
Prem-I-Air guarantees the product free from defects in materials and workmanship for a period of 1 year. Should this unit be operated under conditions other than those recommended, at voltages other than the voltage indicated on the unit, or any attempts made to service or modify the unit, then the warranty will be rendered void. The product you buy may sometimes differ slightly from illustrations. This warranty is in addition to and does not affect, your statutory rights. If you have any problems with this product, please call our help desk on (0845) 459 4816.
Prem-I-Air Appliances Ltd.
Lots LaneSuttonSt. HelensMerseysideWA9 3EX
[xyz-ips snippet=”download-snippet”]