![]()
 EH192412,000BTU Mobile Portable Local Air Conditioner with Remote Control and TimerPlease Retain for Future Reference
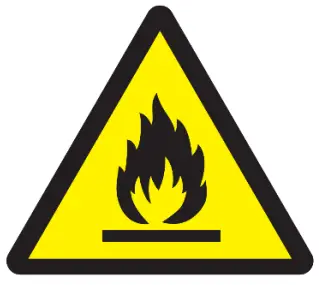 Caution, Risk of fireR290
IMPORTANT
Installer and Users please note:These instructions should be read carefully and left with the user of the product for future reference.
BEFORE USE
- Inspect the product (including its cable and plug) for any signs of damage; If the product is damaged in any way do not use it and contact your supplier immediately.
- The product contains a refrigerant gas, so it must be kept upright at all times.
- After unpacking wait 3 hours for the refrigerant gas to stabilize before use.
- Insert 2 x 1. Sv AAA batteries (not supplied) into the battery compartment of the remote control.
PRODUCT SAFETY
- WARNING! The appliance shall be installed, operated, and stored in a room with a floor area larger than 12m2
- This appliance can be used by children aged 8 years and above and persons with reduced physical, sensory or mental capabilities or lack of experience and knowledge if they have been given supervision or instruction concerning use of the appliance in a safe way and understand the hazards involved
- Children shall not play with the appliance
- Cleaning and user maintenance shall not be made by children without supervision.
- For indoor use only
- Do not use in bathrooms, wet rooms, or other damp locations
- Do not use this product with an extension lead
- Use of this product in boats, caravans, mobile homes, or other similar locations is forbidden
- There must be a minimum 300mm safe area around the sides and 1200mm above the product that is clear of obstructions and flammable materials
- Do not place the mains lead beneath a carpet or rug
- Do not use this appliance in locations where paint, petrol, or other flammable liquids are used or stored
- Please ensure the appliance is switched off and unplug when not in
- Do not use the appliance for anything other than its intended use.
- Do not insert any object into the appliance through the grilles. This may damage the product or result in overheating or electric shock.
- Only use this product on a flat, stable surface.
- Do not leave this product unattended when in
- For domestic use
- There are no user-serviceable parts in this
- Allow to cool down before moving.
- Do not use under curtains or close to soft
- Do not leave water in this product for prolonged periods of time
- Do not move or knock this product while in use. Risk of Electrical Shock
- Disconnect the product from the mains before emptying the unit
- This appliance is fitted with an overload cut-out which will operate if the motor overheats or is stalled. If this happens, disconnect from the mains supply immediately and allow the motor to cool down
- Do not use if incorrectly fitted
- Do not obstruct the air intakes and exhaust vents on this appliance.
- Do not
- This product must only be used and transported in an upright position.
- Do not use in areas with high concentrations of dust or fiber
- This unit must be switched off and disconnected from the mains before the tank is emptied or filters
- The refrigerant loop is sealed. Only a qualified technician should attempt to service
- No open flames, cigarettes, or other possible sources of ignition should be used inside or in the vicinity of the
SYMBOLS FROM THE UNIT AND USER MANUAL
 warning: This unit uses a flammable refrigerant.If refrigerant leaks and comes in contact with fire or heating parts, there is a risk of fire.
 Read the USER MANUAL carefully before operation.
 Further information is available in the USER MANUAL, SERVICE MANUAL, and the like.
 Service personnel is required to carefully read the USER MANUAL and SERVICE MANUAL before operation.
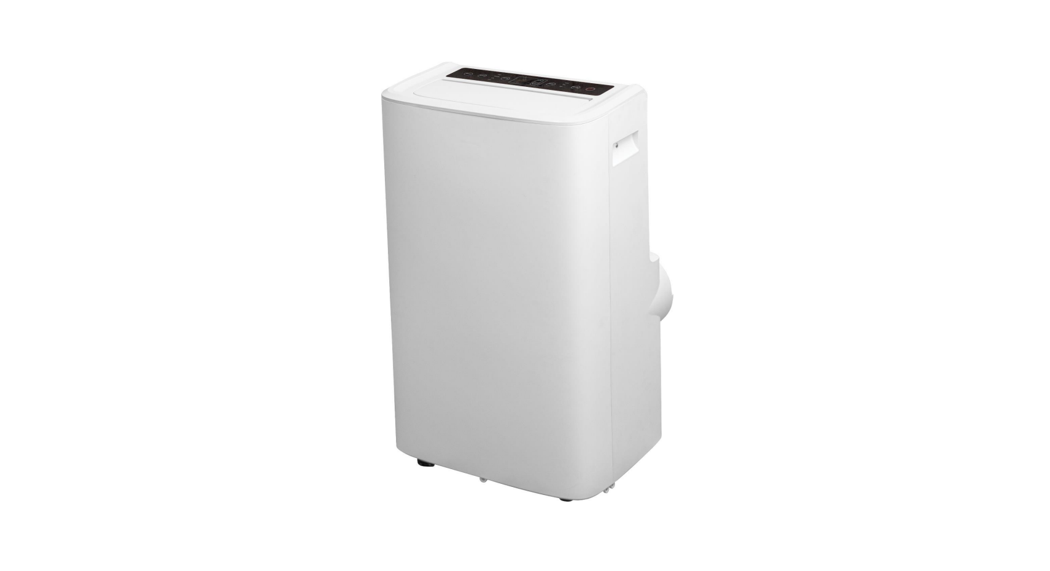
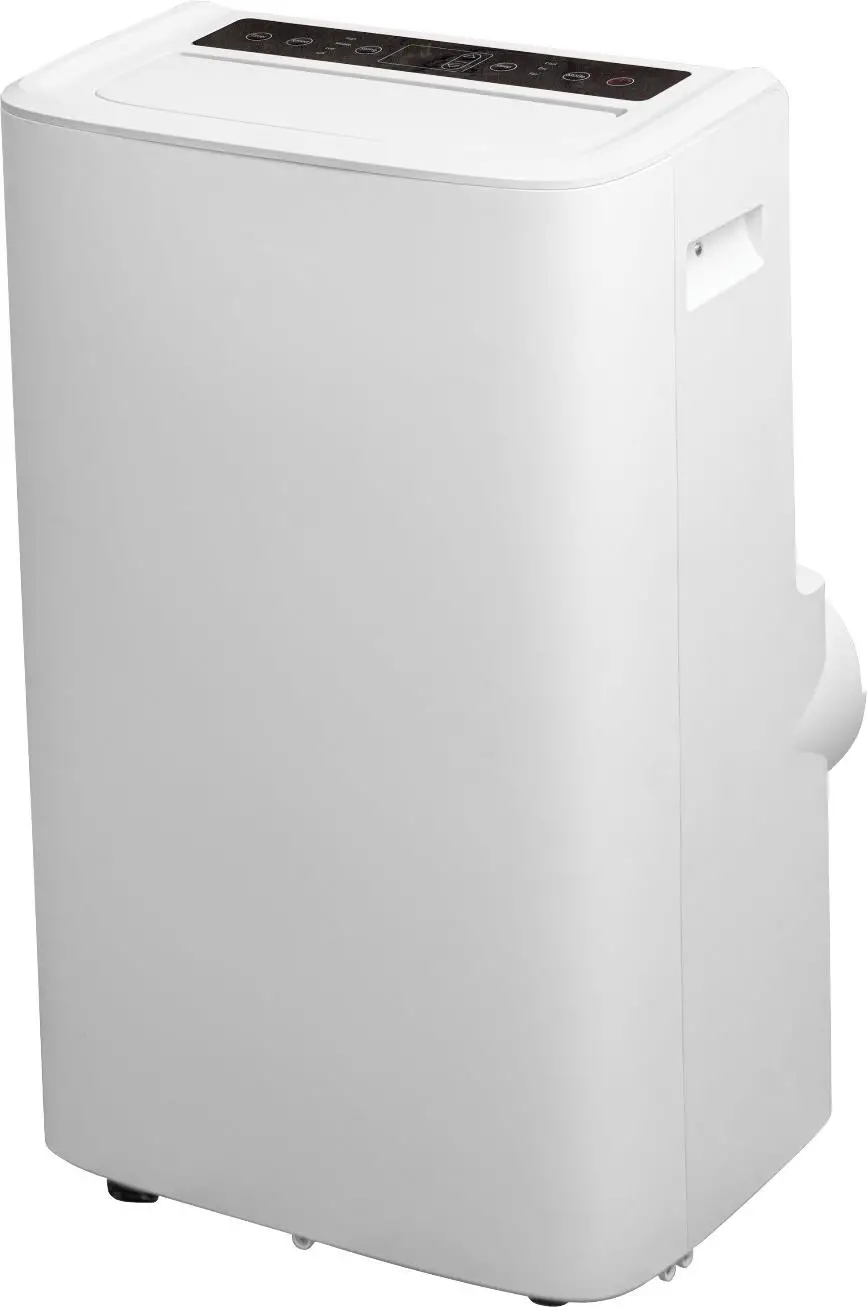
PRODUCT DIAGRAM

| 1. Control Panel2. Air outlet with adjustable Louver3. Air Inlet with Air Filter4. Power Cord | 5. Recessed Handle6. Air Exhaust7. Drain opening with Sealing Plug |
Note: the appearance is only for reference, please see the real product for detailed information.
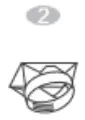
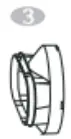
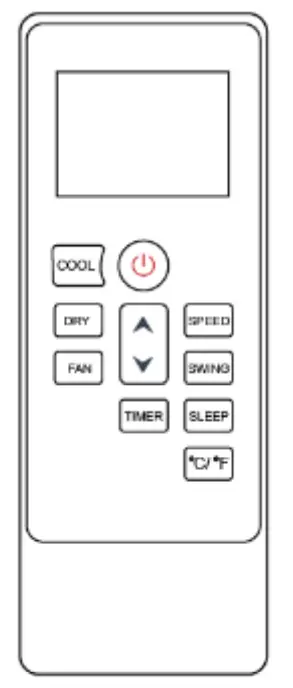
ACCESSORIES
 |
Exhaust Hose |
 |
Hose Connector |
 |
Window Kit Adaptor |
 |
Remote Control |
 |
Window Kit |
FITTING THE EXHAUST HOSE
| 1. Connect the hose connector to one end of the exhaust hose |  |
| 2. Connect the windows adaptor kit to the other end of the exhaust hose | 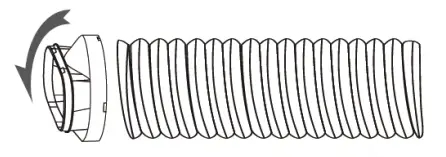 |
| 3. Extend the adjustable window kit to the length of the window |  |
| 4. Close your window to secure the kit in place. It needs to hold the window kit firmly in place. |  |
| 5. Attach the hose connector to the exhaust air outlet of the unit. |  |
| 6. Adjusting the length of the flexible exhaust hose, and avoiding bends in the hose, then place the AC in the desired location. | 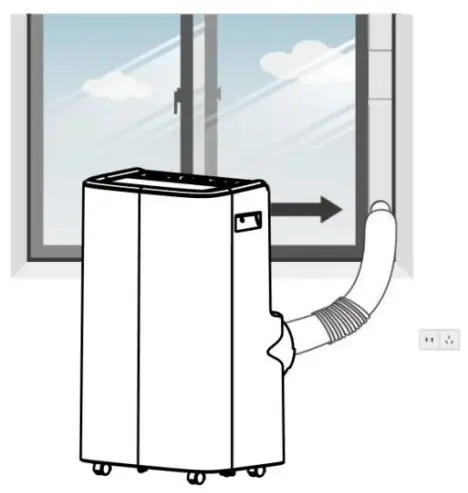 |
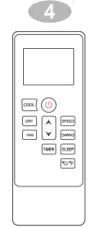
CONTROL PANEL AND DISPLAY
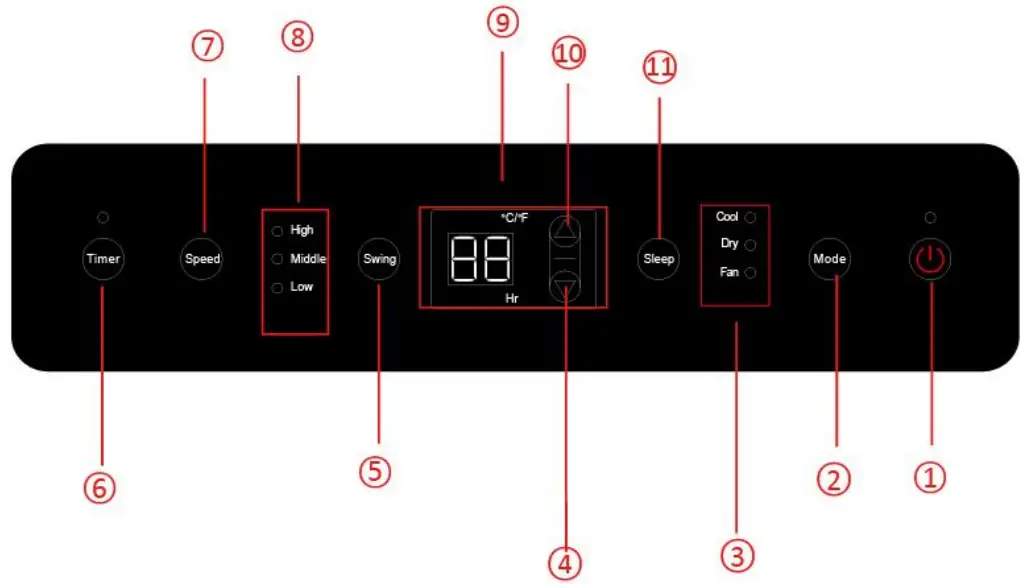 |
Remote Control Panel |
| 1 | Power | Press to switch the machine on or off. |
| 2 | Mode | Mode button. Press to switch the operation mode between cool, fan, and dry. |
| 3 | Indicators | LED for 3 operation modes. Select by pressing the mode button. |
| 4 | Minus | Decreasing the desired temperature or timer setting. |
| 5 | Swing | Adjust the horizontal airflow direction |
| 6 | Timer | Sets a time for the unit to automatically start or stop. |
| 7 | Fan Speed | Press to switch the fan speed between High, Low, and Medium |
| 8 | Indicators | LED for fan speed (High/Medium/Low) |
| 9 | Digital Display | Displays timer setting and room temperature. |
| 10 | Add | Increasing the desired temperature (16°C — 32°C) or timer setting. |
| 11 | Sleep | Press to tum sleep mode on or off. |
OPERATION
The unit has 4 operating modes: Cool, Fan, Dry, Sleep
- Startup and Shutdown1.1. Press POWER to turn the unit on (the unit runs in FAN mode as default)1.2. Press the MODE button to select the desired operating mode1.3. Press POWER again to turn offCaution!: The unit must only be shut down using the control panel or remote control, never directly unplug the unit from the mains as this can seriously damage the unit and increase the risk of fire
- Cooling Mode2.1. Press the MODE button until the COOL LED is illuminated2.2. Use ADD and MINUS buttons to adjust the temperature which is displayed on the screen. The temperature can be set between 16°C and 32°C2.3. Press the SPEED button to adjust the fan speed2.4. To control the direction of the airflow, Press the SWING button.Note: The air conditioner stops if the room temperature is equal to the selected temperature
- Ventilating your room3.1. Press the MODE button until the FAN LED is illuminated3.2. Press the SPEED button to adjust the fan speedNote: in ventilation mode, the room air is circulated, but not cooled
- Drying your Room4.1. Press the MODE button until the DRY LED is illuminated4.2. In this mode the fan speed cannot be adjusted4.3. It is recommended that the user connects the hose to the drain outlet on the bottom of the unit
- Sleep Mode5.1. Press the sleep button on the remote control – after one hour the preset temperature is increased by 1°C. this increases after another hour until the current room temperature is achieved.
TIMER SETTING
The timer can be used for 2 operations: Delay start and Delay stop
- Delay Start1.1. When the unit is turned off, press the TIMER key to turn on the timer function1.2. Use the ADD and MINUS buttons to set the timer value1.3. The unit will switch on after the set number of hours
- Delay Stop2.1. When the unit is switched on, press the TIMER key to turn on the timer function2.2. Use the ADD and MINUS buttons to set the timer value2.3. The unit will switch off after the set number of hours
- To cancel the timer, use the ADD and MINUS buttons to set the timer value to “00”
AUTOMATIC DEFROST
At low room temperatures, frost may build up at the evaporator during operation. The unit will automatically start defrosting and the POWER LED will blink. The defrost control sequence is as follows: When the unit is operating in cooling or drying mode, and the evaporator coil temperature is below -1°C, the compressor will stop operating for 10 minutes until the coil temperature is up to 7°C – the unit will then restart to cool operating mode.
OVERLOAD PROTECTION
In the event of a power loss, to protect the compressor, there is a 3-minute delay until the compressor restarts.
DRAINAGE
The self-evaporating system uses the collected water to cool the condenser coils for better efficient performance.There is no need to empty the drainage tank in cooling operation except in exceptionally high humidity conditions.The condensate water evaporates at the condenser and is evacuated through the exhaust hose.For continuous operation in drying mode, please connect the attached drain hose to the unit. Condensate water can then be directly drained into a bucket or similar.
| Switch off the unit before this operation |  |
| Remove the plug of the water outlet opening and keep it in a safe place | |
| Securely and properly connect the drain hose and ensure it is not kinked and is clear of obstruction | |
| Place the outlet of the hose over a drain or a bucket and ensure that water can flow freely out of the unit |  |
| Do not submerge the end of the hose into water, as this can cause an “airlock” in the hose | |
| To avoid water spillage, tilt the drain hose down towards the floor and straighten out any kinks in the hoseNote: Remember to replace the plug after using the drain hose! |
CLEANING AND CARE
Cleaning the Air FilterDust collects on the air filter and restricts the airflow. The restricted airflow reduces the efficiency of the system and if it becomes blocked it can cause damage to the unit.The air filter requires regular cleaning. The air filter is removable for easy cleaning. DO NOT OPERATE the unit without the air filter or the evaporator may become contaminated.
- Press the POWER button to switch off the unit, then unplug the unit from the mains
- Remove the filter mesh from the back of the unit
- Use a vacuum cleaner to suck dust from the filter
- Turn the filter over and rinse the air filter under running water. Let the water run through the filter in the opposite direction of air flow. Set aside and allow the filter to air dry before reinstalling.
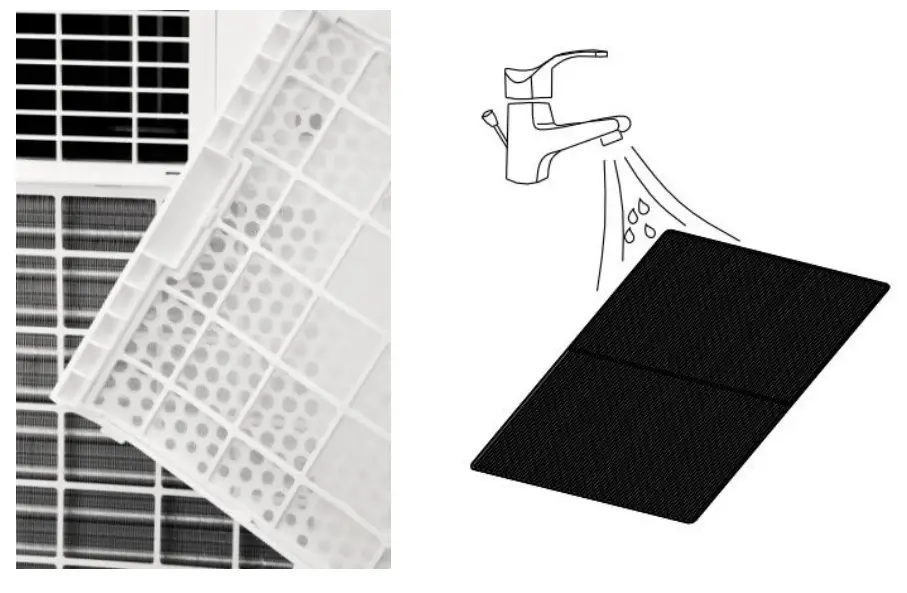
WARNING! To prevent accidental injury from extreme temperatures and sharp edges, do not touch the evaporator surface!
STORAGE
For long term storage (more than a few weeks) it is best to clean the unit and dry it out completely:
- Unplug the unit and remove the exhaust hose and window kit.
- Drain the remaining water from the unit
- Clean the filter and let the filter dry completely
- Collect the power cord at the water tank
- Re-install the filter in its position
- The unit must be kept in an upright position when in storage
- To preserve the unit, keep it in a dry, well-ventilated space indoors.
Note: the evaporator has to be completely dried out to avoid component damage and mold. Unplug the unit and leave it in a dry open area for a few days to completely dry it out.
TROUBLESHOOTING
|
Symptom |
Inspection |
Solution |
|
| The unit is not operating. |
|
||
|
|||
|
|||
| The unit works with reduced capacity. |
|
||
|
|||
|
|||
|
|||
|
|||
| Water Leakage |
|
||
|
|||
| Excessive Noise |
|
||
|
|||
|
|||
| Error Codes | EO |
|
|
| El |
|
||
| E2 |
|
||
| Ft |
|
GENERAL SAFETY REQUIREMENTS
Domestic wiring must be tested periodically by a qualified electrician at least once every 10 years or at every change of occupancy. For office and retail premises, and buildings such as village halls, the wiring must be inspected at least once every 5 years. It is recommended that all buildings be fitted with smoke alarms (it is mandatory for new buildings).TESTINGWhen used in an office environment, we recommend that this product should be safety-tested yearly by a qualified electrician (PAT Tested).We recommend that it is PAT tested regularly when used in a domestic environment.If the mains lead is damaged, it must be replaced by the manufacturer or an authorized service center. If the mains plug needs to be replaced, proceed as follows:
 report this ad
- Connect the brown wire to the terminal labeled “L”
- Connect the blue wire to the terminal labeled “N”
- Connect the green and yellow wire to the upper terminal labeled “E”
- Make sure that the cord-grip is positioned correctly (over the outer sheath of the cable) and fully tightened.
- If the plug is fitted with a fuse other than 13A, then please replace it with an approved fuse of the correct value.
OPERATING COSTS
At the time of going to press, the average cost of electricity is £0.15 per unit (kilowatt-hour). The amount you are being charged will be shown on your electricity bill. At this cost, the EH1924 will cost £4.80 per day to run on the “High Speed” setting.
DISPOSAL AND RECYCLING
You must not dispose of this appliance with domestic household waste.Most local authorities have a specific collection system for appliances and disposal is free of charge to the end-user.When replacing an existing appliance with a similar new appliance your retailer may take the old appliance for disposal.
TECHNICAL SPECIFICATION
| Product Code | EH1924 |
| Cooling Capacity (Btu/h) | 12,000 |
| Power Supply | 230V~ |
| Rated Cooling Input (W) | 1337 |
| Rated Current Cooling (A) | 5.9 |
| EER For Cooling (W/W) | 2.63 |
| Noise Level (dB) (High) | 65 |
| Product Dimensions (mm) | 762 x 470 x 353 |
| Packaging Dimensions (mm) | 878 x 462 x 505 |
| Refrigerant (Type/Charge) | R290/240g |
| Net Weight (kg) | 29.5 |
| Gross Weight (kg) | 33.5 |
| Application Area (m) | 18-25 |
| Fan Speeds | 3 |
| Louvers | Automatic |
Prem-i-Air guarantees the product free from defects in materials and workmanship for a period of twelve months.Should this appliance be operated under conditions other than those recommended, at voltages other than the voltage indicated on the appliance, or any attempts made to service or modify the appliance, then the warranty will be rendered void. The product you buy may sometimes differ slightly from illustrations. This warranty is in addition to, and does not affect, your statutory rights. Our guarantee is administered by our retailers.If your product arrives damaged, you must contact the retailer from whom you bought it. The retailer’s contact details will be on the invoice that arrived with the product, or on the e-mail, you received when you placed the order.Do not contact Prem-i-air, only your retailer can arrange a replacement. If your product fails within the guarantee period, firstly read the “fault-finding” section of this manual, because temperature and weather conditions can affect the performance of certain products.If the product needs to be repaired or replaced, you must contact the retailer from whom you bought it. The retailer’s contact details will be on the invoice that arrived with the product, or on the e-mail, you received when you placed the order. If you have just received your product and require technical help in using it, please call our Help Desk on (0845) 459 4816. If you have any other technical queries about the product, please call our Help Desk on (0845) 459 4816.
![]() Prem-i-Air Appliances Ltd.,Lancots Lane, Sutton,St. Helens, Merseyside.WA9 3EXwww.prem-i-air.com
Prem-i-Air Appliances Ltd.,Lancots Lane, Sutton,St. Helens, Merseyside.WA9 3EXwww.prem-i-air.com
References
[xyz-ips snippet=”download-snippet”]