Wireless Add-A-Dog®GIF00-16918 | Product Manual
Have questions about your Wireless Fence or need training tips for your pet?Our Customer Care representatives are here to help you.Call our USA-based Customer Care Center at +1 (866) 381-2785USA & Canada: Mon-Fri 8am-8pm EST | Sat 9am-5pm ESTThis product includes a one-year warranty.Call, click, or chat with us before you return your product.premierpet.com
Important Safety Information
Explanation of Attention Words and Symbols used in this guide
![]() This is the safety alert symbol. It is used to alert you to potential personal injury hazards. Obey all safety messages that follow this symbol to avoid possible injury or death.
This is the safety alert symbol. It is used to alert you to potential personal injury hazards. Obey all safety messages that follow this symbol to avoid possible injury or death.
WARNING indicates a hazardous situation that, if not avoided, could result in death or serious injury. CAUTION, used with the safety alert symbol, indicates a hazardous situation that, if not avoided, could result in minor or moderate injury.CAUTION, used without the safety alert symbol, indicates a hazardous situation that, if not avoided, could result in harm to your pet.
WARNING
- Do not use this product if your dog is prone to aggressive behavior. Aggressive dogs can cause severe injury or death to their owners and others. If you are not sure that this product is right for your dog, please talk to your veterinarian or a certified trainer.
- Risk of explosion if the battery is replaced by an incorrect type. Do not short circuit, mix old and new batteries, dispose of in fire, or expose them to water. When batteries are stored or disposed of, they must be protected from shorting. Dispose of used batteries properly.
CAUTION
- This Premier Pet™ Wireless Fence is NOT a solid barrier. The system is designed to act as a deterrent to remind pets by a static correction to remain in the boundary established. It is important that you reinforce training with your pet on a regular basis. Since the tolerance level to static correction varies from pet to pet, Radio Systems Corporation CANNOT guarantee that the system will, in all cases, keep a pet within the established boundary. Not all pets can be trained to avoid crossing the boundary! Therefore, if you have reason to believe that your pet may pose a danger to others or harm himself if he is not kept from crossing the boundaries, you should NOT rely solely upon the Premier Pet™ Wireless Fence to confine your pet. Radio Systems Corporation shall NOT be liable for any property damage, economic loss, or any consequential damages, sustained as a result of any animal crossing the boundary.
- This product is not a toy. Keep it away from the reach of children.
CAUTION
- Proper fit of the collar is important. A collar worn for too long or made too tight on the pet’s neck may cause skin damage ranging from redness to pressure ulcers. This condition is commonly known as bed sores.
- Avoid leaving the collar on a pet for more than 12 hours per day.
- When possible, reposition the collar on the pet’s neck every 1 to 2 hours.
- Regularly recheck the fit to prevent excessive pressure; follow the instructions in this guide.
- You may need to trim the hair in the area of the contact points. However, never shave the dog’s neck; this may lead to a rash or infection.
- Never connect a leash to a collar with contact points. It will cause excessive pressure on the contact points.
- When connecting a leash to a separate collar, do not allow it to put pressure on the receiver collar.
- Wash the dog’s neck area and the contact points of the collar weekly with a damp cloth.
- Examine the contact area daily for signs of a rash or a sore.
- If a rash or sore is found, discontinue using this product until the skin has healed.
- If the condition persists beyond 48 hours, see your veterinarian.
- For additional information on bed sores and pressure necrosis, please visit our website.
- Proper training of your pet is essential to successfully use the system. During the first 2 weeks of training, do not use the system without direct supervision of your pet.
- Always remove your pet’s receiver collar before performing any transmitter testing or adjustments. This will prevent unintended corrections.
- The boundary zone must be tested whenever an adjustment is made to the fence transmitter setting to prevent unintended corrections to your pet. Do not use an outlet protected with a residual current device (RCD) or ground fault circuit interrupter (GFCI). The fence system will function properly, but in rare cases, nearby lightning strikes may cause the RCD or GFCI to trip. Without system power, your pet may escape. You will have to reset the RCD or GFCI to restore power to the system.
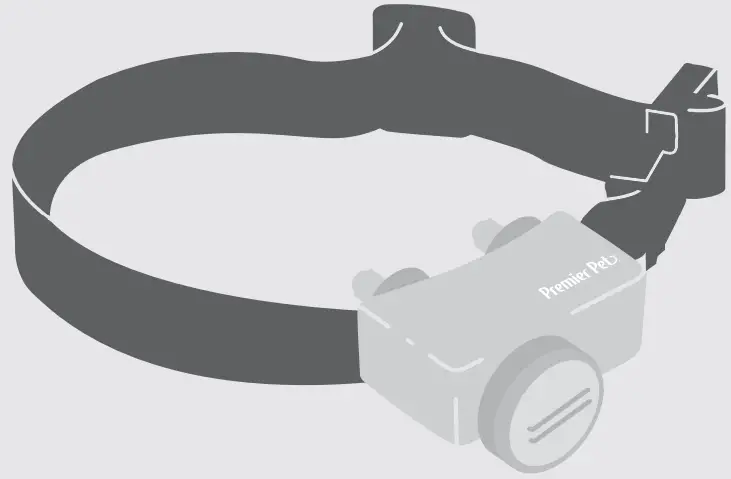
Fit the Collar
Important: The proper fit and placement of your Wireless Add-A-Dog® collar is important for effective operation.

- Start with the collar turned off and your dog standing comfortably, not sitting.
- Place the collar on your pet so that the Premier Pet™ logo is right side up and the collar is directly under your dog’s chin. Center the contact points underneath your dog’s neck, touching the skin. NOTEIt is sometimes necessary to trim the hair around the contact points to make sure that contact is consistent.
- Check the tightness of the collar by inserting one finger between the end of a contact point and your dog’s neck. The fit should be snug but not constricting.
- Allow your dog to wear the collar for several minutes, then recheck the fit. Check the fit again as your dog becomes more comfortablewith the collar.
CAUTION
Do not shave the pet’s neck as this may increase the risk of skin irritation. The collar should not be worn for more than 12 hours out of every 24-hour period. Leaving the collar on too long could lead to skin irritation.
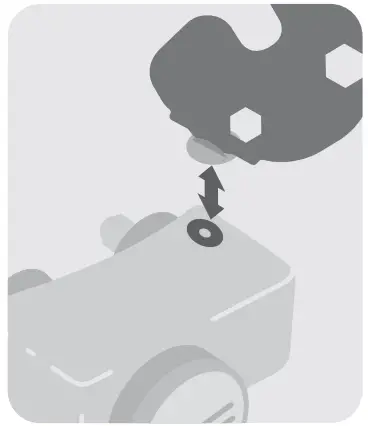
Insert and Remove the Receiver Collar Battery
CAUTIONDo not install the battery while the receiver collar is on your pet.
This receiver collar utilizes a replaceable battery (GAC11-16351). This unique battery is designed to make battery replacement easier and increase water protection.To insert the battery, align the symbols on the battery (arrow) and receiver collar (triangle). Use the edge of the test light tool to turn the battery clockwise until the arrow lines up with the lock symbol on the housing.To remove or replace the battery, turn the battery counter-clockwise using the edge of the test light tool. DO NOT attempt to cut into or pry open the battery. Be sure to discard the used battery properly. When removing the old battery from the receiver collar, discharge all power by holding the static level button down until the light is no longer illuminated. Replace with a new battery.
![]() WARNING
WARNING
Risk of explosion if batteries are replaced by an incorrect type. Do not short circuit, mix old and new batteries, dispose of them in fire, or expose them to water. When batteries are stored or disposed of, they must be protected from shorting. Dispose of used batteries properly.
A replacement battery (GAC11-16351) can be found at many retailers. Contact the Customer Care Center or visit our website at premierpet.com to locate a retailer near you.
Set the Static Correction Level
Read all steps before attempting to set the static correction level.
- Remove the clear plastic cover with the edge of the test light tool to expose the correction level button.
- With the battery installed, press the correction level button and release it when the receiver LED indicator light lights up.
- The receiver LED indicator light will emit a series of flashes representing the static correction level.
- Increase the static correction level by pressing and releasing the correction level button within 5 seconds of the previous series of flashes.
- After setting the static correction level, replace the cover to protect the correction level button.
The static correction levels increase in strength from 1 to 6. Pushing the correction level button while the receiver collar is on level 6 will cause the receiver collar to revert to level 1. Refer to the static correction level table in the operating guide to choose the static correction level that best fits your pet.The receiver indicator light acts as a low battery indicator. The light will flash every 4 to 5 seconds when battery replacement is required.
Battery Contact Verification
Remove the receiver collar from your pet. Press the button and verify that the LED light illuminates. If the LED light does not come on remove the battery. Locate the metal tabs in the battery compartment.Gently lift the tabs to ensure that the battery will make good contact. Replace the battery with the receiver collar. Press the button and check that the LED light illuminates.
Static Correction Level Table
| Static Correction Level | Indicator Light Response | Receiver Collar Function |
| 1 | 1 Flash | No Static Correction, Tone-only |
| 2 | 2 Flashes | Low Static Correction |
| 3 | 3 Flashes | Medium-Low Static Correction |
| 4 | 4 Flashes | Medium Static Correction |
| 5 | 5 Flashes | Medium-High Static Correction |
| 6 | 6 Flashes | High Static Correction |
| Flashes once every 4 to 5 seconds | Indicates Low Battery |
Terms of Use and Limitation of Liability
- Terms of UseThis Product is offered to you conditioned upon your acceptance without modification of the terms, conditions, and notices contained herein. Usage of this Product implies acceptance of all such terms, conditions, and notices.
- Proper UseThis Product is designed for use with pets where training is desired. The specific temperament of your pet may not work with this Product. If you are unsure whether this is appropriate for your pet, please consult your veterinarian or a certified trainer.
- No Unlawful or Prohibited UseThis Product is designed for use with pets only. This pet training device is not intended to harm, injure or provoke. Using this Product in a way that is not intended could result in violation of Federal, State, or local laws.
- Limitation of LiabilityIn no event shall Radio Systems Corporation be liable for any direct, indirect, punitive, incidental, special, or consequential damages, or any damages whatsoever arising out of or connected with the use or misuse of this Product. Buyer assumes all risks and liability from the use of this product.
- Modification of Terms and ConditionsRadio Systems Corporation reserves the right to change the terms, conditions, and notices under which this Product is offered.
Warranty
One Year Non-Transferrable Limited WarrantyThis product has the benefit of a limited manufacturer’s warranty. Complete details of the warranty applicable to this Product and its terms can be found at premierpet.com.
Perchlorate Battery
Perchlorate Material – special handling may apply. See www.dtsc.ca.gov/hazardouswaste/perchlorate.
 Battery Disposal
A separate collection of spent batteries is required in many regions; check the regulations in your area before discarding spent batteries. The collar receiver operates on a 6-volt lithium coin cell battery. Replace only with equivalent battery available from the Customer Care Center. For a listing of Customer Care Center telephone numbers in your area, visit www.premierpet.com.
ComplianceFCC
This device complies with part 15 of the FCC Rules. Operation is subject to the following two conditions: (1) This device may not cause harmful interference, and (2) this device must accept any interference received, including interference that may cause undesired operation.NOTE: This equipment has been tested and found to comply with the limits for a Class B digital device, pursuant to part 15 of the FCC Rules. These limits are designed to provide reasonable protection against harmful interference in a residential installation. This equipment generates, uses, and can radiate radio frequency energy and, if not installed and used in accordance with the instructions, may cause harmful interference to radio communications.However, there is no guarantee that interference will not occur in a specific installation. If interference does occur to radio or television reception, which can be determined by turning the equipment off and on, the user is encouraged to try to correct the interference by one or more of the following measures:
- Reorient or relocate the receiving antenna.
- Increase the separation between the equipment and the receiver.
- Connect the equipment to an outlet on a circuit different from that to which the receiver is connected.
- Consult customer care, the dealer, or an experienced radio/TV technician for help.
 report this ad
CAUTION: Modification or changes to this equipment not expressly approved by Radio Systems Corporation may void the user’s authority to operate the equipment.
For a list of patents protecting this product, please visit: http://www.radiosystemscorporation.com/patentsRadio Systems Corporation10427 PetSafe Way | Knoxville, TN 37932 | +1 (866) 381-2785 | premierpet.comYU400-2383 | ©2019 Radio Systems Corporation
References
[xyz-ips snippet=”download-snippet”]